El año de clases de costura // A year of sewing classes

 
clases de costura www.studiocostura.com

Hola! Hoy un breve post para resumir un poco este año "escolar". Llevo exactamente una semana de vacaciones aunque debo de decir que Madrid ya parece años luz de lejos, jaja.

Hey! Today a short post to recap a bit this "school" year. I've been on vacations exactly one week now although I have to admit that Madrid feels light years away already, haha.

clases de costura www.studiocostura.com

Quiero dar gracias a todas mis alumnas (que este año han sido sólo chicas y puedo hablar en femenino) por venir a coser conmigo. He conocido a muchas mujeres increíbles este año que me han enseñado muchas cosas. Yo les guíe para que empiecen a coser y ver cómo funciona la máquina y ellas en cada clase me aportaban su punto de vista, me preguntaban cosas que me hicieron replantear muchos temas para poder explicarlos mejor. Había días cuando yo no estaba con muchos ánimos para entrar a clase pero al verlas siempre me contagiaban con su energía y con sus ganas de crear y aprender...la verdad es que tengo la suerte de tener un trabajo estupendo.

I'd like to thank all my students to have come to sew with me. I've met so many incredible women this year who have taught me lots of things. I helped them to start sewing and to know the machine from the beginning and they gave me their unique point of view in every class and asked questions that made me rethink many aspects to be able to explain the topics better each time. There were days when I didn't really feel like going to teach the class but as soon as I saw them enter by the door, their energy was contagious and they were so ready to create and learn...I have to admit that I really have an amazing job!

clases de costura www.studiocostura.com

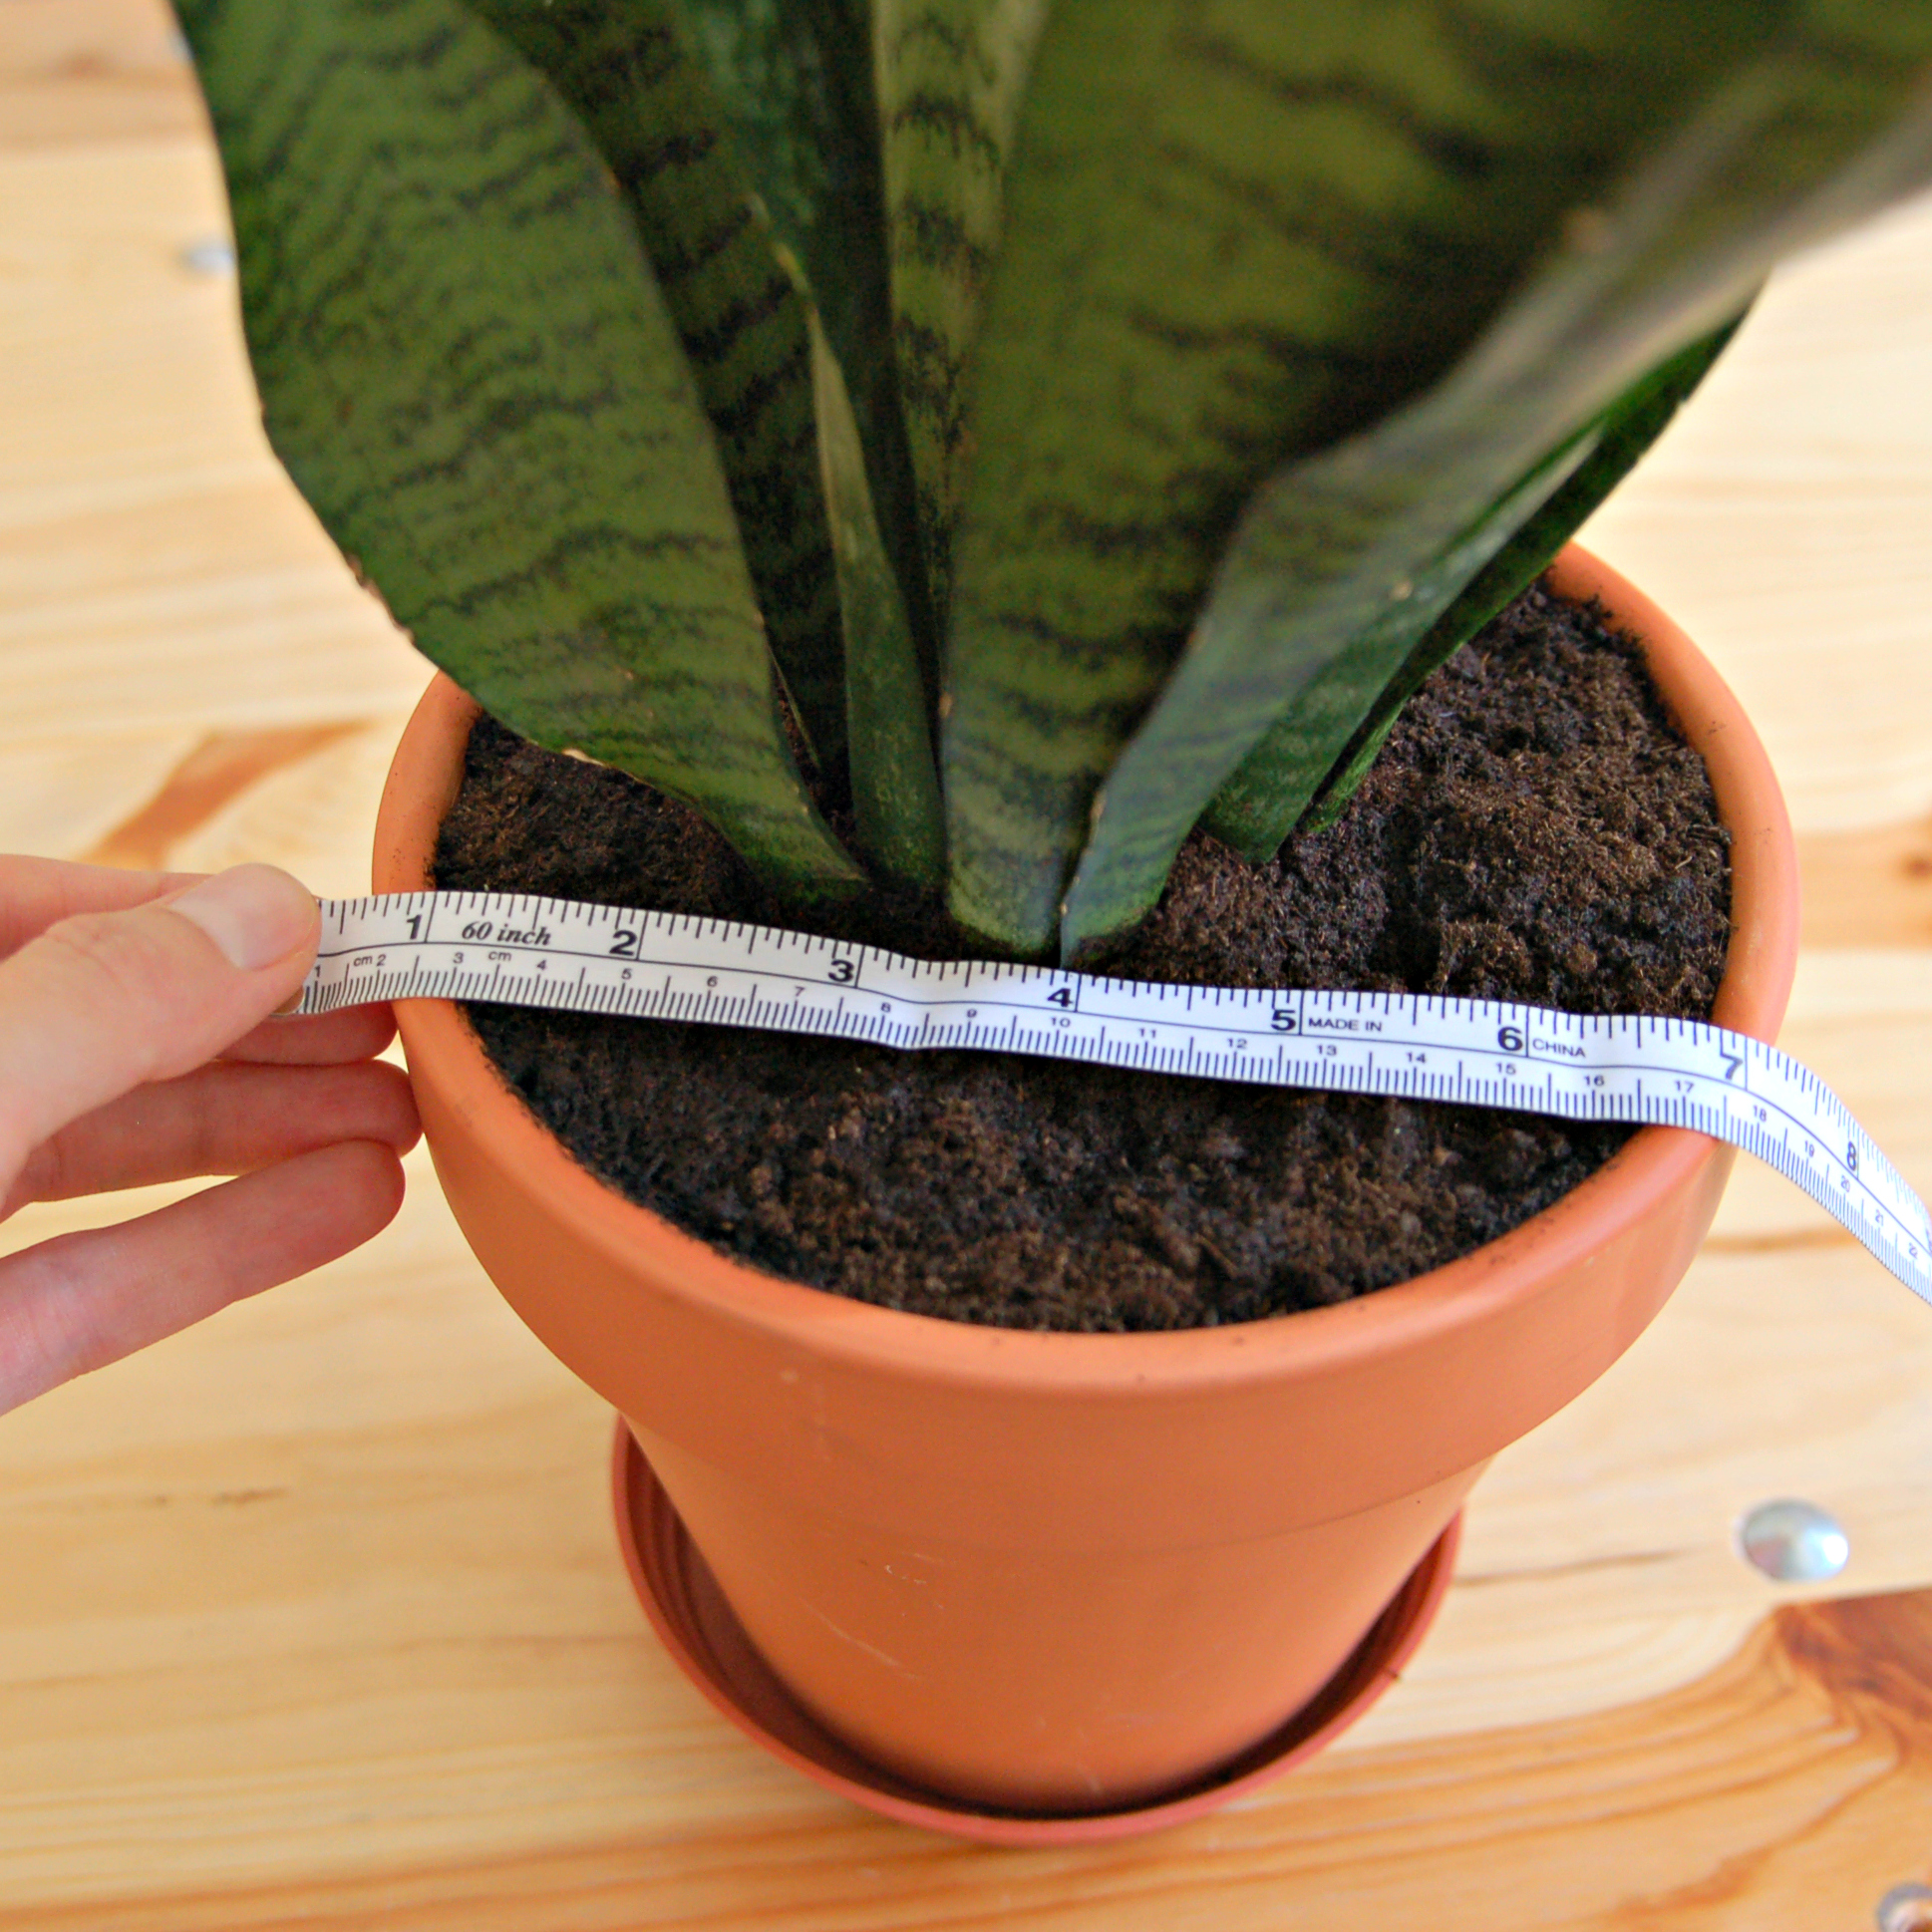
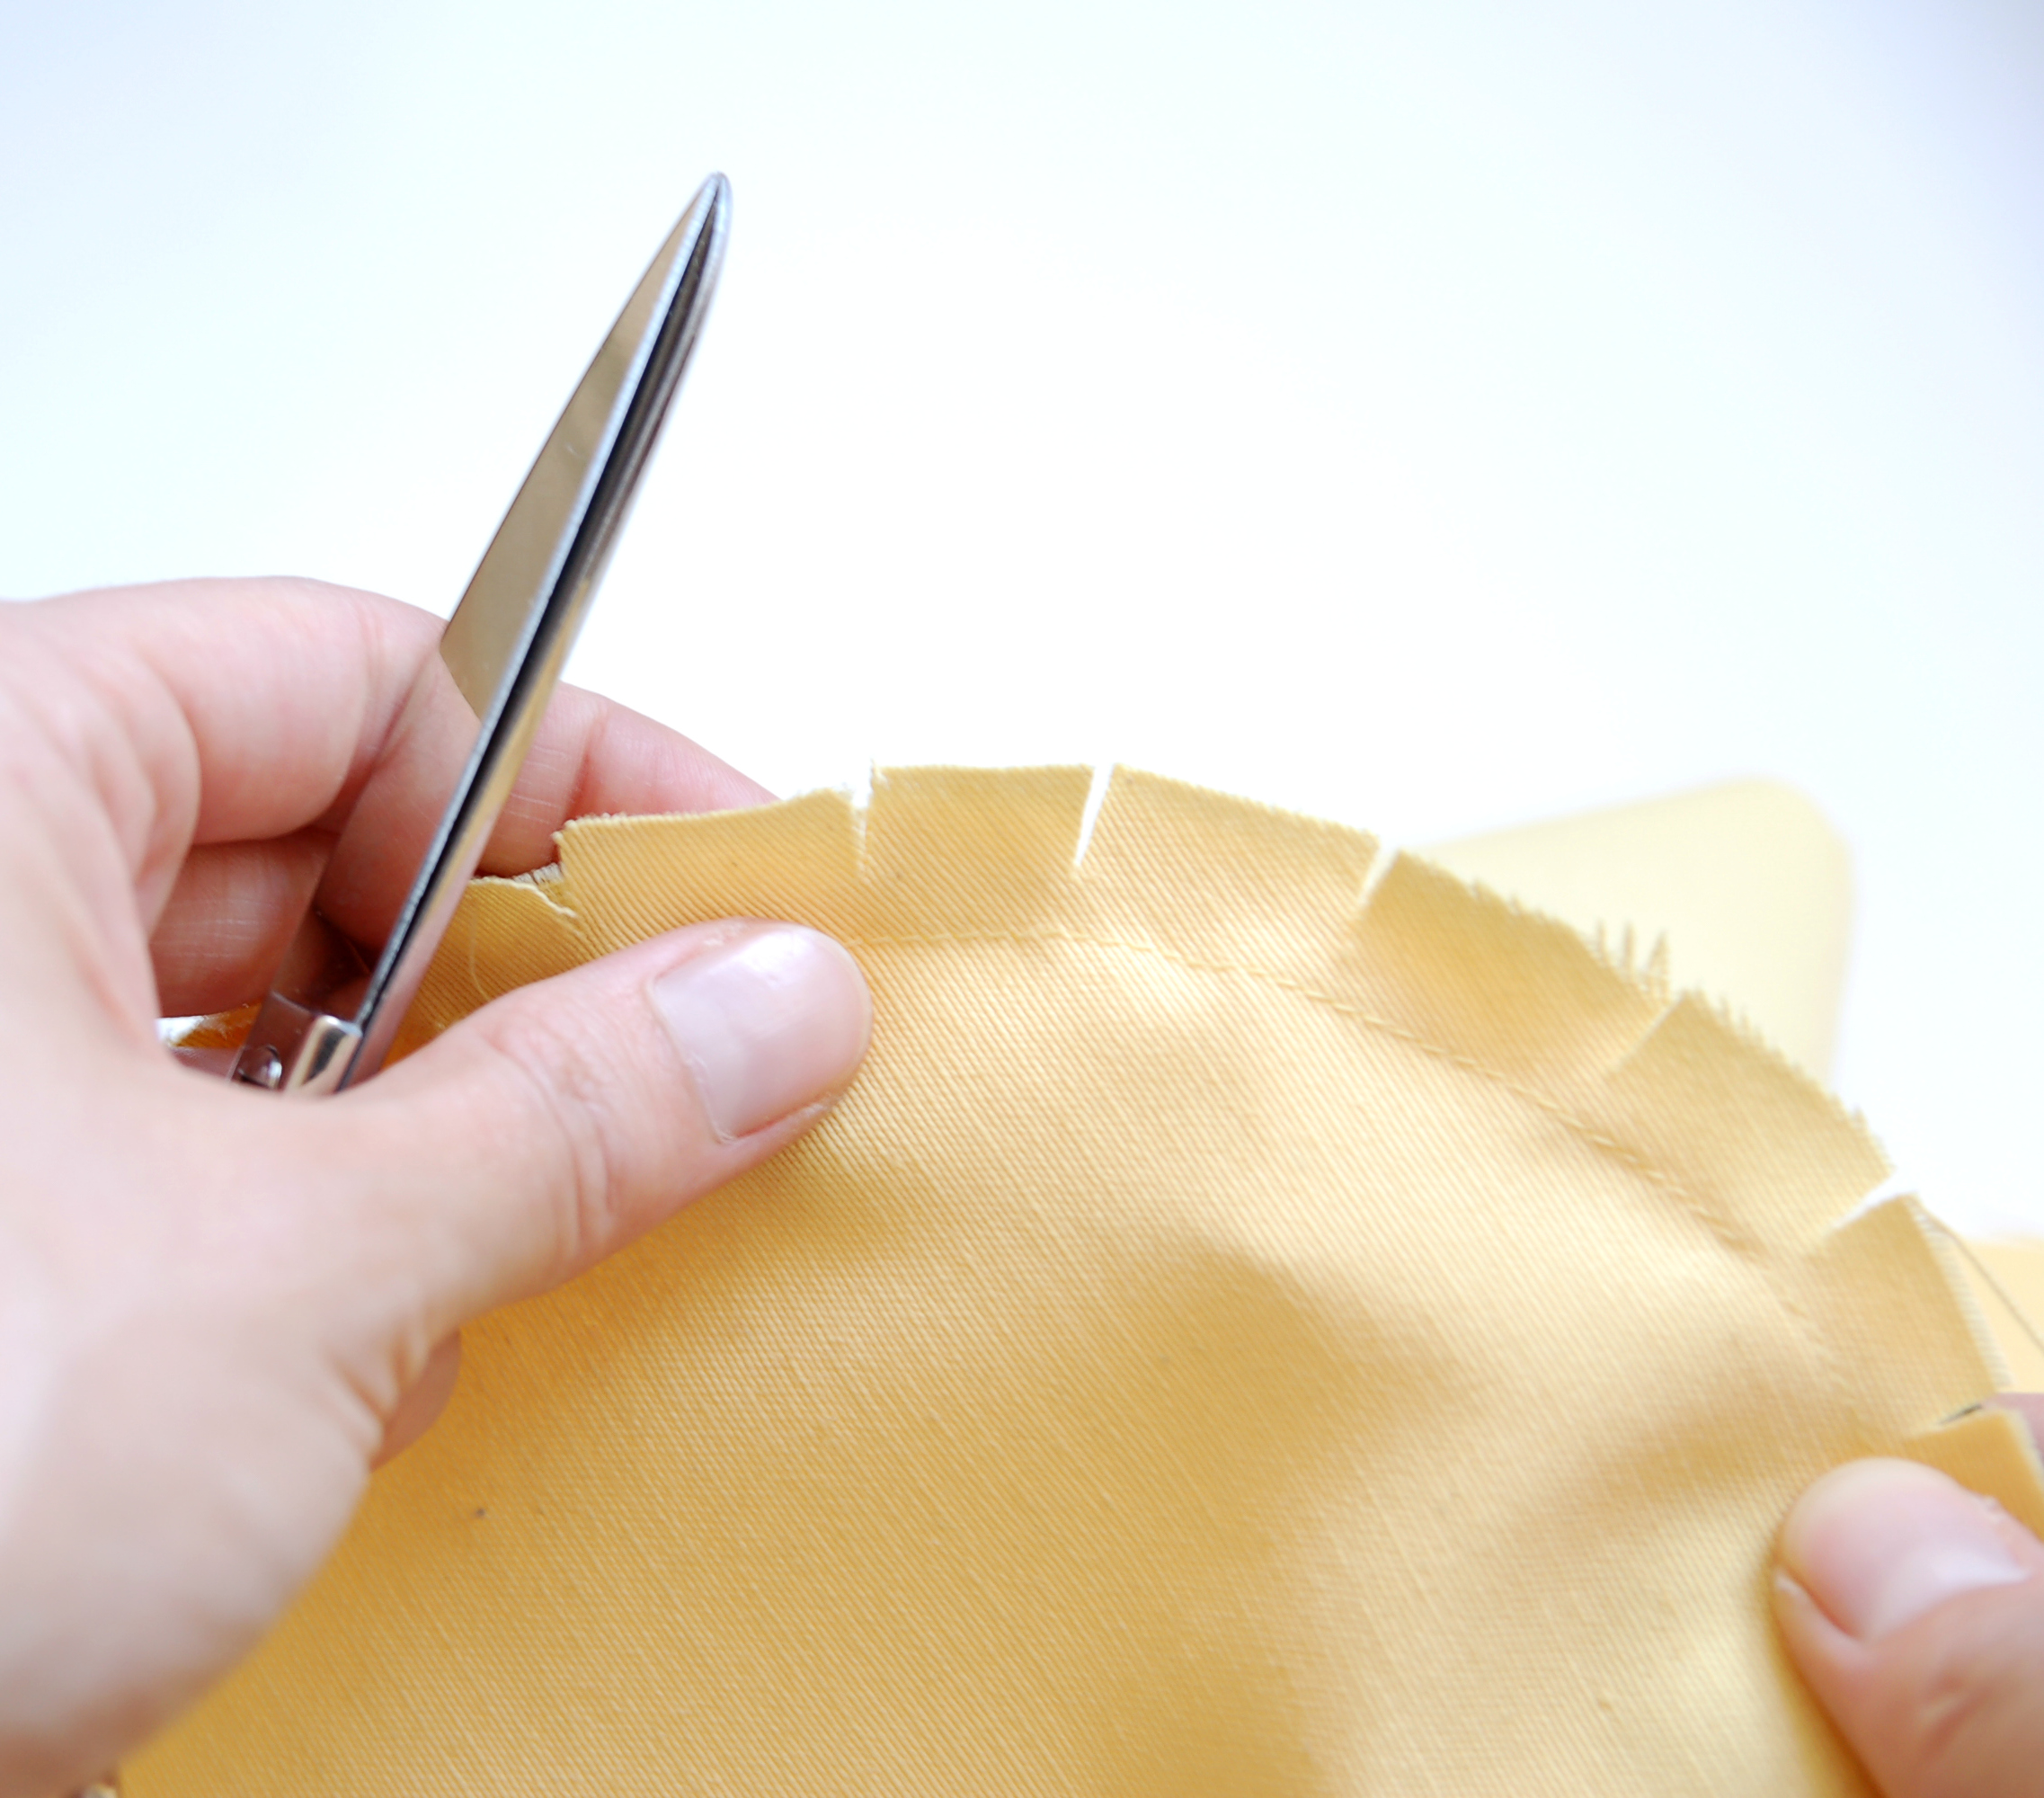
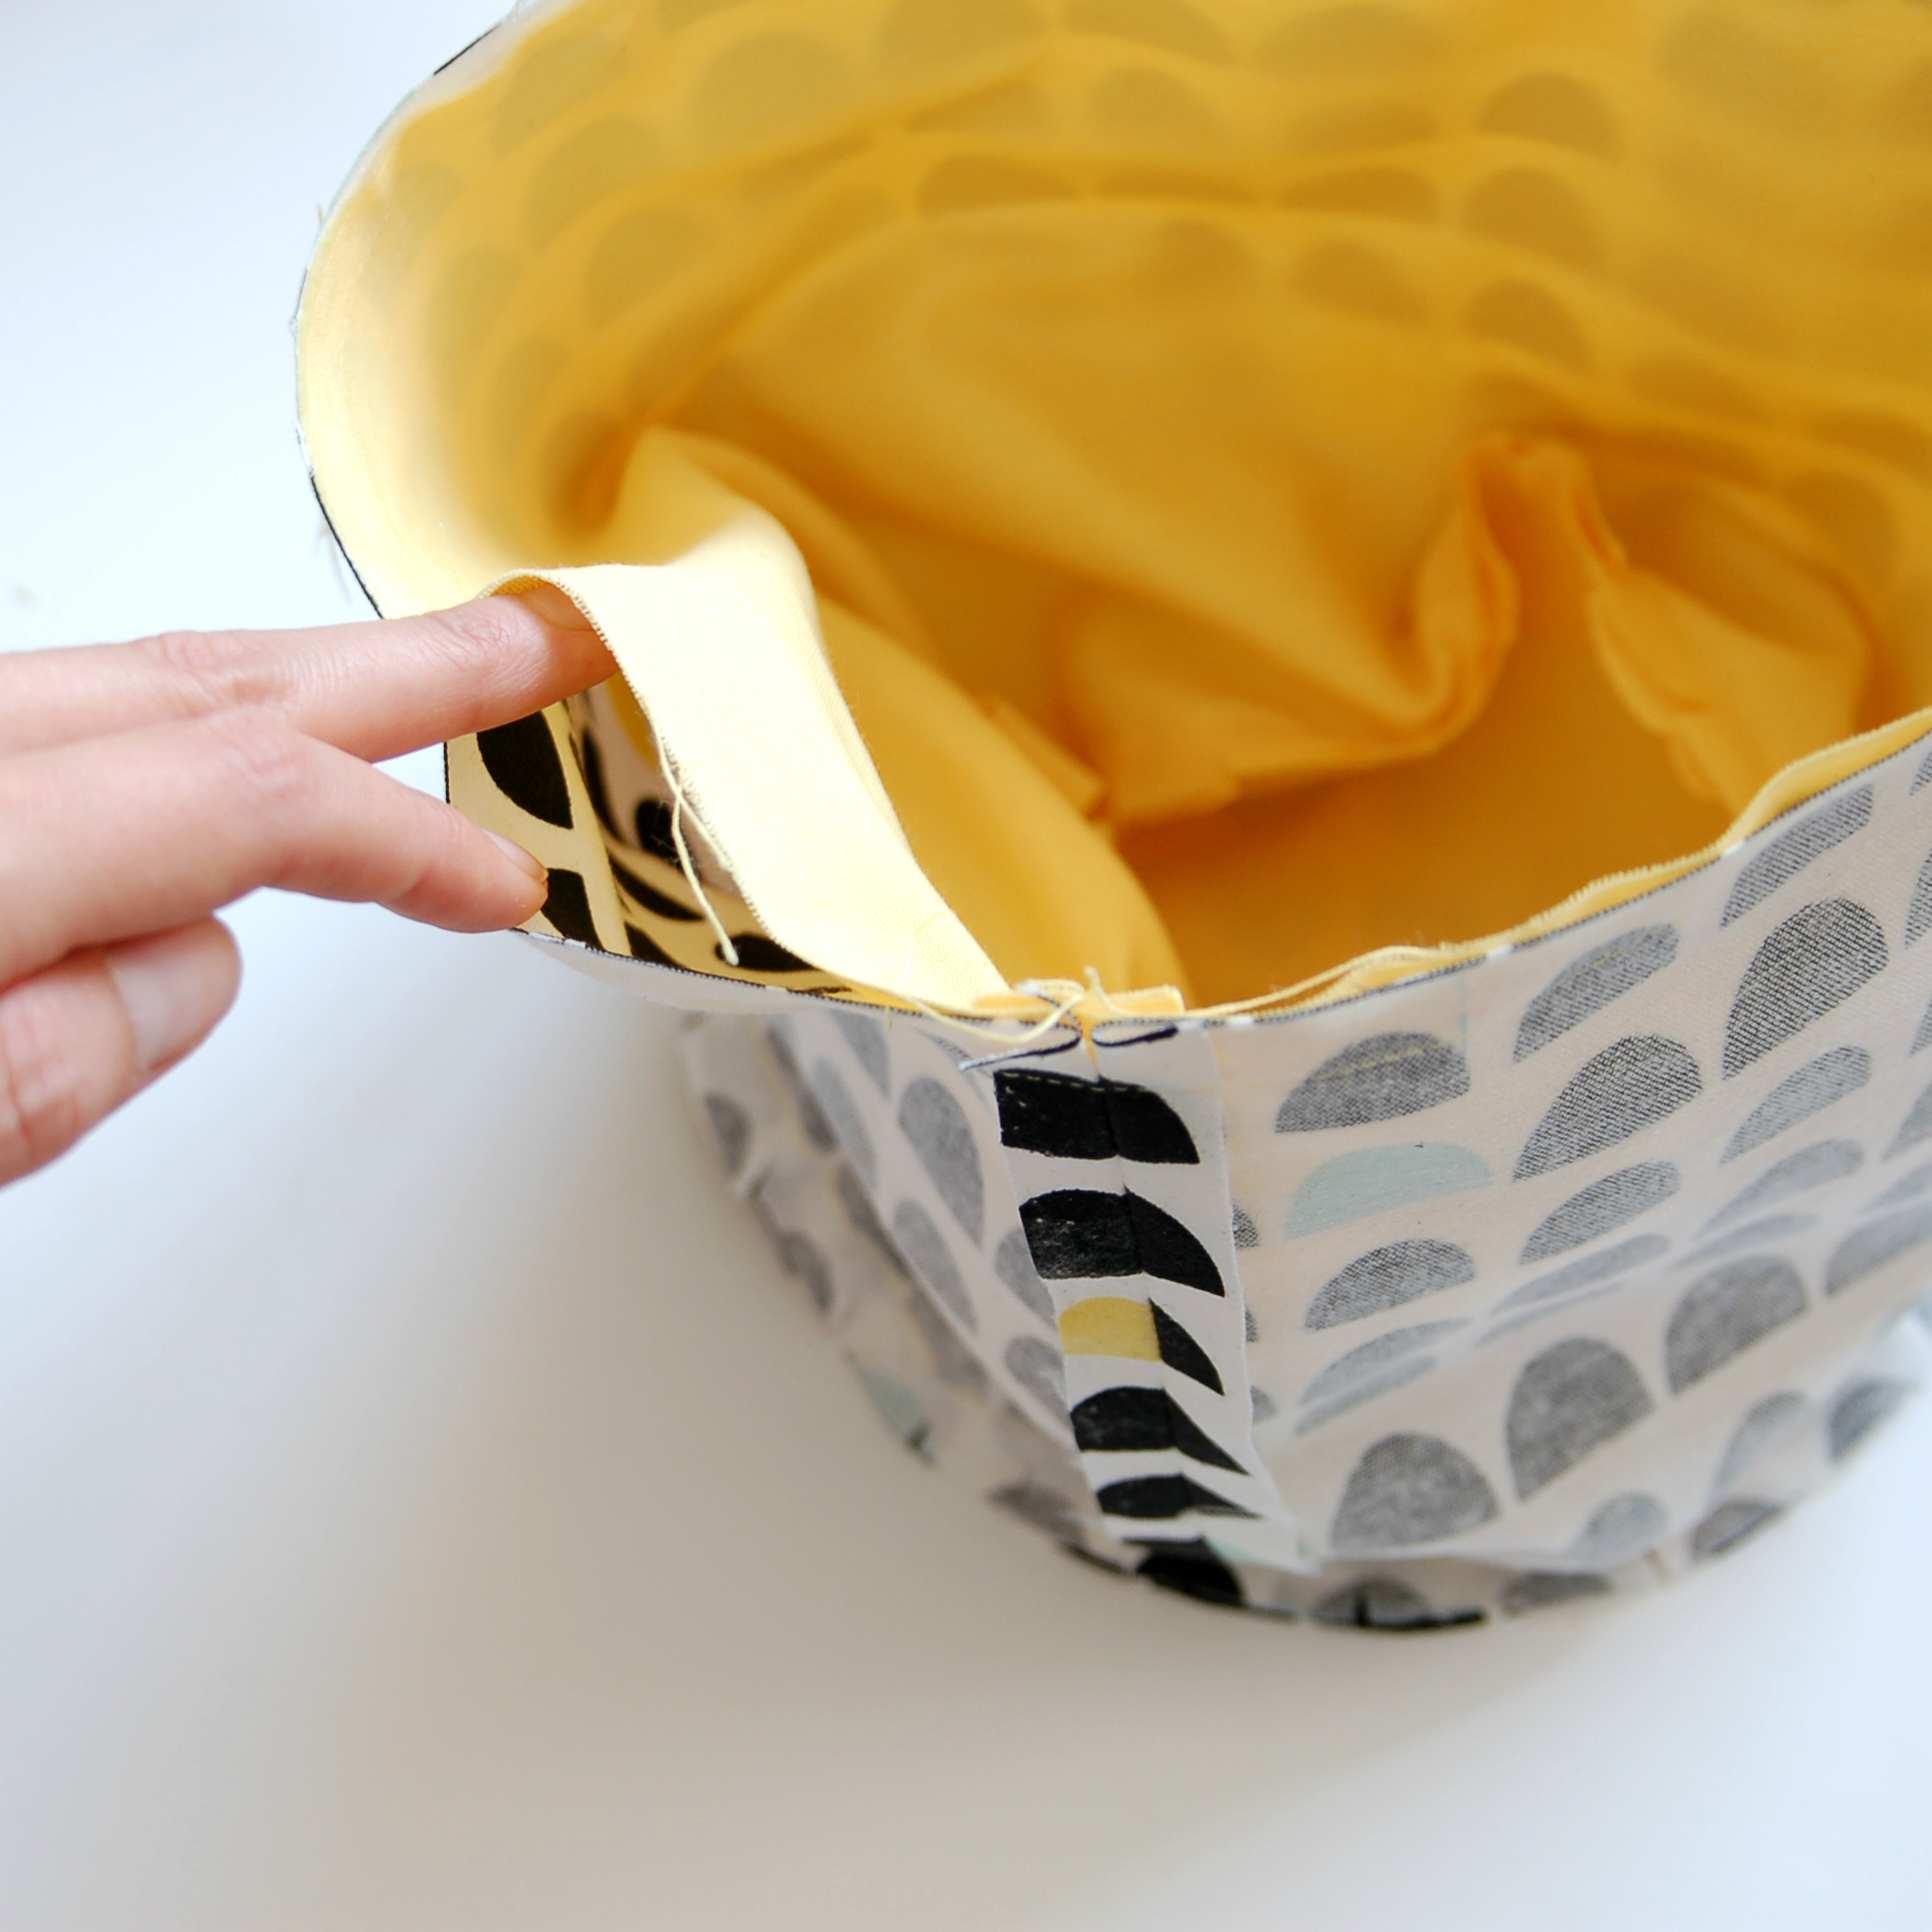
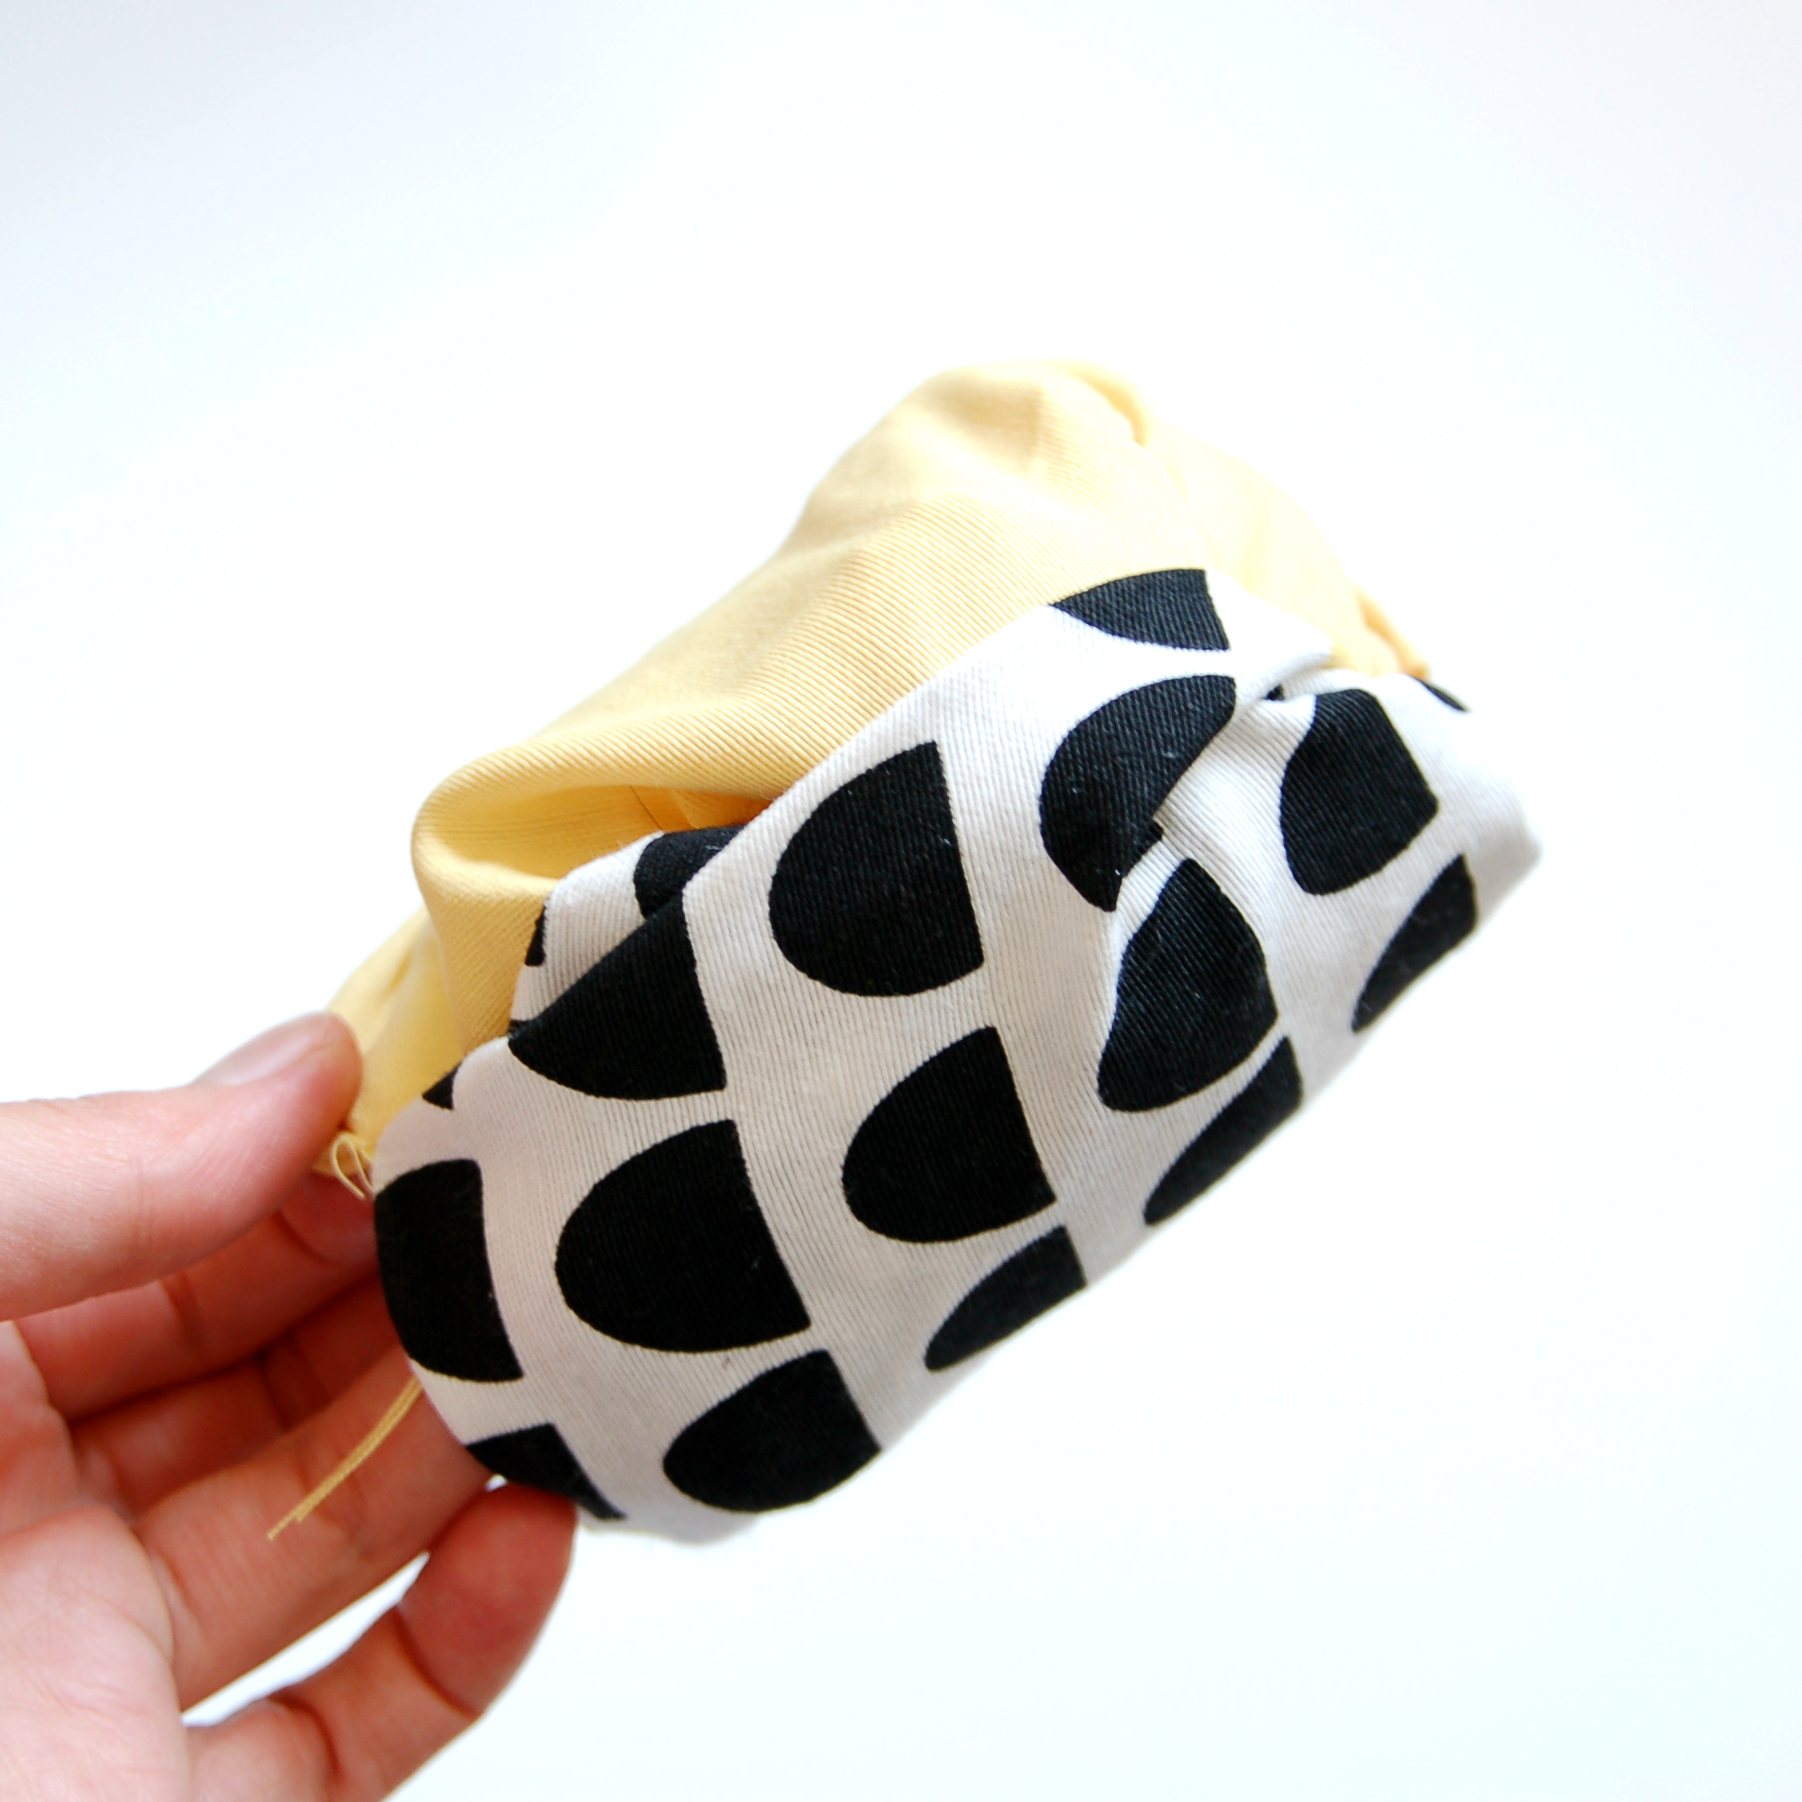
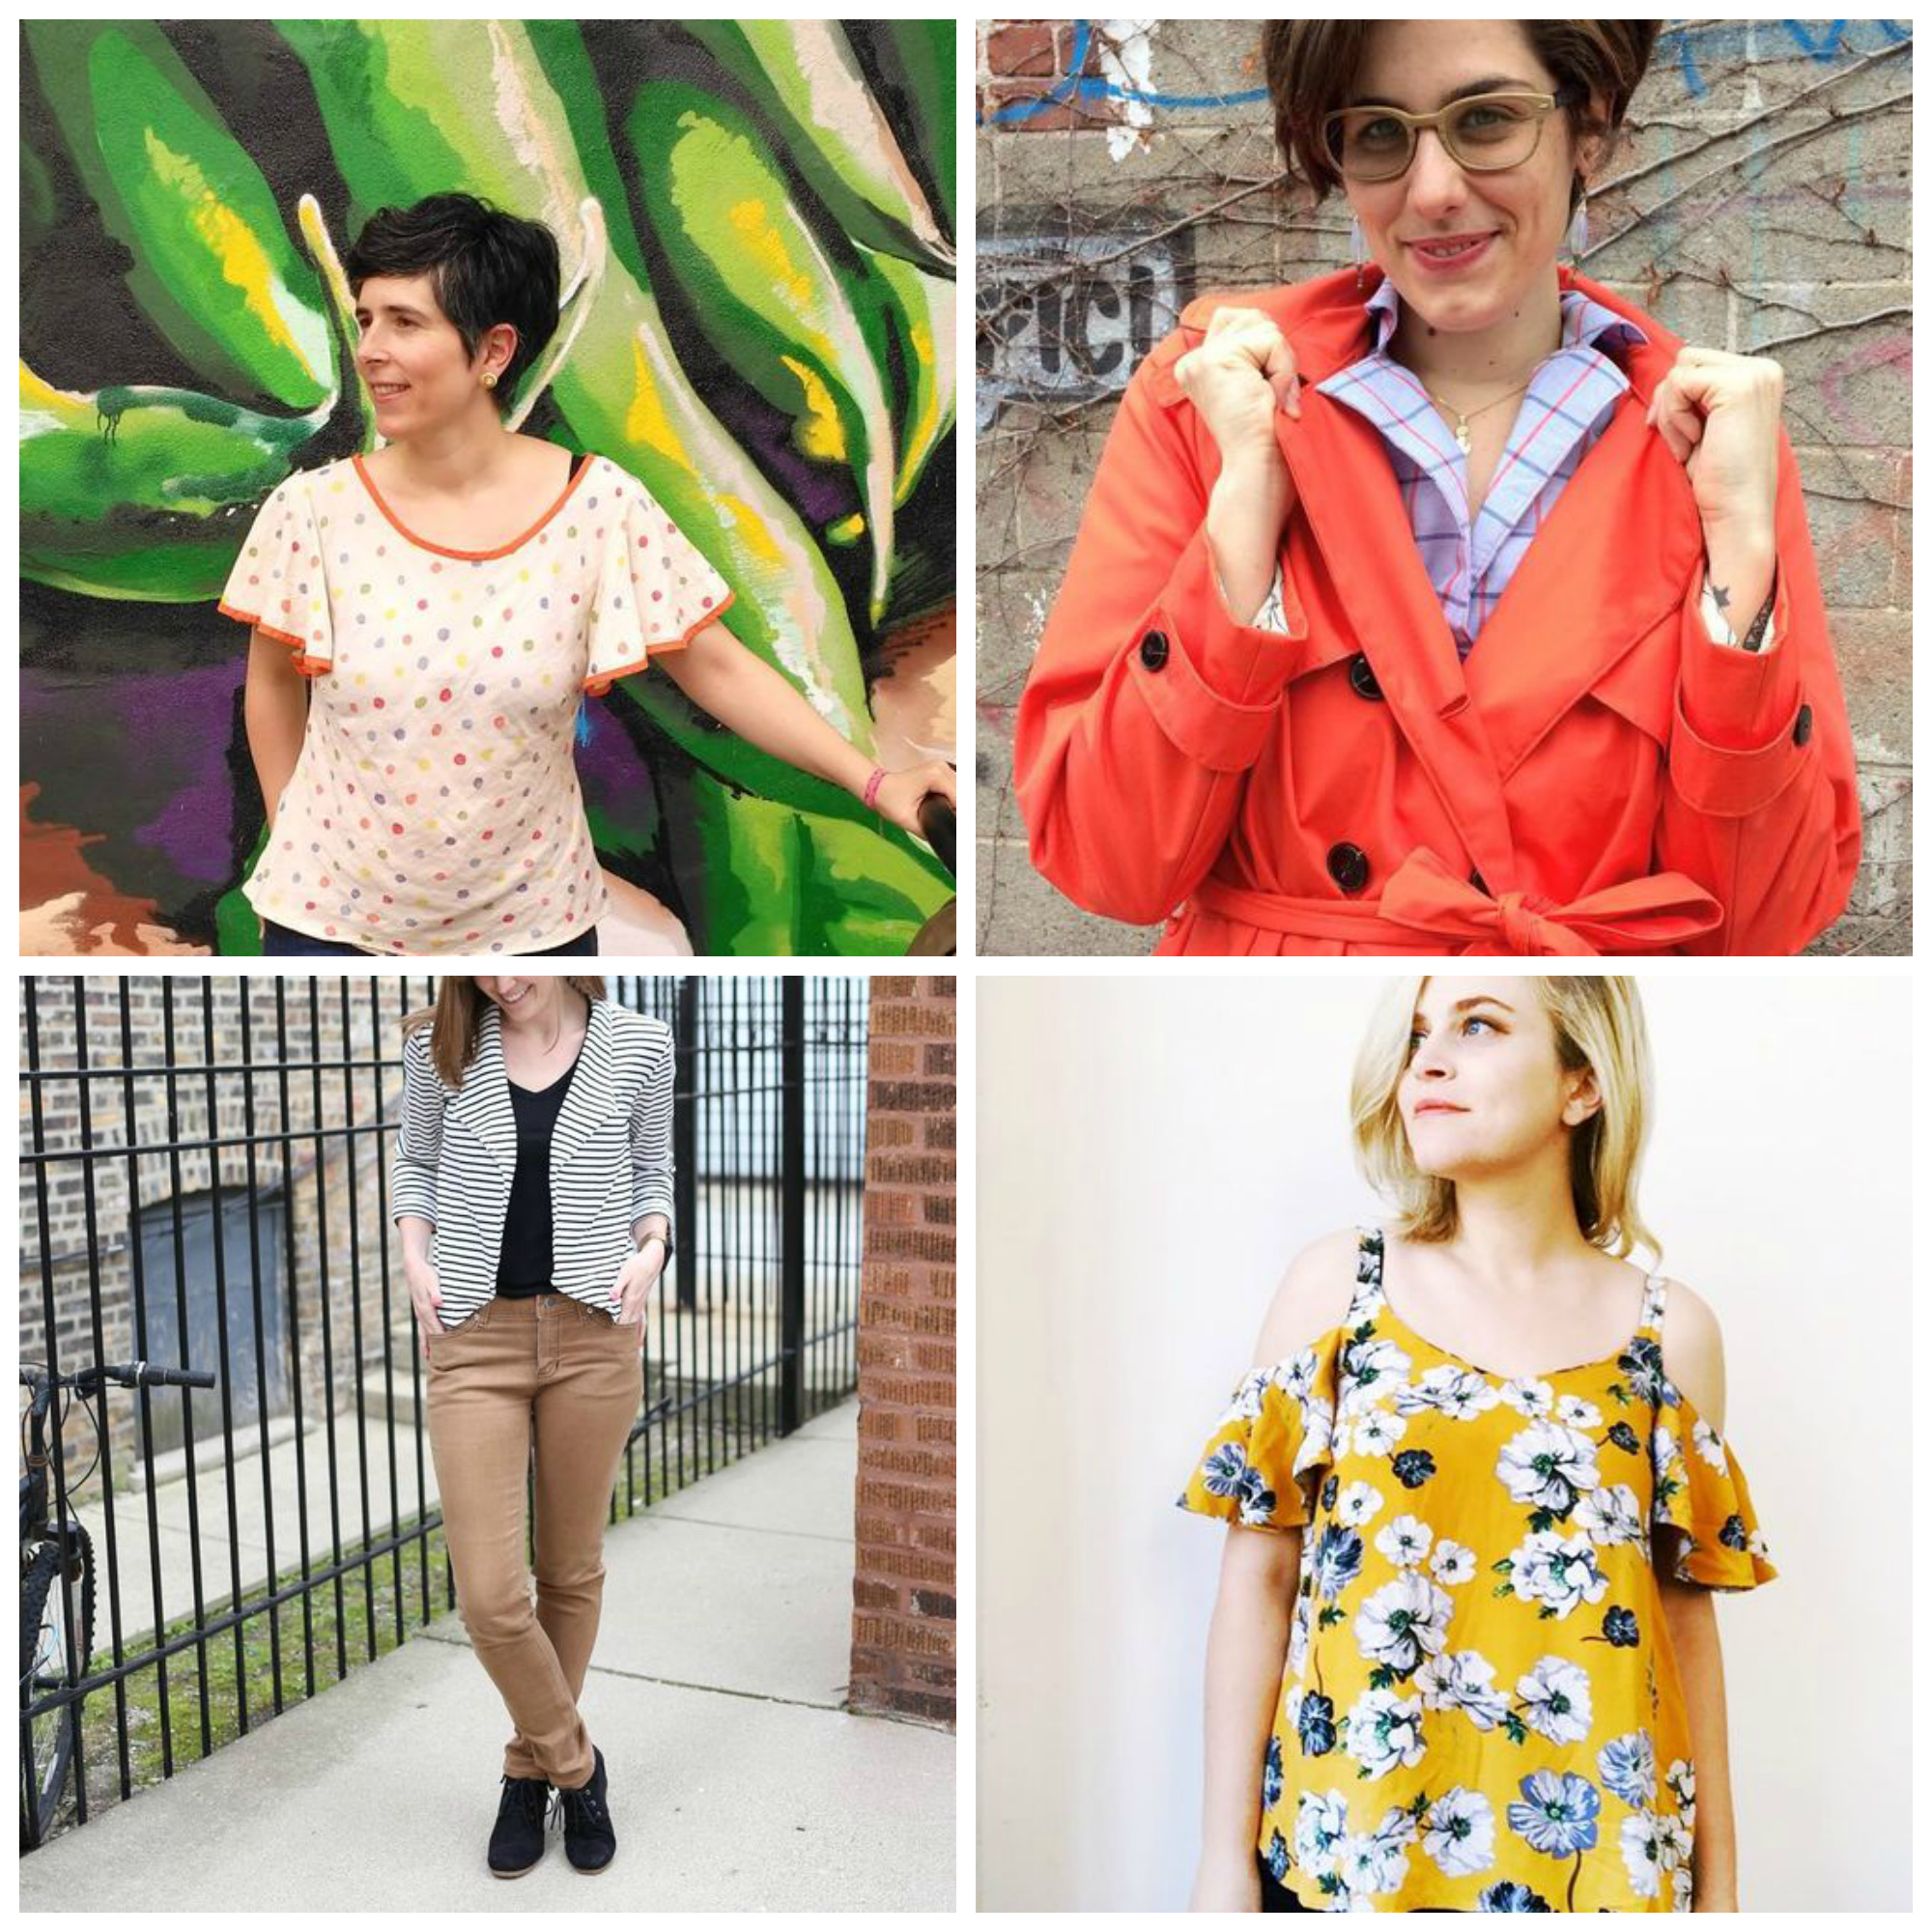
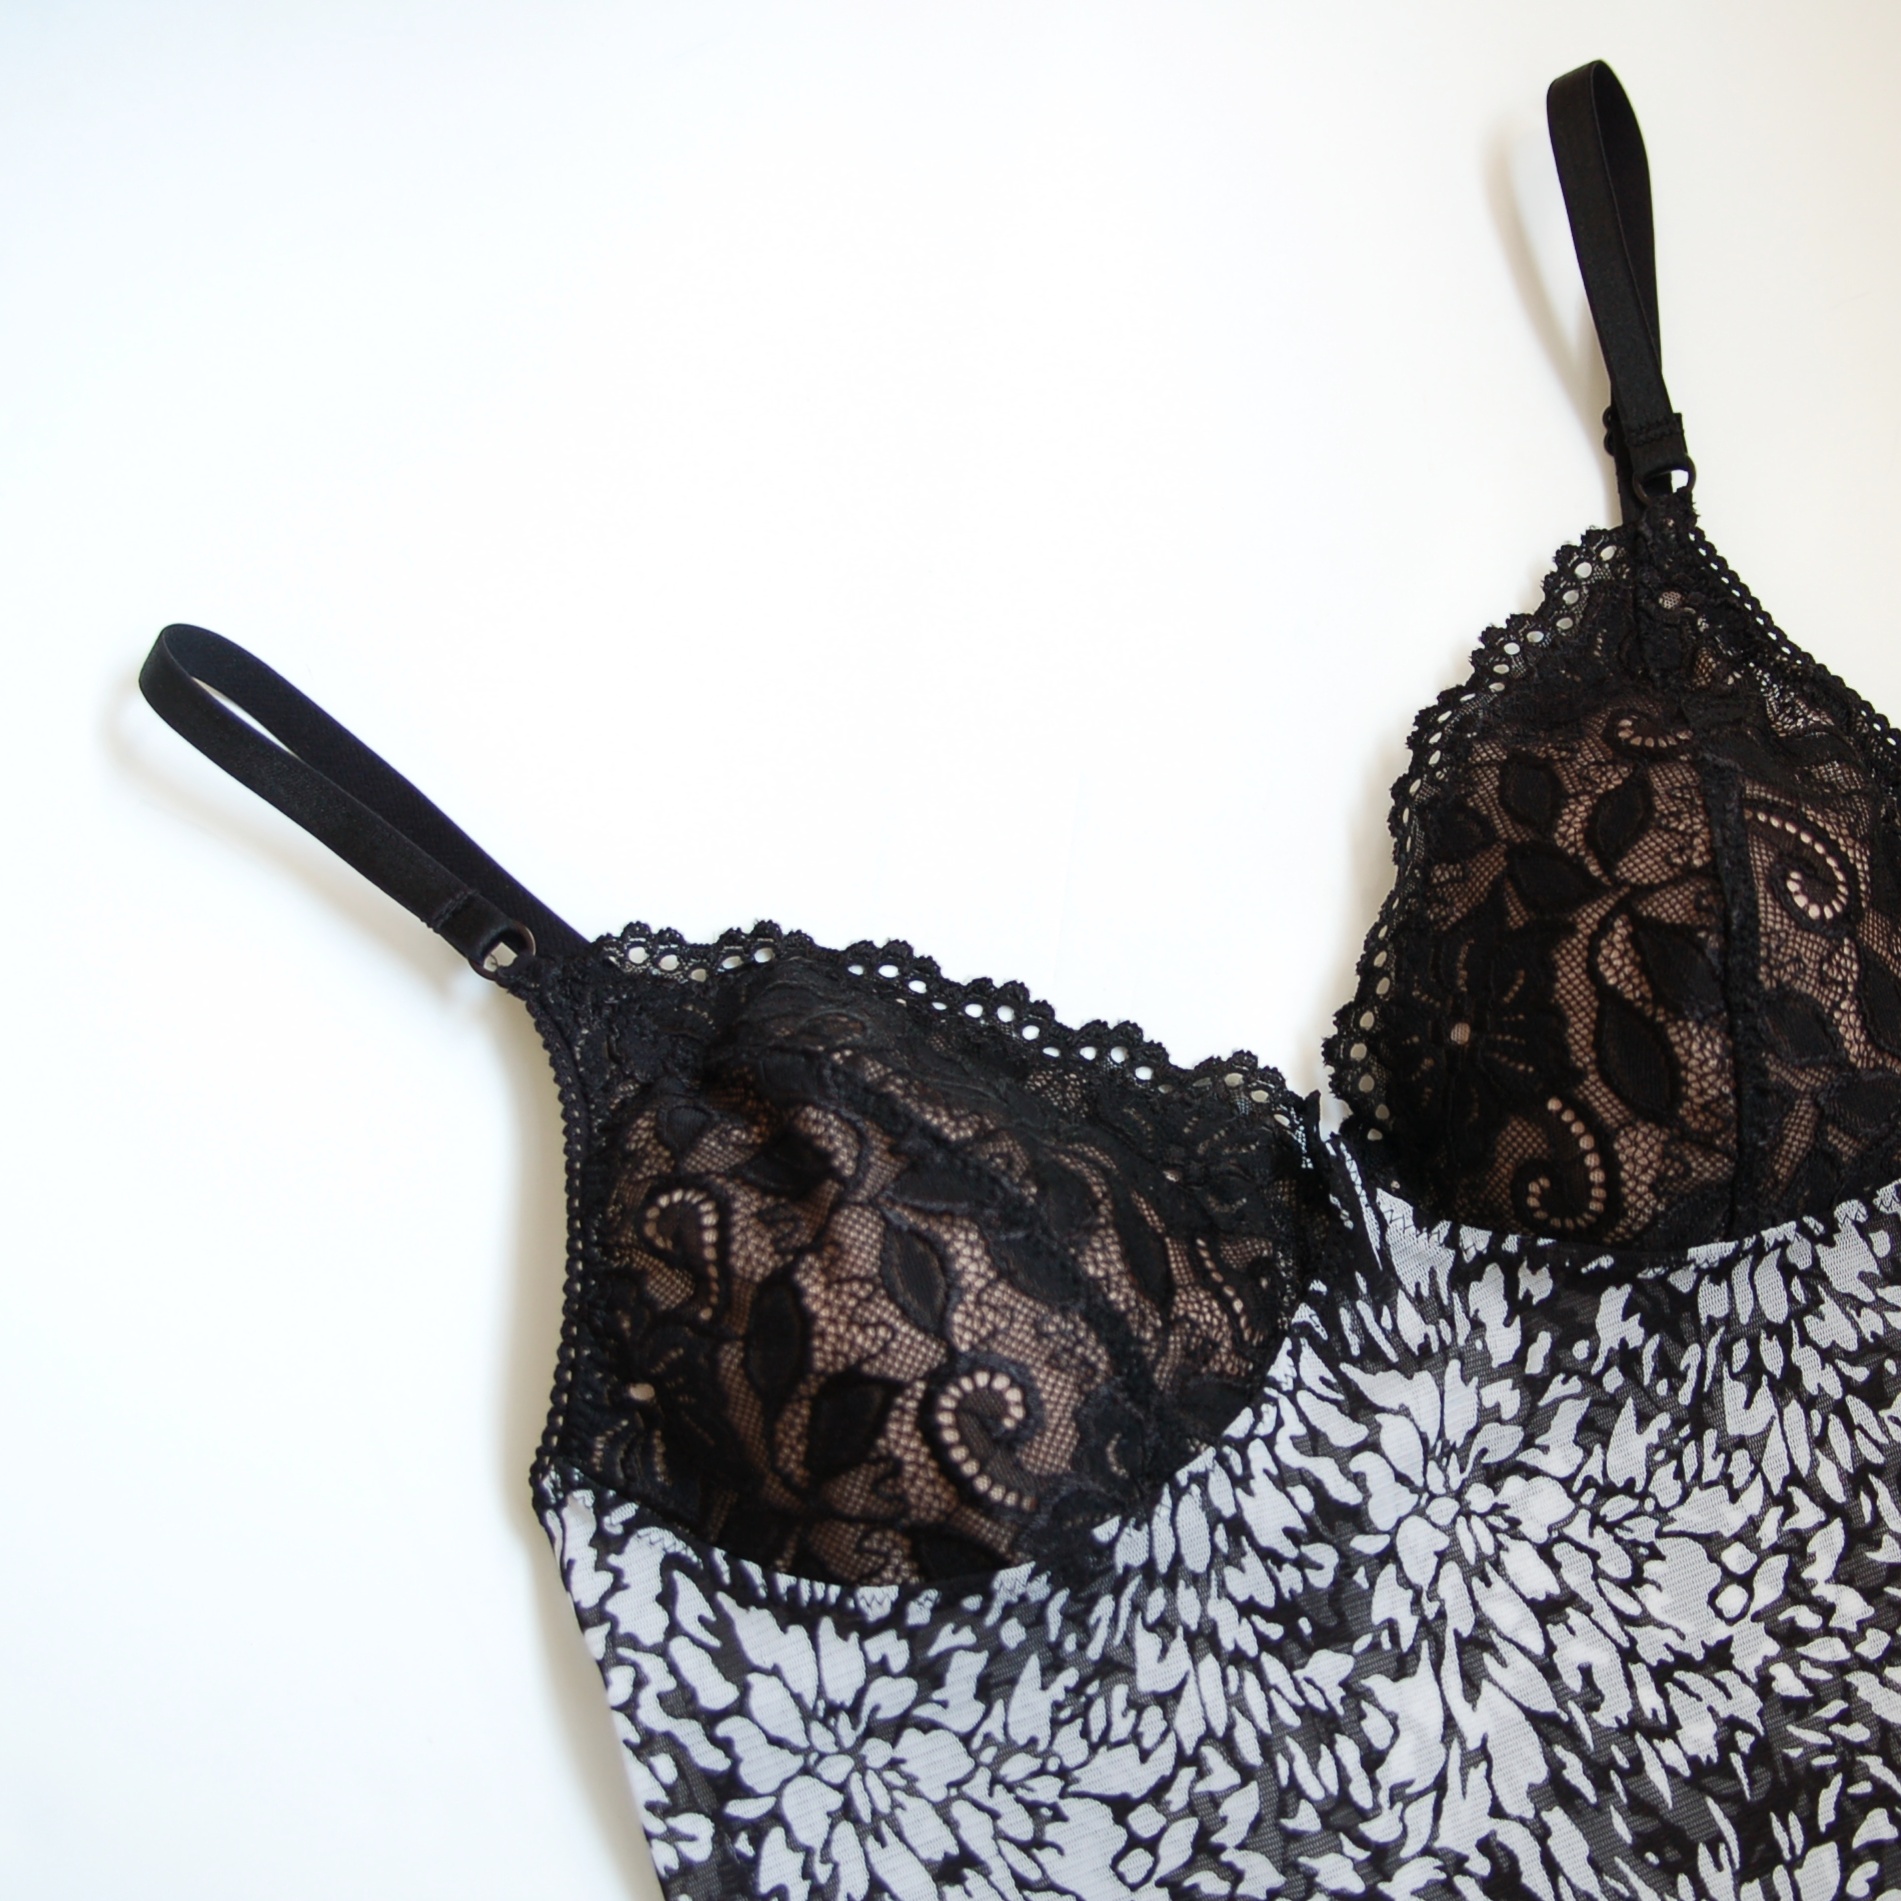
Han cosido cosas muy bonitas y no tengo ni una pequeña parte de las fotos que quisiera tener de sus creaciones. Pero os muestro algunas que hemos hecho en el taller para que lo veáis. Me alegro mucho de ver cómo han avanzado en las clases, cómo poco a poco van haciendo cosas cada vez más complicadas y qué contentas están al terminar algo nuevo.

They have sewn so many beautiful things and I only have a little part of the photos. But I'll show you some of them that we made during the class so you can see their makes. I love seeing how they make progress and little by little sew up every time more complicated projects. Their happiness when they finish something new is empowering!

clases de costura www.studiocostura.com

De nuevo quiero agradecer a todas ellas por compartir estos momentos conmigo, para mí ha sido un placer conoceros. El curso que viene seguimos con más cosas y más gente nueva!

Again I'd like to thank all of them for sharing those moments with me, it has been a pleasure to get to know you all. Next year we'll continue and there will be more new people for sure! 

IMG_20161111_142642.jpg
 

Tutorial: funda de macetero / flower pot cover

 
tutorial diy macetero flower pot www.studiocostura.com

Hola! Hace mucho que no escribo un tutorial, así que hoy os traigo uno muy fácil y práctico. Tengo varias de estas fundas para los maceteros y me parecen muy bonitos. Esta vez tenía que hacer un regalo para una persona que me cae muy bien pero la verdad es que no la conozco mucho (la profe de mi niña, jaja), así que se me ocurrió que una planta bonita sería una buena idea. Y si se le añade algo hecho a mano, pues mejor. Así que aproveché para de paso hacer el tutorial y compartirlo con vosotros por si alguien más se anima a coser este proyecto que se hace rápido y queda muy mono.

Hey! It's been ages since I wrote a tutorial around here, so today I'm bringing you a real simple and useful one. I have many of those flower pot covers and I think they are really cute. This time I had to give a present to someone I like a lot but I don't really know her (my kids teacher, hahaha) so I tought that a plant would be  a good gift. And if you throw something handmade in too, well it's even better, right? So when sewing it I also prepared a tutorial for you guys if anyone is up to try it out too, it's a very fast make and looks good.

tutorial diy macetero flower pot www.studiocostura.com

He usado telas tipo loneta, el de estampado es de Black Oveja y el liso es de Tejidos Paredes. Se puede usar todo tipo de telas, mejor que sean más bien fuertes como loneta, telas de tapicería etc pero también puedes aprovechar algodones más finos si usas entretela para darles un poco más de grosor. Yo he usado dos telas distintas para tener un poco de contraste, pero también puedes hacer el exterior e interior de la misma tela. La cantidad depende del tamaño de tu maceta.

I used a canvas type of fabric, the print is from Black Oveja and the solid one is from Tejidos Paredes. You can use many types of fabrics, middle weight would be a good choice, like canvas for example or home dec fabrics etc, you can also use lighter weight cottons if you interface them to give them a bit more stability and weight. I used two different fabrics to have a bit of contrast but you can of course use the same fabric for the inner and outer shell. The quantity you need depends on the size of your flower pot.

tutorial diy macetero flower pot www.studiocostura.com

Para empezar mide el diámetro de tu maceta en la parte más ancha y añadele un poco más de margen para que sea cómodo de poner y sacar la planta. También mide el alto de la maceta para saber cuánto va a medir tu funda. Yo lo he hecho un poco más alto para que pueda doblar el borde y que se vea la tela amarilla.

To start with, measure the widest part of your pot and add a bit extra room to be able to take the plant out later. Also measure the height of the pot to know how high your cover will be. I added a bit of height there to be able to fold down the border for the color effect.

tutorial diy macetero flower pot www.studiocostura.com

El diámetro (más margen de comodidad) de mi maceta es de 20 cm, he dibujado el círculo de base sabiendo esto. Luego para calcular el lateral necesitas calcular la circunferencia de tu base, y sería el diámetro multiplicado por π (3,14). En mi caso es 20 x 3.14 = 63 cm.

Así que tengo mi base que dibujé en papel sabiendo que el diámetro es de 20 cm, luego le añadí 1 cm de margen de costura alrededor. Y la pieza lateral mide 63cm x 20 cm (el alto de la maceta más un poco para doblar). A esta pieza también le doy 1 cm a todos los laterales para margen de costura después. Yo prefiero siempre primero calcular cuánto miden las piezas y después añadir margen a todo, sino me lío con el tema de la circunferencia y los margenes etc.

The diameter (and the extra space) of my pot is 20 cm, I've drawn the circle based on that measurement. To calculate the size of the body piece you need to know the circumference of the base circle and this would be the diameter multiplied by π (3,14). In my case it's 20 x 3,14 = 63 cm.

So I have my base pattern drawn on the paper knowing that the diameter is 20 cm, I then added the seam allowance of 1 cm around that. The body piece is 63 cm x 20 cm (the height of the pot and some extra to fold down). I also added 1 cm seam allowance to that piece later. I prefer to first calculate everything and then add the seam allowances to not mess up with the circumference etc.


tutorial diy macetero flower pot www.studiocostura.com

Con los cálculos hechos corta una pieza de base y una pieza de lateral de la tela exterior y exactamente las mismas piezas también de la tela interior: dos bases y dos laterales.

With all the calculations made, cut a piece of the base and a piece of the body from the outer fabric and exactly the same pieces from the inner fabric too: two bases and two bodys.

tutorial diy macetero flower pot www.studiocostura.com

Para empezar, dobla las piezas laterales por la mitad, derecho con derecho, para coser la costura lateral para formar un tubo. Lo haces una vez en la tela interior y una vez en la tela exterior. Plancha abierta esta costura para que haya menos bulto luego.

To start with, double the body piece right side with right side and sew the side seam to form a tube. It's done one time with the outer fabric and one time with the inner one. Press the seam open to reduce bulk later on.

tutorial diy macetero flower pot www.studiocostura.com

Ahora divide tu base en cuatro partes iguales: doblas primero el círculo por la mitad y marcas dos puntos y luego lo doblas por otro lado y marcas los otros dos puntos. La pieza lateral que ahora es un tubo también tiene que estar marcado en cuatro partes de la misma forma. 

Now it's time to divide the base circle in four equal parts: fold the circle in half and mark the two points and then fold it again in other direction and you'll have the other two points. The body piece that's now a tube needs to be divided in four parts the same way.

tutorial diy macetero flower pot www.studiocostura.com

Ahora es fácil unir todos los puntos que marcaste entre sí, así sabes que todo el círculo está repartido igual. La base y el lateral se unen entre sí derecho con derecho. 

Now it's easy to fit the base and the body together using the same marks, the space will be divided equally. The pieces need to be put right isdes together.

tutorial diy macetero flower pot www.studiocostura.com

Ahora se une la base con los laterales. Yo prefiero coser teniendo la pieza de lateral encima y el círculo abajo, me parece que es más fácil unir la parte recta a la parte curvada al hacerlo de esta manera. Coses todo alrededor.

Now it's time to sew the base and the body together. I prefer to sew with the body piece on top of the circle piece as it seems to be easier to sew a straight edge to a curved one that way. Sew all the way around.

tutorial diy macetero flower pot www.studiocostura.com

Una vez hecho esto, le das unos piquetes para que el margen esté más "libre" y que no tire.

Repites el mismo proceso con la otra parte de la funda.

Once this is done, clip the seam allowances a bit to relax the fabric.

Repeat the same step with the other shell.

tutorial diy macetero flower pot www.studiocostura.com

Ahora tienes dos fundas ya montadas independientes. Para cerrar la funda se mete uno dentro del otro, primero dale la vuelta a una de ellas y ponlo dentro del otro, tienen que estar derecho con derecho. Se cose todo alrededor de la parte de arriba, dejando un hueco de aprox 5 cm para dar la vuelta.

Now you have two separate shells sewn up. To finish the cover you have to put one inside the other: first turn one of them the around because they need to be with right sides together. Sew all around the upper edge leaving a aprox 5 cm long opening to be able to turn your work around.

11.jpg

Allí está el hueco para dar la vuelta. Si prefieres, este hueco lo hubieras podido dejar también en la costura lateral (la primera que hicimos) del forro de la funda, pero yo entre que siempre me olvido de hacerlo antes, casi prefiero que esté allí arriba porque de todas maneras voy a dar un pespunte después que va a cerrar este hueco.

There's the hole to turn the work around. If you like, you could leave the opening in the side seam of the lining shell of the cover (the first one we sew), but as I always forget to do it, I also prefer to leave it in the upper seam as I anyway will sew another row of stitching that will close it.

tutorial diy macetero flower pot www.studiocostura.com

Da la vuelta a tu funda a través del hueco y plancha un poco el resultado (que suele ser arrugado, jeje).

Turn the project inside out and press it a bit (it tends to be full of wrinkles at that point, hehe).

tutorial diy macetero flower pot www.studiocostura.com

Para terminar, cose un pespunte en el borde superior para asentar esa costura y de paso cerrar el hueco que usamos para dar la vuelta antes. Yo subí un poco el forro para este efecto de color que se vea un poco, pero también puedes mantener los bordes exactamente iguales y dar el pespunte. A veces también uso el bies para rematar este borde y también queda bonito, allí ya cómo cada uno quiere.

To finish it off, sew a topstitching row in the upper part of the cover to make the seam flat and also to close the opening we left before. I raised the lining a bit to have this color effect there but you can also just leave both of the shells on equal heights and sew it that way. I also use bias tape sometimes and it's a very cute finishing method too, you have lot's of choices there.

tutorial diy macetero flower pot www.studiocostura.com

Y ya está! Como veis, es muy sencillo pero queda muy bien y puedes usar todo tipo de estampados chulos que has comprado pero no sabes muy bien qué hacer con ellas (ehmmm...alguien adicta a las telas de Ikea por aquí?). Y como comenté antes, me parece buena idea de regalo cuando no sabes muy bien qué regalar pero quieres dar una sorpresa bonita. Espero que os haya gustado!

That's it! As you can see it's so simple but looks good and you can use all those cool prints you've been hoarding and don't know what to do with them (ehmmm...any more Ikea fabric addicts around here?). And as I told you before, I think it's a good gift idea when you're not very sure what to give but you need a cute surprise. Hope you liked it!

DIY tutorial flower pot cover /funda de maceta www.studiocostura.com
 

Curso de lencería


Hola, hoy un pequeño anuncio sobre un curso que voy a dar. Va a ser el último curso de lencería antes de las vacaciones, así que si has pensado en probar coser algo de encaje, ahora es el momento.

En qué consiste?

Vas a aprender cómo coser braguitas: desde el corte, el montaje de las piezas hasta poner los elásticos específicos de lencería. Hacemos un par con tela de punto, más sencillo y luego otro par con encaje para que sepas todos los trucos! 

El curso dura 4 horas y el patrón y los materiales están incluidos en el precio. Los grupos son muy reducidos, sólo de dos personas, así que tienes toda la atención que necesitas.

El único requisito para asistir a este curso es que sepas manejar la máquina de coser con soltura. No digo que tienes que ser experta pero tienes que tener experiencia porque vas a aprender algo nuevo con materiales que quizás no hayas usado antes.

Cuándo y dónde?

Los dos cursos van a ser el sábado, 17 de junio, primer grupo a las 10h-14h (una plaza disponible) y el segundo grupo a las 17h-21h (una plaza disponible).

El precio es 60 euros por persona (materiales incluidos) por 4 horas de clase. Los cursos se imparten en mi taller en Vallecas (metro Portazgo), en Madrid.


Si estás interesada, escríbeme a costurastudio@gmail.com y especifica si quieres apuntarte al curso de mañana o tarde. Recuerda que sólo hay dos plazas en cada uno, así que reservo plazas según el orden de que me lleguen las solicitudes.

Feliz semana!


Me Made May 2017

 
memademay 2017 www.studiocostura.com

Hola! Otro mes del reto Me Made May 2017 se ha acabado para este año y me gustaría hacer un pequeño resumen aquí en el blog sobre mi propia experiencia y también mostraros lo que más me gustó de lo hicieron otras.

Es el segundo año que participé y ha habido bastantes cambios en la experiencia comparado con el año pasado. Para empezar, este año todo fue más fácil, jaja. Primero porque tenía mucha más ropa que ponerme con todo lo que había cosido durante el año. Segundo porque como decidí no subir fotos todos los días, no tenía el agobio de tener que hacerlo sí o sí, cosa que hizo el mes mucho más llevadero. También he llegado a un punto donde coso cada vez más cosas que realmente me pongo y no hago prendas sólo porque me gusta como se ven aunque sé que no es mi estilo. Estoy bastante contenta con las cosas que tengo y como suelo coser prendas muy básicas, se combinan sin mucha dificultad. Me gustan los vestidos y prendas formales pero no van mucho con mi estilo de vida así que con el tiempo he ido acercándome más a lo que realmente necesito (sólo he tardado como seis años, jaja).


Hey! The Me Made May 2017 has ended for this year and I’d like to make a little conclusion post over here at the blog about my experience this year and to show you the inspiration I got from the other participants.

It was the second year for me and this year it was quite different compared to the last one. To start with, everything was way easier this year, hehe. First because I had more clothes to choose from as I had sewn quite a lot of garments during the year. Second because I decided not to share photos every day so I didn’t have the duty and the “obligation” which made the month way easier. Also I’ve now reached a point where I sew every time more garments I actually wear and I don’t make stuff only because I like how it looks ignoring if it’s my style or not. I’m quite happy with what I have and as I make a lot of basic stuff it’s quite easy to combine them together. I like dresses and other formal garments  but they don’t really go with my lifestyle so with time I’ve really started to make things that I actually need (only took me like six years, hehe).


También aunque no lo mencionaba, todos y cada uno de los días he llevado ropa interior hecho por mí. Hice muchas muestras para mis talleres y ahora las tengo todas para mí, así que no me puedo quejar de la variedad de encajes de todo tipo, jaja.

Lo que echaba de menos era de más pantalones y faldas, cosa que debería trabajar más a partir de ahora. También llevé un montón de prendas que ya tengo desde años y aunque es aburrido volver a hacer fotos iguales que el año pasado, estoy contenta de darle uso continuado a mis prendas porque eso significa que realmente tiene sentido poner el tiempo y el esfuerzo de hacerlas...mucho mejor que fast fashion.


Also I didn’t metion this but every day I have been wearing my handmade lingerie. I’ve made a lot of samples for my workshops and now I have them all for me, so I can’t really complain about the variety of lace in my underwear drawer, hehe.

I’m in need of more pants and skirts, I should make more in the future. Also I’ve been wearing lots of things from past years which means same photos as last year but I’m glad they are in active use in my wardrobe as this means the time and effort spent making them has been actually worth it...not much fast fashion around here.

memademay 2017 www.studiocostura.com

@cosmia

Me gusta mucho también que durante este mes hay tanta inspiración al ver lo que lleva y hace todo el mundo. Ahora tengo una larga cola de cosas que quiero coser después de ver tantas prendas bonitas! Por eso quería recopilar aquí también una lista de personas que más me han inspirado para que echéis un vistazo a sus fotos que molan mucho.

Para empezar, podría robar todo el armario de Marta, tiene prendas tan elegantes!


I’ve really enjoyed all the inspiration seeing what other people have been wearing. Now I have a long list of garments I want to sew after seeing all the beautiful makes! That’s why I wanted to make a list of sewers who have been inspiring me the most so you can check out their work too.

To start with, I could totally steal Martas closet, she has so elegant garments!

memademay 2017 www.studiocostura.com

@adaspragg

Mi otro favorito es Sophie, su estilo es perfecto y sus fotos super bonitas.

My other favourite is Sophie, her style is perfect and her photos are stunning.

memademay 2017 www.studiocostura.com

@maider_masustak @jess_fildespagescouture @alinadesignco @missmake

Maider tiene un armario de lo más variado con prendas muy chulas, el estilo vintage de Jess mola mucho, Alina combina básicos de una manera muy original y los estampados de Devon son expectaculares.

Maiders closet has so many cool varieties in her closet, Jess'es vintage style is awesome, Alina combines the basics in a really original way and Devon has so many beautiful prints.

memademay 2017 www.studiocostura.com

@tailormadeshop @masdeloquemegusta @_ym.sews_ @jens.ks

Ying ha enseñado tanta lencería bonita, me molan mucho las prendas de Auxi (que también ha sido la persona con quien pude compartir en la vida real la experiencia, ya que viene a mis clases!), _ym.sews_ tiene vestidos de punto super bonitos y Jens tiene un estilo que me gusta mucho.

Ying has been showing some real beautiful lingerie, I love Auxis garments (also she's been someone with who I have had a pleasure to share this experience in real life too as she comes to my classes!), _ym.sews_ has some amazing knit dresses and Jens has a great style I admire.

memademay 2017 www.studiocostura.com

@lieslgibson @sewdiyblog @thedappercrow @ladulsatina

Liesl sale tan bien sus fotos en las calles de Madrid con un montón de prendas muy bonitas, Sew DIY tiene unos conjuntos que molan mucho, Thedappercrow tiene las prendas con un toque muy original y Martina hace cosas in-cre-íbles!

Liesl loks so great on her photos on Madrids streets and she really has a closet full of nice clothes, Sew DIY showed us so many great outfits, Thedapperdrow has some really original takes on garments and Martinas makes are just increeeedibly beautiful!

Esto es todo! Había muuucho más por allí, basta con mirar el #mmmay17 por Instagram! Espero que os gusten los trabajos de estas costureras talentosas y quizás vais a descubrir a alguien nuevo por las redes <3

That's it! There was of course sooo much more, just check out the #mmmay17 over at Instagram! Hope you like the projects from these talented seamstresses and that maybe you'll discover someone new in the social media<3