

Edited on 7th of June 2022:
The Hanna bikini is now available as a separate pattern with lots of improvements and four styles of bikini bottoms. If you already own a Hanna bralette pattern you can of course follow this tutorial here but if you’d like to get more specific information about sewing a whole bikini set I’d suggest you to get the Hanna bikini pattern! It’s available in English and in Spanish.
Hola! Hoy os traigo un tutorial que tenía pensado desde hace tiempo ya y como el verano casi está aquí, qué mejor momento que ahora. Os voy a enseñar cómo hacer un bikini con el patrón de bralette Hanna! Es muy fácil y de hecho quizás para las personas que tienen un poco de miedo a empezar a coser lencería, este podría ser un buen punto de partida porque es más sencillo y los materiales son más fáciles de encontrar. Para empezar y para que os animéis os muestro un montón de modelos para la inspiración!
Hey! Today I'm bringing you a tutorial that I wanted to show you guys for a long time now and as the summer is almost here it's right about time now. I'll show you how to make a bikini with the Hanna bralette pattern! It's very easy and it's actually a good project for those of you who are a bit afraid to start sewing lingerie as it's easier o sew and the materiales are easier to find too. To start things off and to make you want to sew your own bikinis I'll show you some inspirational images!


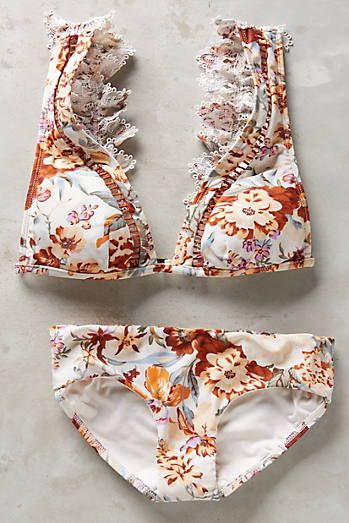
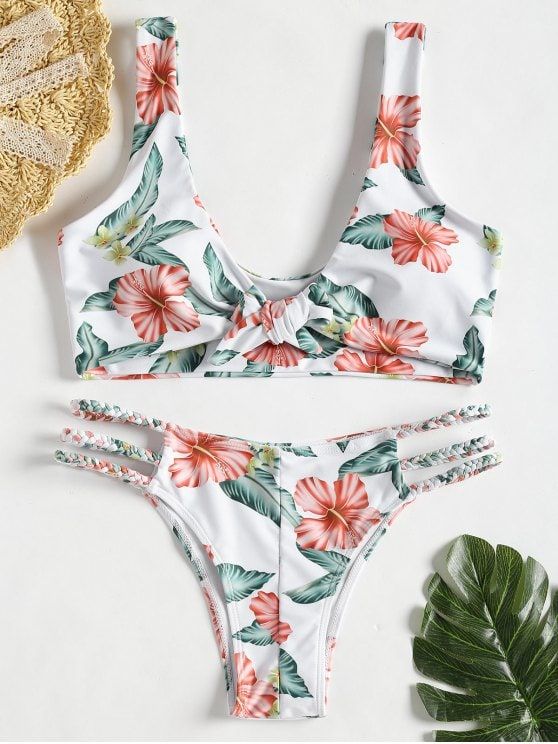
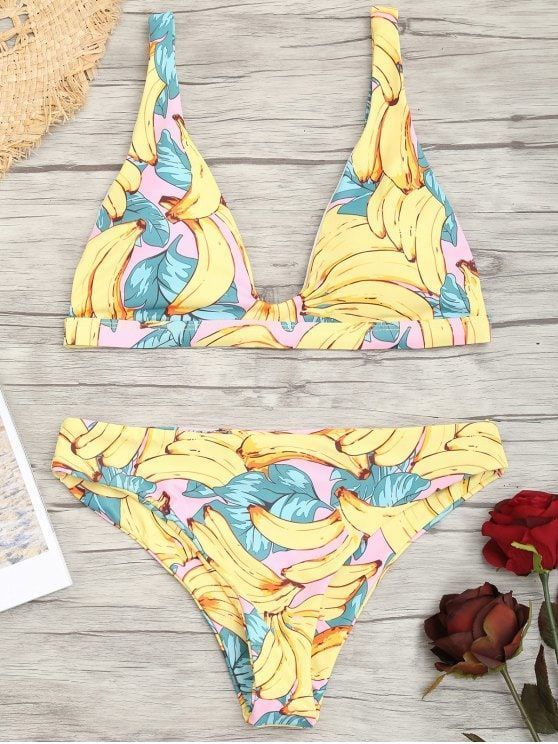
Todas las fotos son de mi carpeta de Pinterest donde iré subiendo más cosas cuando vea algo por el estilo así que podéis buscar allí más inspiración. Lazos, piezas redondas o cuadradas para unir las copas, volantes, tirantes cruzados...hay un montón de posibilidades y puedes hacer el bikini exactamente como a ti más te guste.
All the photos are from my Pinterest page and I'll be adding more there so you can follow along for more inspiration there. Bow ties, round or square details to join the cups, flounces, crossed straps...there are so many possibilities and you can make yourself the bikini exactly as you'd like to.
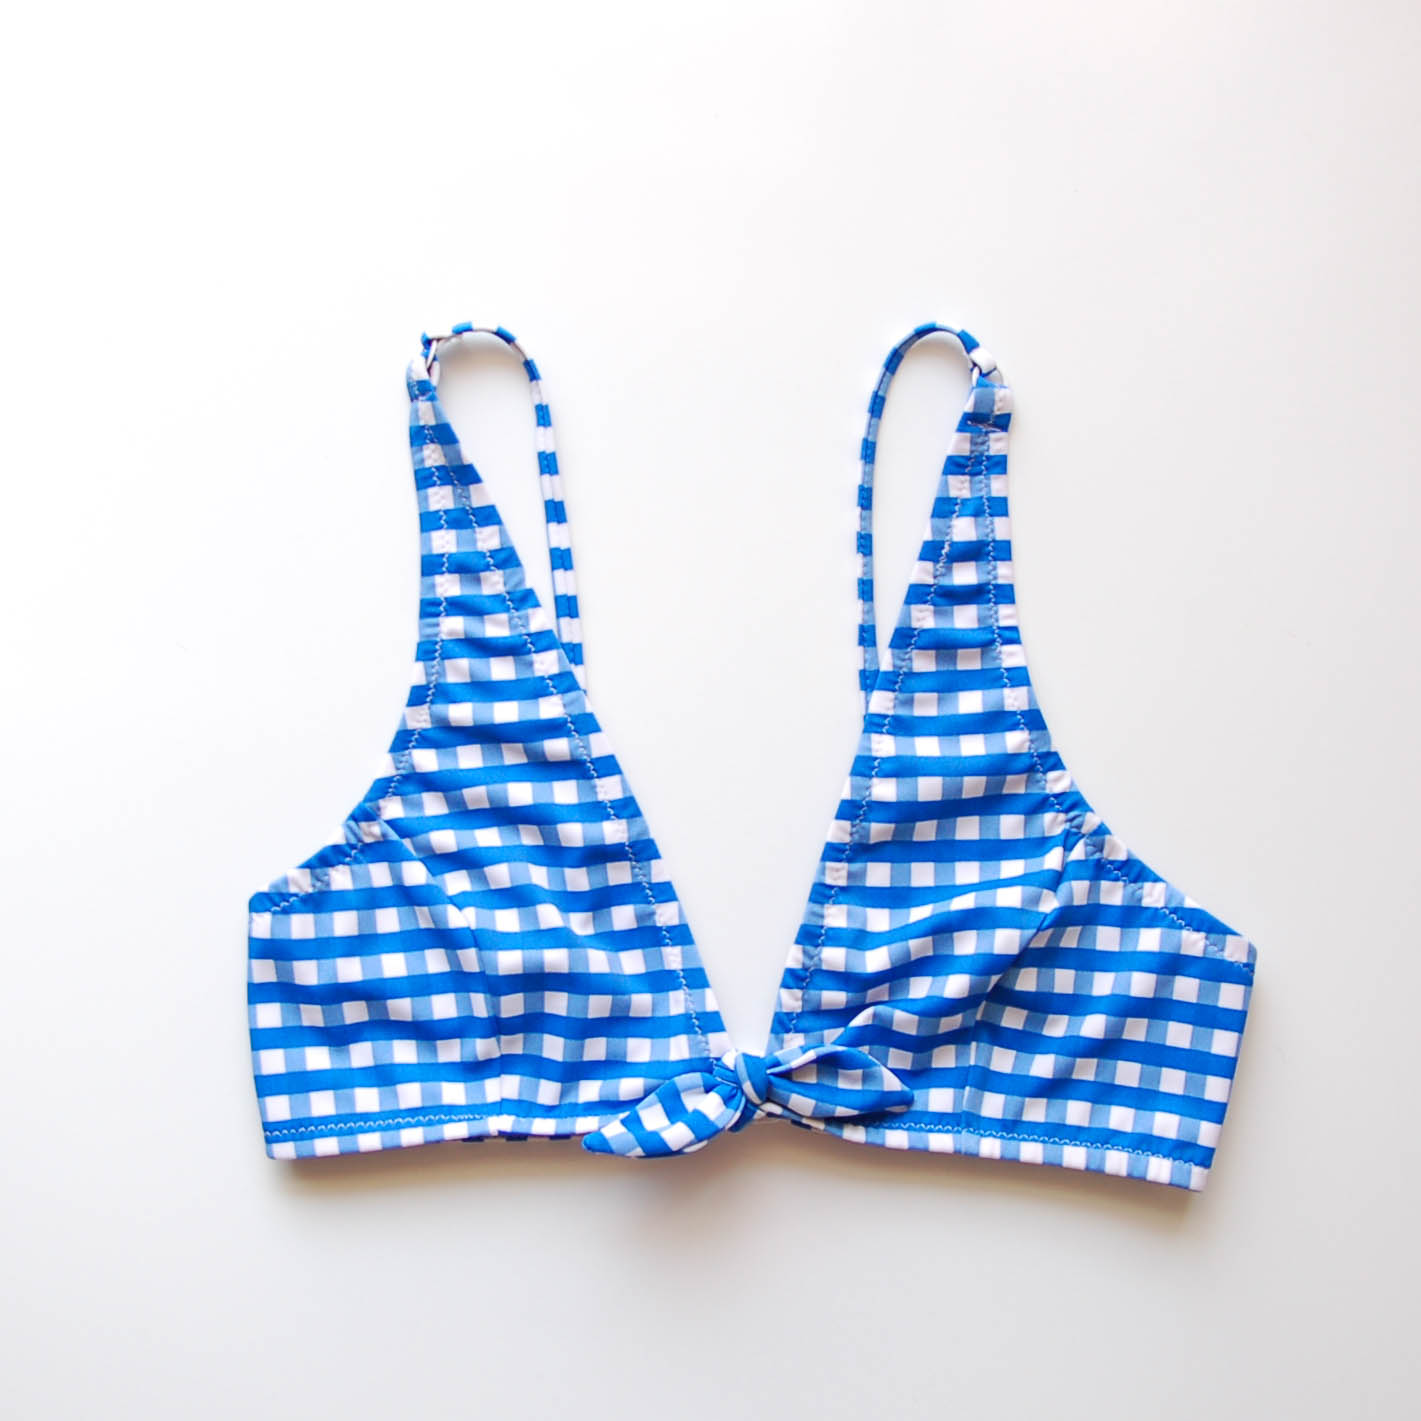


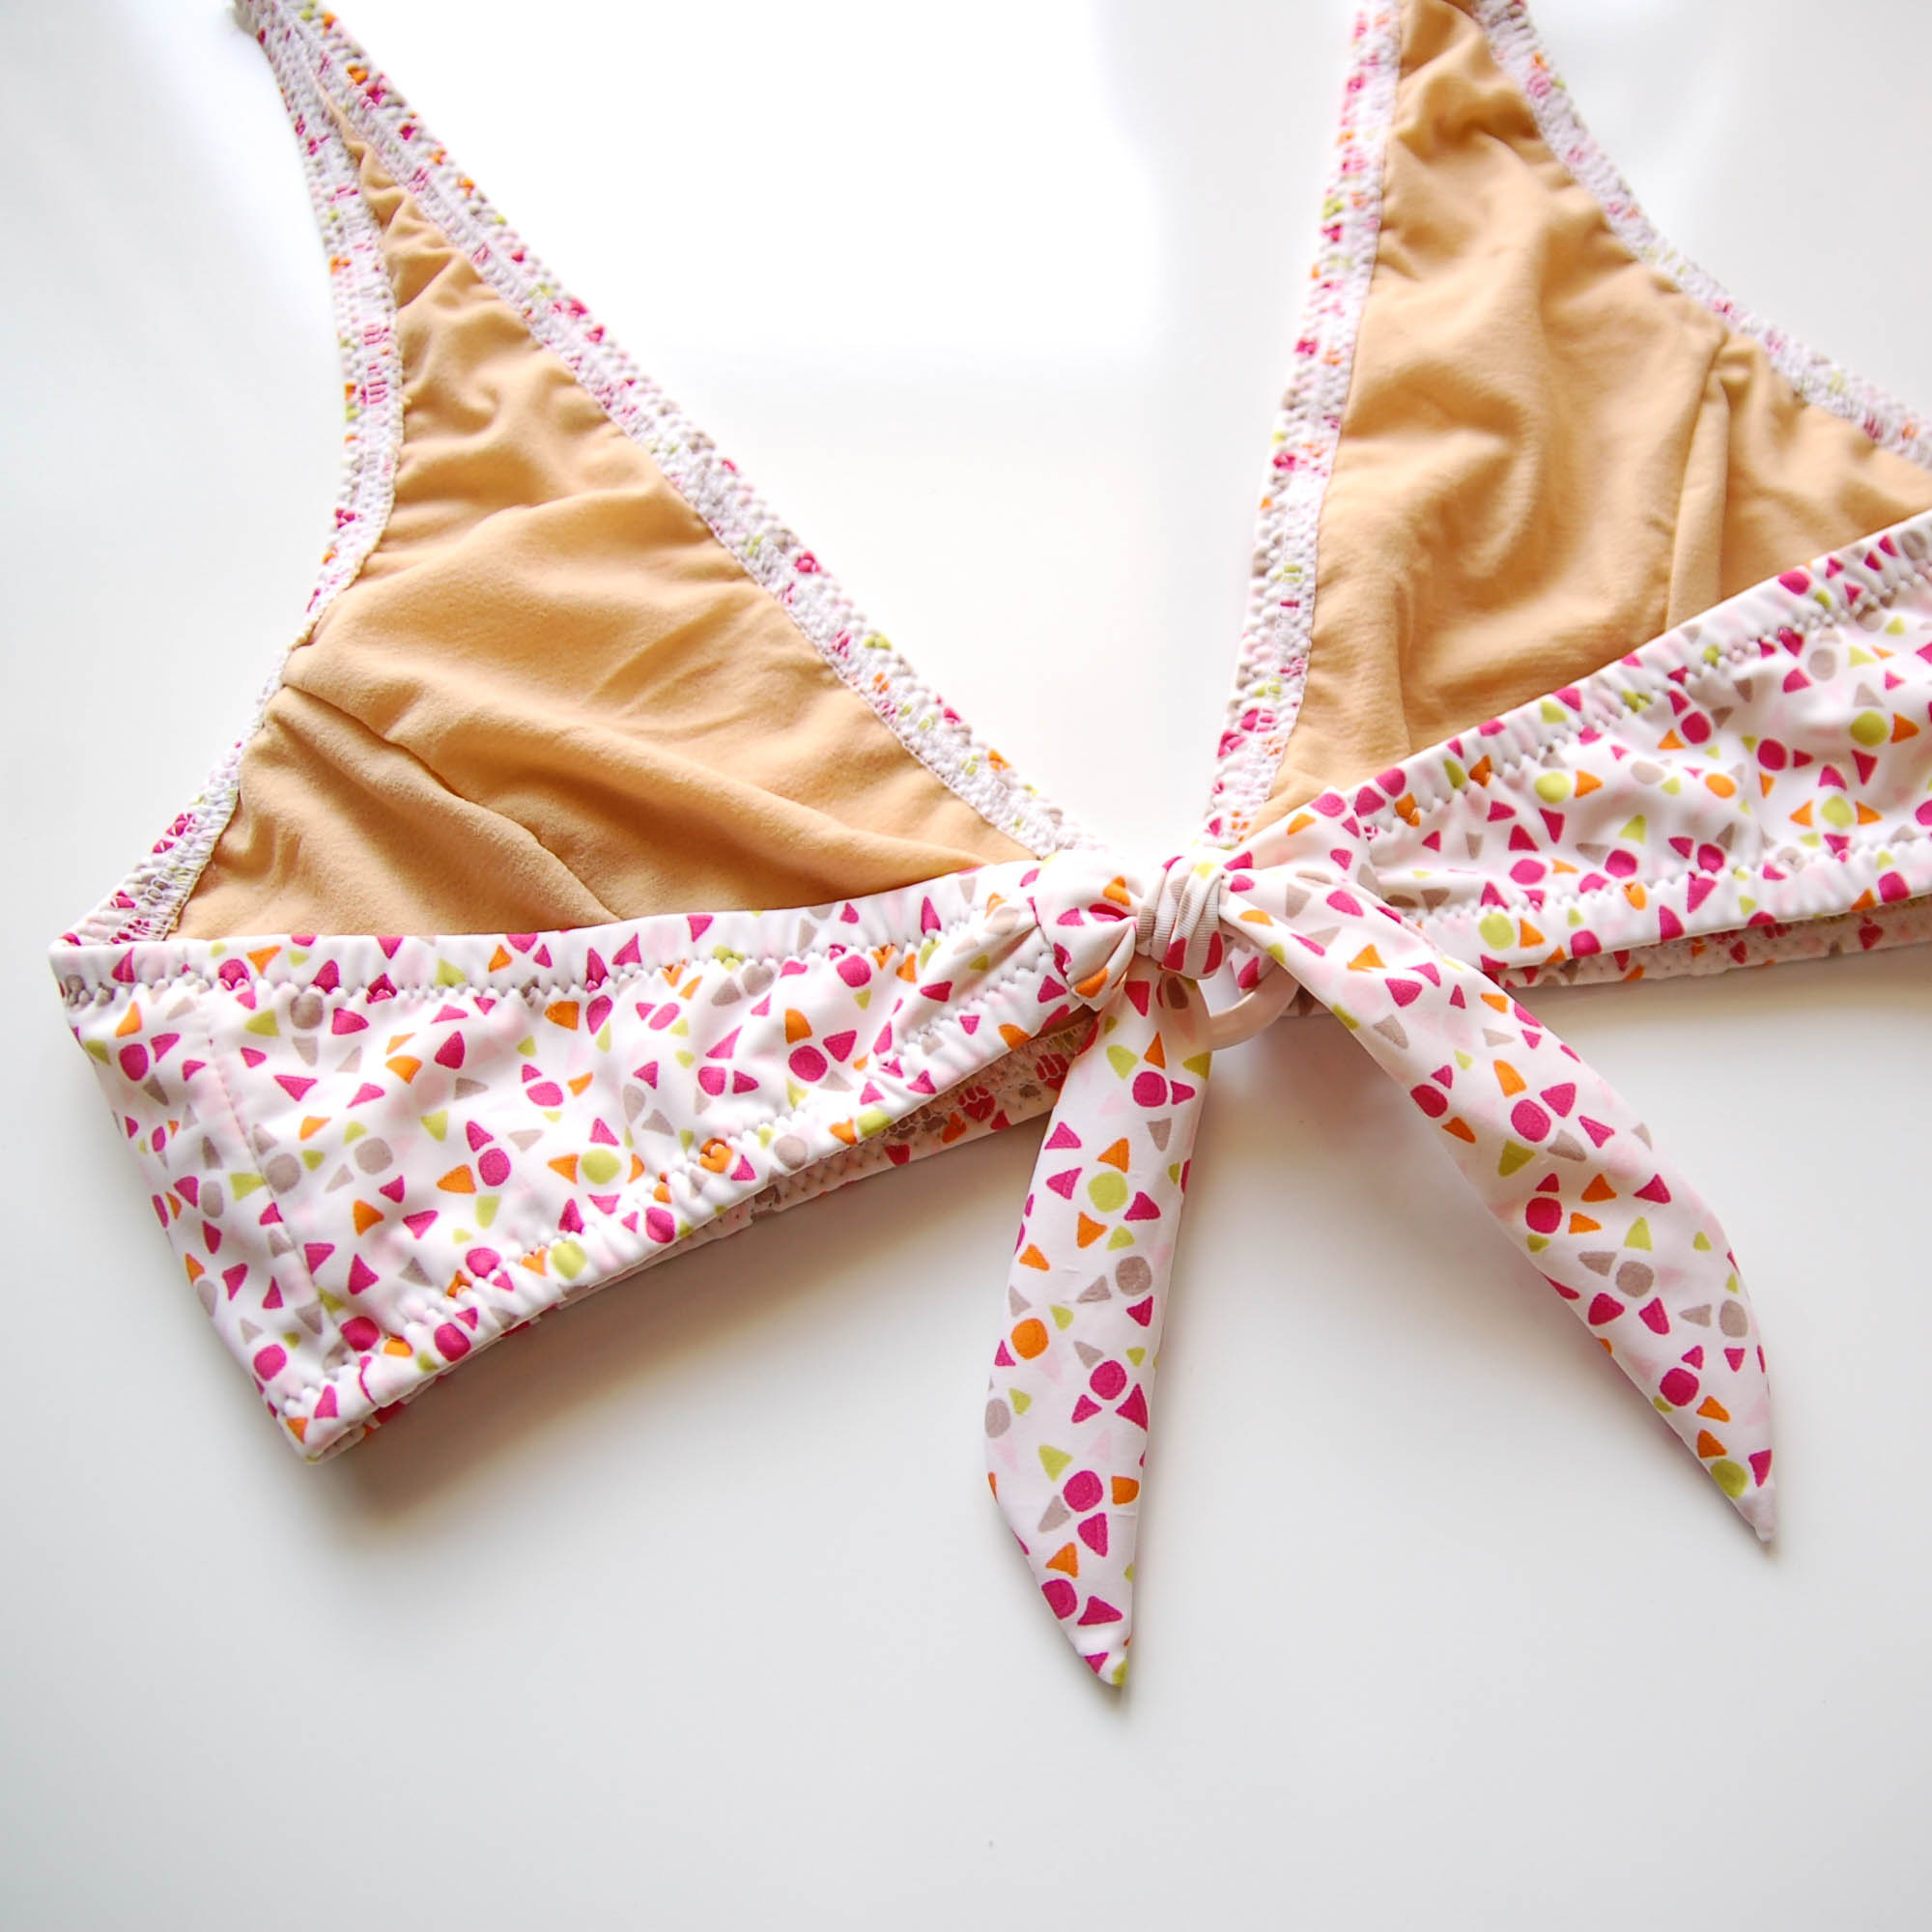
He dividido este tema en dos posts, así que hoy os hablo de materiales, de cómo modificar el patrón, el corte y cómo empezar a unir las piezas y mañana será ya sobre los detalles. Os muestro diferentes formas de coser el bikini con este patrón con dos ejemplos diferentes pero obviamente podéis elegir lo que más os gusta y cambiar cosas. El ejemplo azul tiene el centro delantero cerrado y encima un lazo, los tirantes igual que el bralette Hanna y el cierre de plástico. El ejemplo blanco y rosa tiene en el centro delantero una arandela y tanto la espalda como el cuello se cierran con un lazo.
I divided this topic into two posts, today I'll be talking about materiales, how to hack the pattern, cutting the pieces and joining them. Tomorrow I'll show you all the details. I'll show you the diferent ways to sew a bikini top with this pattern using two different variations but you can of course choose to mix and match the closures etc. The blue sample has a closed center front with a bow tie, straps like in the original Hanna bralette version and a plastic closure. The white and pink sample has a ring detail in the center front and both back and neckline are closed with a bow tie.

Para coser el bikini en el formato más básico lo que se necesita es tela de bañador/lycra. En las tiendas hay variedades y podéis encontrar cosas interesantes, las muestras las he hecho con unos retales que tenía ya en casa. Justo al hacer el tutorial conocí también una tienda de Madrid que tiene unas lycras muy bonitas, se llama Donnatela. Ellos me ofrecieron una colaboración, así que os enseñaré en breve también unos modelos con sus telas que tienen unos estampados muy bonitos que no se ven en muchos sitios.
Luego necesitas forro de bañador, es un punto que suele venir en color crudo y en negro (lo que he usado es de Ribes y Casals). Y para los elásticos se usa el elástico de bañador o también llamado goma virgen/goma gaucho. Es un elástico resistente al cloro y al sol, especial para baño. Este lo compré en Pontejos y es de 8 mm de ancho, también lo tienen a muy buen precio en Seoane Textil. Si quieres usar cierres o detalles como arandelas o formas cuadradas los puedes normalmente encontrar en mercerías (de nuevo las que he usado son de Pontejos).
To sew the bikini you'll need a bikini/lycra fabric. There are many varieties in the fabric shops and you can find interesting stuff. I made the samples with some fabric I had at home but just when making the tutorial I was contacted by a fabric shop called Donnatela so I'll be showing you also samples I made with their fabrics that have very nice prints. Then you'll need a swimwear lining, it 's a knit fabric that usually comes in nude or black. For the elastic you need swimwear elastic that's resitant to chlorine and sun. If you'd like to use closures or other details you'll need them as well.

Las modificaciones del patrón son muy fáciles. Yo he usado un elástico de 8 mm de ancho así que en general no tengo que cambiar los márgenes de costura porque luego veis que al coser dejo un mini margen de 2 mm en el borde así que con este ancho de elástico y este patrón que tiene 1 cm para los márgenes de elástico todo va bien. Si tu elástico es más ancho/estrecho, tienes que modificar según eso todos los márgenes donde va a ir elástico.
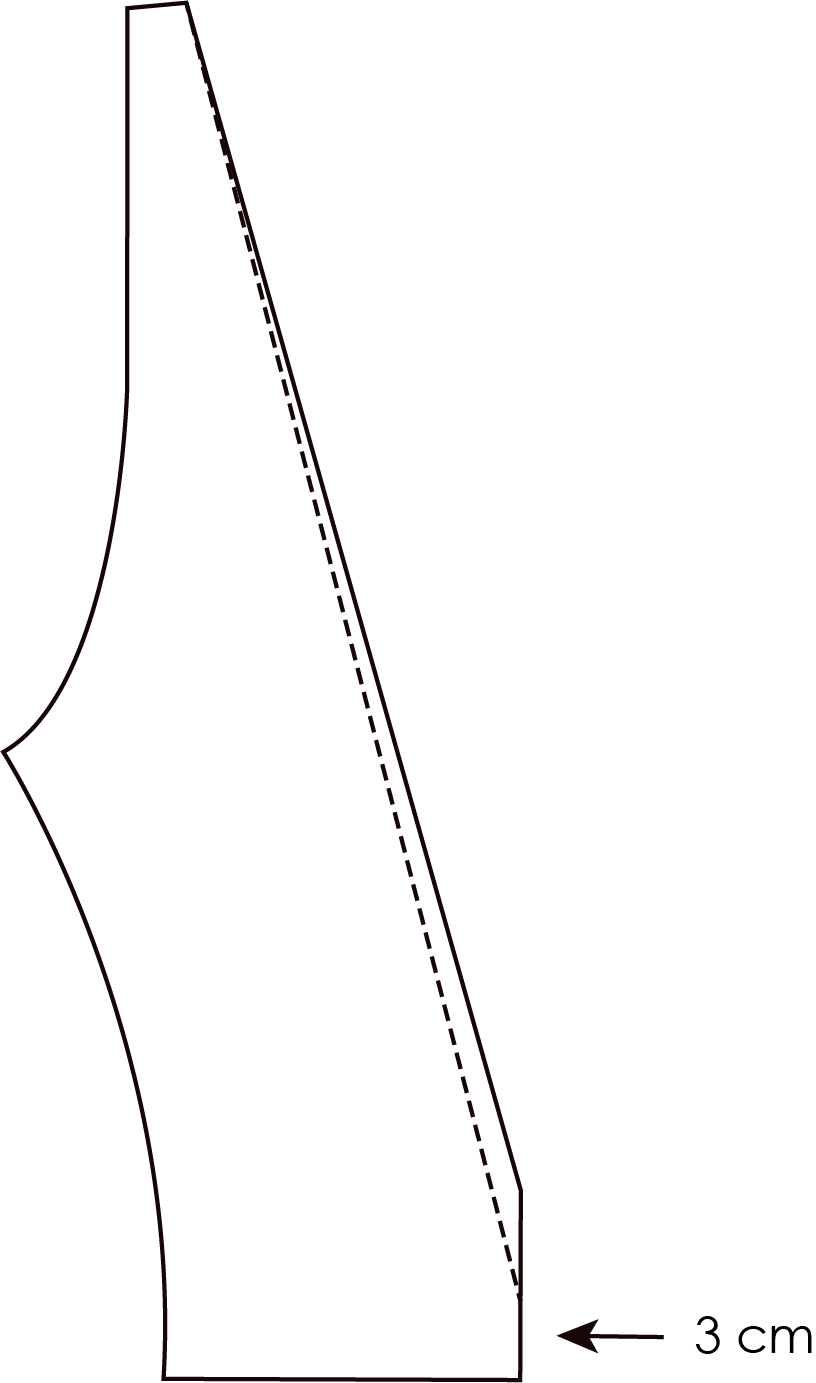
Yo he preferido escotar un poco el delantero y he movido el punto de centro delantero más abajo (en mi caso dejé 3 cm desde el bajo). Este paso es opcional, si te gusta cómo queda el patrón original o incluso quieres subir el escote lo puedes hacer perfectamente. Simplemente marca el nuevo punto de altura de escote y vuelve a dibujar la línea recta.
Una vez que tienes tu patrón tal como lo quieres hay que añadir a la línea de escote 1 cm de margen de costura porque en el patrón original no lo lleva porque va con encaje.
The modifications on the pattern pieces are very easy. I have used a 8 mm wide elastic so in general I don't need to change my seam allowances as you'll see once I sew on the elastic I'll leave a mini seam allowance of 2 mm. This means that I'm using exactly these 10 mm that the Hanna pattern includes already. If your elastic is wider/narrower you'll need to alter the seam allowances according to the width of your elastic.
I wanted to make the neckline a bit lower so I moved the center front point lower (in my case I left 3 cm from the hemline). This step is optional, if you like how the original pattern fits you don't need to move this point and if you'd like to get more coverage you can even raise this point. Just mark where you'd like your neckline to end and draw a new line ending in the original spot where the strap ends.
Once you'll have the pattern as you like add a 1 cm seam allowance to the neckline side as in the original version there's no seam allowance because there's the lace scalloped edge.

En la versión de blanco y rosa he usado una arandela para el detalle del centro delantero, si quieres hacer eso tienes que dar un margen extra en esta zona. Usando el patrón que has creado con añadir el margen de costura al escote en el paso anterior tienes que dar ahora un margen para poder doblar la tela a través de la arandela. El ancho de ese margen es aprox 2 cm para que puedas doblar y el largo depende de tamaño de arandela (o pieza cuadrada) que vayas a usar. Es una forma como ves en el dibujo.
In the white and pink sample I've used a ring in the center front so if you'd like to do the same you need to add some more seam allowance there too. Using the pattern you just created in the last step with the new seam allowance add a piece of "extension" to this pattern aprox 2 cm wide in order to be able to fold it down once you sew the ring on. The length of the extension depends on the diameter of your ring (or a square piece if you are using one). It should be something like on the drawing.

Si eliges cerrar tu bikini con lazos no hace falta cambiar nada en la pieza de la banda. Si eliges poner un cierre tienes que hacer más largo al patrón para que puedas doblar la banda a través del cierre para poder coserlo. También mide el ancho de tu cierre y ajusta el final de la banda que tenga el ancho: 2 cm para el elástico + el ancho del cierre.
If you choose to close your bikini with a bow tie you don't need to alter the band piece. If you want to use a closure you need to make the band piece aprox 2 cm longer as you'll need that seam allowance in order to fold the piece under to instert the closure. Also measure the length of your closure and make the band ending the same length: it should be the length of your closer + 2 cm for the elastics.

Corta las piezas de lycra y del forro, dos veces cada pieza de patrón en las dos telas. Vas a a necesitar las piezas A, B y C, el forro D no hace falta.
Cut the pieces from lycra and form the lining, two pieces of each pattern piece from both fabrics. You'll need the pieces A, B and C, the lining piece D is not neeed.
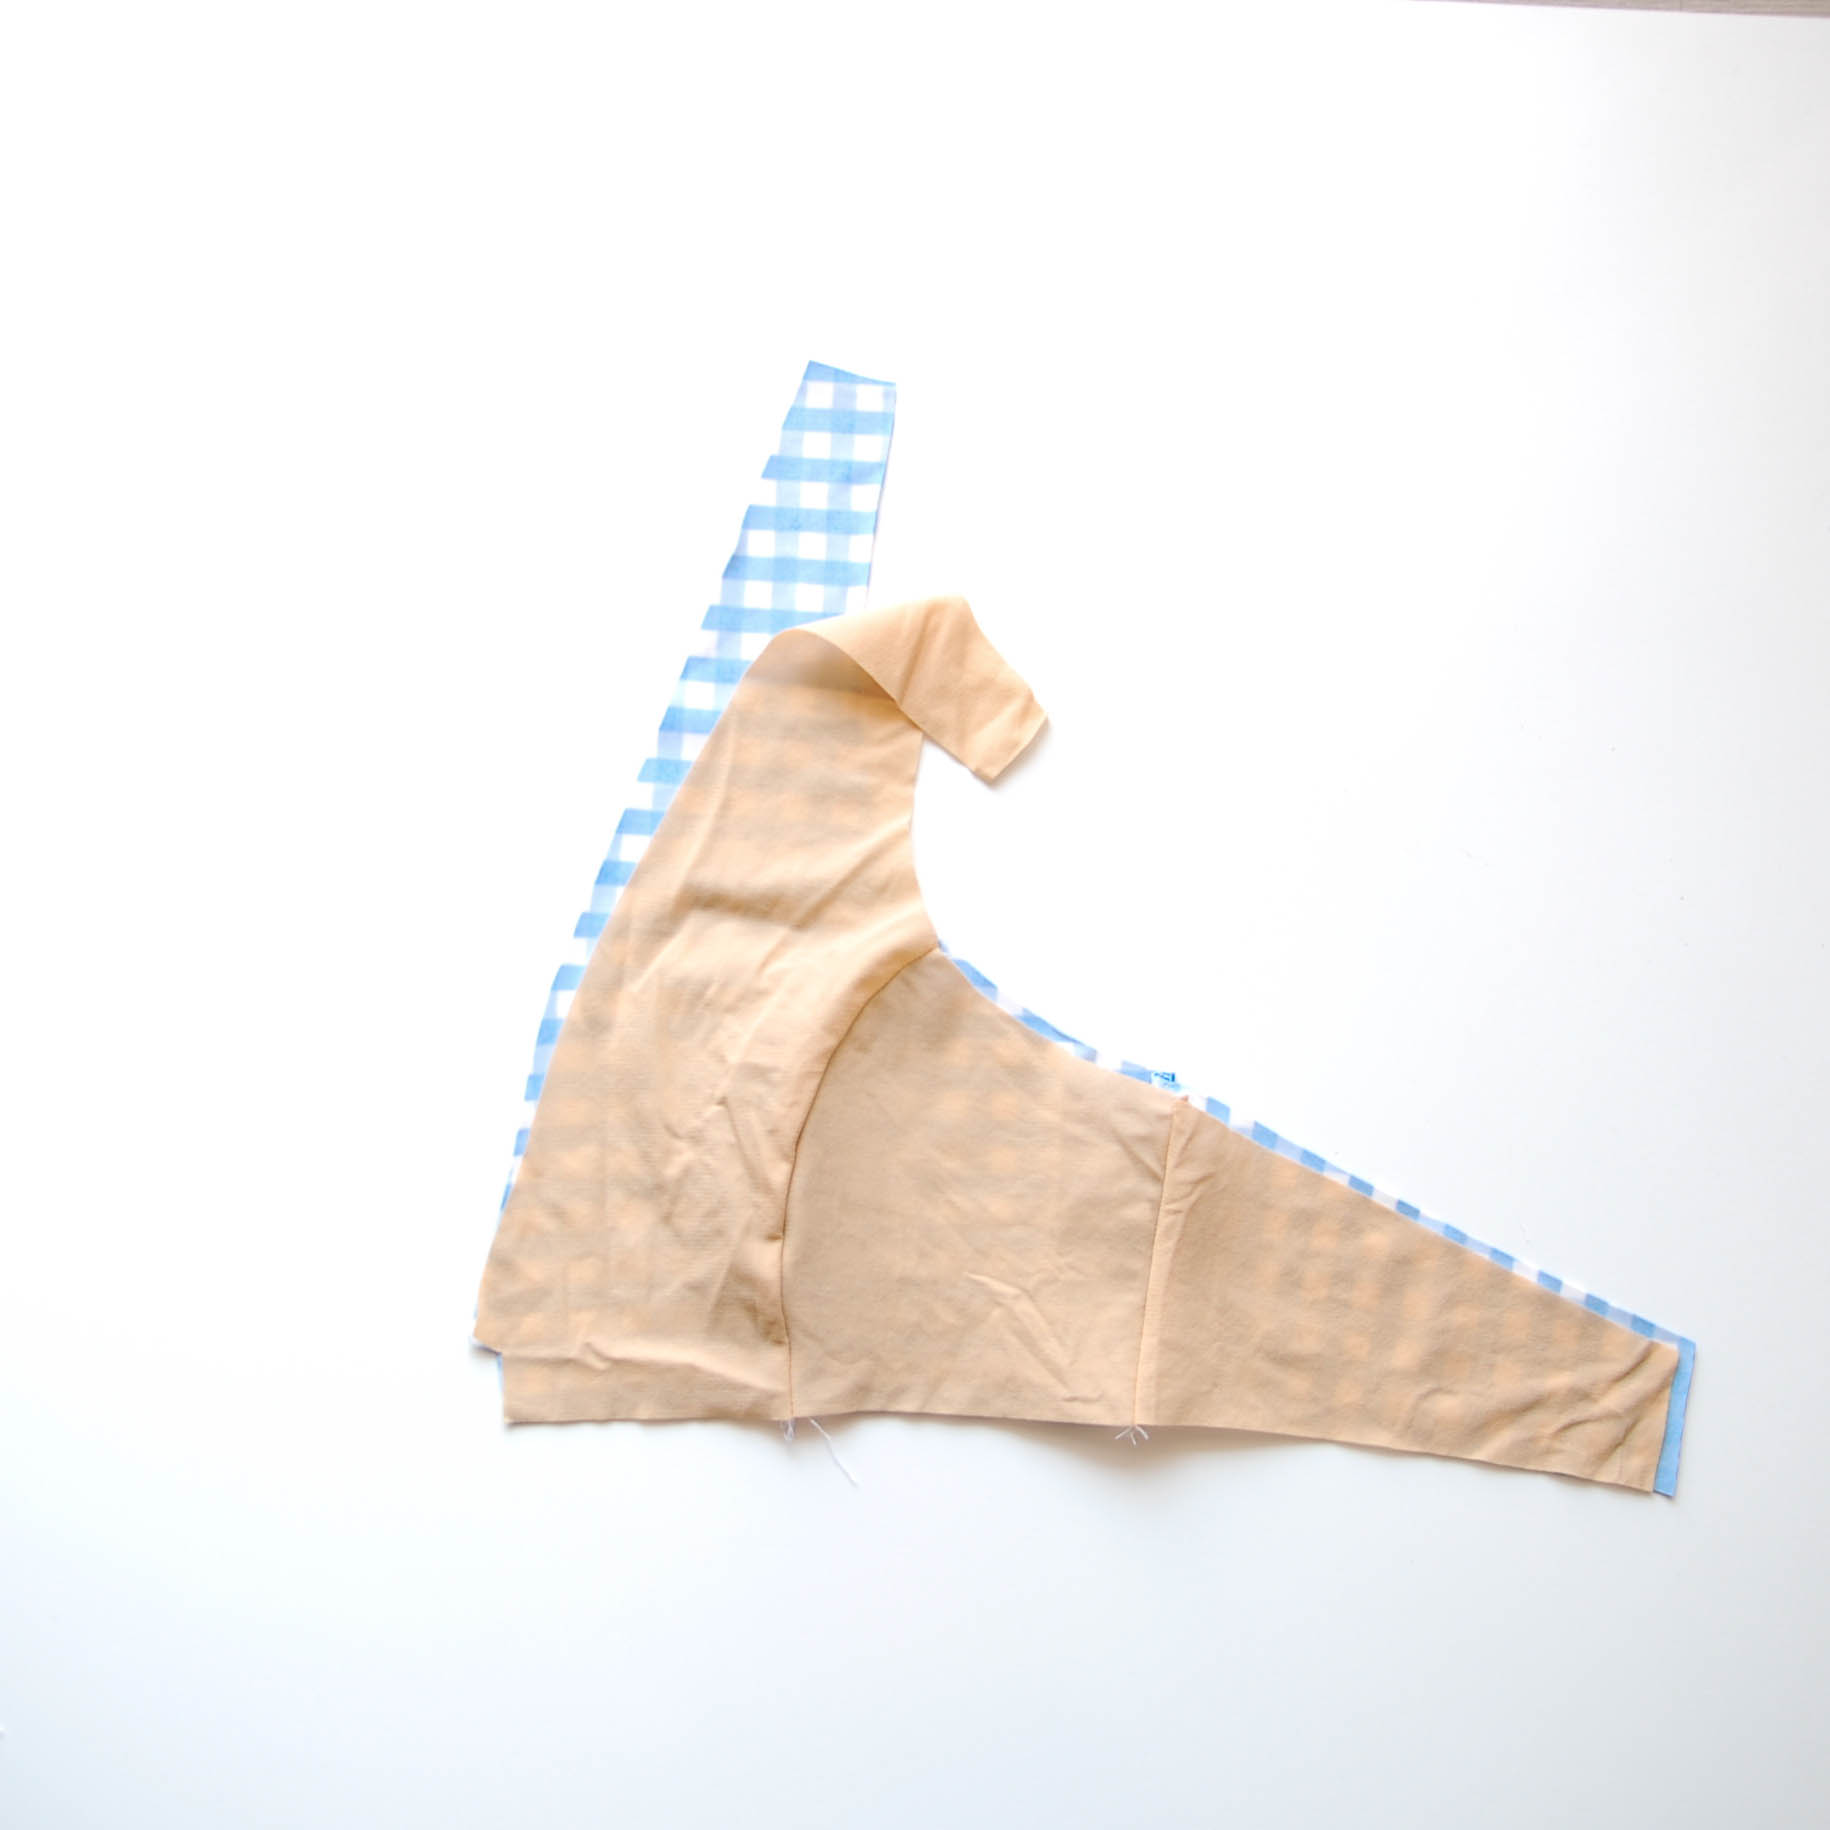
Une las piezas de lycra A, B y C derecho con derecho en un lado y en el otro lado independientemente (digamos el lado derecho de bikini y el lado izquierdo de bikini) con la remalladora o en la máquina con un pequeño zig-zag (2 de ancho, 2 de largo). Haz lo mismo con las piezas de forro.
Ya está para hoy. Mañana ponemos los elásticos, cierres, lazos etc. Espero que las fotos de inspiración os han dado ideas y que probáis a coser bikinis, es muy fácil!
Sew the lycra pieces A, B and C together right sides facing on both sides (one side will be the right side of the bikini and the other one will be the left side) using an overlocker or a small zig-zag stitch (2 width, 2 length). Do the same with the lining pieces.
That's it for today. Tomorrow we'll sew on the elastics, closures, bows etc. I hope that the inspirational images made you want to sew your own bikinis too, it really is very easy!
