

Editado en abril 2025: este patrón está ahora publicado como Tote Bag debajo de la marca Laola Patterns, puedes comprar el patrón en español aquí.
-
Hola! Como prometido hace tiempo, quería compartir diferentes versiones de Daily Tote para que veáis las posibilidades que tiene este patrón. Hoy os traigo un tutorial muy fácil para dar un toque diferente a un bolso simple: doble bolsillo en el exterior. Mi opinión es que los bolsillos nunca sobran así que esta versión con dos bolsillos extra me parece muy práctico. Solo hay que hacer un par de cambios al patrón y ya está!
Edited in April 2025: this pattern is now published as the Tote Bag under Laola Patterns, you can buy the English version of it here.
-
Hey! As I promised some time ago I wanted to share some different Daily Tote versions so you can see the possibilities of this pattern. Today I’m bringing you a simple tutorial about how to make this style a bit differently: adding a double sided pocket for the exterior. I think that you can never have too many pockets on a bag so this version is a very practical one. You only need to hack the pattern a bit and that’s it!

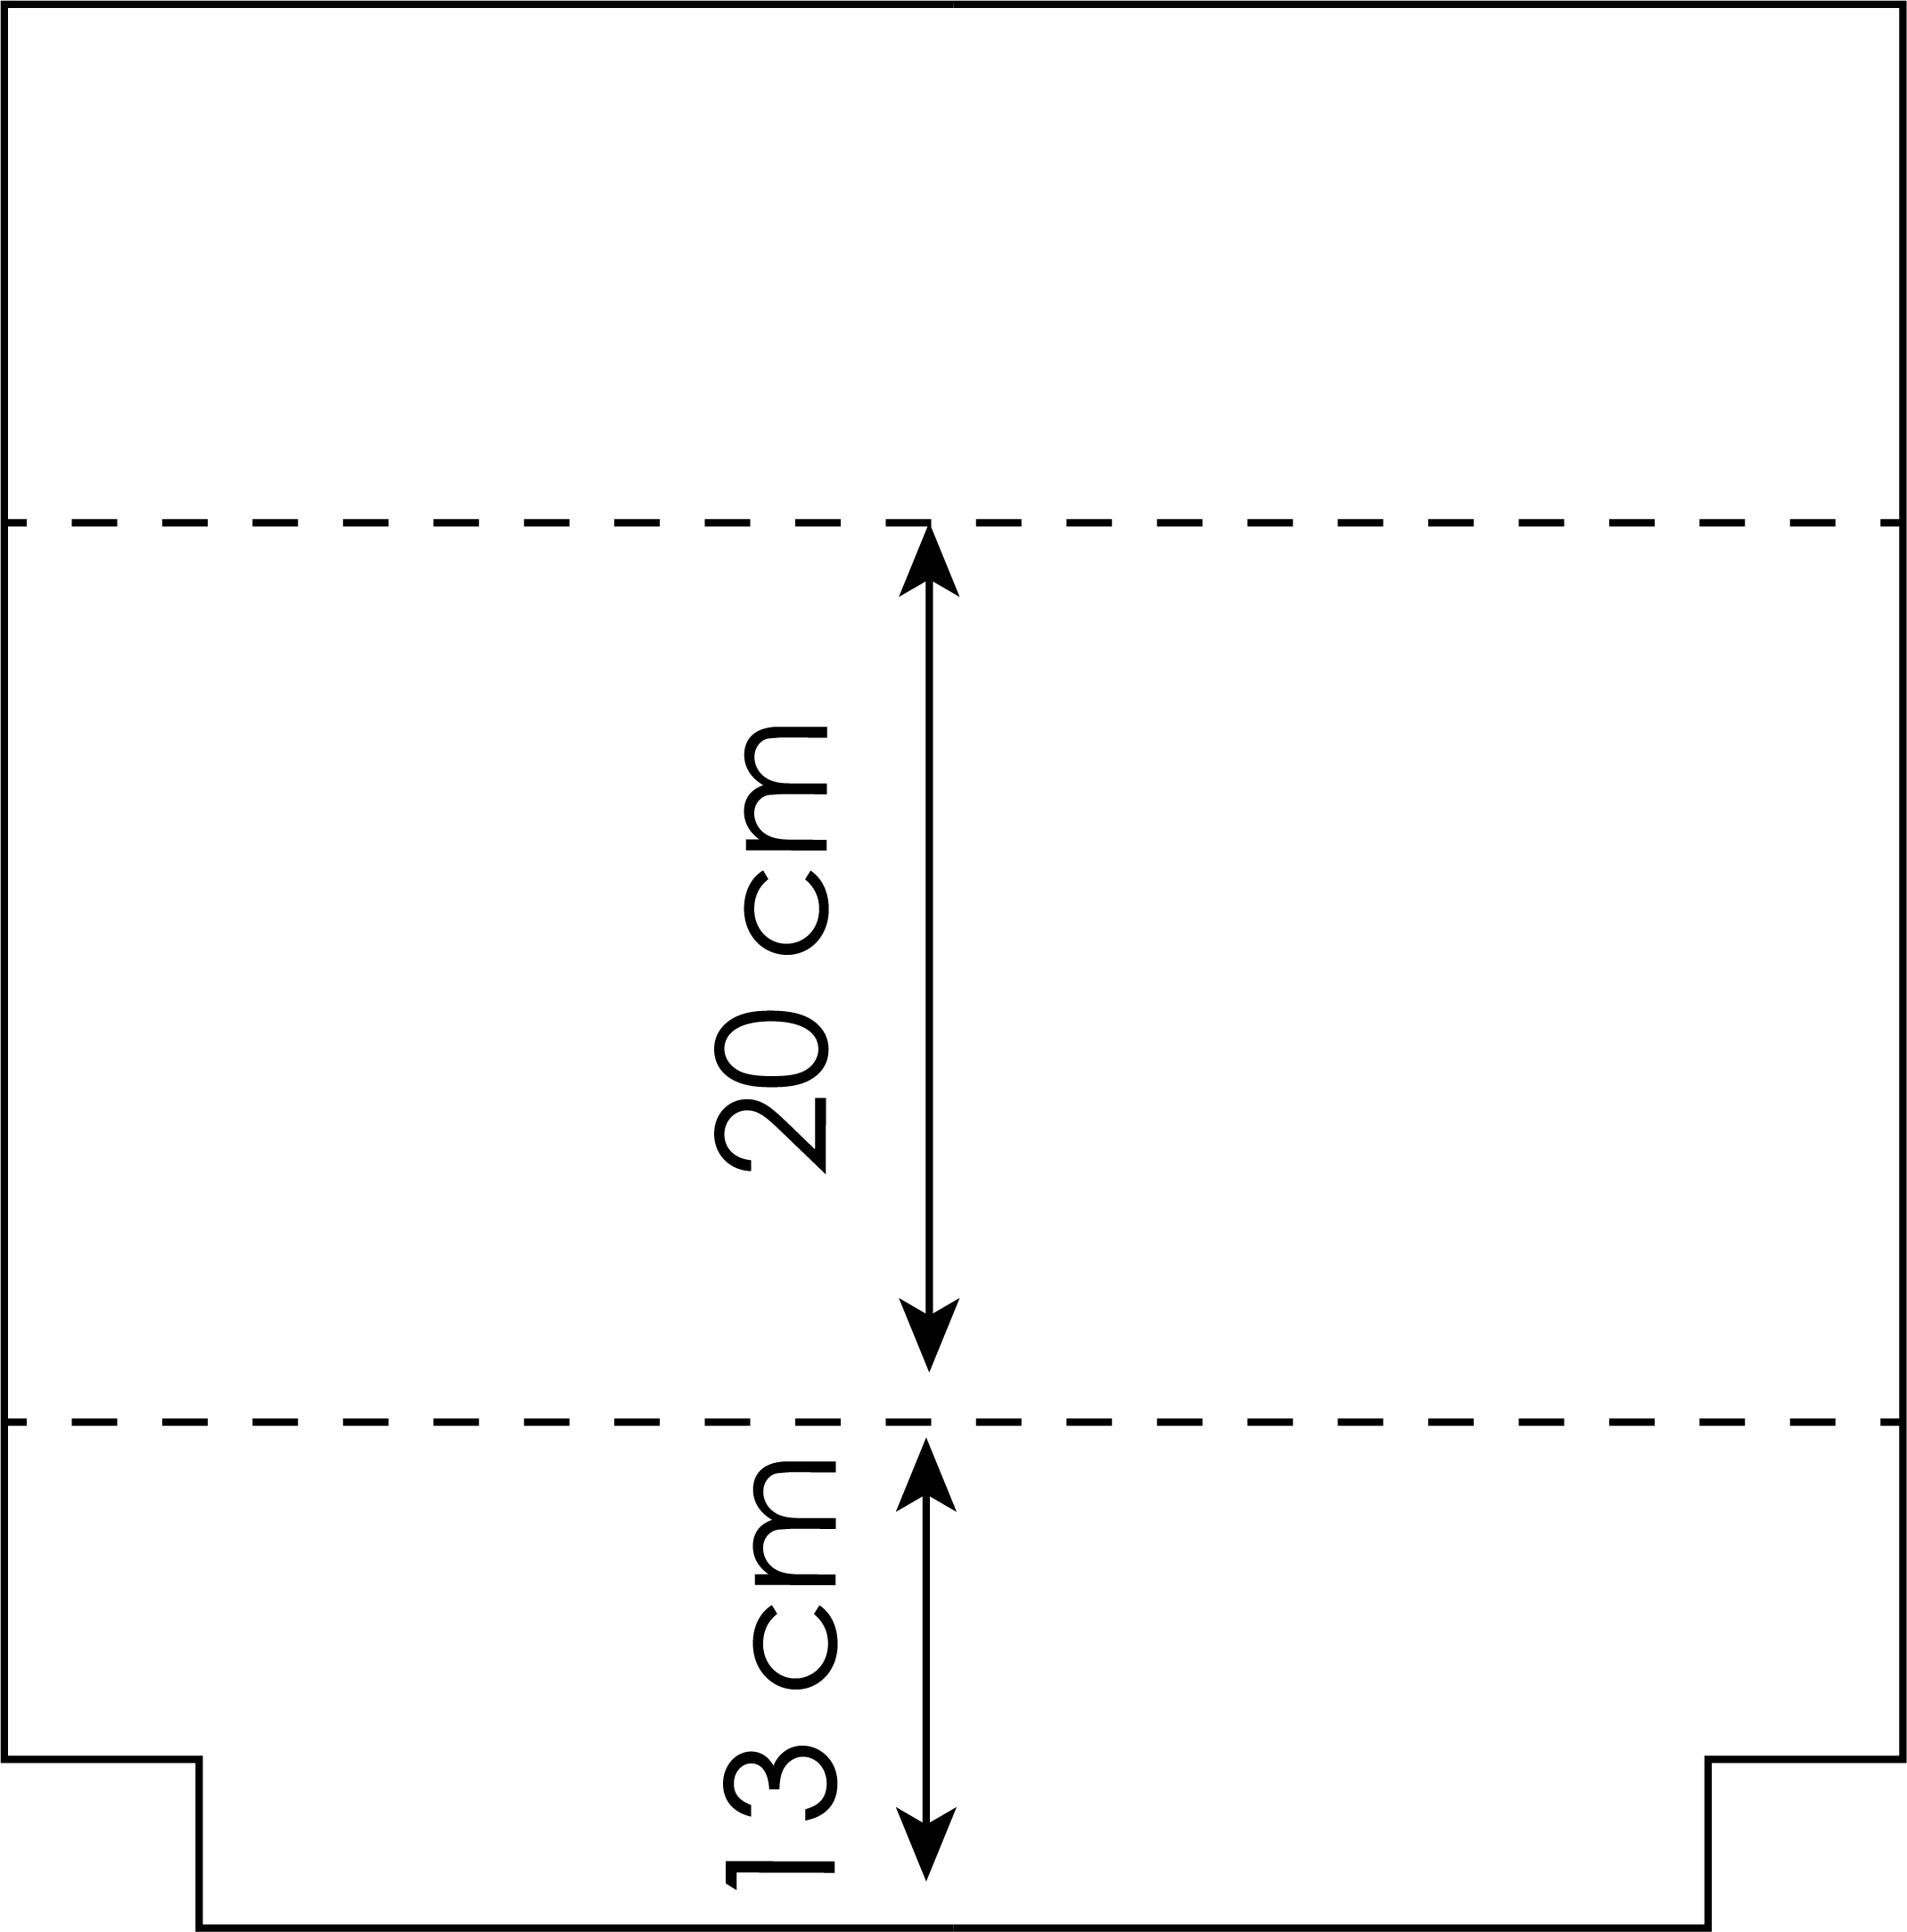
Como siempre puedes hacer los bolsillos a la medida que más te guste, aquí os he indicado las medidas que he usado para mi bolso. Para poder coser el bolsillo exterior de esta manera el bolso tiene que tener una pieza extra en el fondo, esto hace que la pieza de bolsillo se engancha allí. Para esto tienes que dividir el patrón de cuerpo del bolso en partes: lo que quieras que mida el fondo, la parte de bolsillo y lo que sobra arriba.
As always you can make the pockets in a size you prefer, I’ve indicated here the measurements I’ve used for my sample. To be able to sew a pocket like this, the bag needs to have a separate bottom piece, this way the pocket is attatched to the bag. You need to divide the bag body pattern piece in parts: the base heigth, the pocket height and the rest.

Después tienes que añadir márgenes de costura donde hace falta. Para la pieza de fondo necesitas 1 cm en la parte de arriba para poder coserlo junto al bolsillo, el resto de los márgenes ya los tienes. La pieza de bolsillo necesita 1 cm tanto arriba como abajo (arriba para poder coser las dos piezas del bolsillo, el exterior y el interior, juntas y abajo para coserlo junto al fondo).
After that you need to add seam allownces where needed. For the base part you need to add 1 cm for the upper part to be able to join it with the pocket, the rest of the seam allowances stay the same. The pocket piece needs 1 cm seam allowance both on the upper and lower parts (on the upper part you will join two pocket pieces together and the lower part will be sewn together with the base).

Necesitas cortar dos piezas de bolsillo y dos piezas de fondo. En este bolso he puesto este bolsillo solo en un lado exterior, si quieres hacer el bolsillo en los dos lados necesitas cuatro piezas. El fondo lo he hecho con otra tela distinta pero puedes usar la misma tela si solo quieres usar por ejemplo el estampado. También tienes que cortar el resto de las piezas según la versión original del patrón (cuerpo, asas, piezas de cremallera etc).
You need to cut two pocket pieces and two base pieces. In this sample I only wanted to make the pocket on one side of the bag, if you want to make the pockets for both sides you need to cut four pocket pieces. I used a different fabric for the base but you can use the same print/solid you use for the rest too. You also need to cut all the original parts of the bag pattern pieces (body, straps, zipper pieces etc).
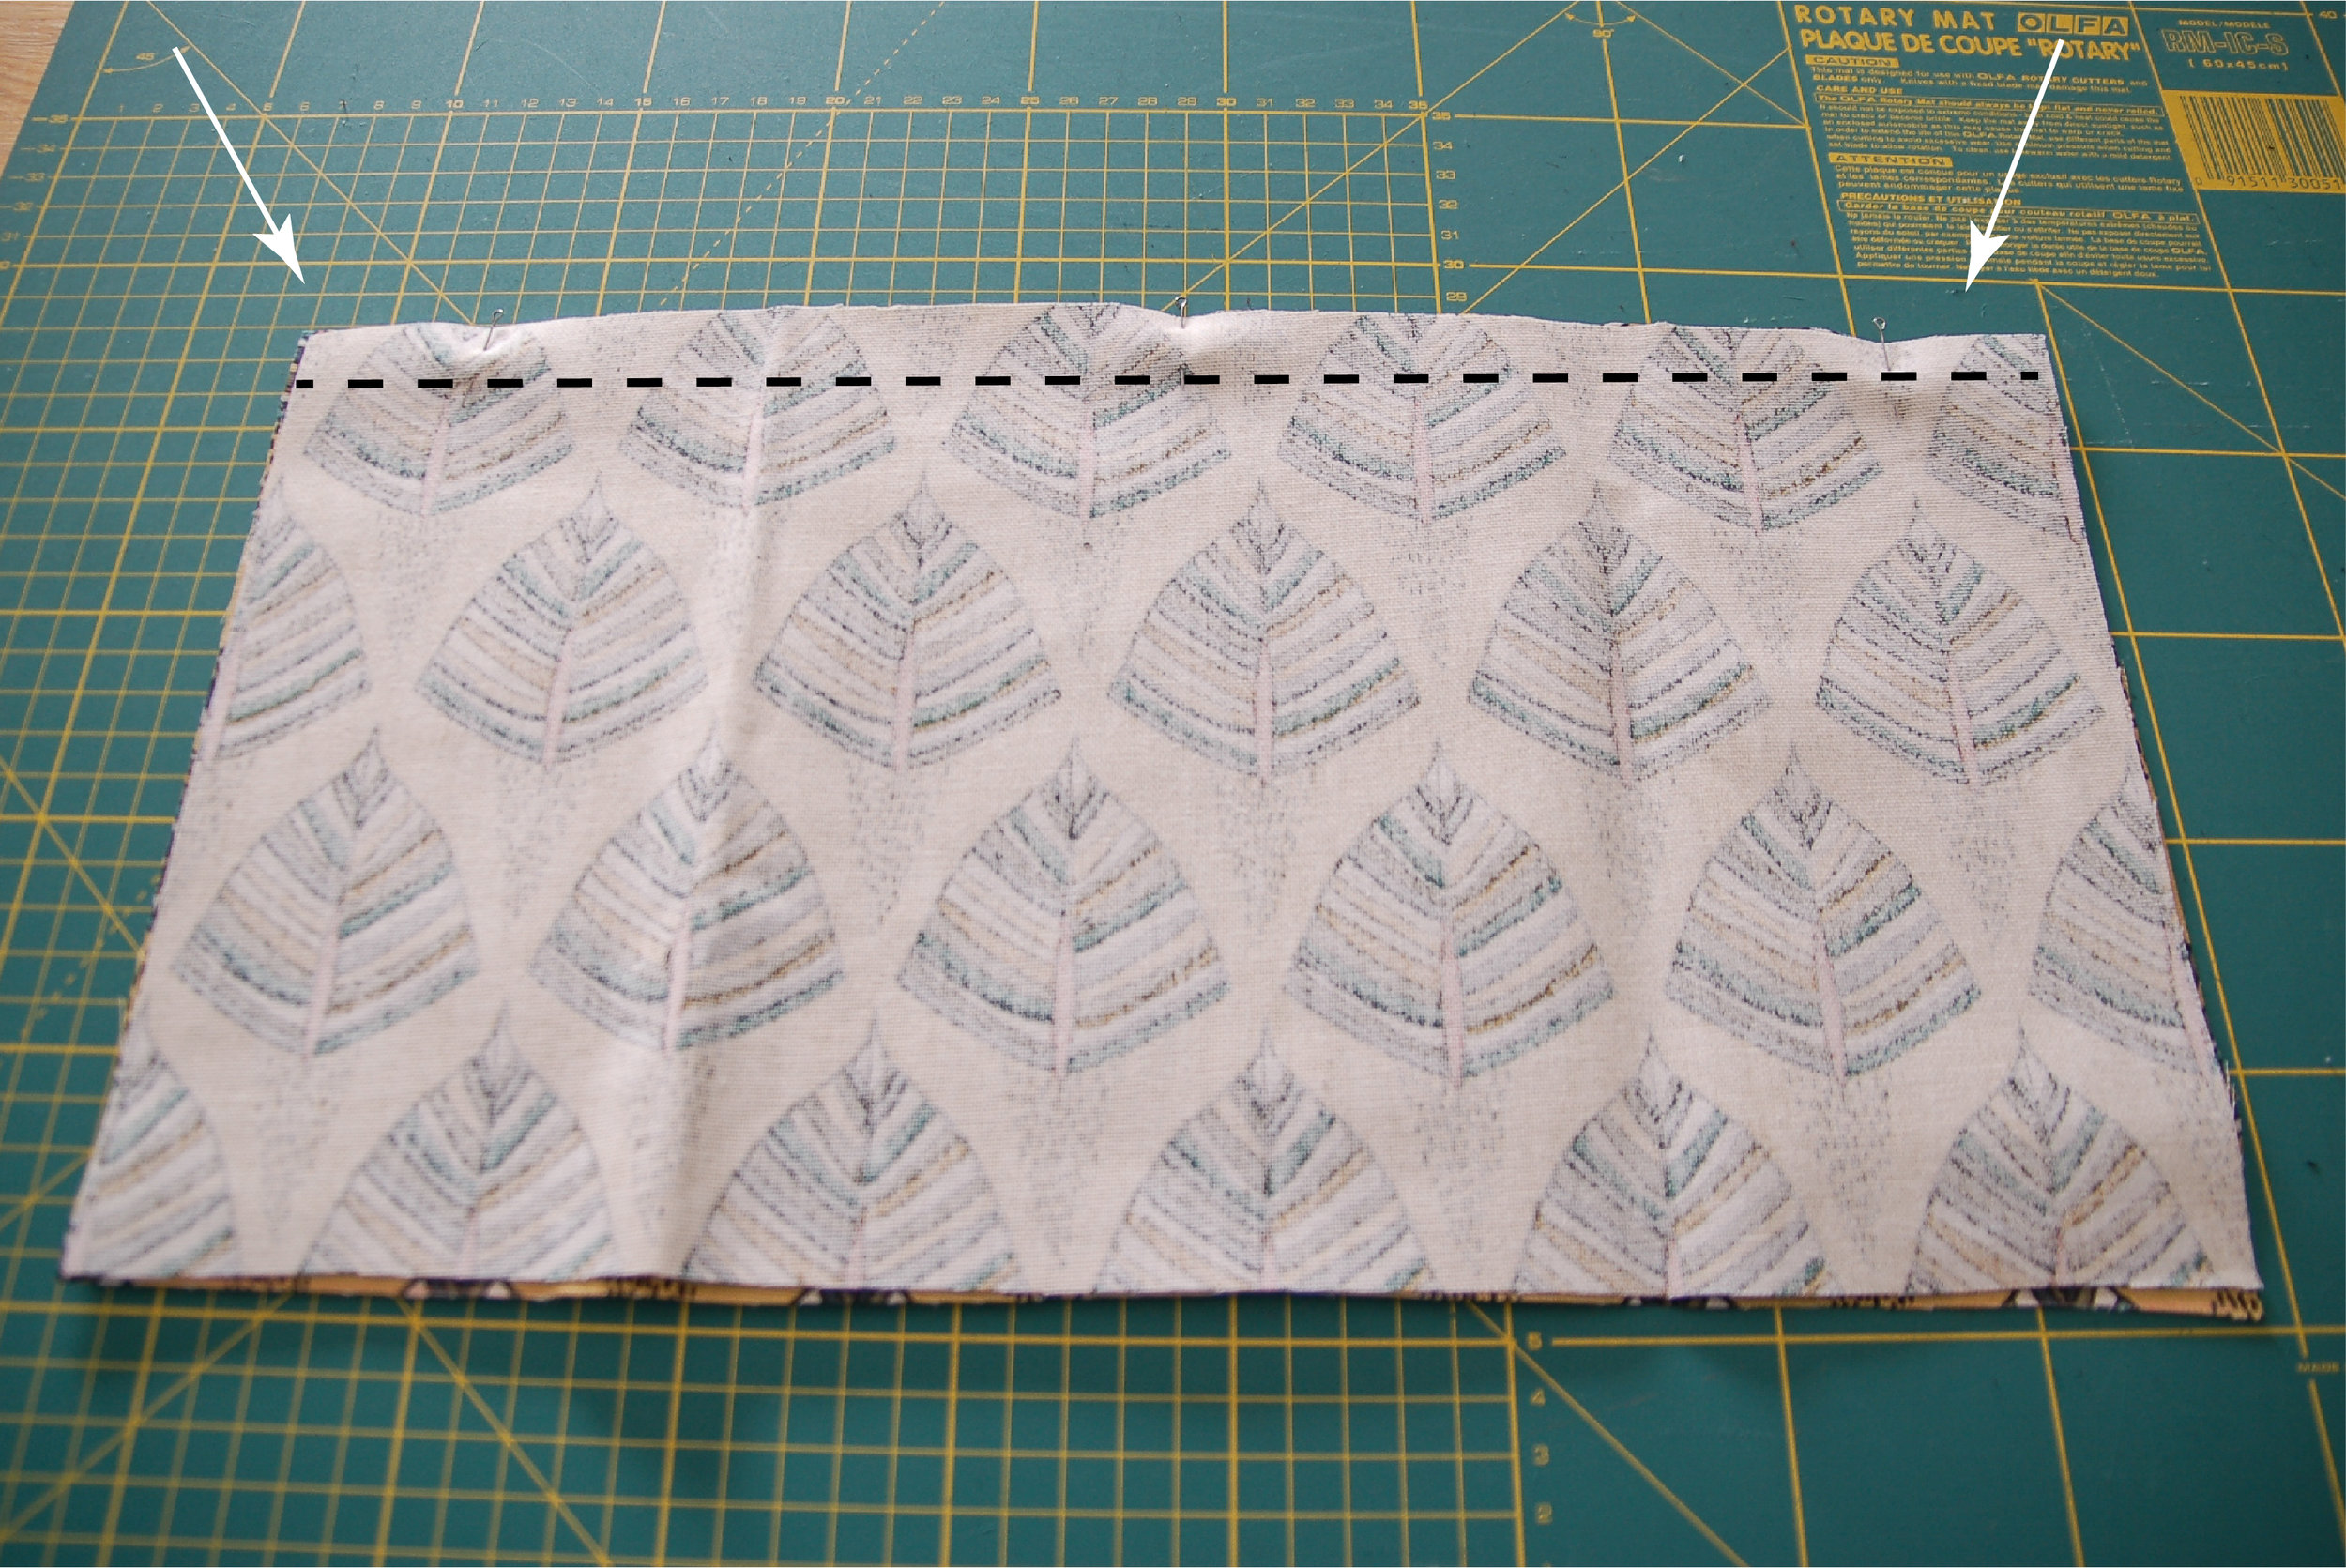
Para empezar coloca las piezas de bolsillo con los lados derechos juntos y cose en la parte de arriba a 1 cm. Da la vuelta para que el lado derecho se quede hacia fuera y plancha.
To begin with put the pocket pieces with right sides together and sew the upper part with 1 cm seam allowance. Turn the pices with right sides out and press the seam.

Haz un pespunte a 2 mm desde el borde en la parte superior donde has hecho la costura anterior, así la costura se queda bien asentado y plano.
Topstitch on the upper part where you just joined the two pieces, this way the seam will be nicely flat.

Coloca uno de los fondos junto a tu pieza de bolsillo, derecho con derecho. Cose la unión a 1 cm. Da la vuelta para que el lado derecho se quede hacia fuera y plancha.
Put one of the base pieces with right sides together with the pocket pieces. Sew them together with 1 cm seam allowance. Turn the work with right side out and press.

Ahora coloca primero tu pieza grande del cuerpo de bolso y allí encima coloca tu bolsillo + fondo, cuadra bien abajo para que las esquinas estén bien. Sujeta con alfileres. Haz un pespunte a 2 mm desde el borde en la parte superior del fondo donde has hecho la costura anterior de unión, así unes esta pieza con el cuerpo del bolso y al mismo tiempo coses el fondo del bolsillo.
For the next step first put your original bag body piece with the right side up and put your pocket + base piece on top of it, matching the lower corners. Pin in place. Topstitch 2 mm from the edge of the base where you sewed the last seam. This way you are sewing the piece together with the body piece and at the same time you are sewing the pockets base too.

Mide el centro de la pieza de bolsillo y marcalo, allí va a haber la costura que separa los dos bolsillos.
Measaure the center of the pocket piece, you’ll be sewing the seam that separates the two pockets there.

Haz la costura de separación. Para hacerlo más fuerte lo que hago es empezar donde el fondo, coser hasta el borde del bolsillo, girar, hacer una o dos puntadas, girar y bajar otra vez. La pieza está terminada, para que no se te mueva el bolsillo/fondo cuando sigues cosiendo, puedes coser en los bordes a 0.5 cm para unir las capas y así trabajas más cómodo.
Sew the separating seam. To make it stronger I usually start from the lower part (from the base), sewing up until the pocket border, then pivoting and making one or two stitches, then pivoting again and sewing all the way down until the base again. Now the body piece is finished, you can machine baste the pieces together on the sides to be able to sew the rest of the pieces easily.

En la otra parte del cuerpo también se cose el fondo. Esta vez primero plancha el borde superior de la pieza de fondo 1 cm hacia el revés. Luego coloca la pieza con derecho hacia arriba encima del cuerpo con el derecho hacía arriba también y sujeta con alfileres. Cose a 1-2 mm desde el borde superior del fondo. De nuevo puedes coser los bordes de las dos piezas juntas a 0.5 cm desde el margen y así no se te mueven.
Ahora tienes las dos piezas exteriores preparadas y sigues como siempre, siguiendo las instrucciones!
On the other body piece you also need to sew the base piece. This time first press 1 cm down on the wrong side of the base piece on the upper side of it. Then put the base piece on top of the body piece matching the lower corners, pin in place. Sew 1-2 mm from the border of the base. Again you can sew the rest of the edges together after that step.
Now you have both exterior pieces together and you’ll continue sewing the tote as always following the instructions!

El resultado tiene unos cómodos bolsillos!
The finished bag has comfortable pockets!

Yo hice la versión 2 de Daily Tote y le puse un forro alegre también. Era para un regalo para una amiga, así que aproveché para fotografiar a este tutorial. De paso me hice luego otro más con telas más discretas (jaja, ya sabéis mi estilo) y me gusta también mucho el resultado.
I made the version 2 of the Daily Tote and I added a cute lining too. It was for a gift for a friend so I used this occasion for making this tutorial too. I then made another more basic version (hehe, you know my style) and I also really like this versatile result.


Espero que os haya gustado este tutorial y lo podéis usar para cualquier bolso! Tenéis más ideas sobre bolsos de tela en mi carpeta de Pinterest y el patrón de Daily Tote en mi tienda de Etsy.
I hope you liked this tutorial and that you can use it for any kind of bags! You can check out more tote bag ideas on my Pinterest board and you can get the Daily Tote pattern over at my Etsy shop.