

Hola! Hoy os traigo un post muy teórico, jeje. Me alegro un montón que muchas de vosotras habéis lanzado a coser lencería, cada día me salen fotos en IG de vuestros kits y proyectos y me hace mucha ilusión, la verdad!
Desde que comencé con mi pequeña tienda de materiales de lencería, muchas que habéis comprado el kit (gracias!!!!) me habéis preguntado cómo es eso de conseguir que el lado bonito de encaje quede bien en el interior de la copa del sujetador, en el escote digamos (como en la foto de abajo). Así que ya era hora de que haga un pequeño tutorial sobre los pasos que suelo hacer para esta parte de la construcción del sujetador.
Hey! Today I'm bringing you a very teorical post, hehe. I'm really glad that many of you have tryed out sewing lingerie already, every day new photos about your kits and projects pop up on my IG feed and it really makes me very happy!
Since I started my little lingerie supply shop many clients who have been buying the kits (thank you!!!) have been asking about how to finish the lace edge on the inner cup of the bra to have this beautiful scallop detail (like on the photo above). So I guess it's time to make a little tutorial about what I usually do with my bras to have this effect.

La primera parte de este tutorial está basado en el "coseconmigo" de sujetador Watson en el blog de Cloth Habit (si vas a coser Watson, tienes que pasar por allí porque está muy bien explicado todo paso a paso) y los que sabéis inglés, seguramente ya lo habéis visto. La segunda parte va sobre cómo yo coso las copas de encaje con forro. Los ejemplos los hago con el patrón de Watson (puedes ver los sujetadores cosidos con ese patrón en mis otras entradas), pero eso vale para cualquier patrón realmente.
The first part of this tutorial is based on the Watson sewalong held in Cloth Habits blog (if you are sewing a Watson you definitely have to check it out, it has all the steps explained). The second part is about how I line my lace cup pieces. The examples are made with Watson sewing pattern (you can see my makes in my previous posts), but it really goes for any other bra pattern too.
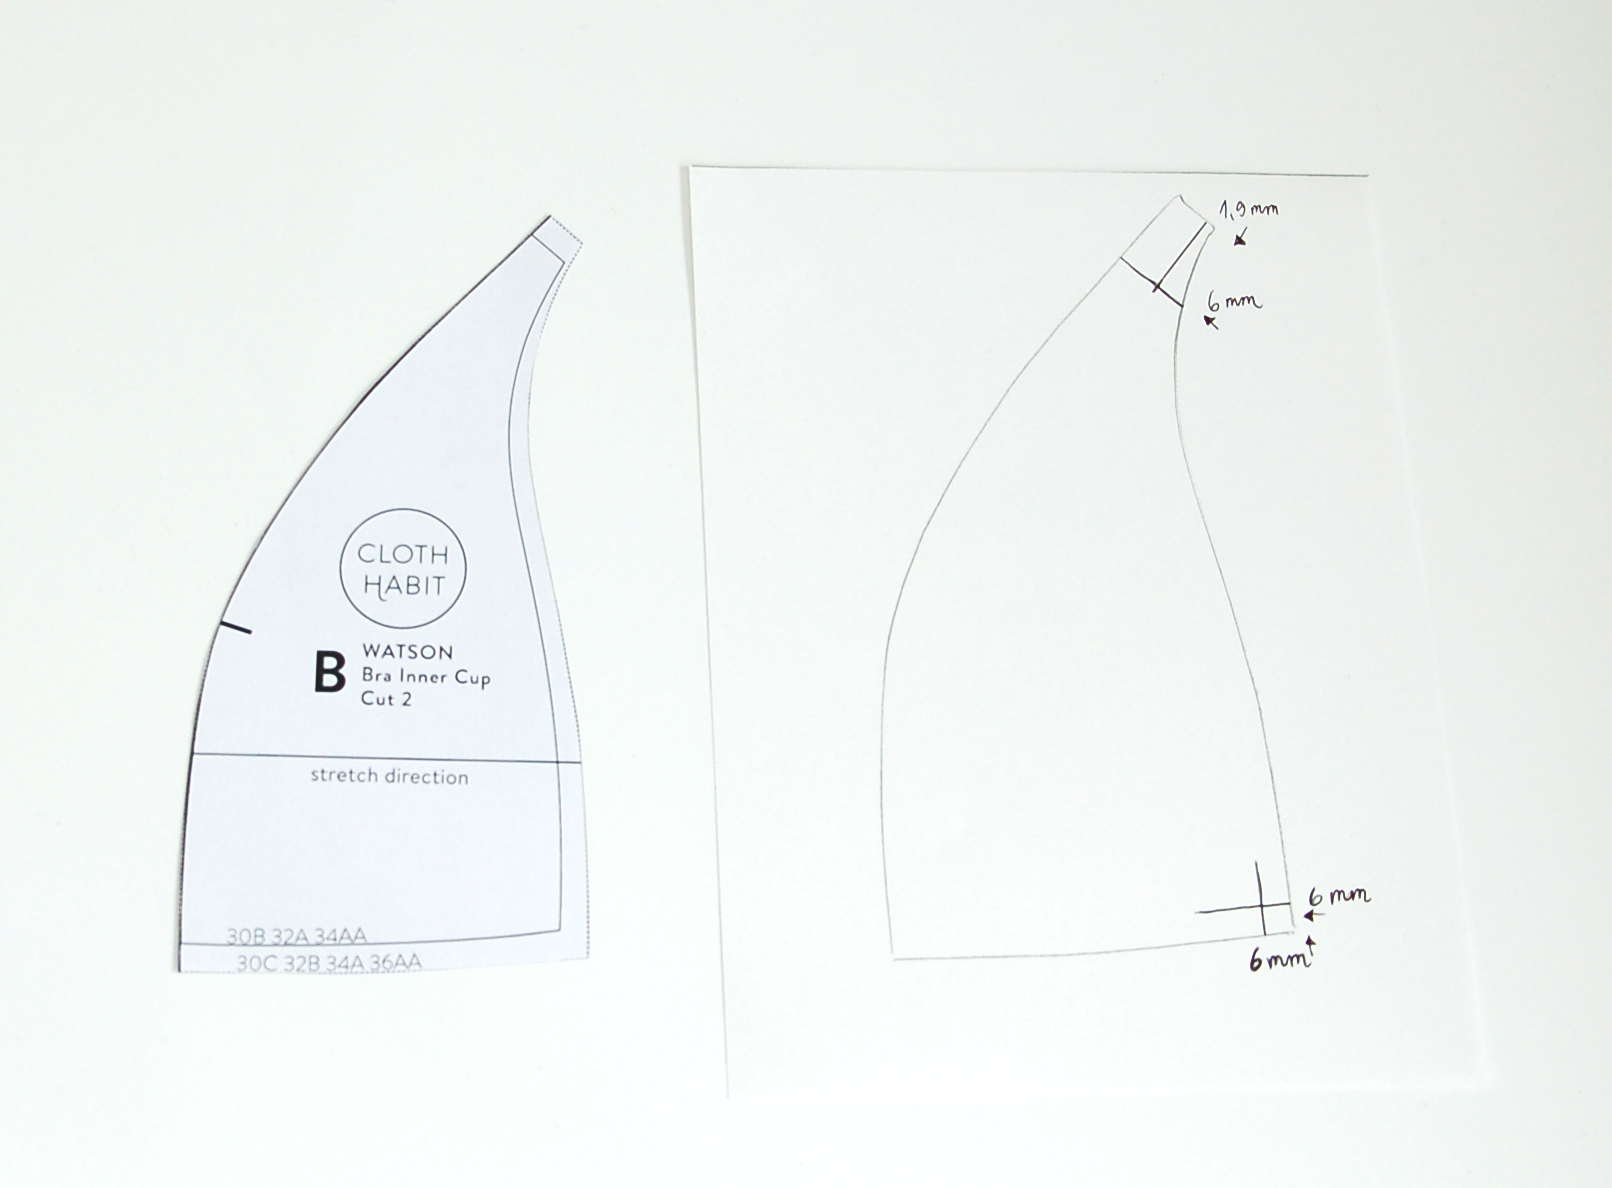
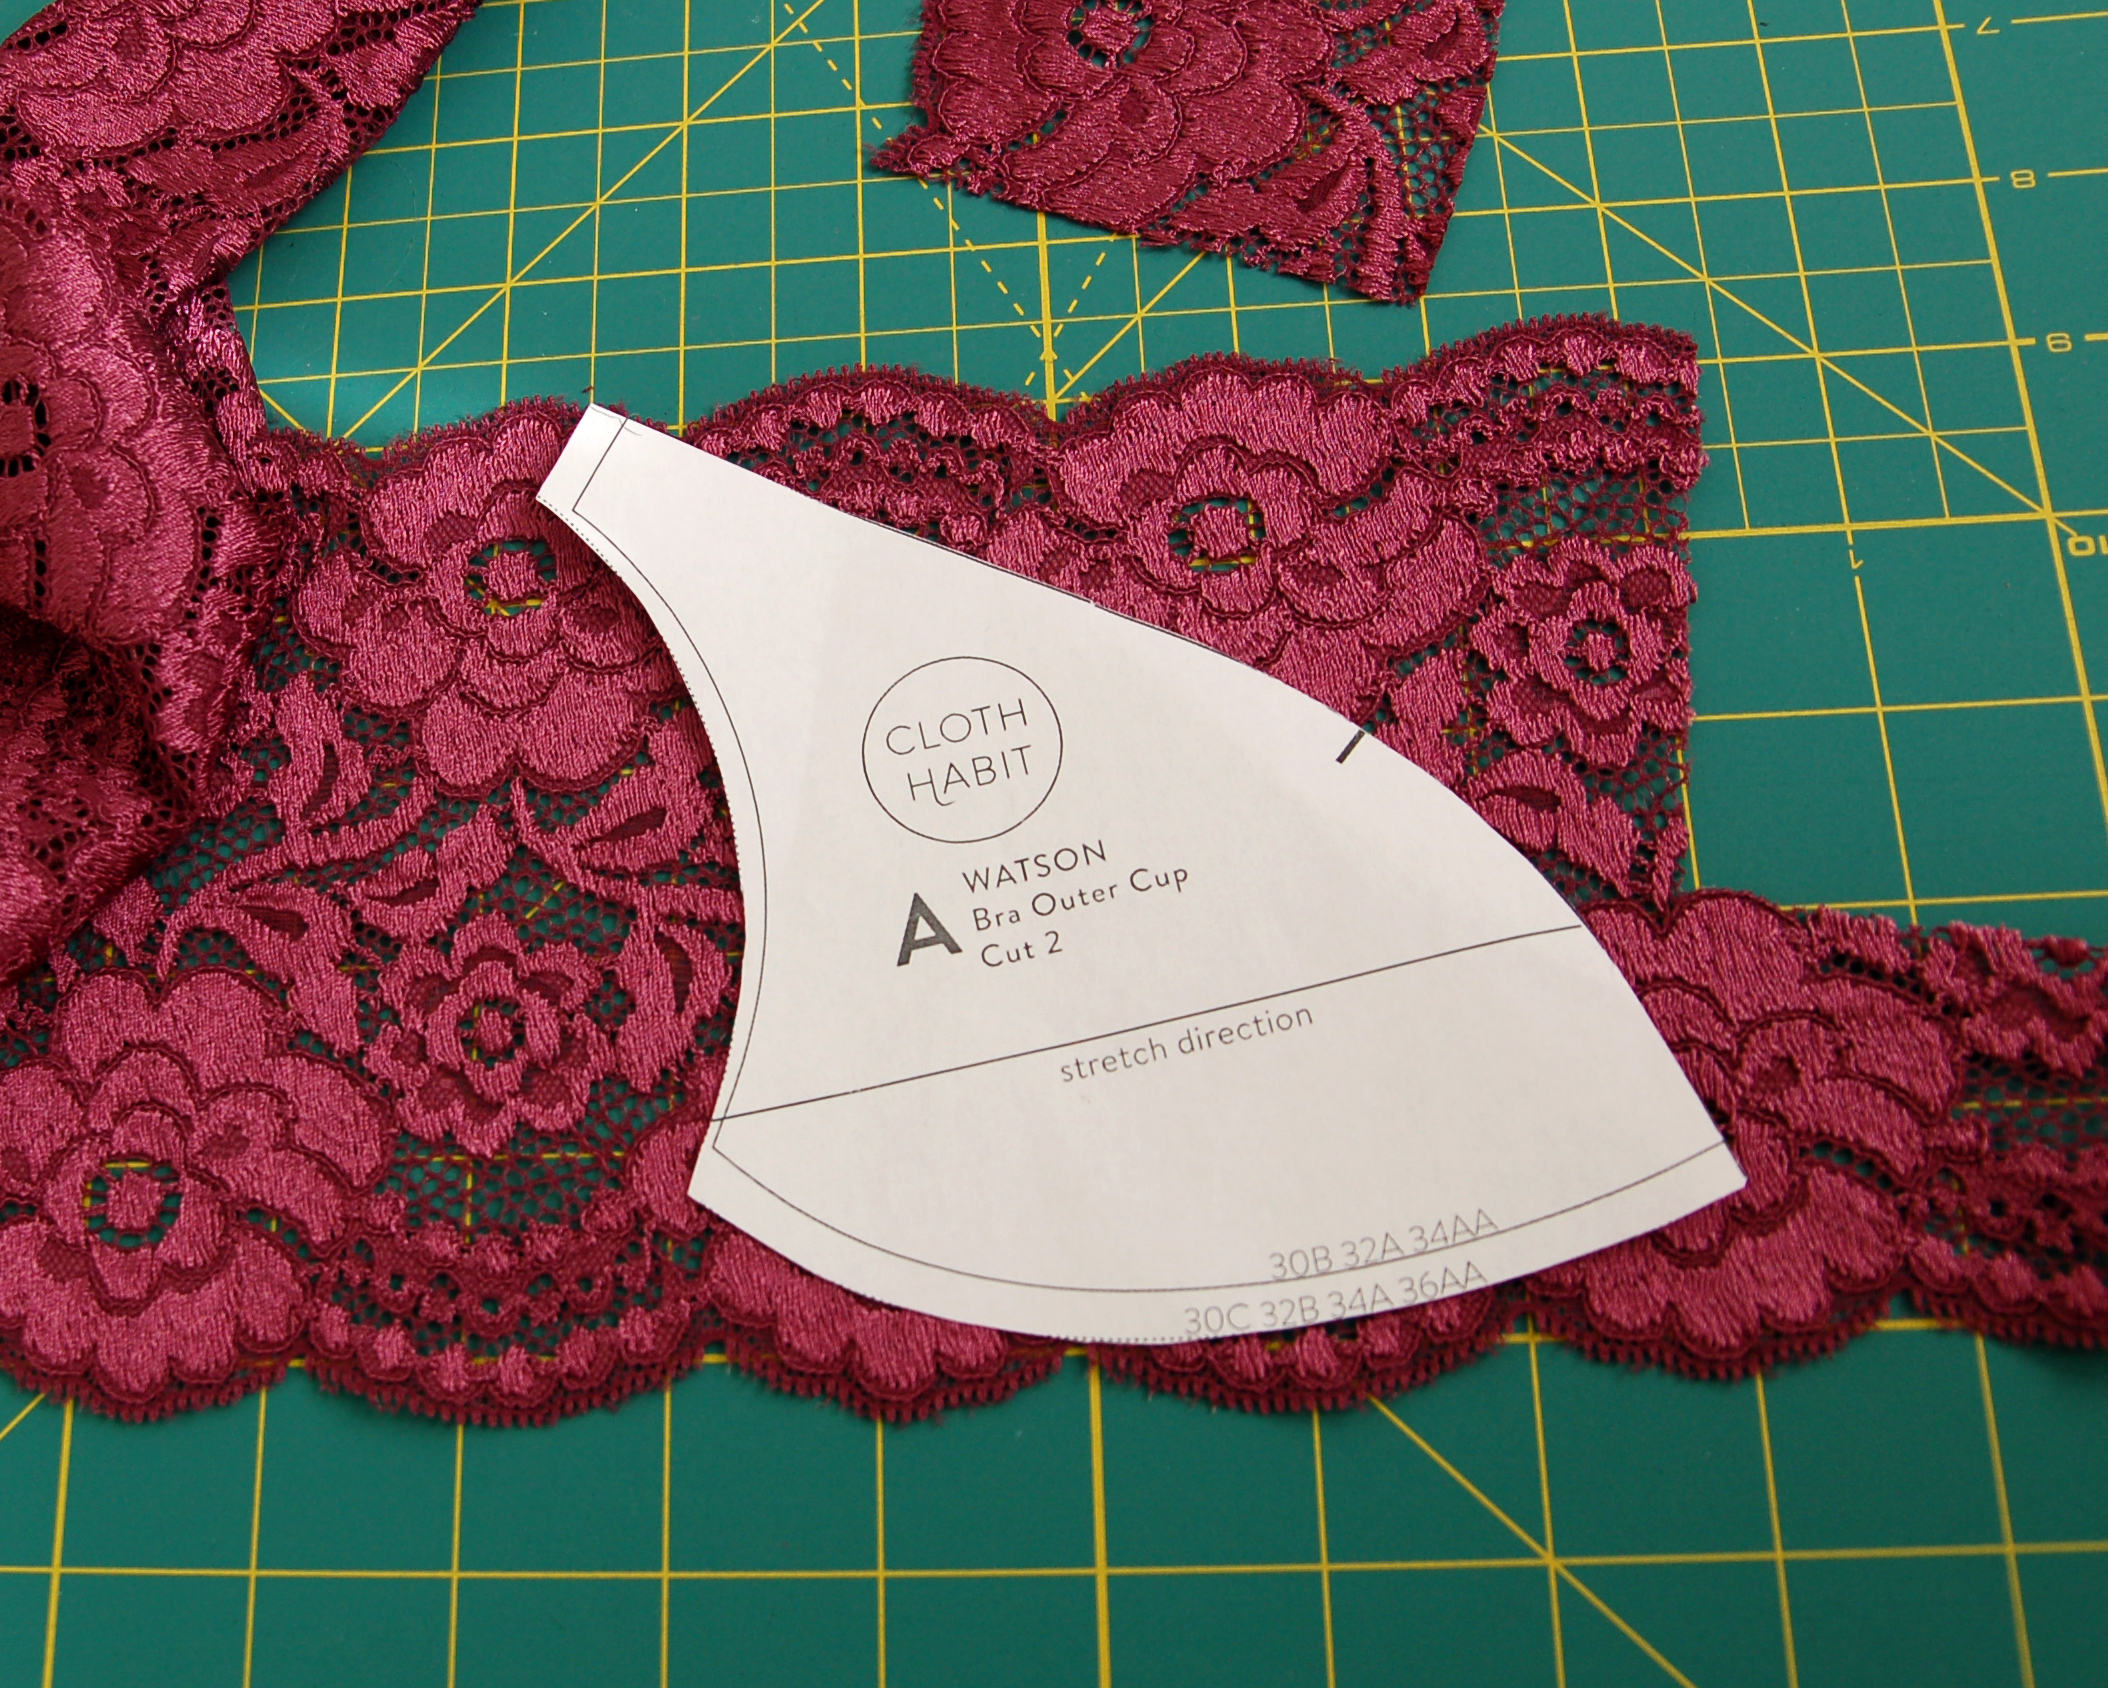
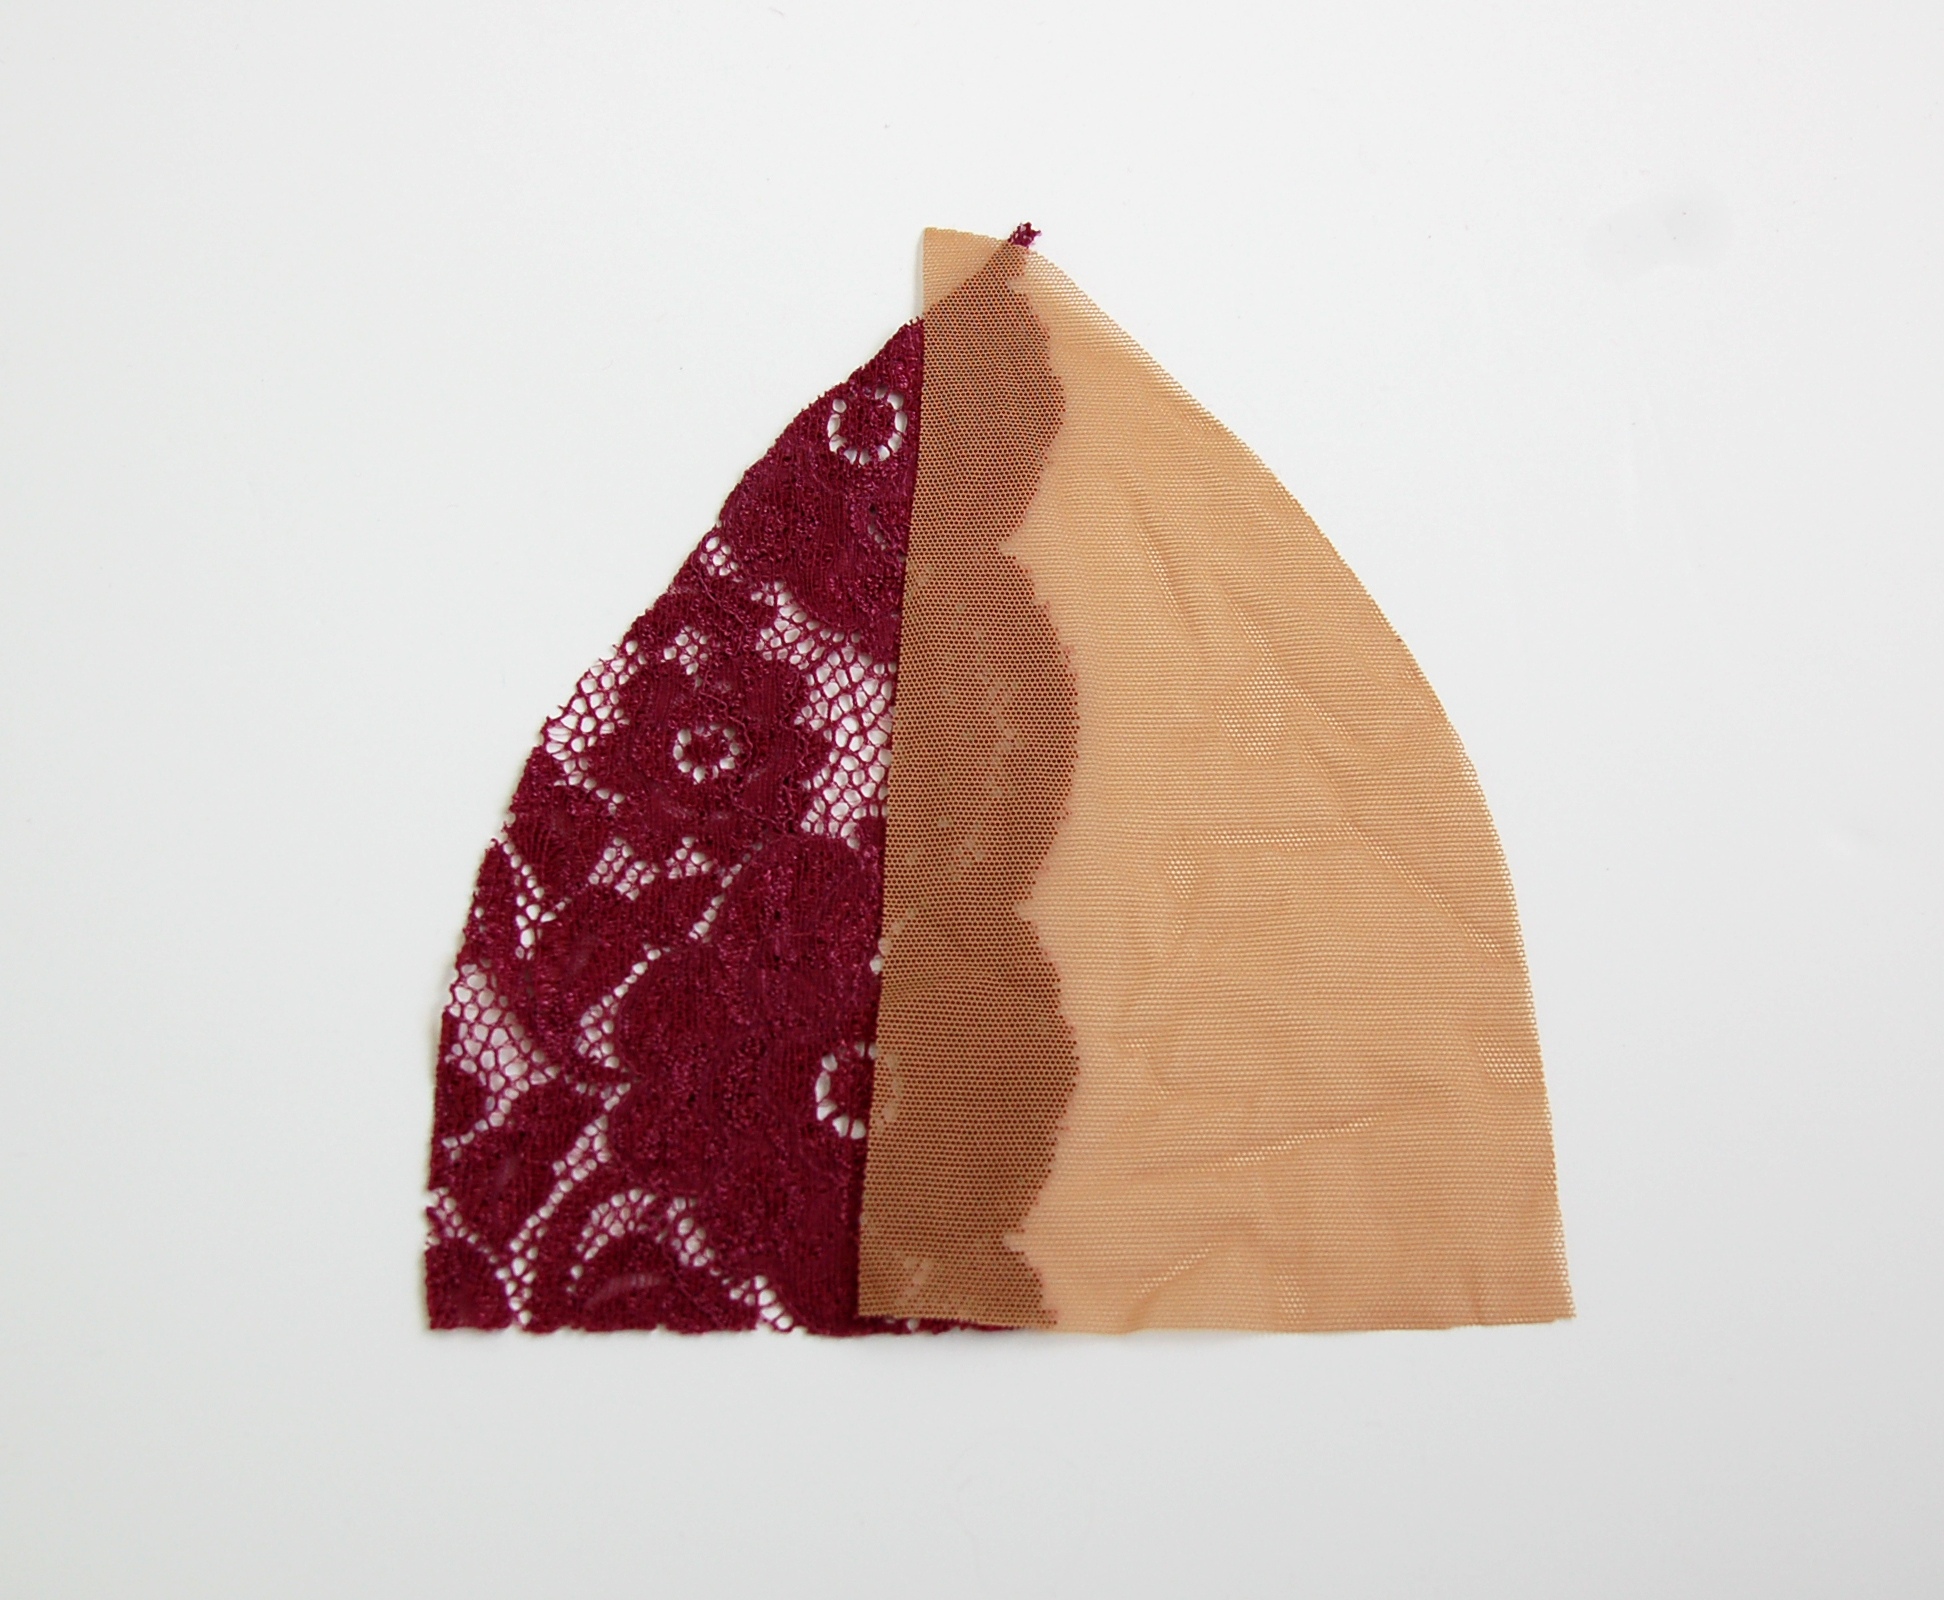
El primer paso es modificar el patrón. El cambio se hace en el patrón de la parte de la copa que queda en el escote (bra inner cup). Al usar el lado bonito con puntilla de encaje, no se necesita el margen de costura en ese lateral, así que hay que marcar 6 mm (6 mm en este caso, comprueba cuánto tiene de margen tu patrón) para dentro en la linea de escote. Arriba hay que bajar 19 mm, porque esta es la parte que se doblaría para dentro para colocar allí la arandela de tirante en el caso de coser la copa con una tela normal y con elástico. Como no hace falta doblar encaje, allí bajamos para quitar el margen y también marcas los 6 mm que sobran del lado.
The first step is to modify the pattern. The change you have to make is on the inner bra cup, the one that is on the neckline. You don't need a seam allowance when using a scalloped edge of the lace so you'll have to mark these 6 mm (in this pattern this seam allowance is 6 mm, check your pattern for exact seam allowances) inside the seam line. From the top part of the pattern you have to mark down 19 mm, because this is the part the piece is later folded under to attatch the straps when you are sewing with the normal fabric and elastic. As you don't need to fold under the scalloped edge you go down this amount of space and also mark those 6 mm from the edge you don't need.

Una vez hecho eso, unimos los dos puntos con una línea recta. Para que que el encaje quede bonito, es necesario tenerlo en una linea recta (este paso también vale para braguitas, si quieres modificar el patrón para encajes). Se corta el sobrante y ya tienes tu patrón.
Once you've done this you draw a straight line through those two points. In order to make a beautiful scalloped edge this part of the pattern has to be straight (this step also can be done when adapting a pantie pattern for lace). You then cut away the extra part and there you have your new pattern.
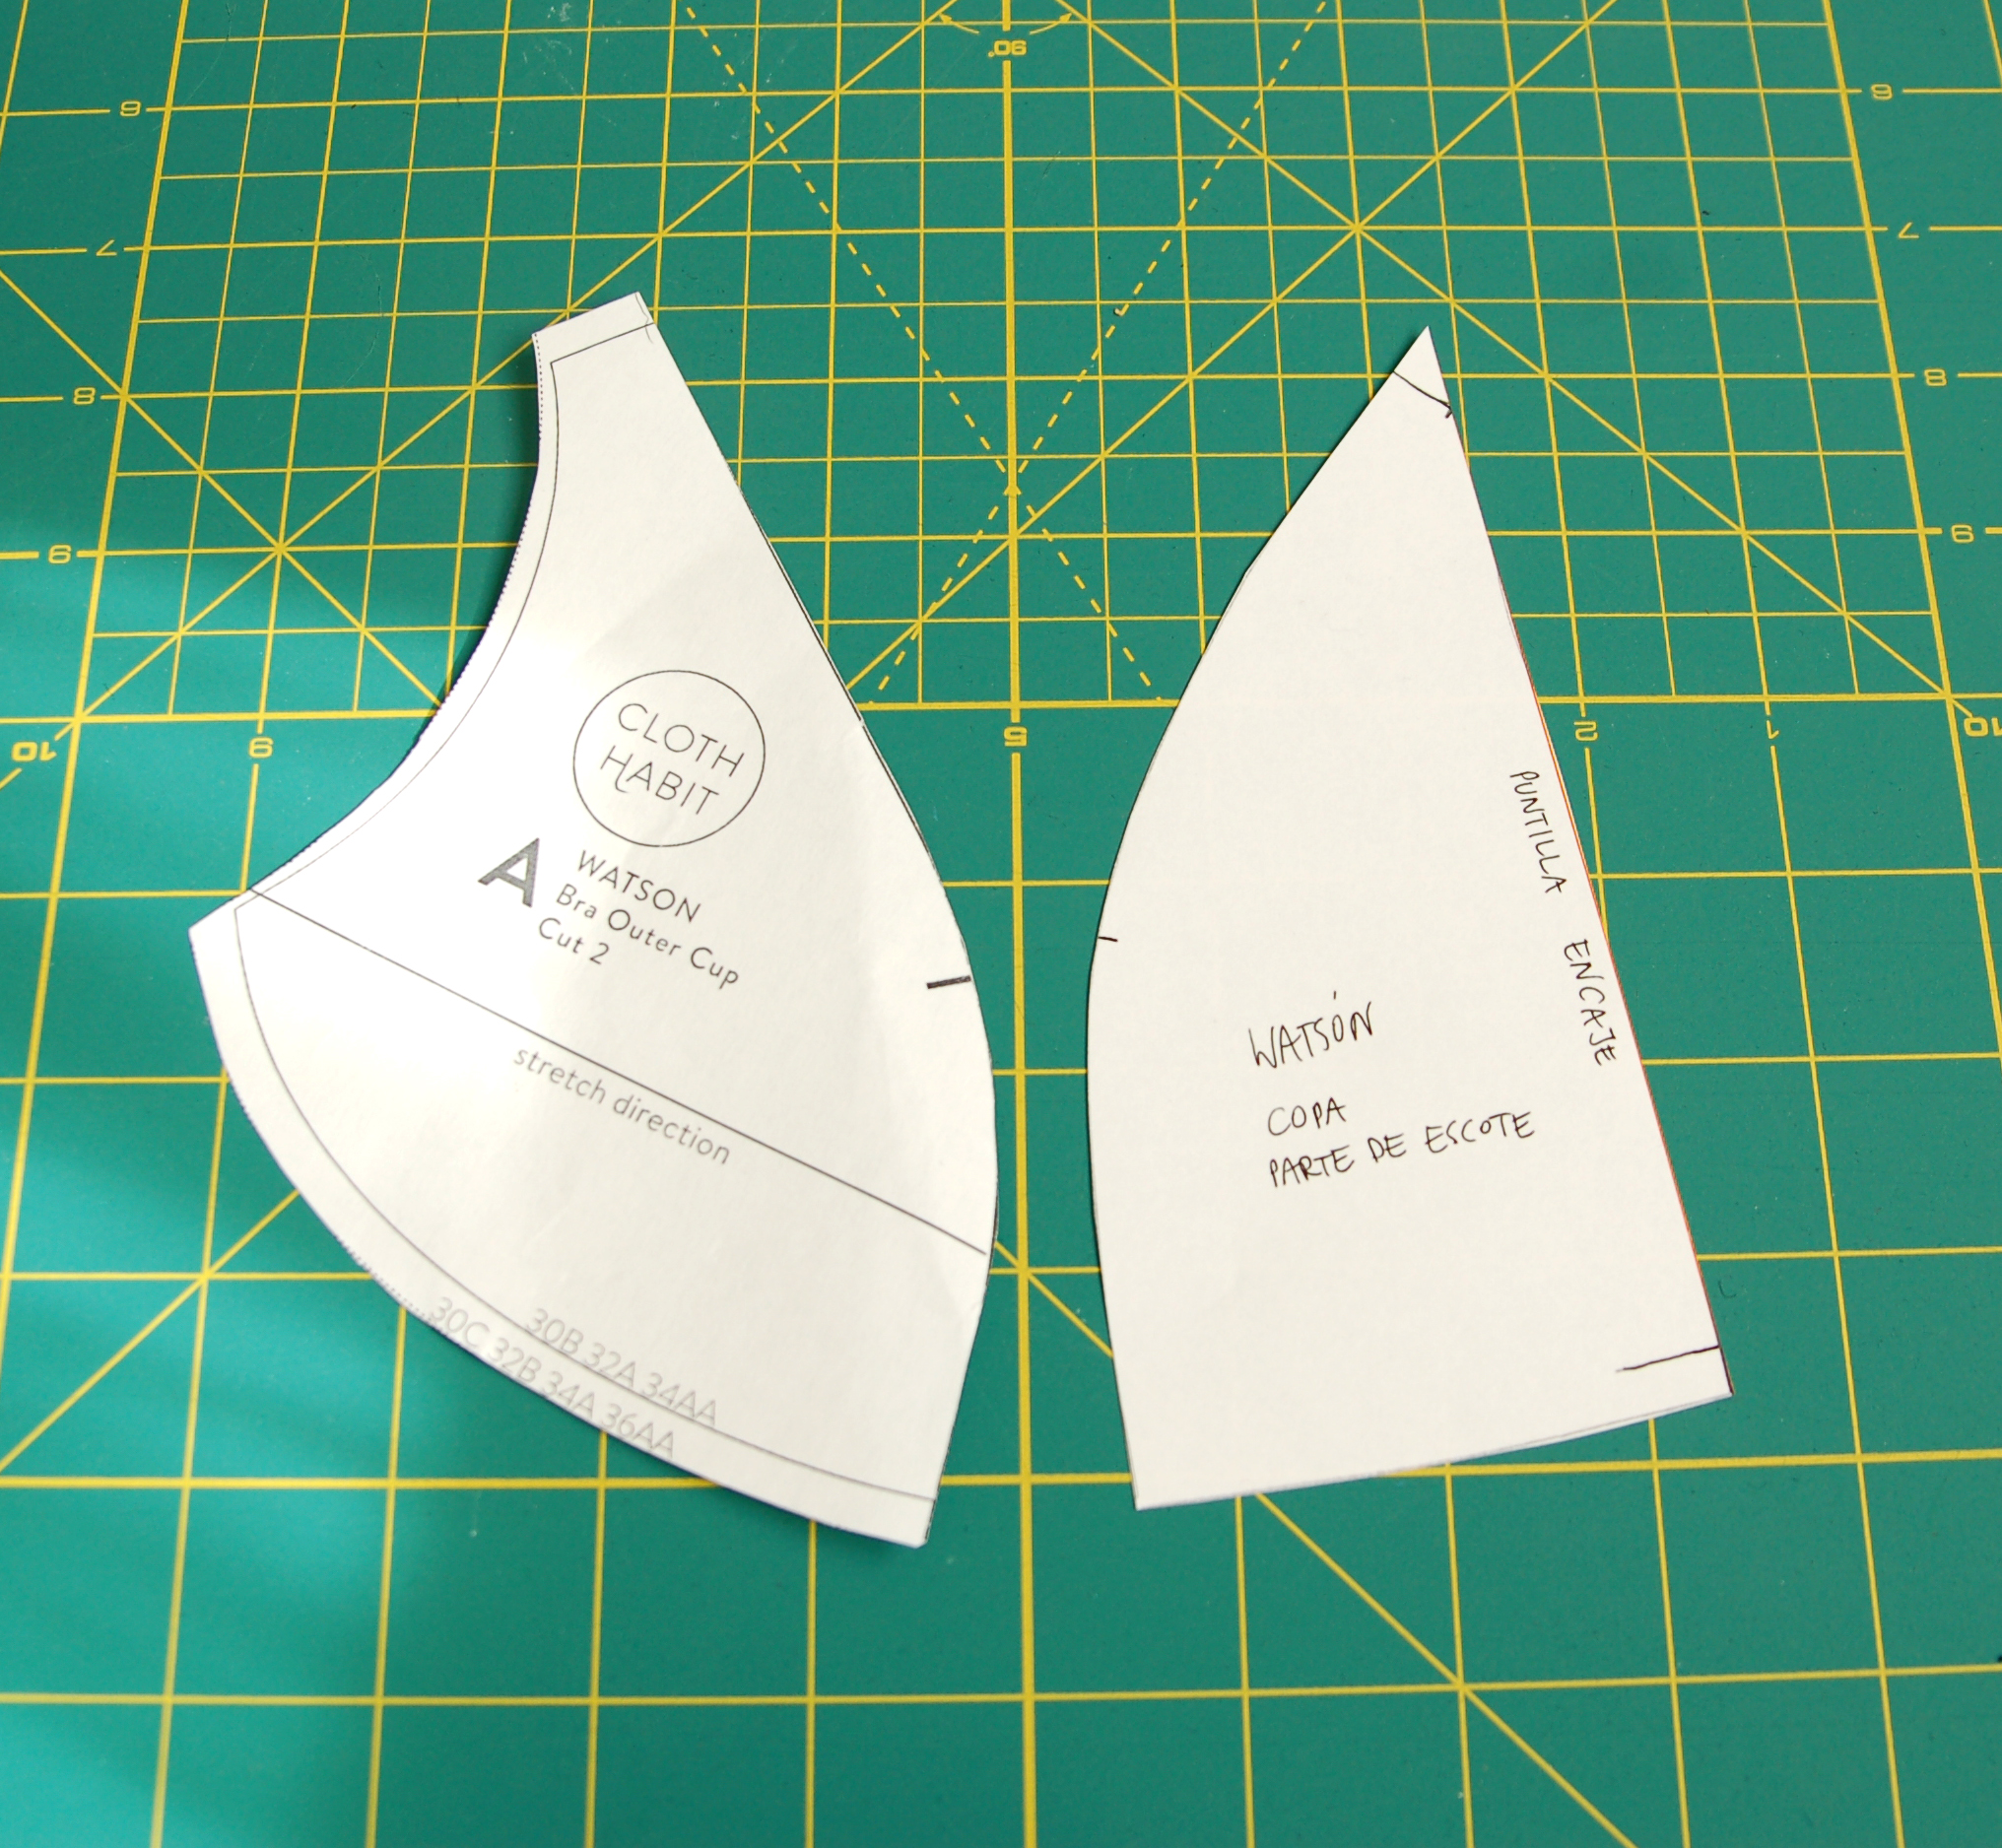
La otra parte de la copa sigue siendo lo mismo porque allí el lateral está rematado por elástico y no se ve el borde bonito.
The outer cup of the bra stayes the same because the edge goes under the elastic and no scallops are seen anyway.

Notarás que no he puesto la línea de hilo/elasticidad en el nuevo patrón. Eso es así porque quiero cuadrar la línea recta sí o sí con la puntilla. Eso puede cambiar ligeramente cómo queda luego el sujetador, porque los encajes son diferentes y no todos tienen la misma elasticidad. Si ves que tu encaje sólo se estira en una dirección y este es lo que no vas a usar para cortar el patrón, podrías probar subir la talla de copa porque puede que luego no tienes suficiente elasticidad en tu copa. Recuérdate de que Watson requiere para la copa telas de punto con aprox 70% de elasticidad, y especialmente con tallas más grandes, cambiar la dirección de la elasticidad puede resultar en una copa que no adapta lo suficiente a tu pecho. Pero ya sabes, experimentar y probar es lo mejor para ver qué funciona para ti.
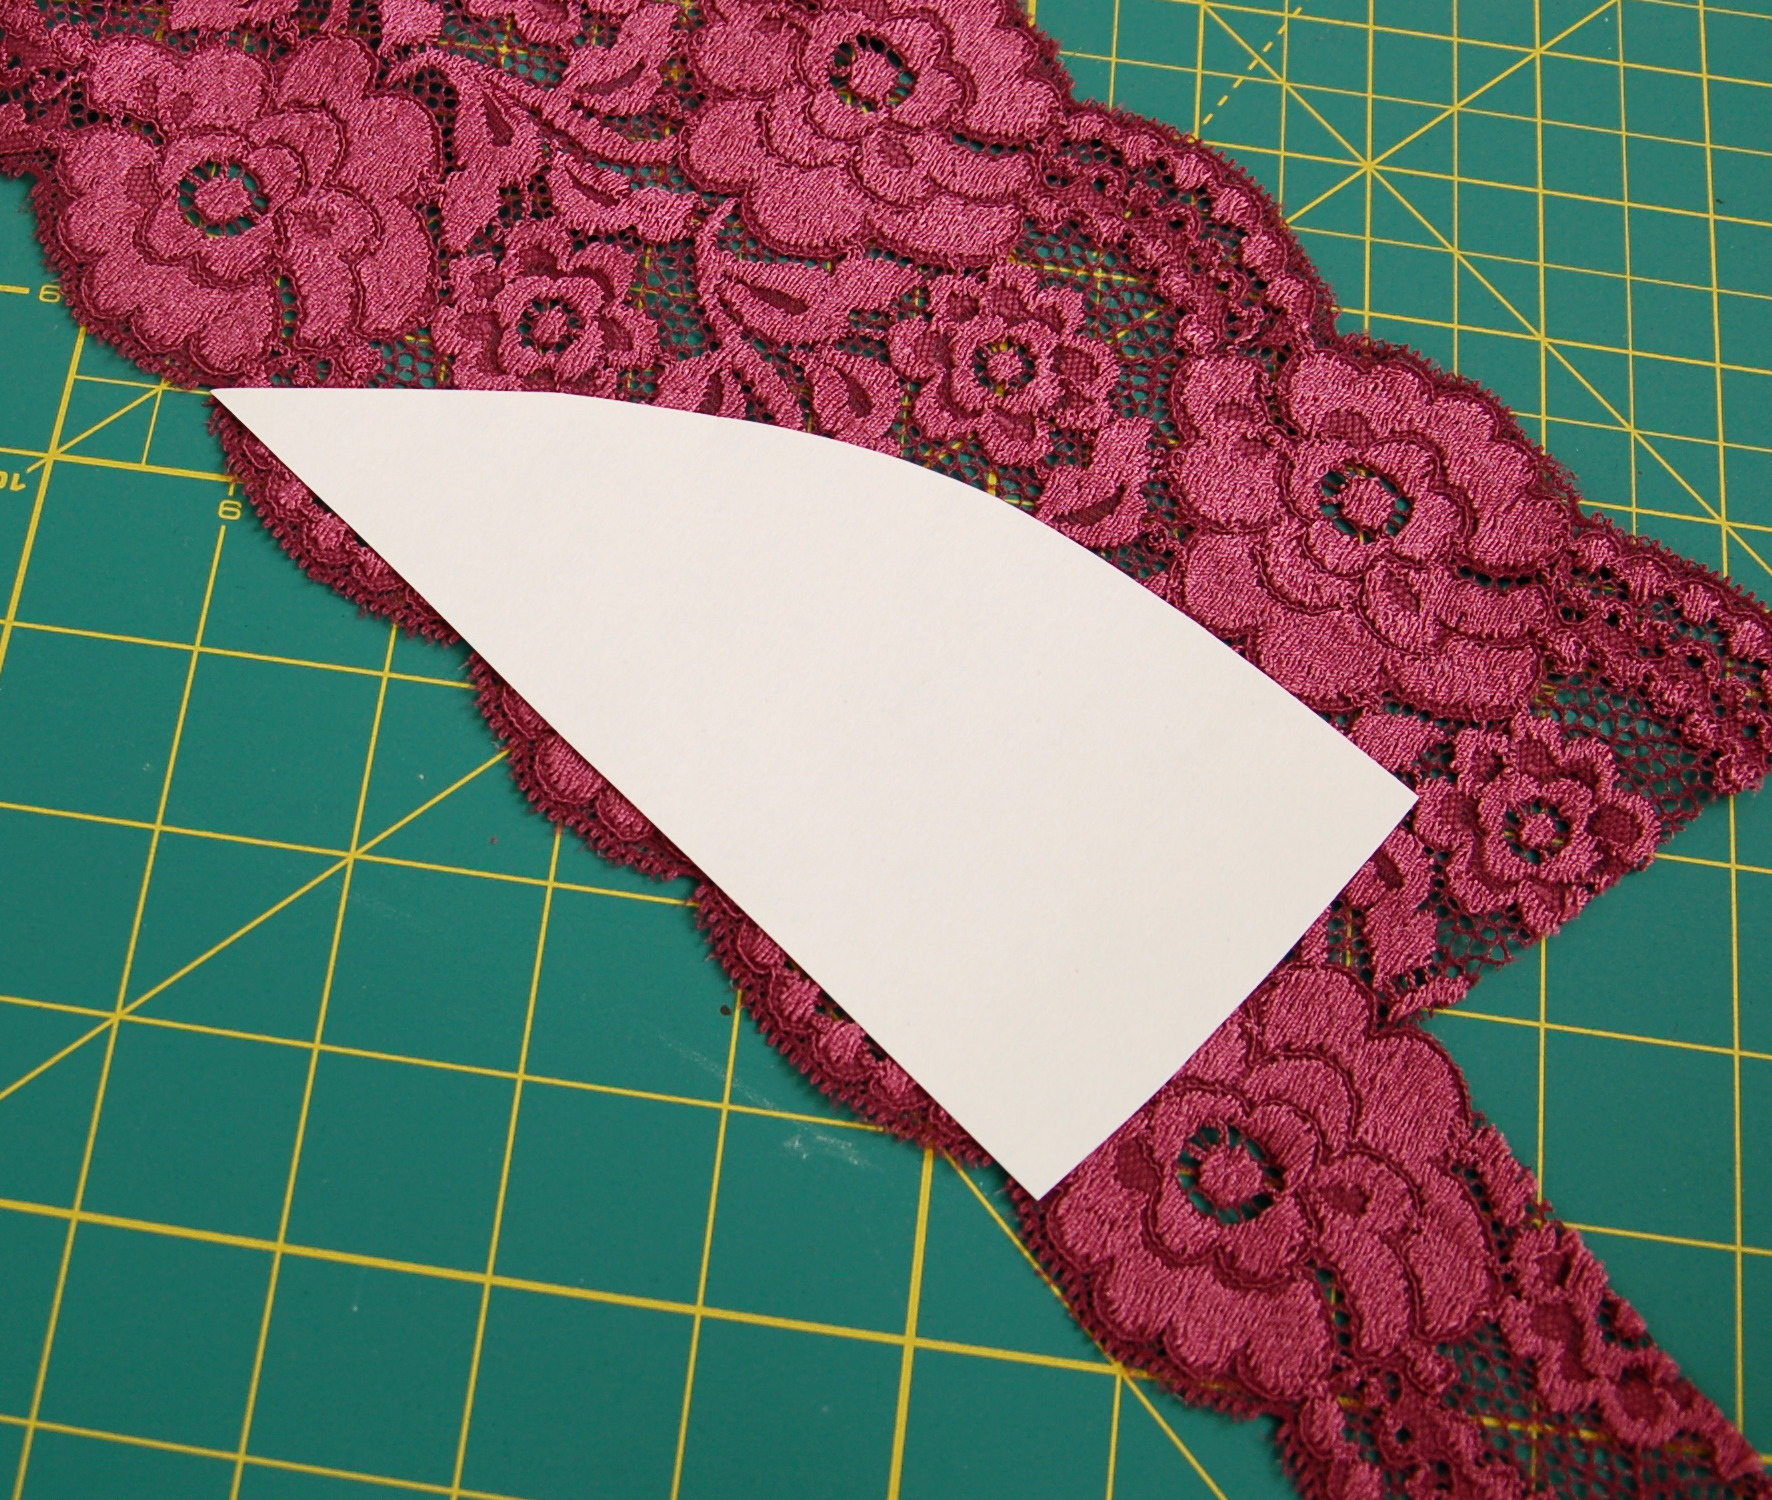
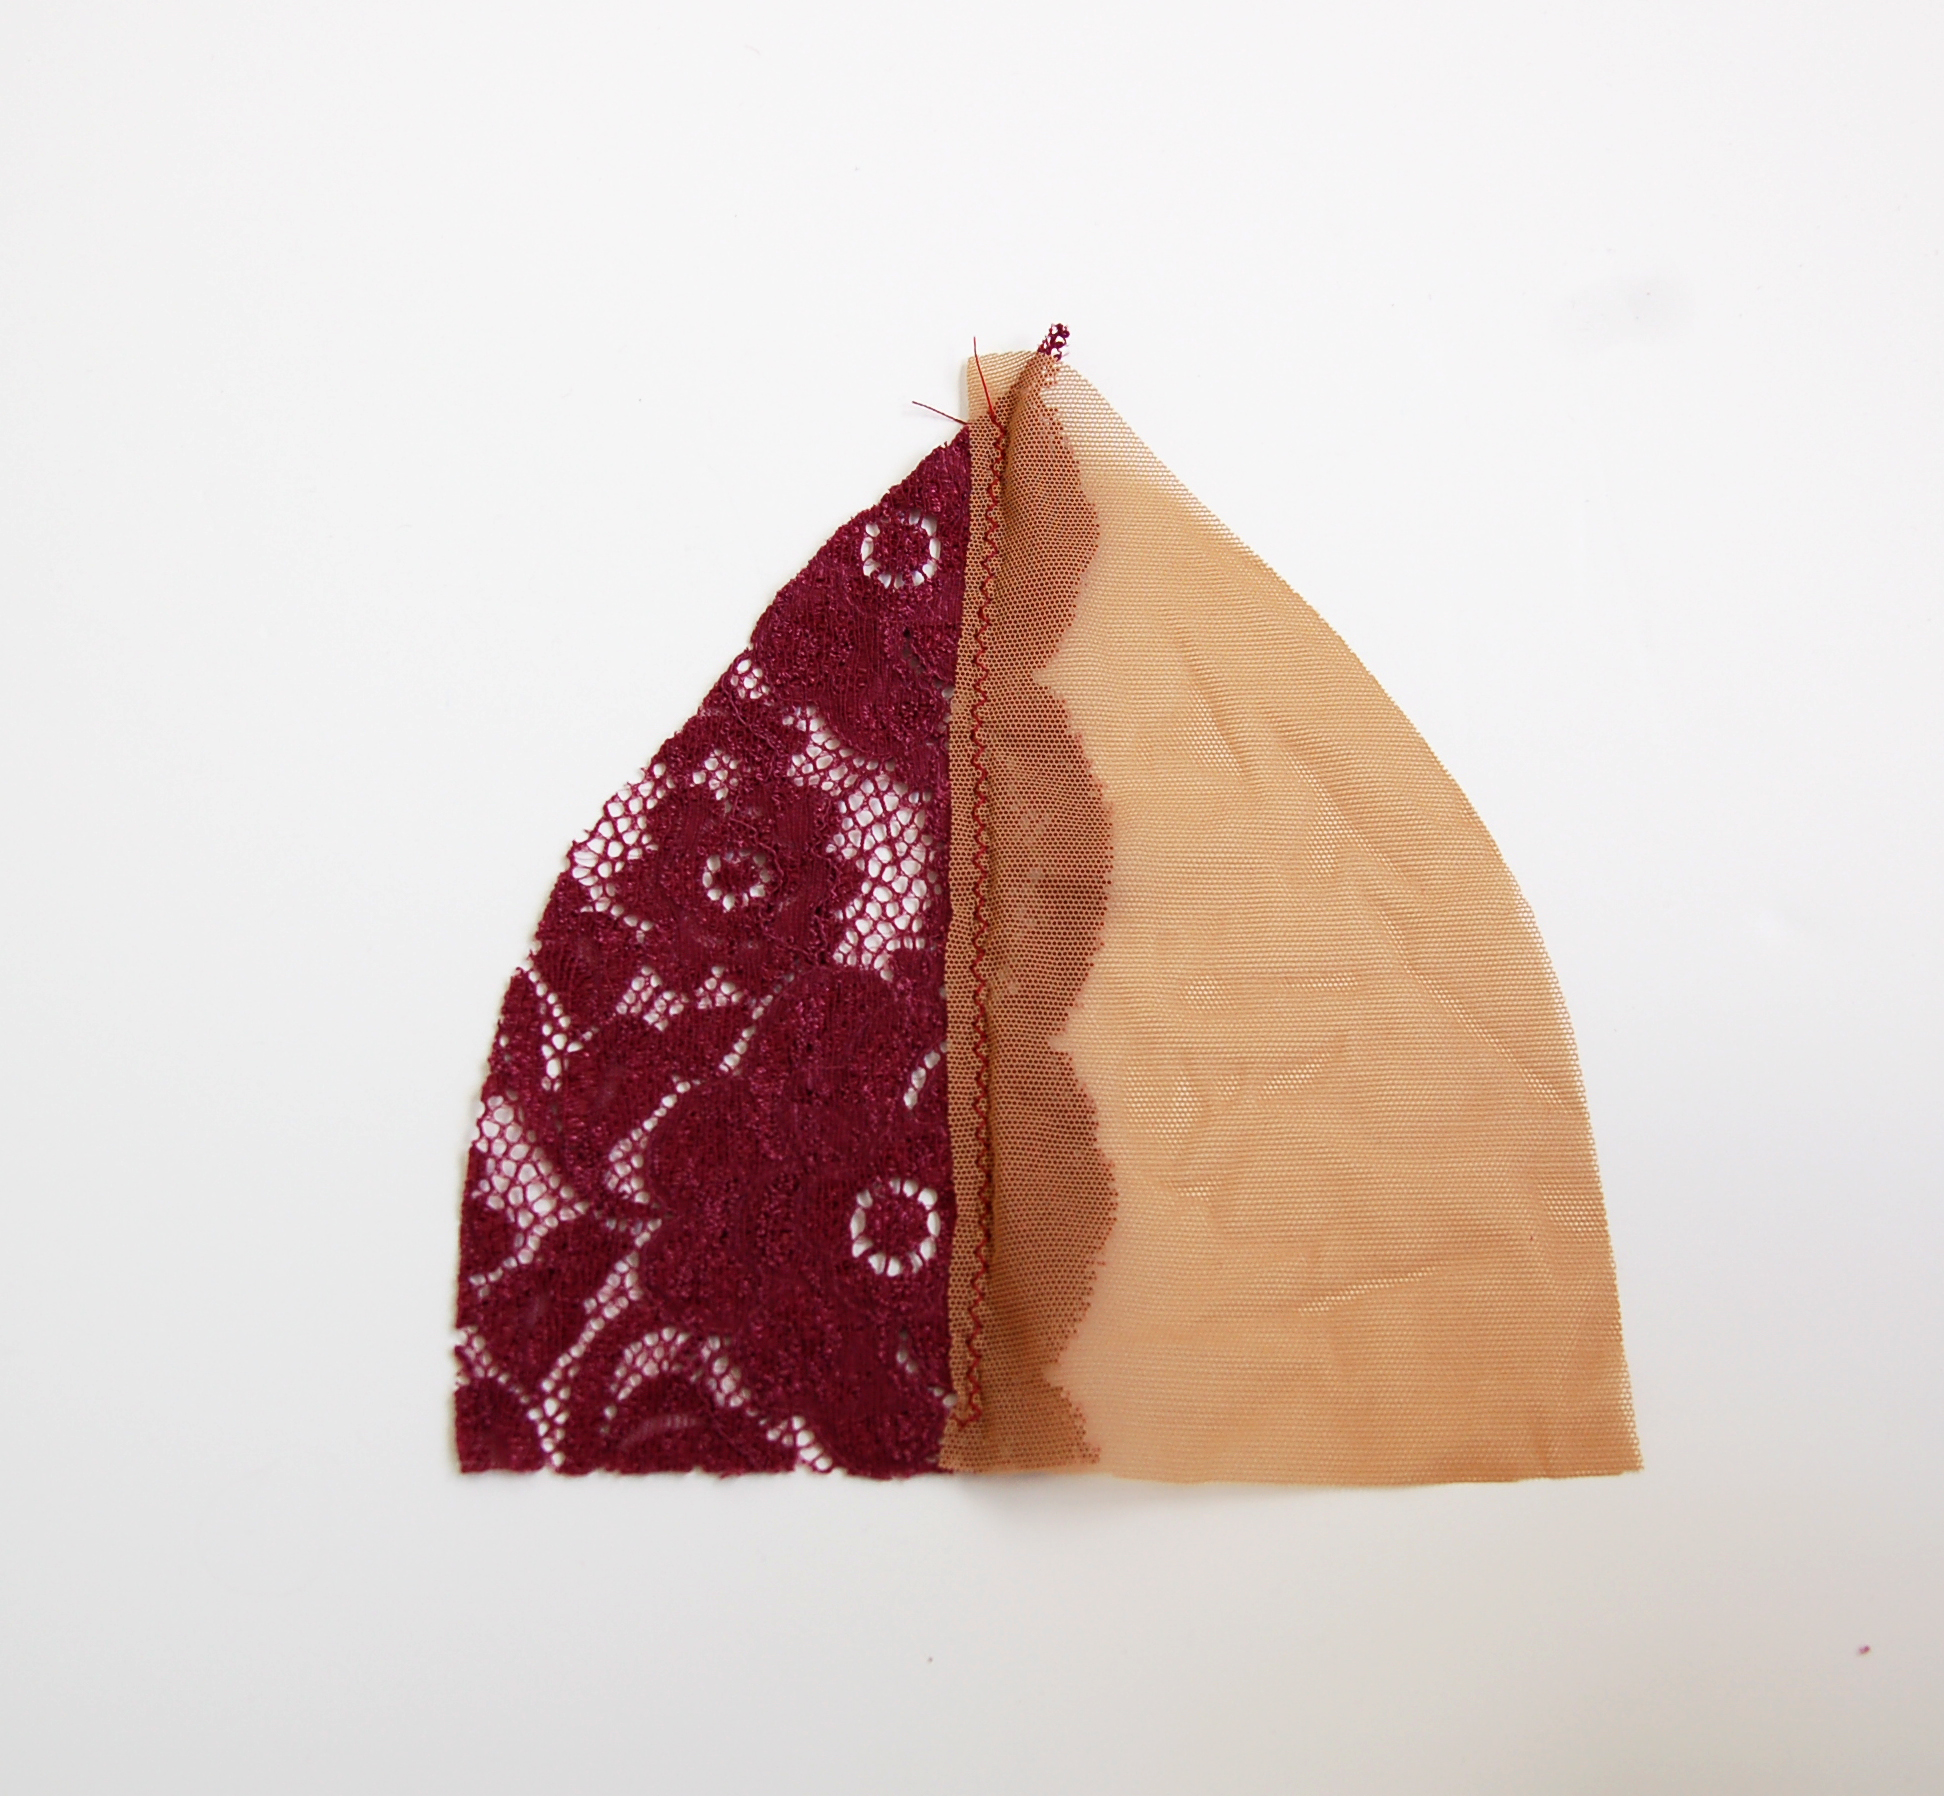
Al colocar el patrón en el borde del encaje tienes que fijar en dos cosas:
1) la línea recta que has hecho en el patrón tiene que cuadrar con el punto más bajo del encaje. De esa manera no quitamos la tela que necesitas para el sujetador, pero sí que consigues el detalle bonito de la puntilla. Los encajes son diferentes y algunos pueden tener mucha diferencia entre el punto más alto y punto más bajo, guíate siempre por el punto más bajo
2) el punto donde marcaste la línea de margen de costura (en la copa, abajo) de 6 mm tiene que quedar justo en el punto bajo de la puntilla. Así una vez unidas las copas con la parte central del sujetador y al haber usado ese 6 mm, justo en el centro comienza la puntilla. Si todo fuera perfecto, también en el mismo punto arriba sería el punto más bajo de la puntilla pero eso ya no es tan importante.
Notice that I didn't put the greatest stretch direction/grainline on this new pattern. I didn't do it because I want to line up my pattern piece straight with the scalloped edge. Doing that can slightly alter the way a bra fits because all the laces are different and not all of them have the same amount of stretch. If you see that your lace only stretches on one direction and this is not the direction you are going to align your pattern piece, you can try to go up a cup size for example because this might result in a cup with not enough stretch in it for your size. Remember that Watson needs to have aprox 70% of stretch on the cups and especially with larger cup sizes changing the greatest stretch direction can end up causing you fit issues. But as you already know, experimenting and trying out different methods is the best thing to do in order to discover what suits you the best.
When you put your pattern piece on the lace, notice two things:
1) the straight line on your pattern piece has tol line up with the lowest points of the scallops. This way you do not take away any neccesary fabric from the cups but you still have the beautiful scallop detail. Laces are different and some have big differences between the lowest and highest points on the scalloped edge but you should always go for the lowest point
2) the point you marked for the bottom edge seam allowance (on the bottom of the cup) 6 mm from the edge is where a low point of scallop should go. That's how you'll have a beautiful finishing with the scallops starting out exactly in the middle of the cradle after you sew your cups together with the cradle piece and use up those 6 mm. In the perfect world your piece should also end with the lowest point of the scallop but that's really not so important

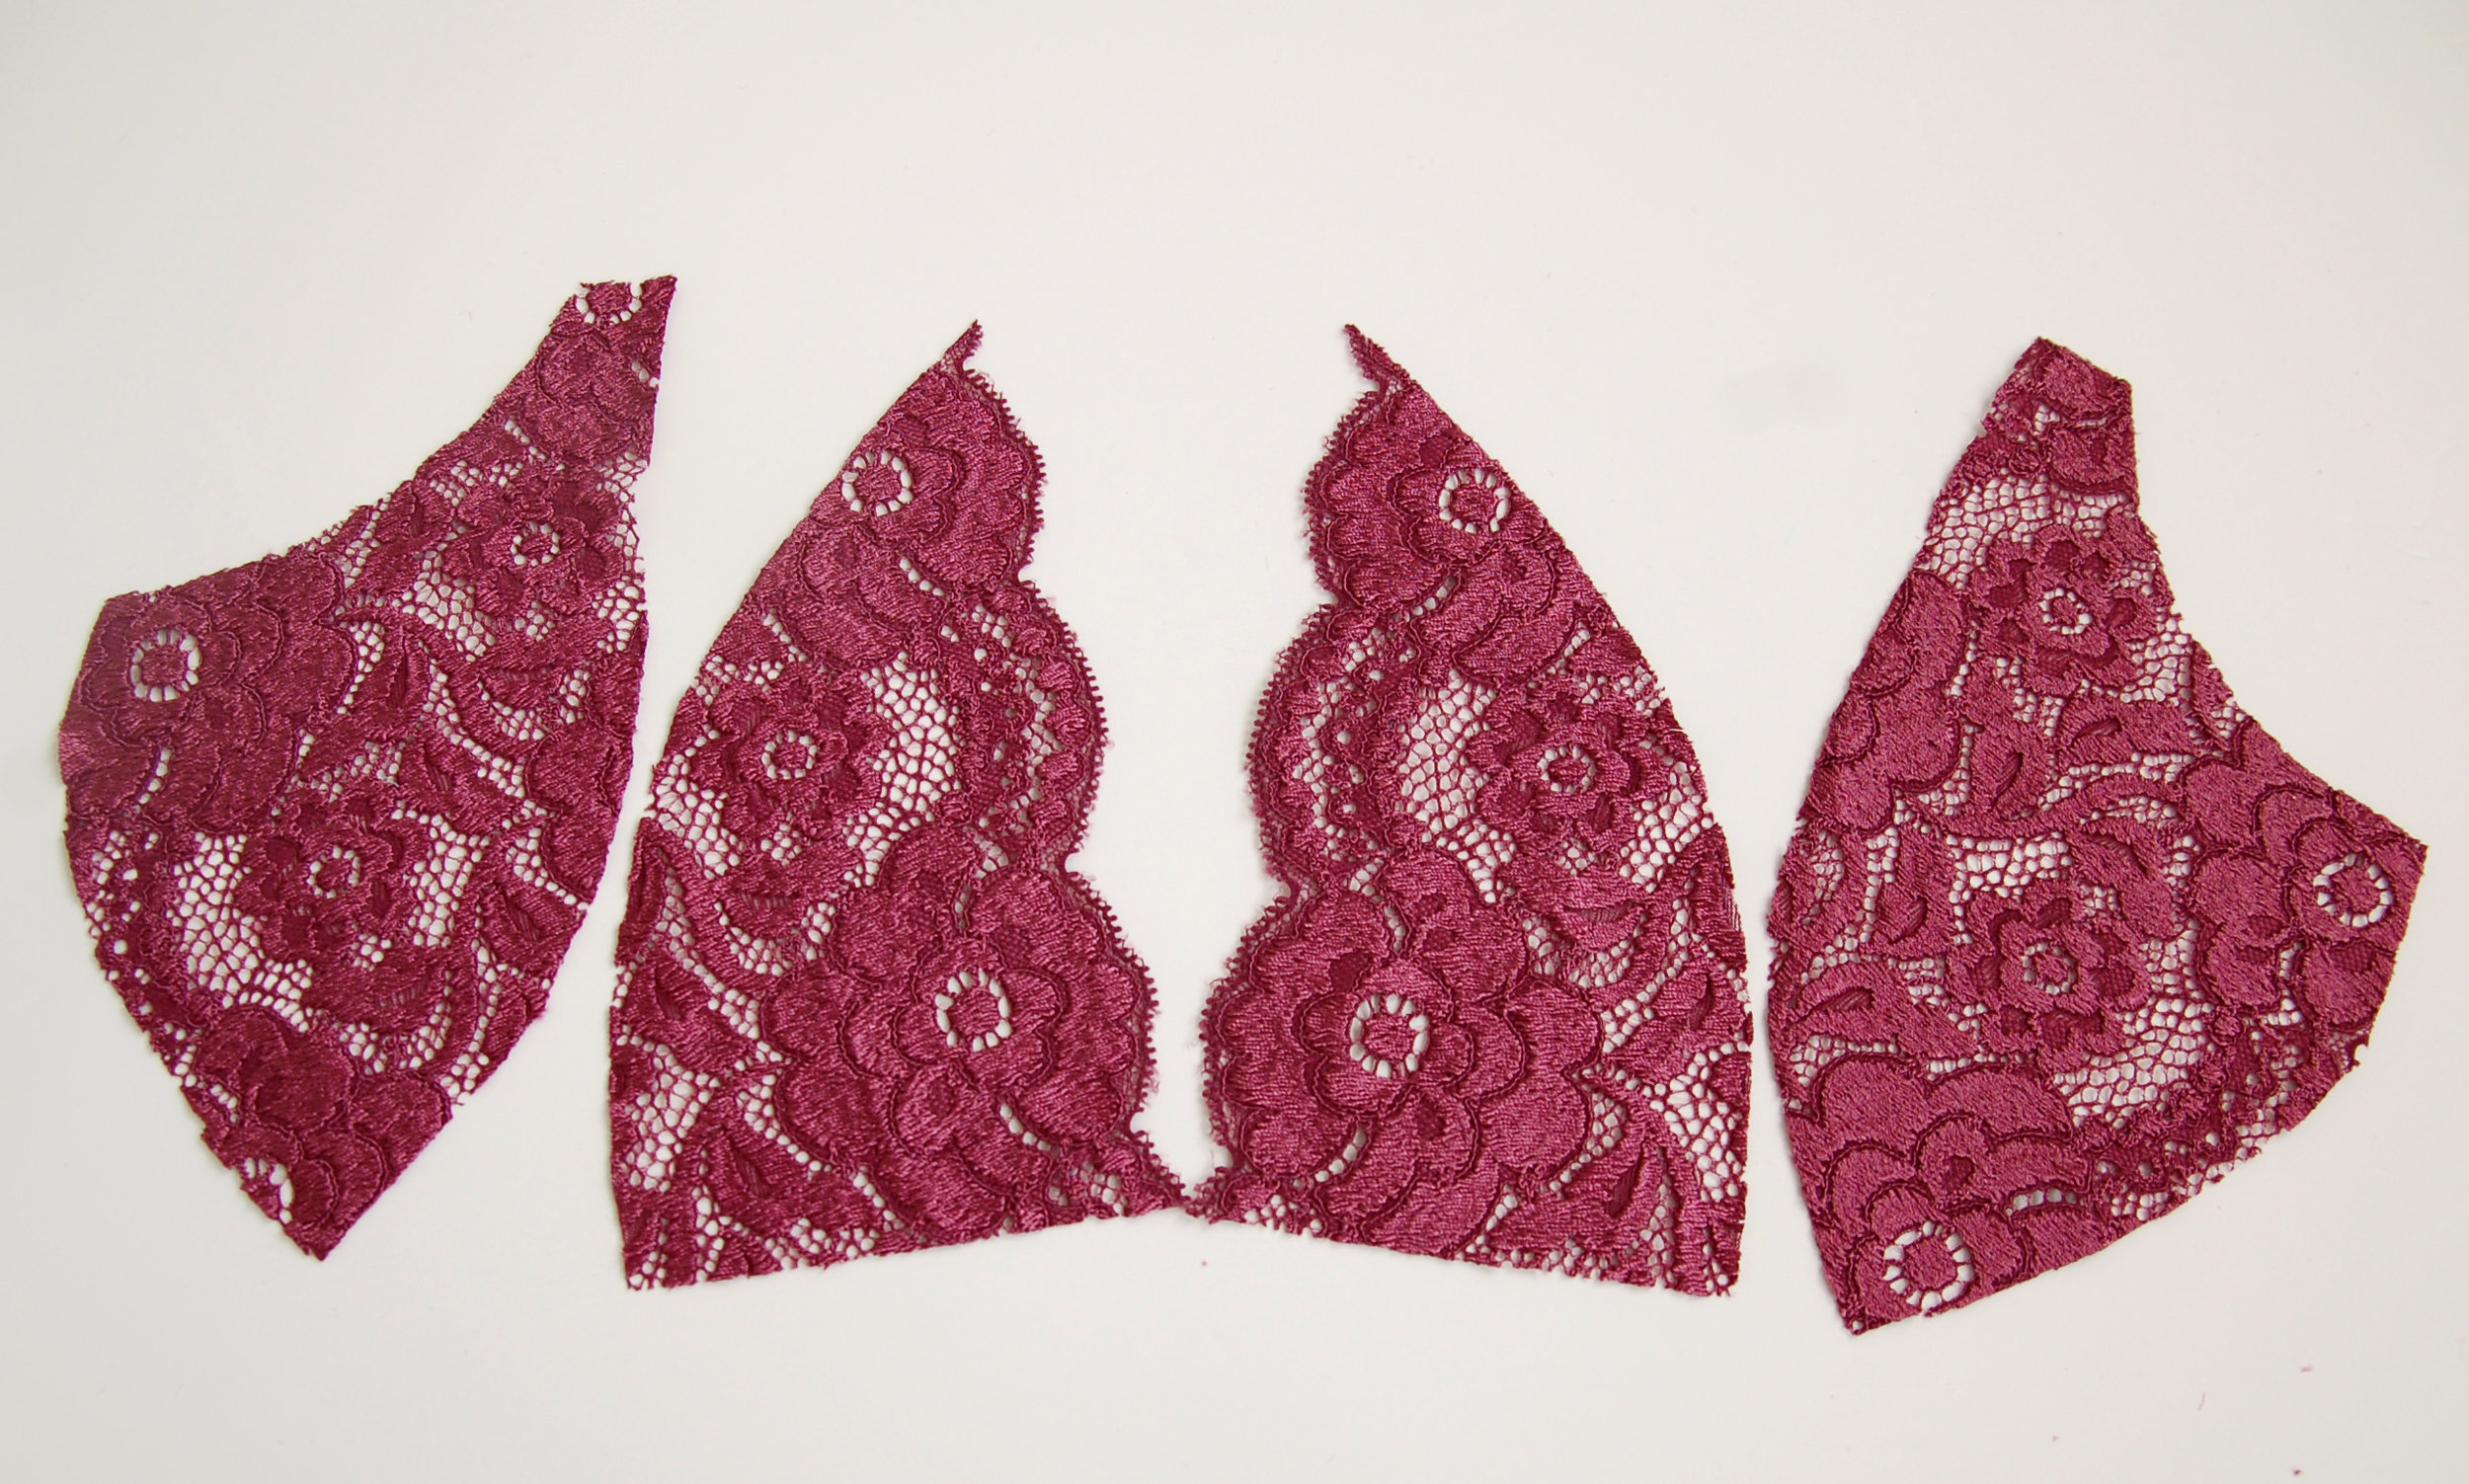
Ya está cortado! Ahora por el otro, recuérdate de ponerlo en espejo para que no tengas dos lados derechos por ejemplo.
It's cut! Now just cut out the other one making sure you mirror the pieces to not have both right cups for example.
Puedes simplemente voltear tu patrón y buscar la misma posición en el encaje...
You can just flip over you pattern piece and look for the same position as in your last piece...
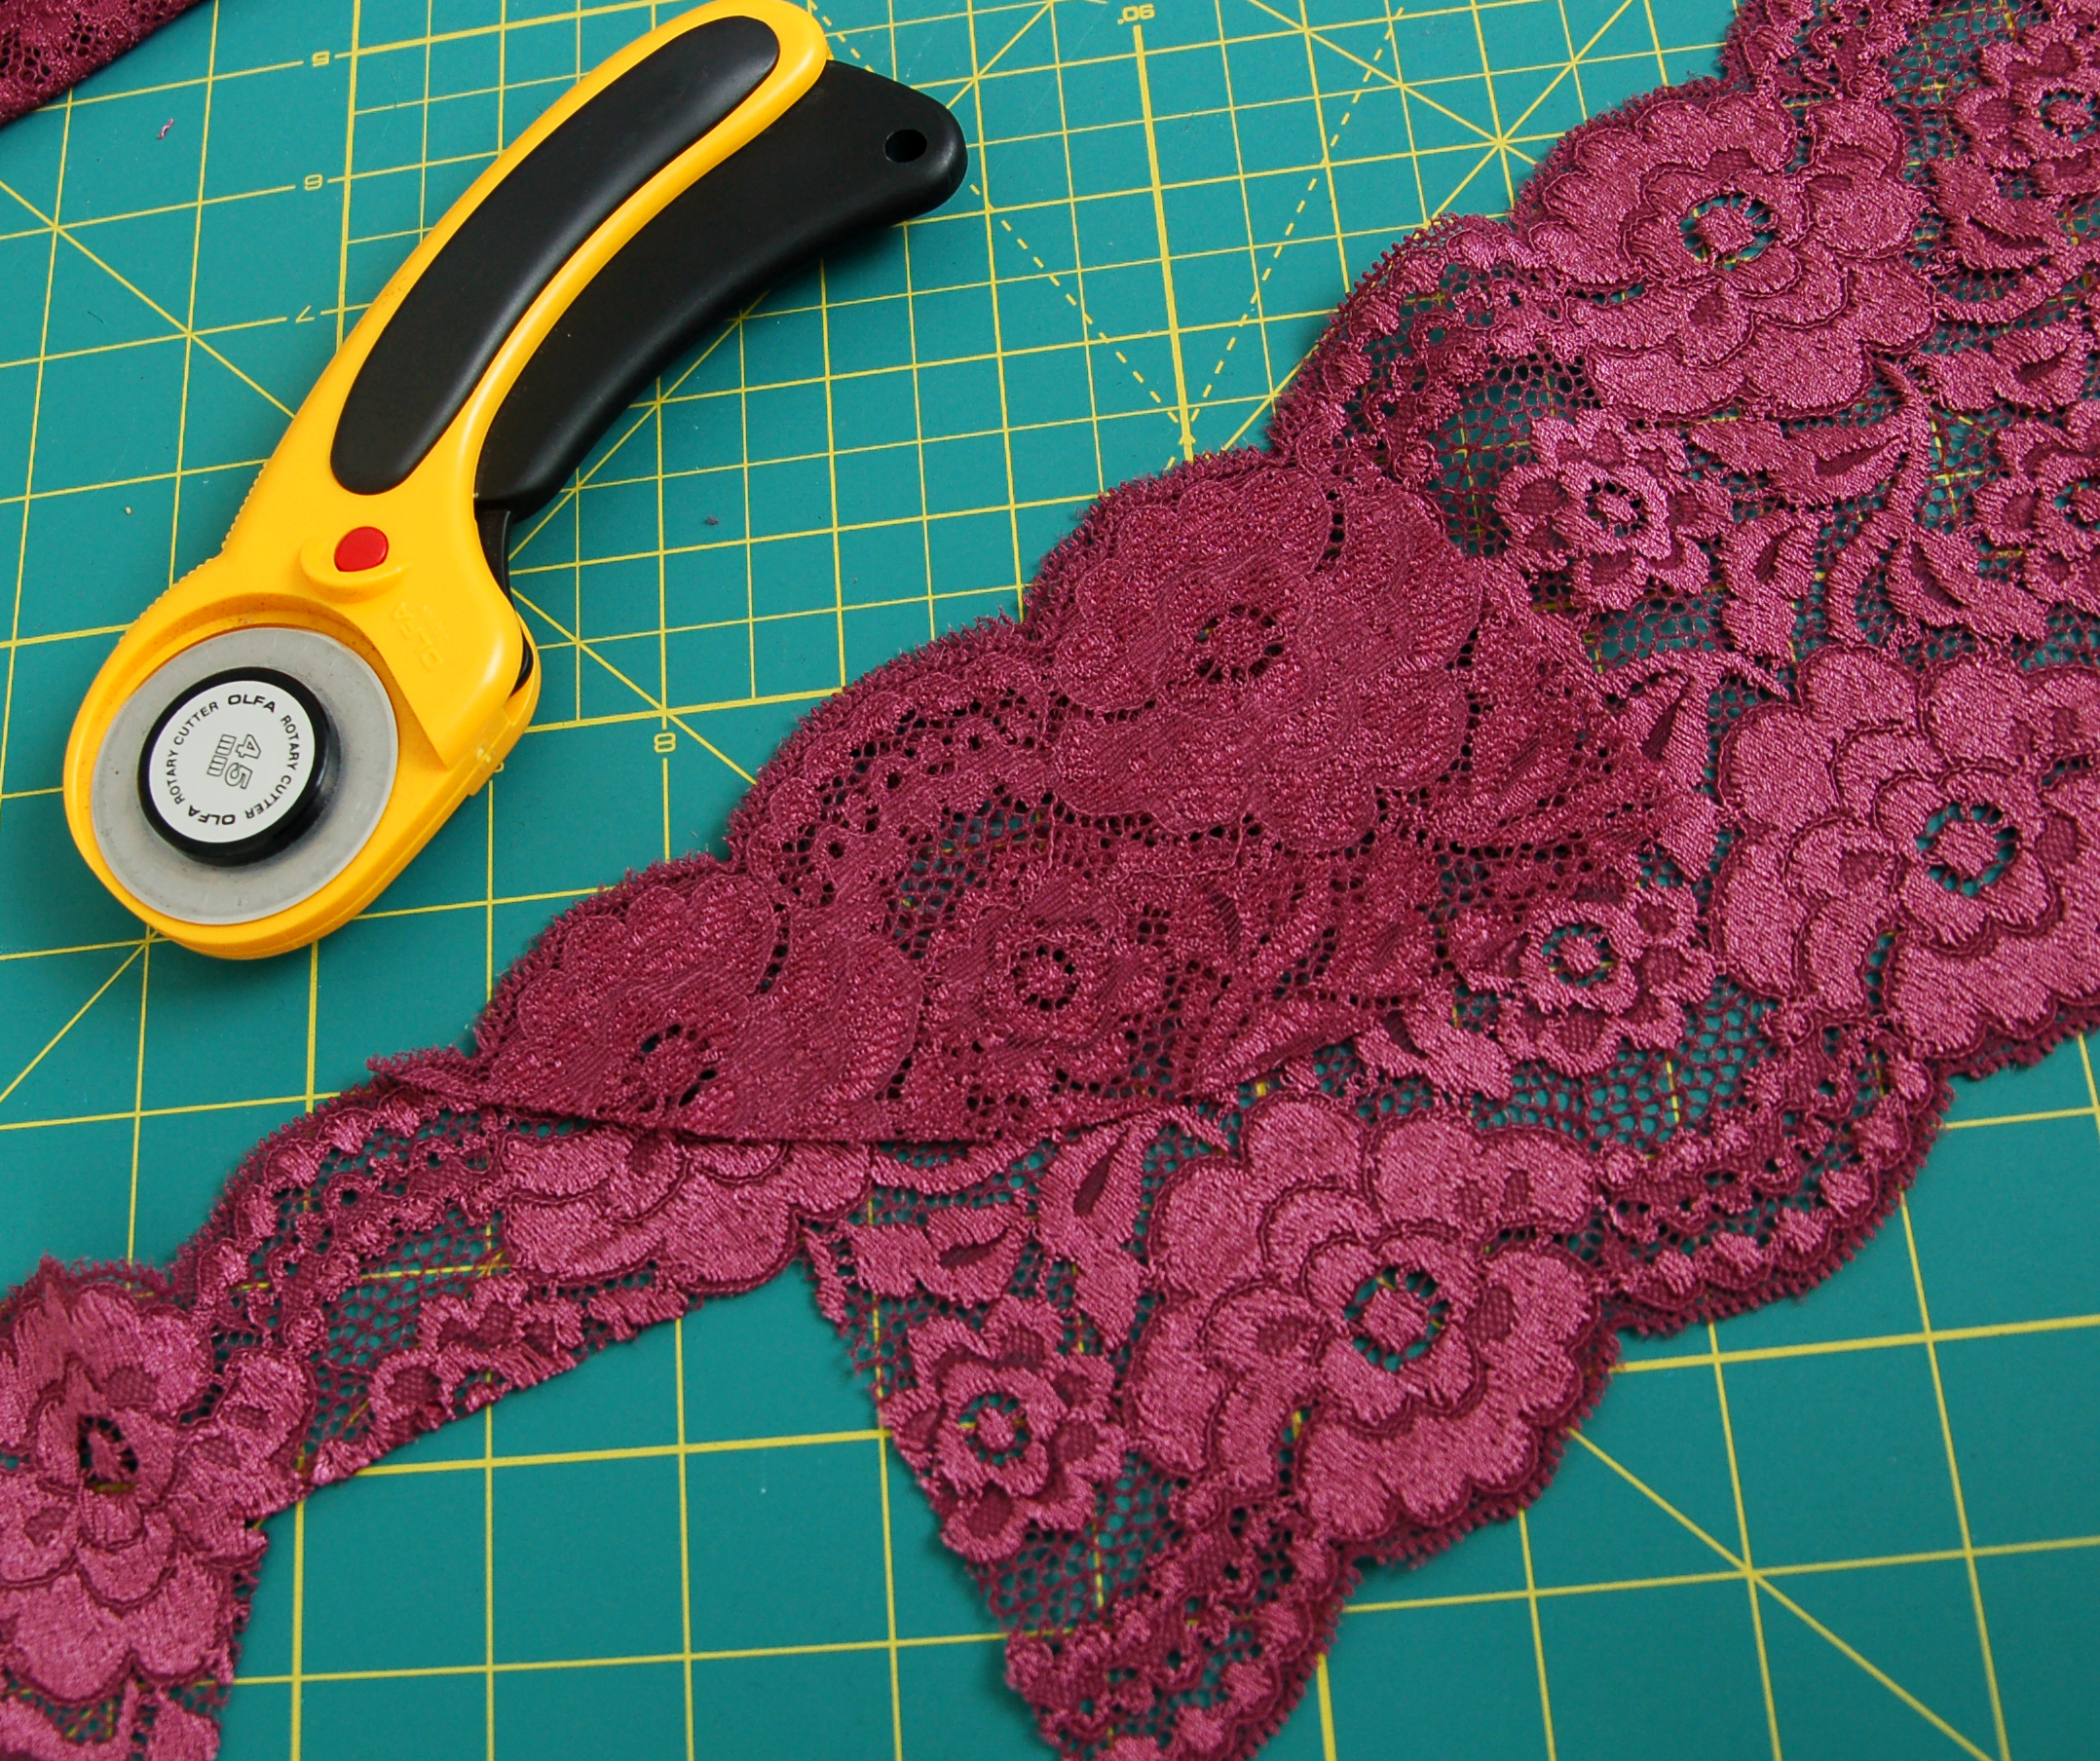
...o lo que me gusta más: coger la primera parte cortada y ponerlo directamente derecho con derecho en el encaje para buscar exactamente el mismo sitio para que todo quede bonito y el dibujo en el encaje sea simétrico en los dos lados.
Por cierto, me gusta más cortar todo lo de lencería con el cutter más pequeño de 18 mm, pero como por el momento se me acabó la cuchilla pues voy con el grande que también se puede, con más cuidado, eso sí.
...or what I like more: you take your fisrt cut out piece and put it directly with right sides facing together on the lace to find exactly the right spot with both scallops being symmetrical.
By the way, I like to use my little 18 mm cutter for lingerie cutting but at the moment I'm out of blades so the big one will do, just have to take more care when cutting.
La otra parte de la copa lo tienes que cortar de la manera normal, sin cambiar el patrón y allí no me fijo tanto de la simetría en los dos lados de encaje. Eso sí, otra vez ves que mi dirección de elasticidad está ligeramente inclinado...en mi caso no es gran problema, pero hay que considerar que eso puede cambiar el resultado final hablando del tema de elasticidad. También ves que mi encaje es bastante estrecho y como uso copa pequeña, la pieza sí cabe allí. En una copa de talla más grande no puedes usar este encaje para cubrir toda la copa porque no cabe en el ancho. Es importante ver eso antes de por ejemplo comprar un kit de lencería o encaje por metros. Te recomiendo primero comprar el patrón, imprimirlo y medir exactamente cuánto ancho de encaje necesitas para tu patrón.
The outer cup piece is cut out as usually, there are no changes made to the pattern and I don't really bother a lot about the lace symmetry there. Then again you can see that my greatest stretch direction is slightly tilted...in my case it's not a biig problem, but you have to remember that it might alter the fit later on. Also you can see that the lace I'm using is quite narrow and as I use a small cup size my pieces can be cut out but if you would be making a bigger size you probably couldn't use this narrow lace as it's not wide enough for your cup pieces. It's important to check out the width you need before buying lingerie sewing kits or just lace per meter, I recommend to first buy a pattern, print out your size and then measure the fabric you'll need.
Una vez cortadas las piezas es un buen momento para comprobar si tienes todas las piezas en espejo y no haya confusión por allí (me pasa mucho...). Seguimos con dos diferentes métodos para preparar tus piezas para empezar a coser.
Once you've cut out your lace pieces it's a good time for checking if you have all the pieces on the correct sides with no confusion (happens to me a lot...). Let's continue with two different methods to prepare your lace for sewing.
copas sin forro // cups without lining

Si coses tu sujetador en la parte de las copas sin forro y tal cual sólo con el encaje, el siguiente paso sería estabilizar un poco esa parte bonita de la puntilla para que no se de de sí con el tiempo. Para eso puedes utilizar elástico transparente. Lo que haces es simplemente cortar un trozo algo más largo que el borde de la copa y lo coses con zigzag en el revés de la pieza cerca de los puntos más bajos de la puntilla. Deberías muy-muy ligeramente estirar del elástico para que tenga buena tensión.
If you're sewing your cups without lining and only with lace the next step would be stabilizing the scallop edge a bit so it wouldn't stretch out in the future. You can use clear elastic for that. What you do is simply cut a clear elastic tape a bit longer than your cup edge and you sew it with a zigzag stitch on the wrong side of the cup close to the low points of the scalloped edge. You should only very slightly pull the elastic there so it'll have a bit of tension.

Ya está! Ahora puedes seguir con los siguientes pasos de tu patrón. En el caso de no tener elástico transparente podrías usar otro tipo de elástico de lencería más bien fino para hacer lo mismo. De todas maneras creo que el transparente es lo que mejor funciona y menos se ve. Lo bueno es además que el zigzag en el mismo color que el encaje no se suele ver casi en el derecho!
That's it! Now you can go on and sew your cup pieces together. In case you don't have clear elastic you can use some other narrow bramaking elastic to do the same. Anyhow I think that clear elastic is the best option here as it doesn't show through. The good thing about zigzag in the same color is that you can hardly see it on the right side of the lace!
copas con forro // cups with lining
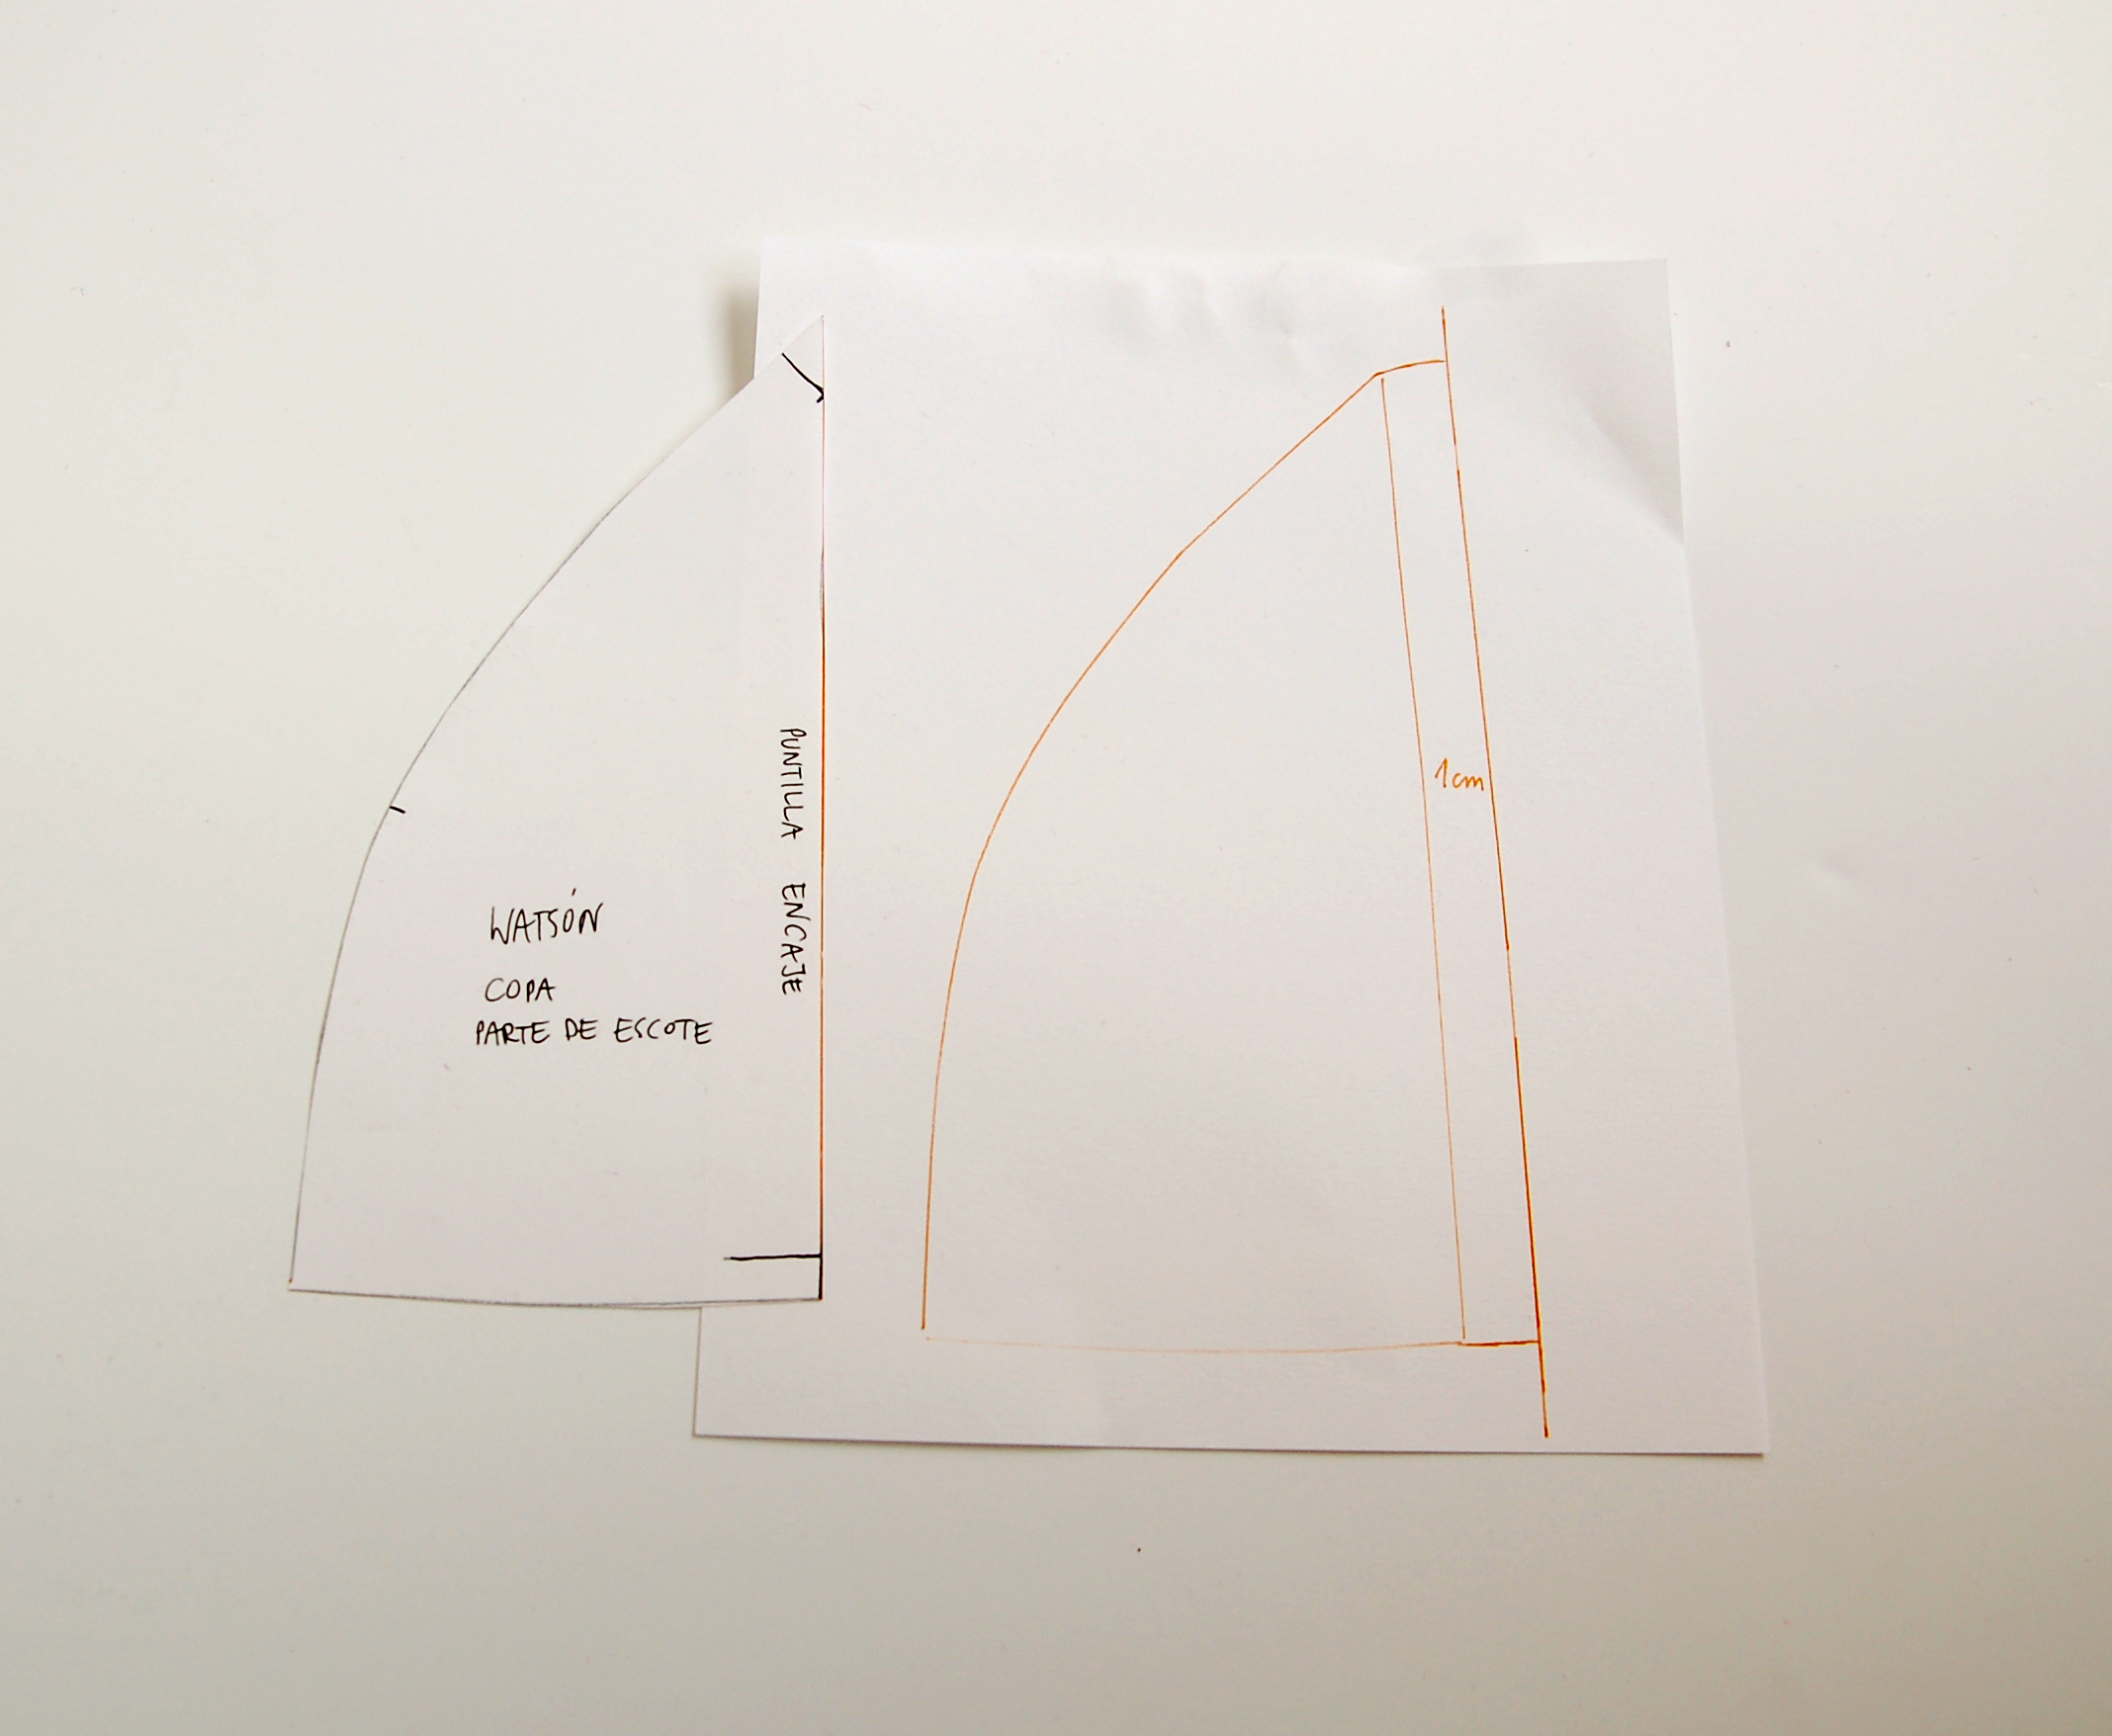
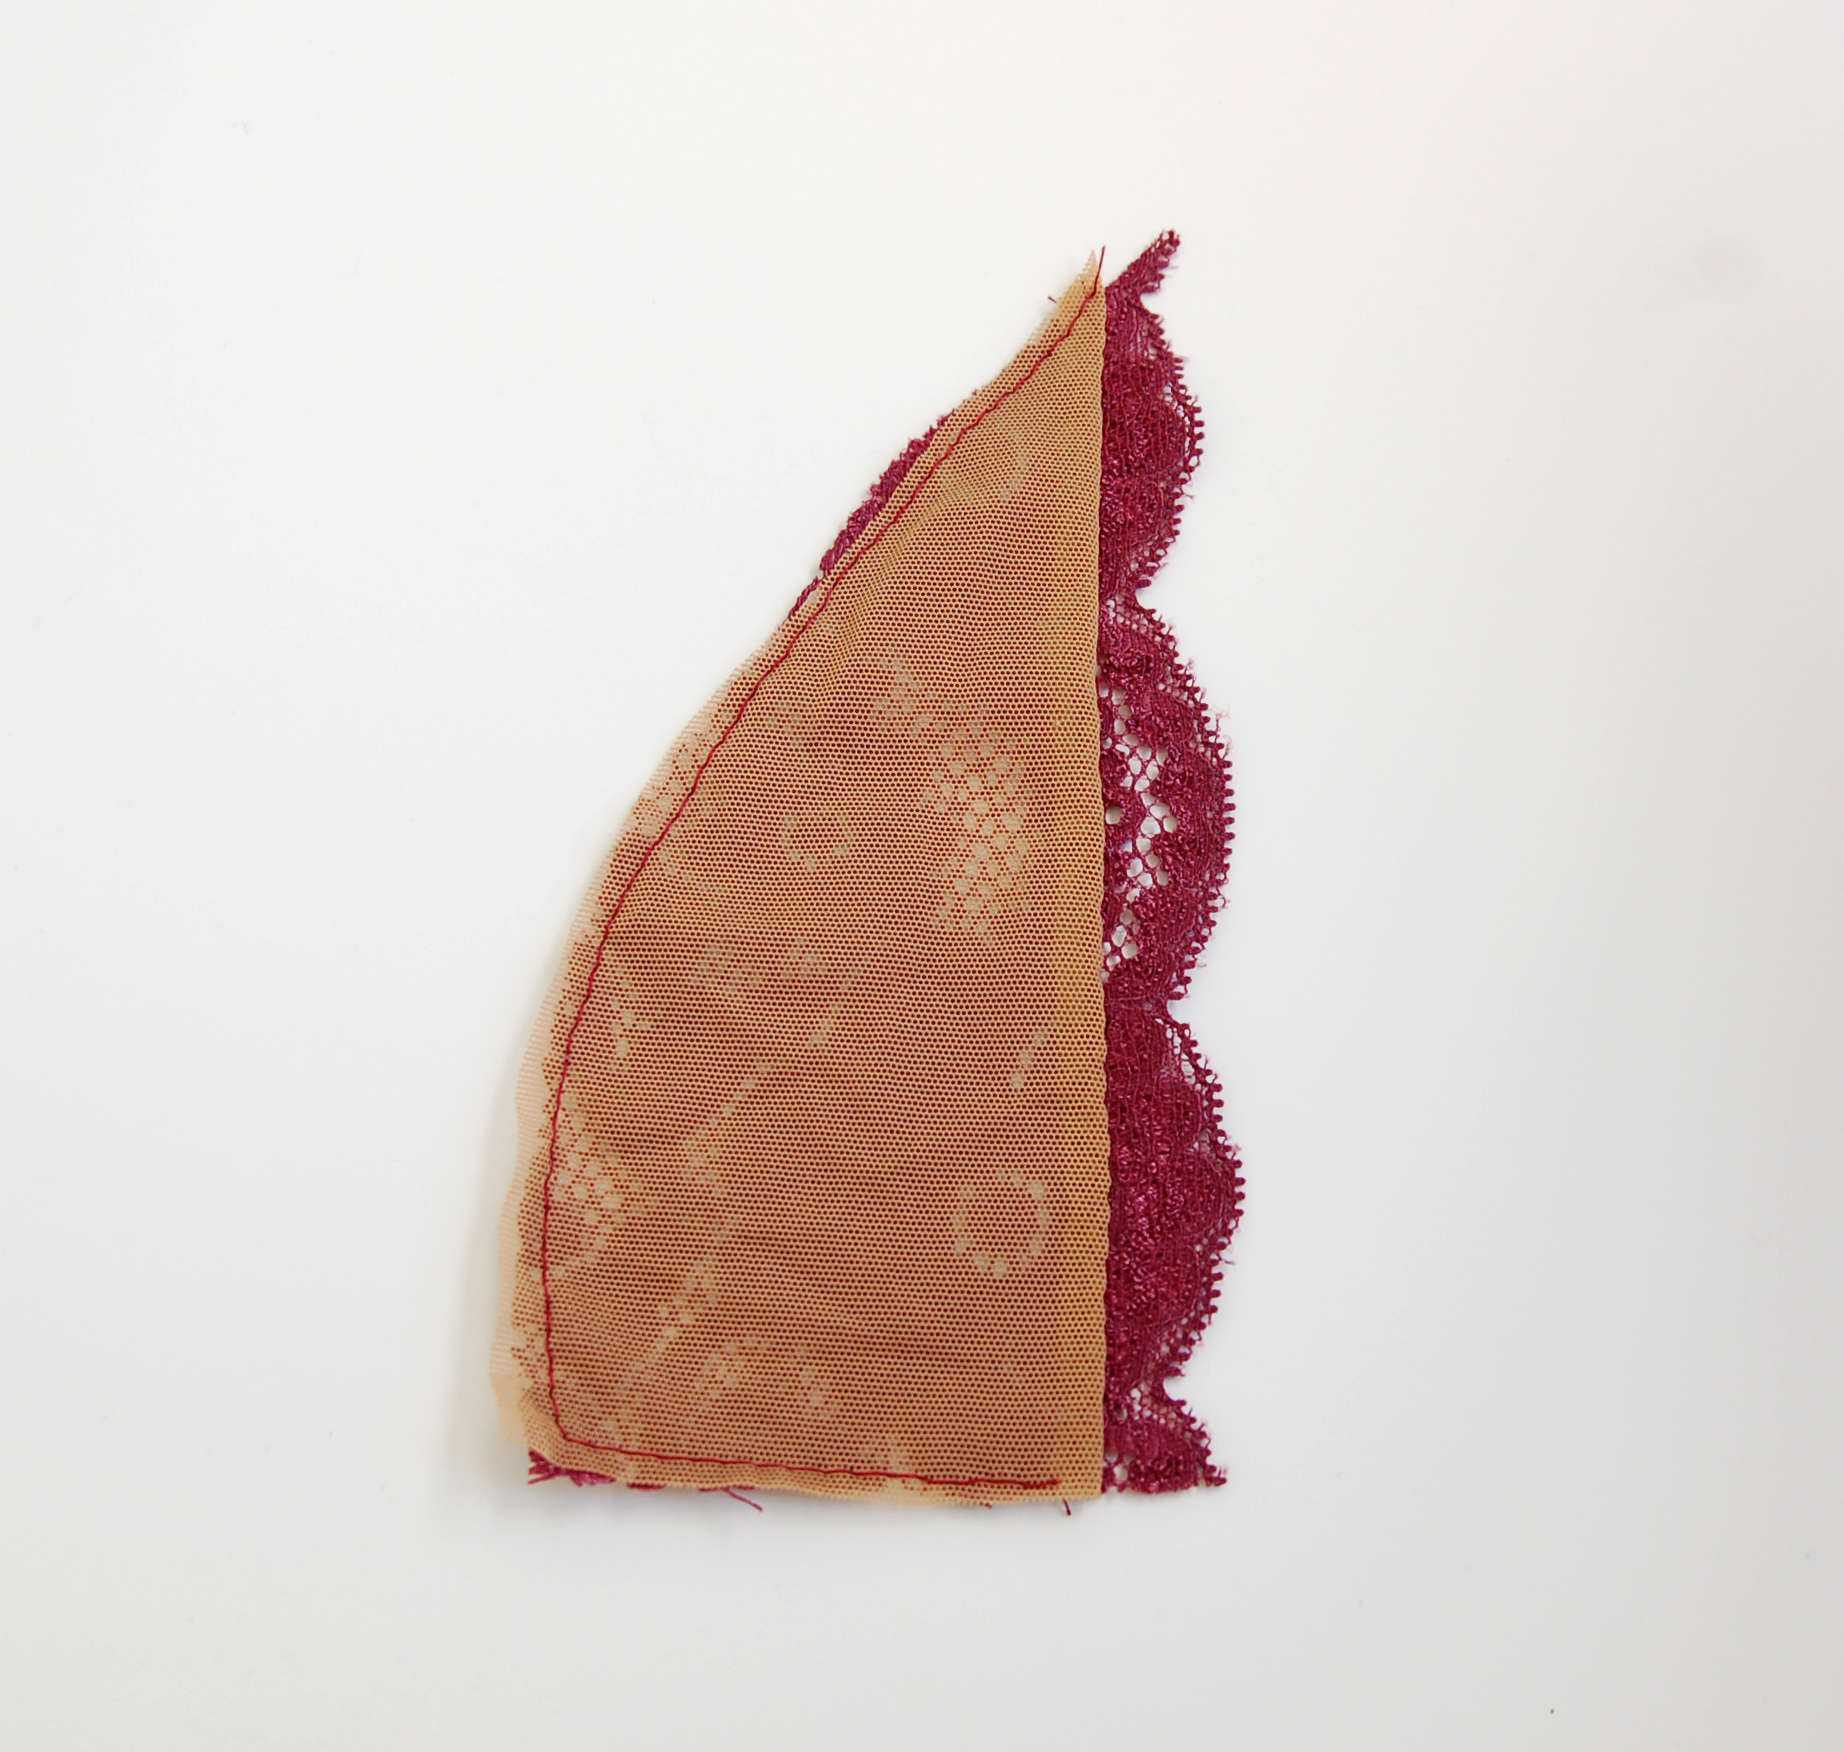
Ahora os cuento cómo he hecho todos mis Watsons, porque me gusta más forrar el encaje con la tela de stretch mesh porque me parece algo más discreto. Primero tienes que seguir todo igual como en los pasos anteriores para cortar tu encaje. Luego usas el mismo patrón de la copa de encaje para hacer otro patrón más para tu forro. En mi caso le añadí 1 cm al lado de la puntilla ya ya está. Ahora vas a ver para qué.
Now I'll tell you how I've sewn all my Watsons, because I like to line the cup pieces with stretch mesh to have a bit more covered look. First you have to follow all the same steps to cut out your lace pieces. Then you'll use the same inner cup piece you made to make another pattern for the lining. In my case I added 1 cm to the scalloped lace side and that's it. Next you'll see why.

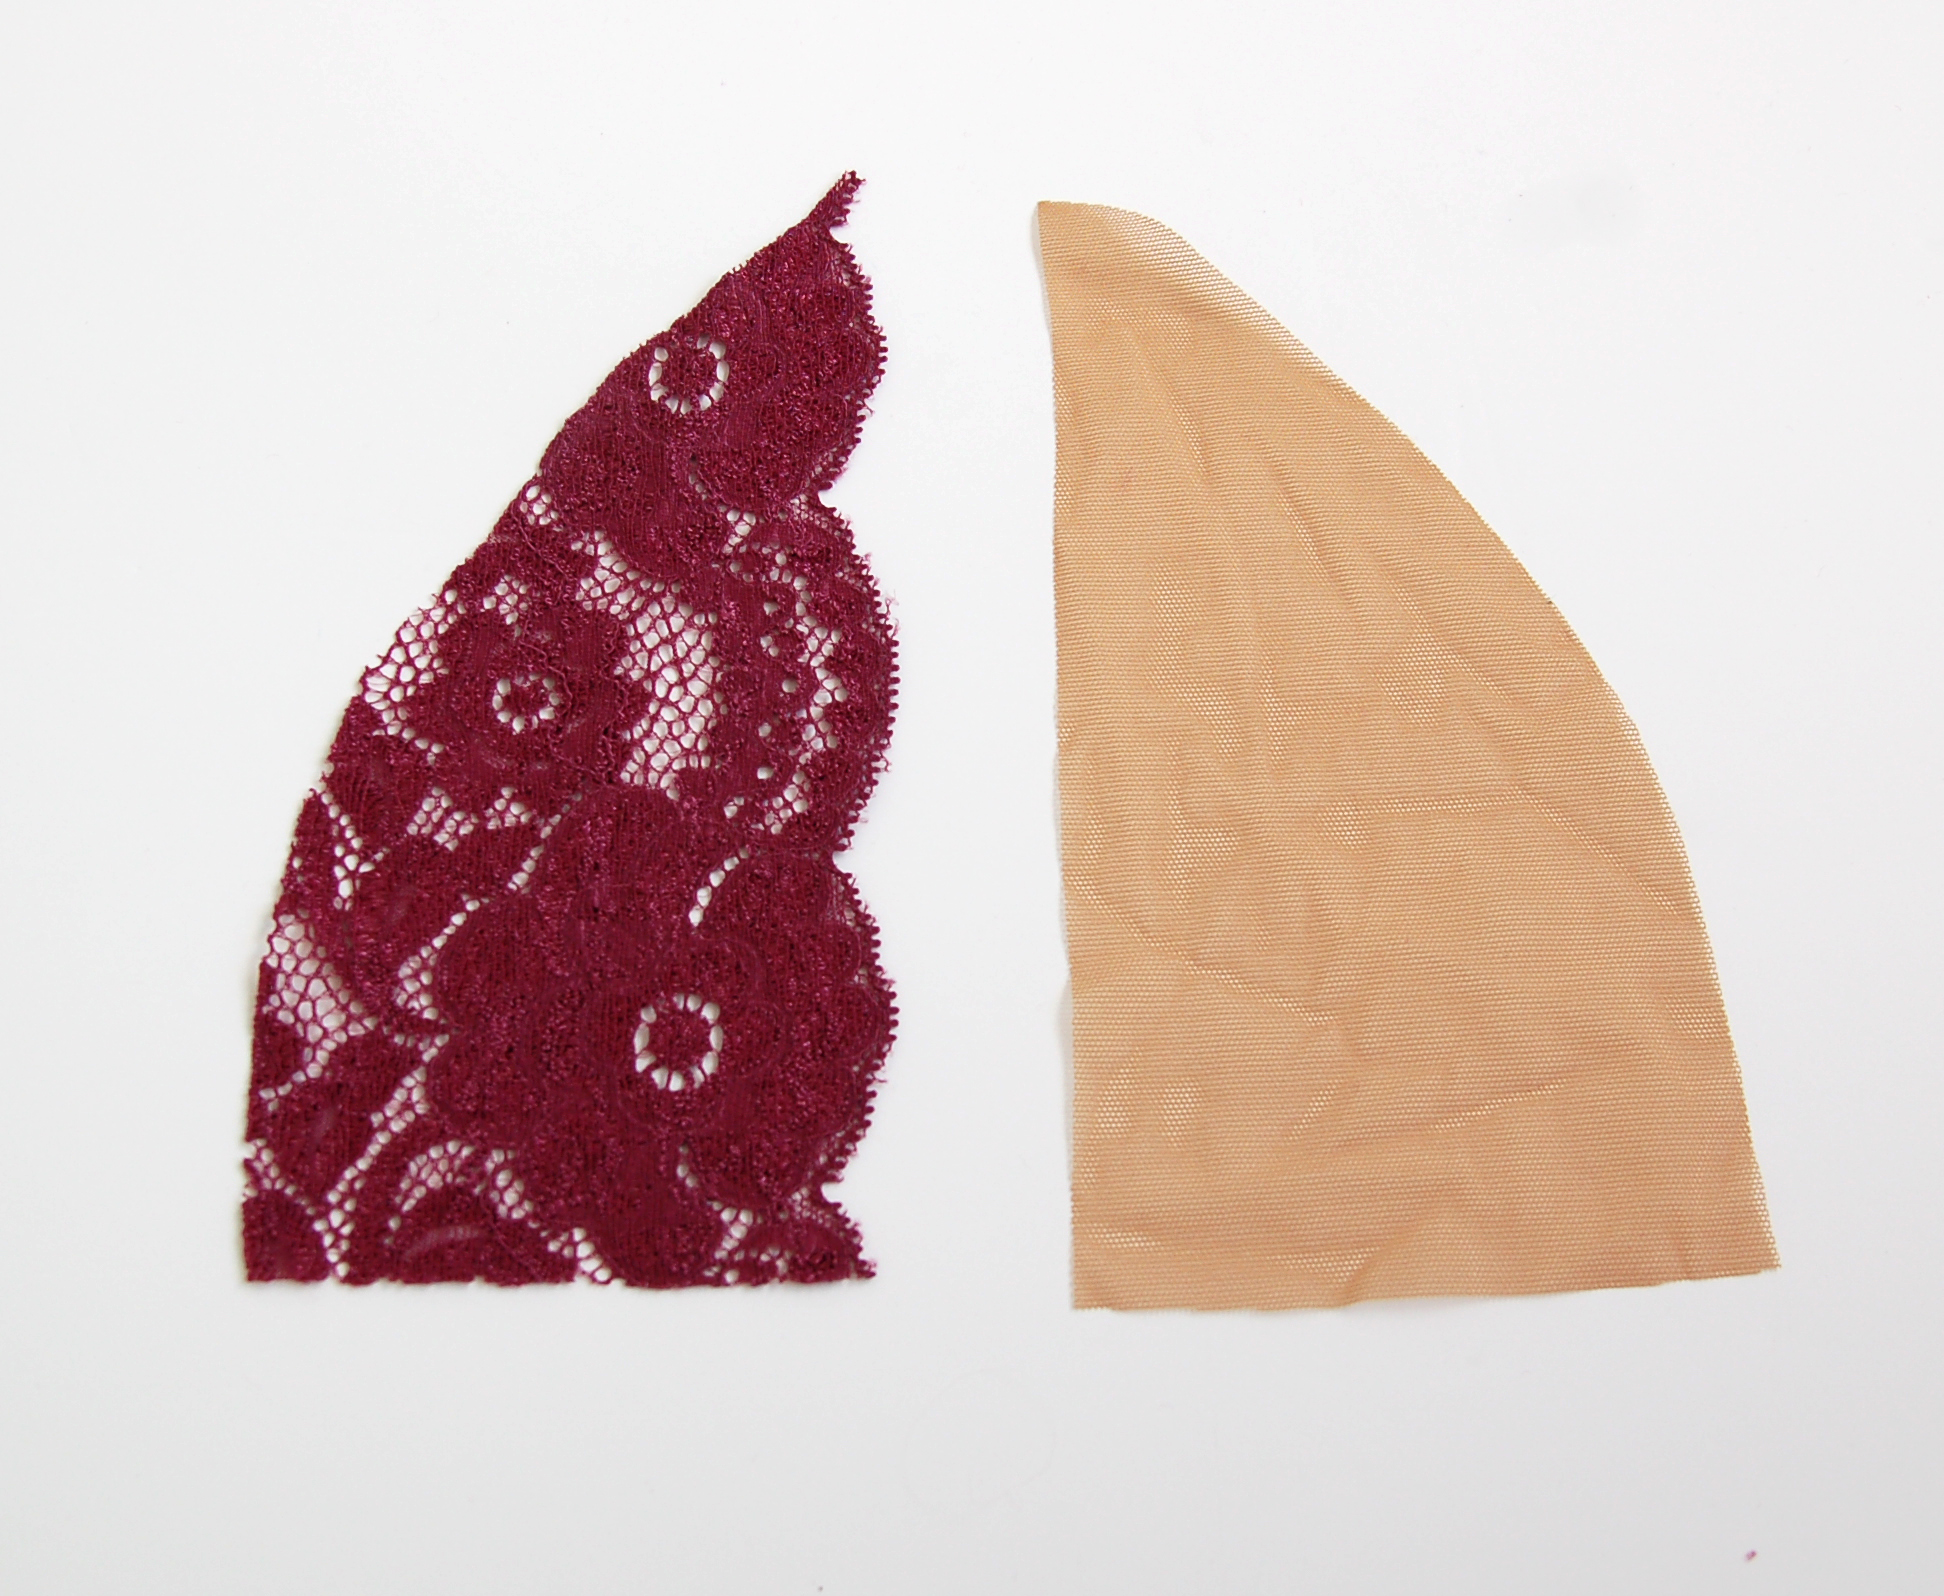
Corta dos piezas del forro (tiene que ser también algo elástico como por ejemplo stretch mesh), lo puedes hacer en doble capa porque ya no tenemos que estar buscando simetría de puntilla como en el encaje.
Cut your lining pieces on the fold of your lining fabric (it has to be a fabric with stretch like stretch mesh for example), we're not looking for any special lines here.
Coloca una pieza de la copa interior (con la puntilla bonita) con cara del revés hacia ti y al lado suyo la pieza del forro con su revés también igual que en la foto.
Take one of your inner cup lace pieces with the wrong side facing you and put it next to a lining piece wrong side up like you see on the photo.
Superpone el forro encima del encaje por unos 1,5 cm desde el punto bajo del encaje.
Put the ling piece on top of the lace piece, covering about 1,5 cm from the low point of the scallop.
Ahora cose con el zigzag a través de las dos capas aprox 1 cm desde el borde del forro (yo lo hice más cerca porque me olvidé, jeje).
Now sew through the two layers aprox 1 cm from the lining edge with zigzag stitch (I sewed closer as I kind forgot that step, hehe).

Ahora ves que si doblas tu forro hacia el encaje con los revéses juntos te queda este borde bonito y limpio y al mismo tiempo has cubierto la pieza. En mi caso ves lo que pasa cuando coses al borde y no a 1 cm. Pues sobra forro, pero eso es muy fácil de quitar, simplemente corta según la pieza del encaje y ya está.
Now when you fold the lining on the lace with wrong sides together you see the beautiful and neat finish and the lining that now covers the piece. In my case you see what happens when you sew closer to the edge: there is too much lining but it's easy to just cut away the rest.
Ahora pasa en los lados abiertos puntada larga recta para "hilvanar" juntas las capas y desde allí trabajas ya con las piezas como si fueran uno. Lo mismo haces con la otra parte de la copa, pero es más fácil, allí cortas el forro igual que el encaje y pasas la puntada recta. Y nada, ahora ya a unir las copas y lo demás!
Now you just "baste" the open edges together with long straight stitch on your machine and from then on you'll have the two layers as one piece. You do the same with the outer cup piece but it's even easier as you don't have to alter the pattern, just cut out lining like your lace and baste them together. Now you just sew together your cup pieces and the rest!

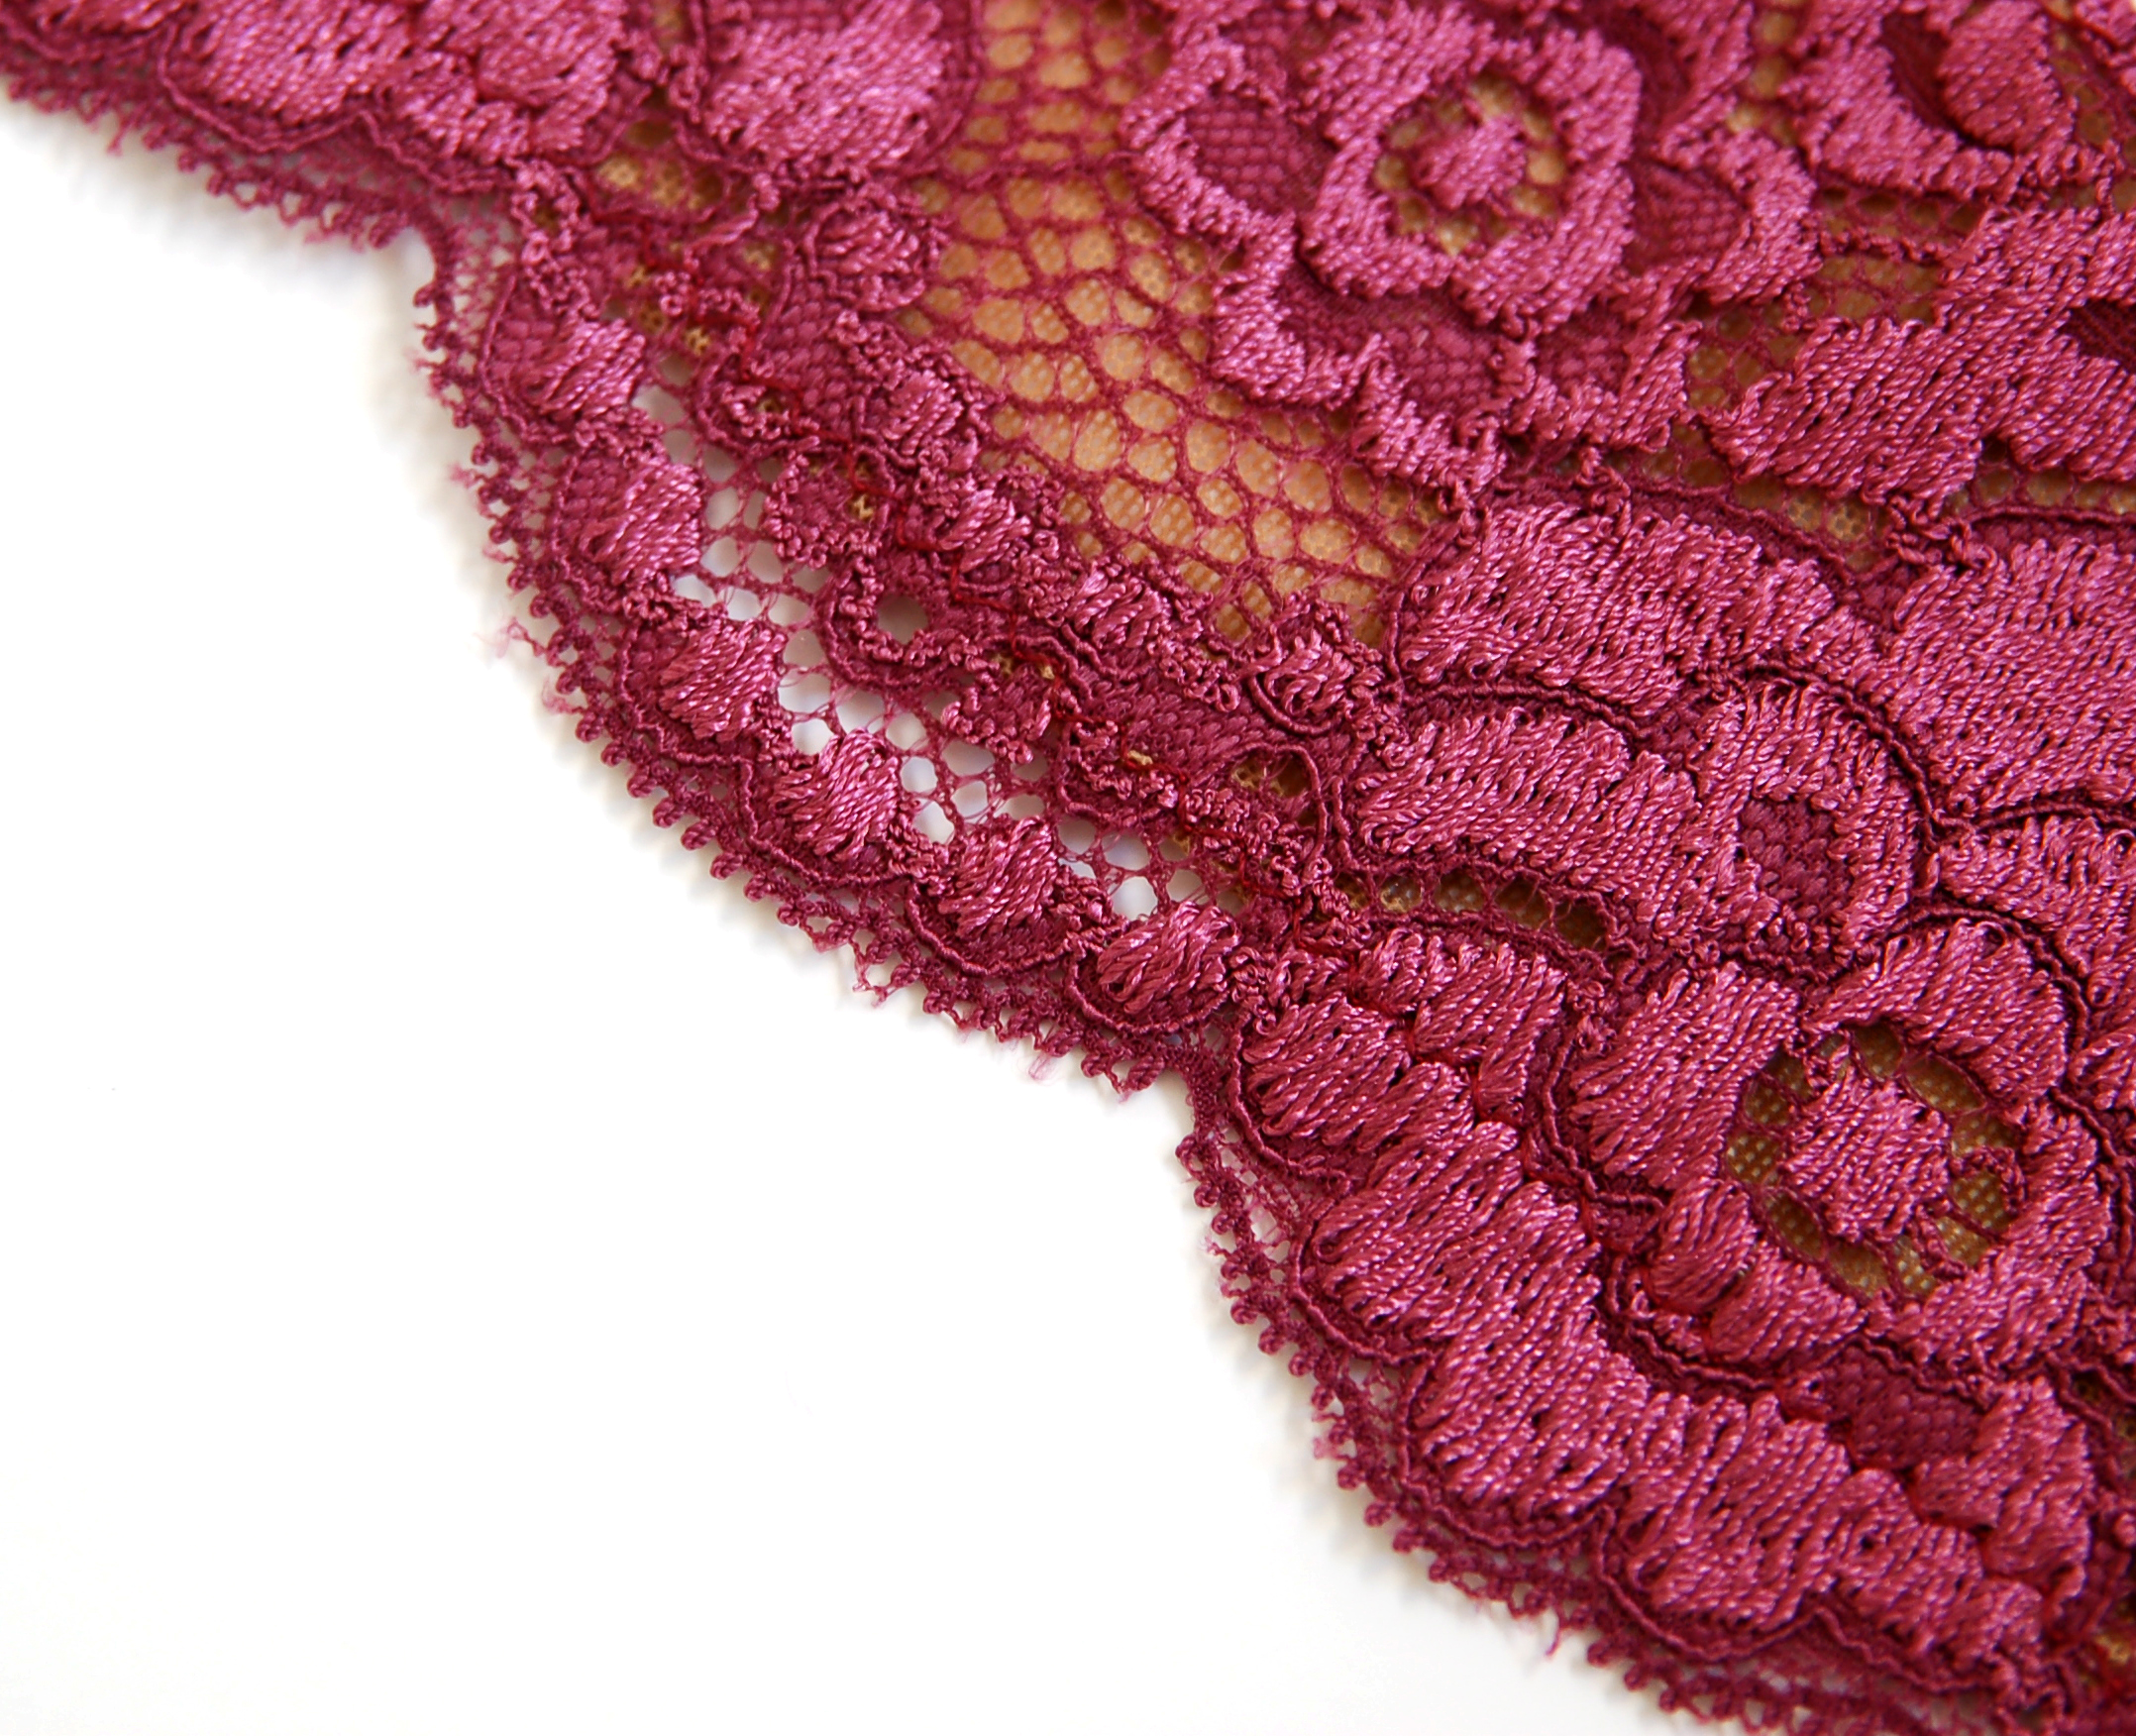
Ya ves que al estar el borde de forro más allá del punto más bajo de la puntilla, se queda bonito con su transparencia a la vista justo hasta donde quieras.
Ahora, en este caso no puse el elástico transparente para estabilizar porque no me ha hecho falta, pero puedes hacerlo perfectamente. Te recomiendo unir primero el forro con encaje y entonces encima de la misma costura colocar el elástico transparente y volver a coser. Después doblas el forro y unes las piezas como en la foto. De esa manera quedaría el elástico entre el forro y el encaje.
As you can see the lining stayes a bit away from the scallops so you'll have your transparencies exactly where you want them to be.
I didn't use clear elastic on this example because I didn't need to, but you can do it of course. I recommend you to first sew together the lace and the lining and then on the same stitching line attatch the elastic, then fold over the lining and baste together. The elastic actually stayes between the lace and the lining.
Como ves, el zigzag se nota poquísimo, por eso no te preocupes por estas costuras, no son casi visibles.
Una chica que compró el kit en la tienda me preguntó de que si podría usar el encaje para el sujetador Marlborough de Orange Lingerie. El caso es que ese patrón está pensado para encajes y telas sin elasticidad en las copas. Yo creo (sin haberlo probado) que si estabilizas/forras tu encaje elástico con sheer nylon (la tela que es similar a stretch mesh de transparencias pero sólo estira en una dirección) y aprovechas la dirección sin elasticidad para darle esa estabilidad al encaje, puede funcionar! Obviamente también puedes usar foam y hacerlo más fácil...
Qué os ha parecido? Es mucha foto por tan poca cosa verdad, jeje? Espero que sea de ayuda y si tenéis más opciones no dudéis en ponerlo en los comentarios. Eso como siempre digo, es mucho de prueba y error, pero no hay que tenerlo miedo!!
As you can see the zigzag is hardly seen on the right side, that's why you shouldn't worry too much about your stitching as it's almost invisible.
One of my clients who bought a lingerie kit at my shop asked me if she could use the stretch lace from the kit for a Marlborough bra from Orange Lingerie. A pattern like that needs a stable lace or no stretch fabrics for the cup pieces. I think (but I haven't tryed it myself) that when you stabilize/line your stretch lace with sheer nylon (it's similar to stretch mesh but with stretch in only one direction) and use the no stretch direction to stabilize the lace it could work out! Of course you can also use foam and it would be easier...
What do you think about this tutorial? Lots of photos for not so much work, right hehe? I hope it helps you out and if you know other ways to work with lace on cups just write it on the comments section. As I always say, it's all about trying out different methods, but don't be afraid of bramaking just because of that!!

Discover my ebook about sewing lingerie
10 step by step illustrated sewing tutorials that will teach you new techniques and inspire you to get creating!