
In this post: details of my two viscose blouses, a tip for learning new sewing techniques, Pili Tejidos Encants and Nonoya fabric shops in Barcelona, my long viscose dresses, my mother's sewing space and some 1993 Burda eye candy.
En este post: detalles de mis dos blusas de viscosa, truco para enfrentar nuevas técnicas de costura, las tiendas Pili Tejidos Encants y Nonoya en Barcelona, mis vestidos largos, el espacio de costura de mi madre y unas joyas del Burda del año 1993.
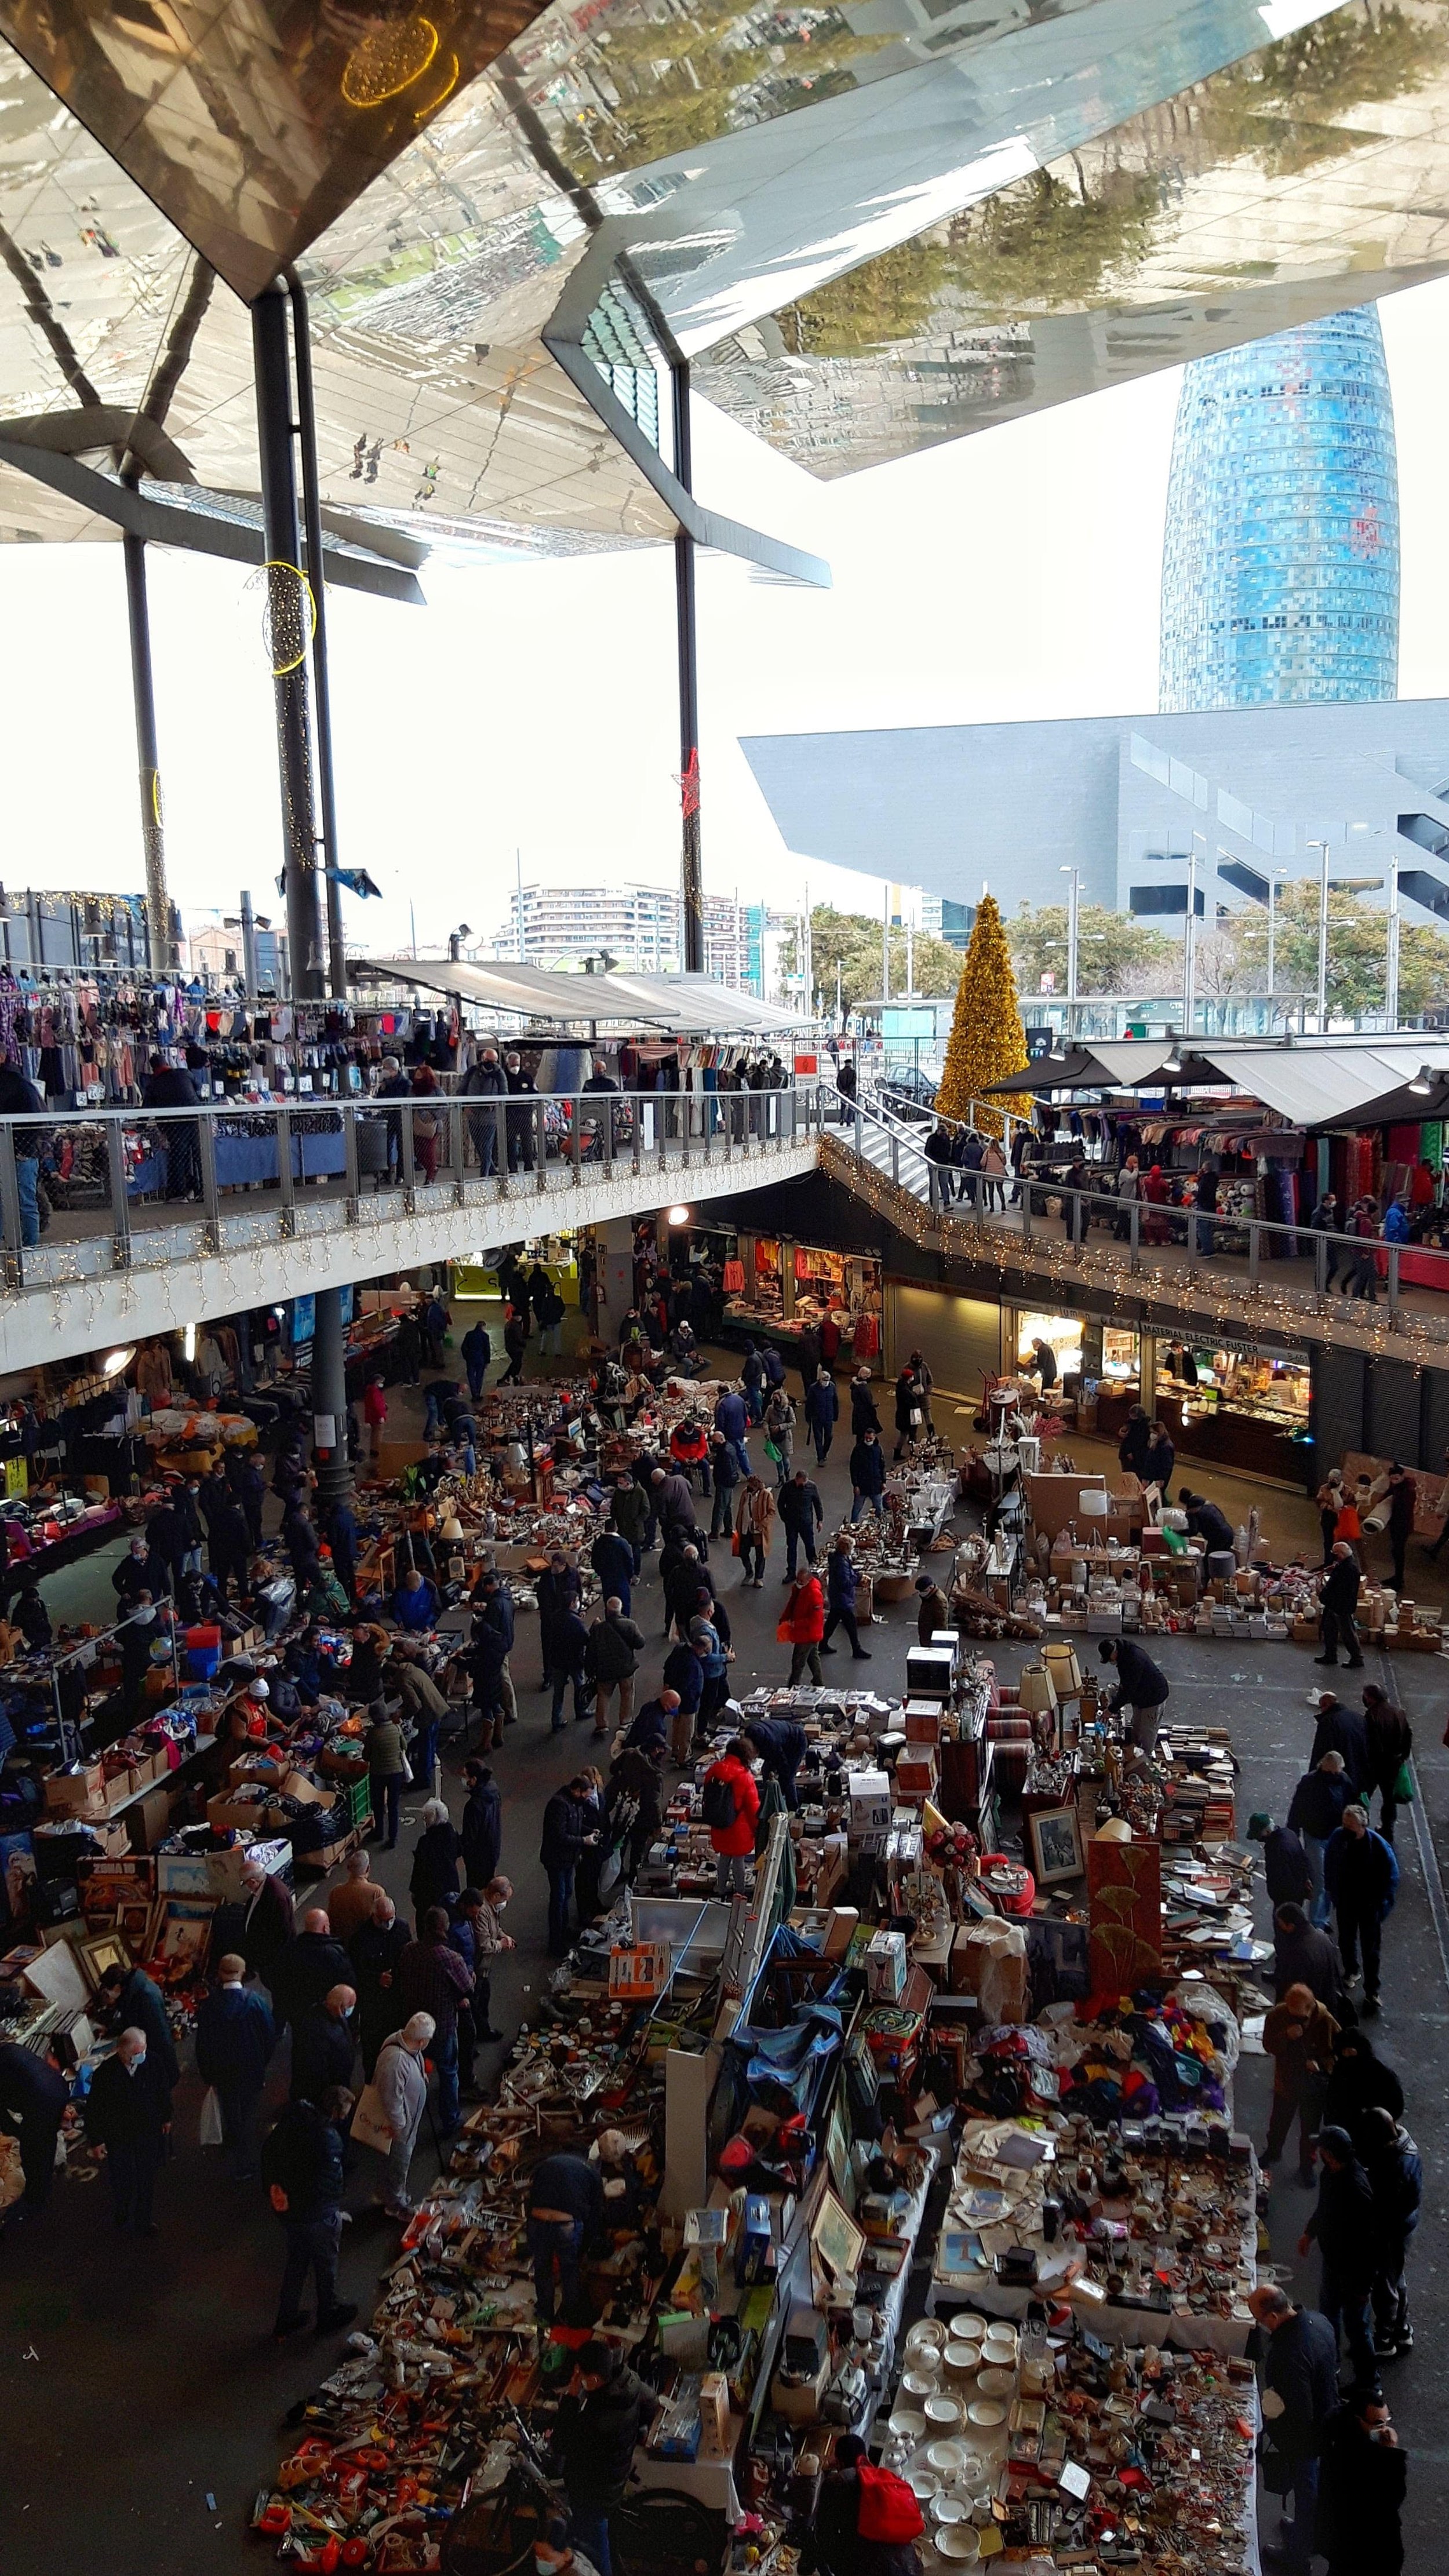
Mercat dels Encants de Barcelona

Pili Tejidos Encants (paradas 416 a 420)
The floral blouse was the first garment I sewed during my vacation. I had a variety of fabrics with me and I knew that I was going to use this rahter light weight viscose for a blouse, but in case I changed my mind about the project, I had three meters, haha.
That happens when you buy viscose at Pili Tejidos Encants, a fabric shop in Els Encants market (Barcelona) where this type of fabrics are so cheap. Lately (read: mostly last year, lol) I've been making long dresses with viscose fabrics (I'm going to add some pictures of the dresses that I haven't published below) so I haven’t been buying less than three meters if the particular fabric might might be a dress one day. Anyway...for this project I used of course less and the rest of it can be used for another project.
La blusa floral fue la primera prenda que cosí durante mis vacaciones. Llevaba conmigo una variedad de telas y sabía que esta viscosa finita la iba a usar para alguna blusa aunque por si me daba por cambiar de idea, tenía tres metros, jaja.
Eso pasa cuando compras viscosas en el puesto de telas de Pili en el mercado de Els Encants (Barcelona) donde todo es más barato. Encima últimamente me ha dado por hacer vestidos largos con este tipo de telas (voy a poner en esta entrada unas fotos de vestidos que no he publicado por aquí, ya que estamos) así que con menos de tres metros ya no estaba comprando en el caso de si la tela pudiera ser un vestido en el futuro. En fin…para este proyecto usé por supuesto menos y el resto se quedó allí en espera de otras ideas.
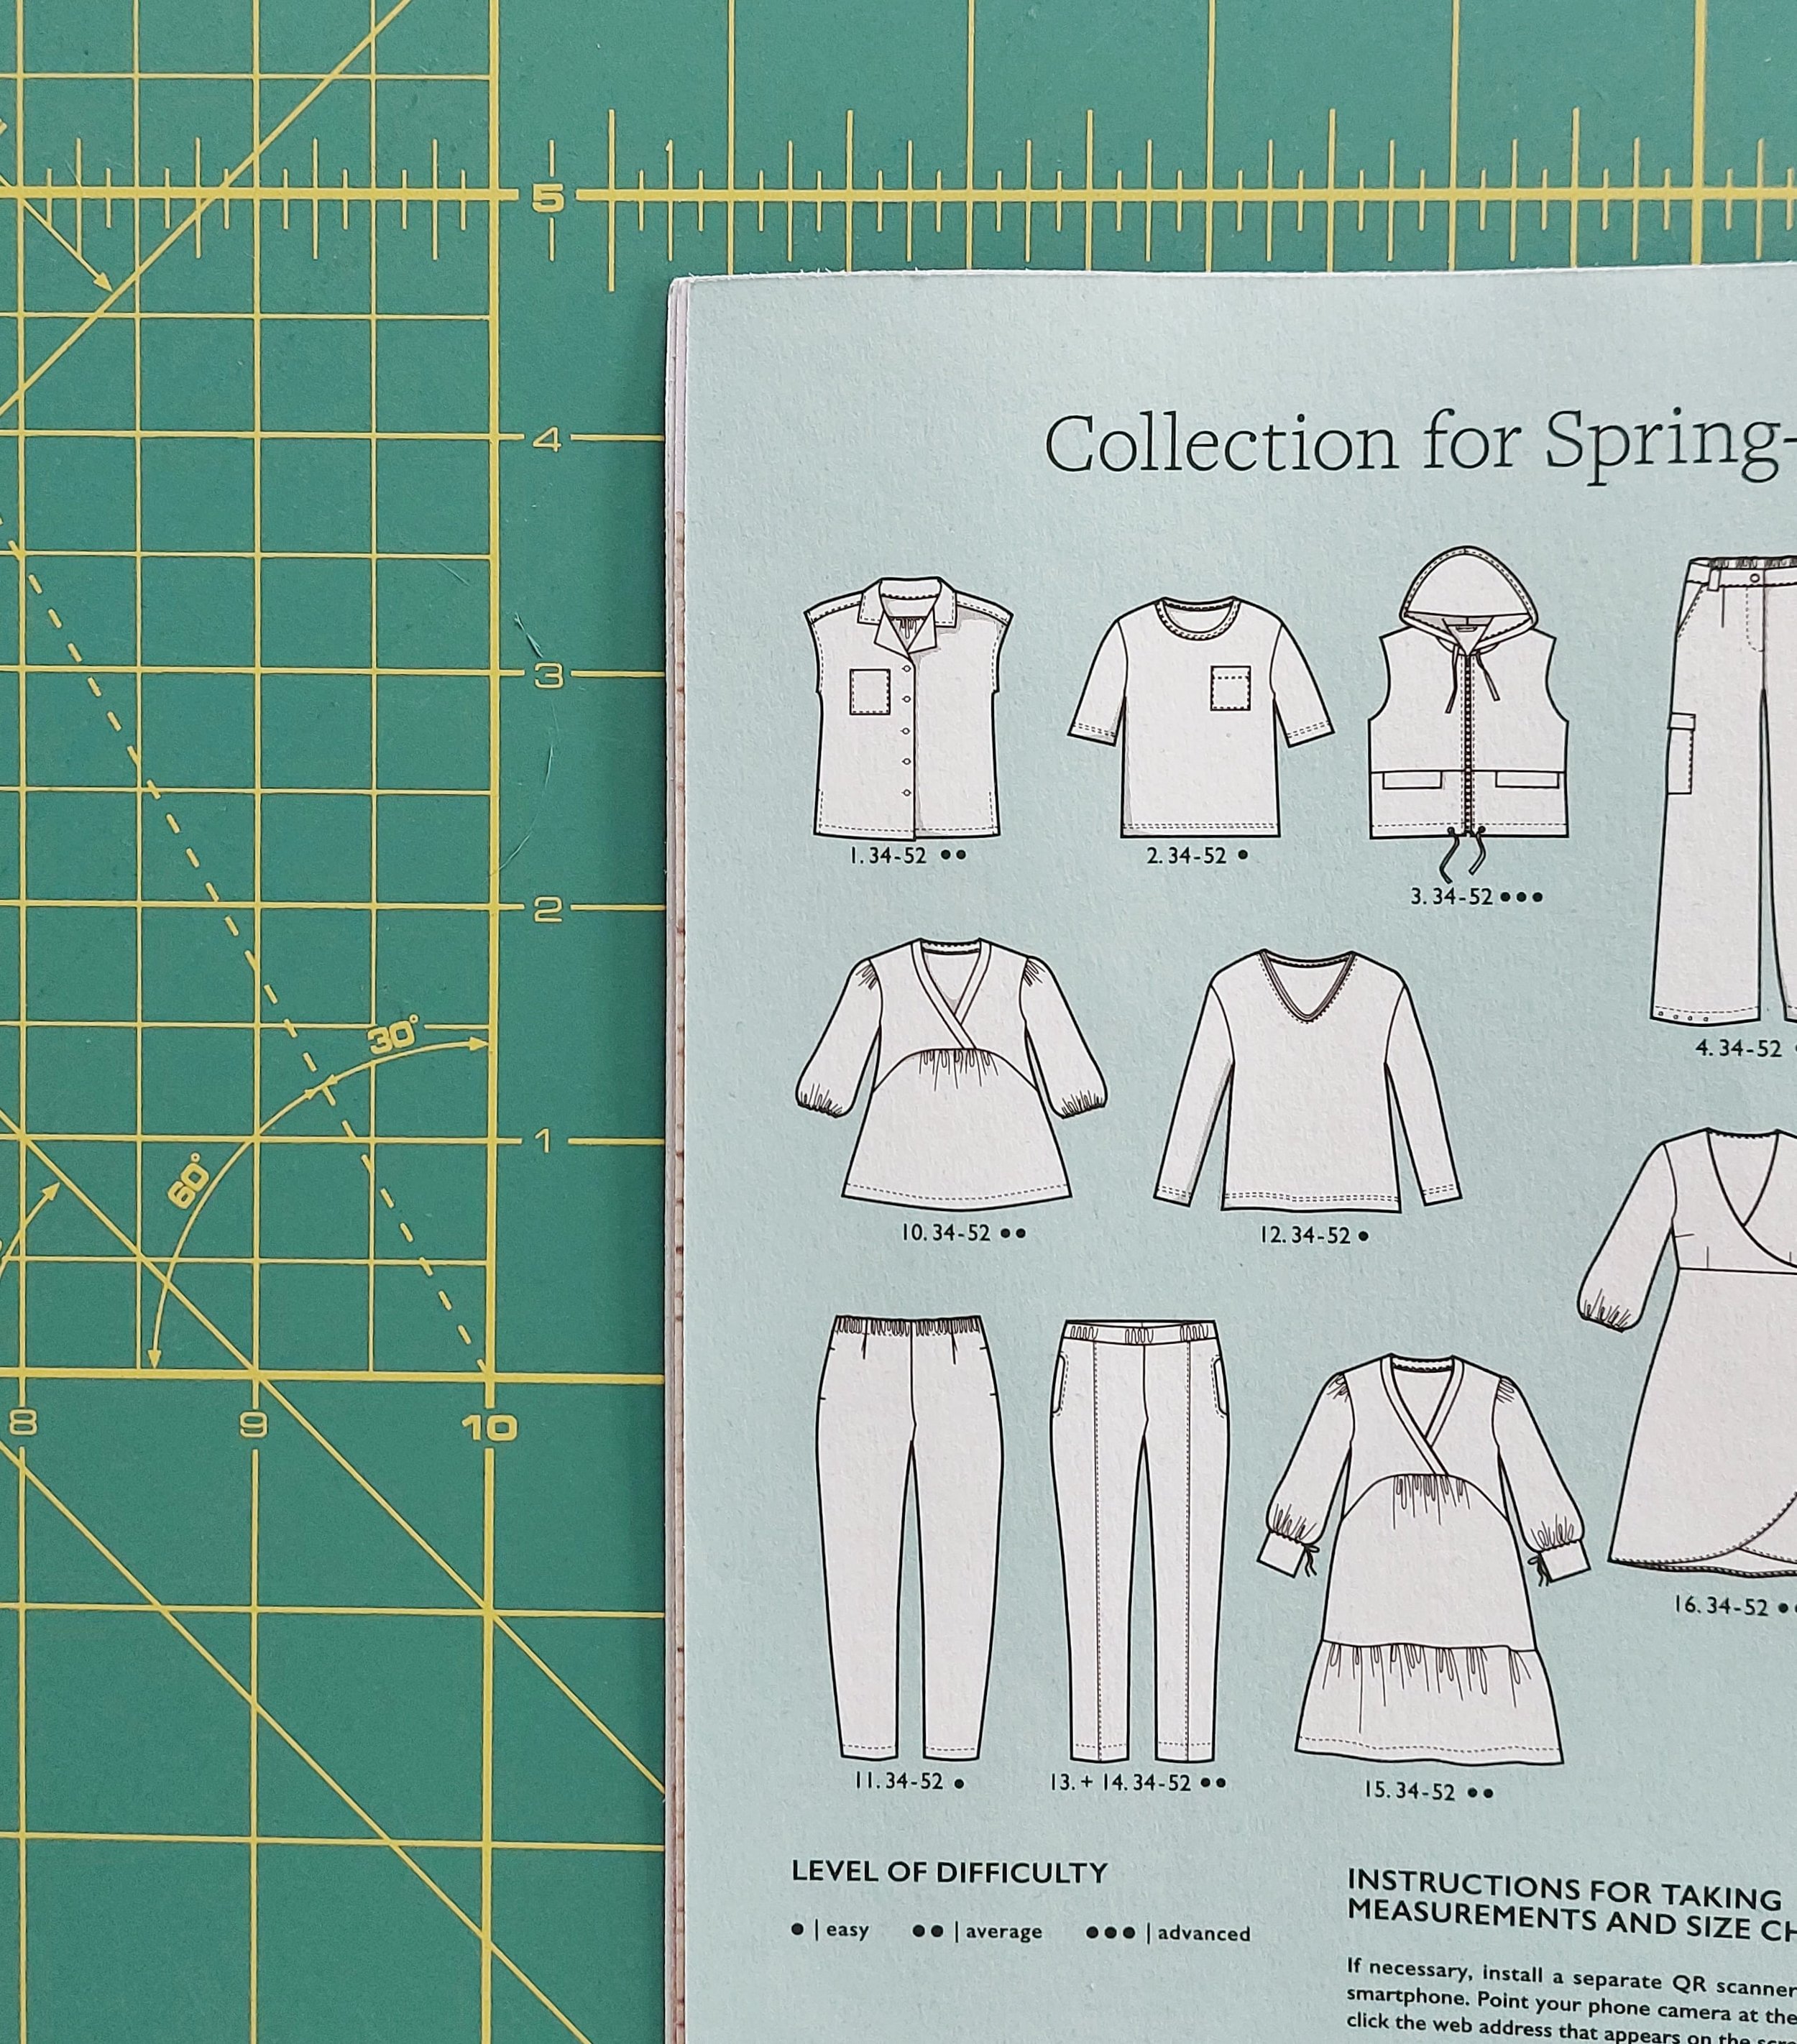
Pattern: model no 1 from Ottobre Design 2/2023
Size: 40, according to my full bust measurement I always choose that size for Ottobre (alterations below).
Fabric:
floral viscose lawn (100% viscose), purchased at Pili Tejidos Encants
Oasis Blush rayon viscose by Atelier Brunette (100% viscose), purchased at Nunoya
Quantity: I think it was 1.2 meters but I didn't measure it and I don't have the magazine with me to see from their chart
Patrón: modelo 1 de Ottobre Design 2/2023
Talla: 40, según mi medida de pecho siempre uso esa talla en esa revista (modificaciones más abajo)
Tela:
viscosa floral (100% viscosa), comprado en Pili Tejidos Encants
viscosa Oasis Blush de Atelier Brunette, comprado en Nunoya
Cantidad: creo que ha sido 1,2 metros pero no lo medí y no tengo la revista para ver lo que ellos pedían.

The fabric of my first blouse is a lovely floral print with a vintage feel. I like it so much that it’s the second time I buy it, haha. The previous time I passed by Pili's shop, I saw the same fabric but in a red colorway and I bought that remnant piece (not three meters, haha). I can make a collection, I know.
I wasn't sure about the pattern for this fabric, but it was probably going to be something like a Gilbert top from Helen's Closet. I've made several of those but I only have a photo of this sleeveless one in a cotton shirting. I really like that collar style! Browsing through my mother's Ottobre Design magazine collection (she has kind of a private library with all the magazines there), I decided on the blouse pattern in the latest issue of the women's magazine.
Speaking of Ottobre Design, I really like the new design of the technical drawings that they have implemented now (probably it’s not something important for most people, but some nice graphic design is something I always value).
La tela de mi primera blusa tiene un estampado floral con un aire un poco vintage que me flipa. Tanto que es la segunda vez que lo compro, jaja. Ya la vez anterior que pasaba por el puesto de Pili, vi la misma tela pero con flores rojas y me quedé con lo poco que quedaba del final del rollo (no tres metros, jaja). Me da para una colección, lo sé.
No tenía claro el patrón, pero probablemente iba a ser algo tipo Gilbert top de Helen's Closet. He hecho varios pero solo tengo foto de ésta que es sin mangas, hecha con un algodón camisero. Ese tipo de cuello me gusta mucho! Hojeando las revistas de Ottobre Design de mi madre (que las tiene todas allí para consultar como una biblioteca privada), decidí por el modelo de blusa que sale en el último número de la revista de mujer.
Hablando de Ottobre Design, me gusta mucho el nuevo diseño de los dibujos técnicos que han implementado ahora (una chorrada para la mayoría probablemente, pero diseño gráfico bonito me alegro mucho el ojo).
I used my usual size (size 40) and made the blouse as is but with a couple of modifications.
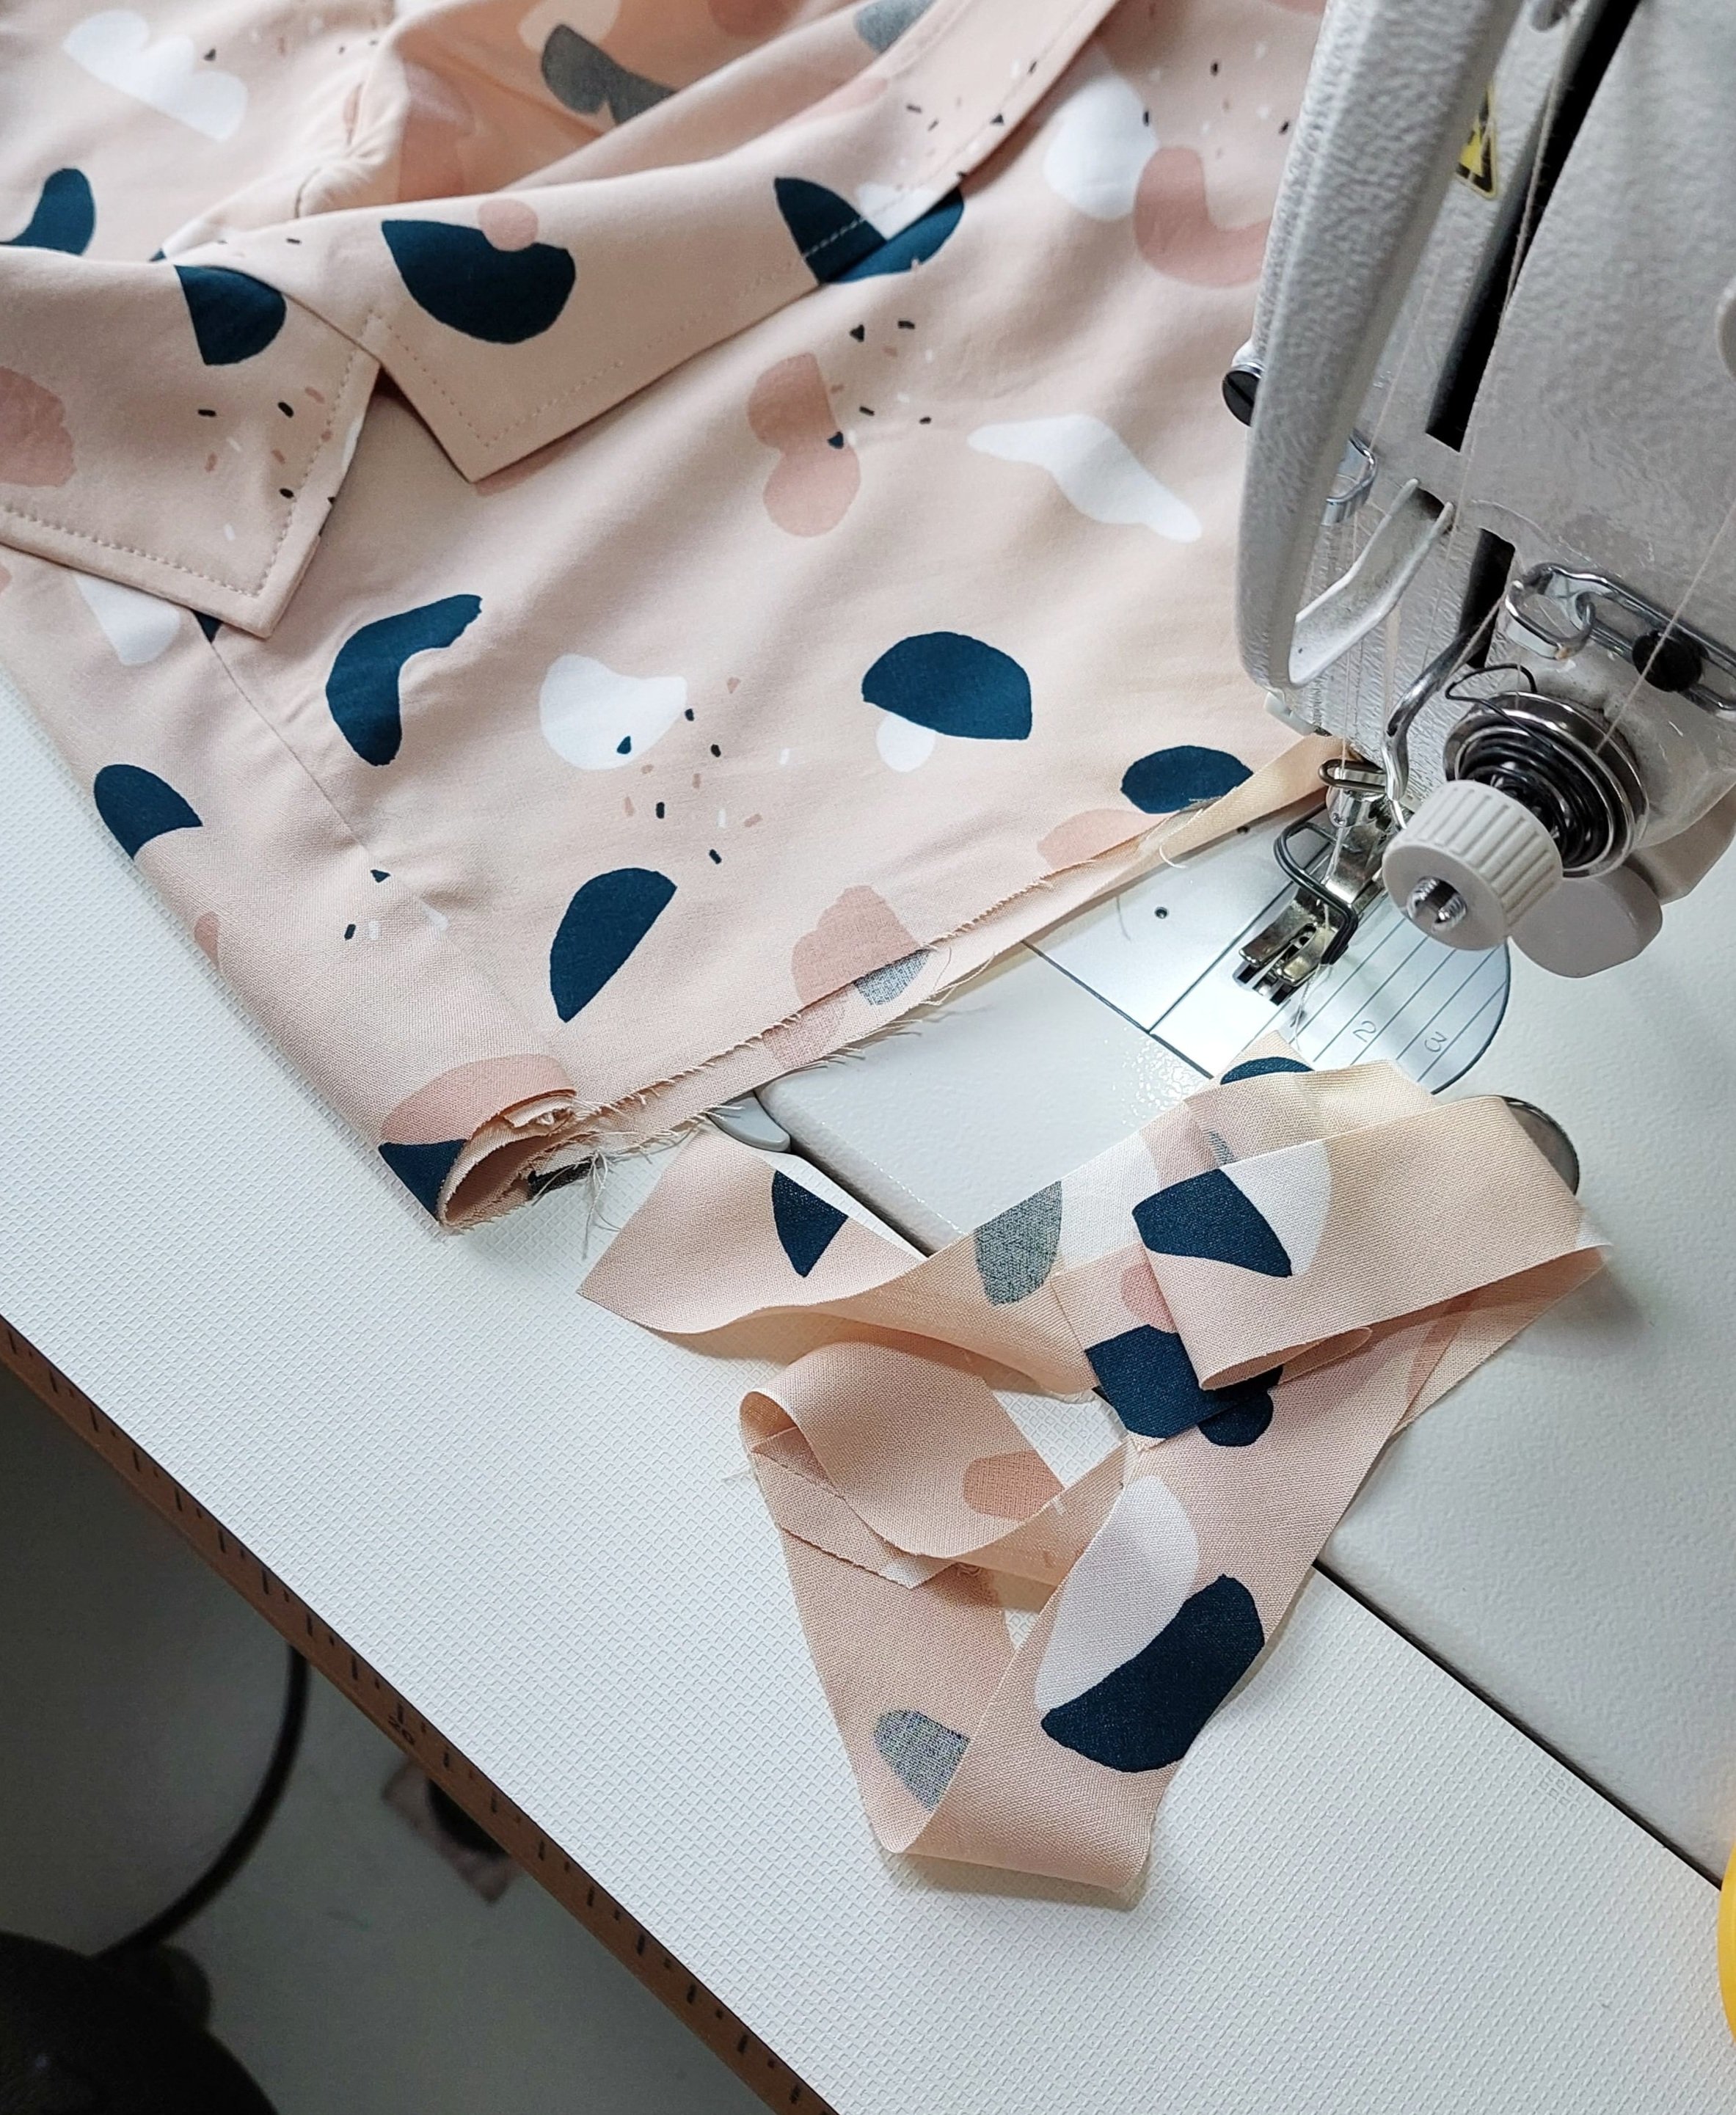
I cut two yoke pieces instead of one because I like that this way you can leave the shoulder and back seams hidden, again using the burrito method I mentioned in my last post about the Weiland top.
The side seams of the pattern have openings at the hem but I didn't use them, I directly cut the pattern with straight sides, without that extra margin that comes in the original pattern to make the slits. After the first test of the blouse, I saw that the blouse was loose enough to use French seams for the sides (gooood!).
For the long edge of the collar (and the front) facing I used a narrow hem on the inside instead of a serged seam, so I could get everything neat on the inside without using the serger.
I changed the collar sewing method a bit.
The instructions for making the collar are detailed on their website as a PDF and I liked the method of doing it this way by cutting a notch into the seam allowance to turn it around neatly. At Ottobre Lab there are a lot of step-by-step instructions for specific techniques in PDF format which are easy to follow.
I had a whole folder with several print outs of these PDFs for my students when someone needed to learn how to sew a more complicated detail. During the time I was teaching continuous sewing classes, I would try to make the samples of those kinds of details in a muslin fabric. So when I had to teach for example how to sew a jeans zipper, I could use those step by step instructions from the PDF and my own sample. This way it’s easier to understand the process, you can see the wrong side of the project and how all the pieces are sewn together.
It's actually a trick I've recommended a lot for learning new techniques. Make a muslin for the technique/detail you are going to use before starting to sew the entire grament. It could be a collar, a shirt cuff with an opening or an invisible zipper. Testing the techinque out on a scrap fabric, without the stress of ruining your nice fabric, helps you tremendously when trying out new sewing techniques. And if you keep that sample together with your valuable comments about the process...that's a big favor for the future you, of course!
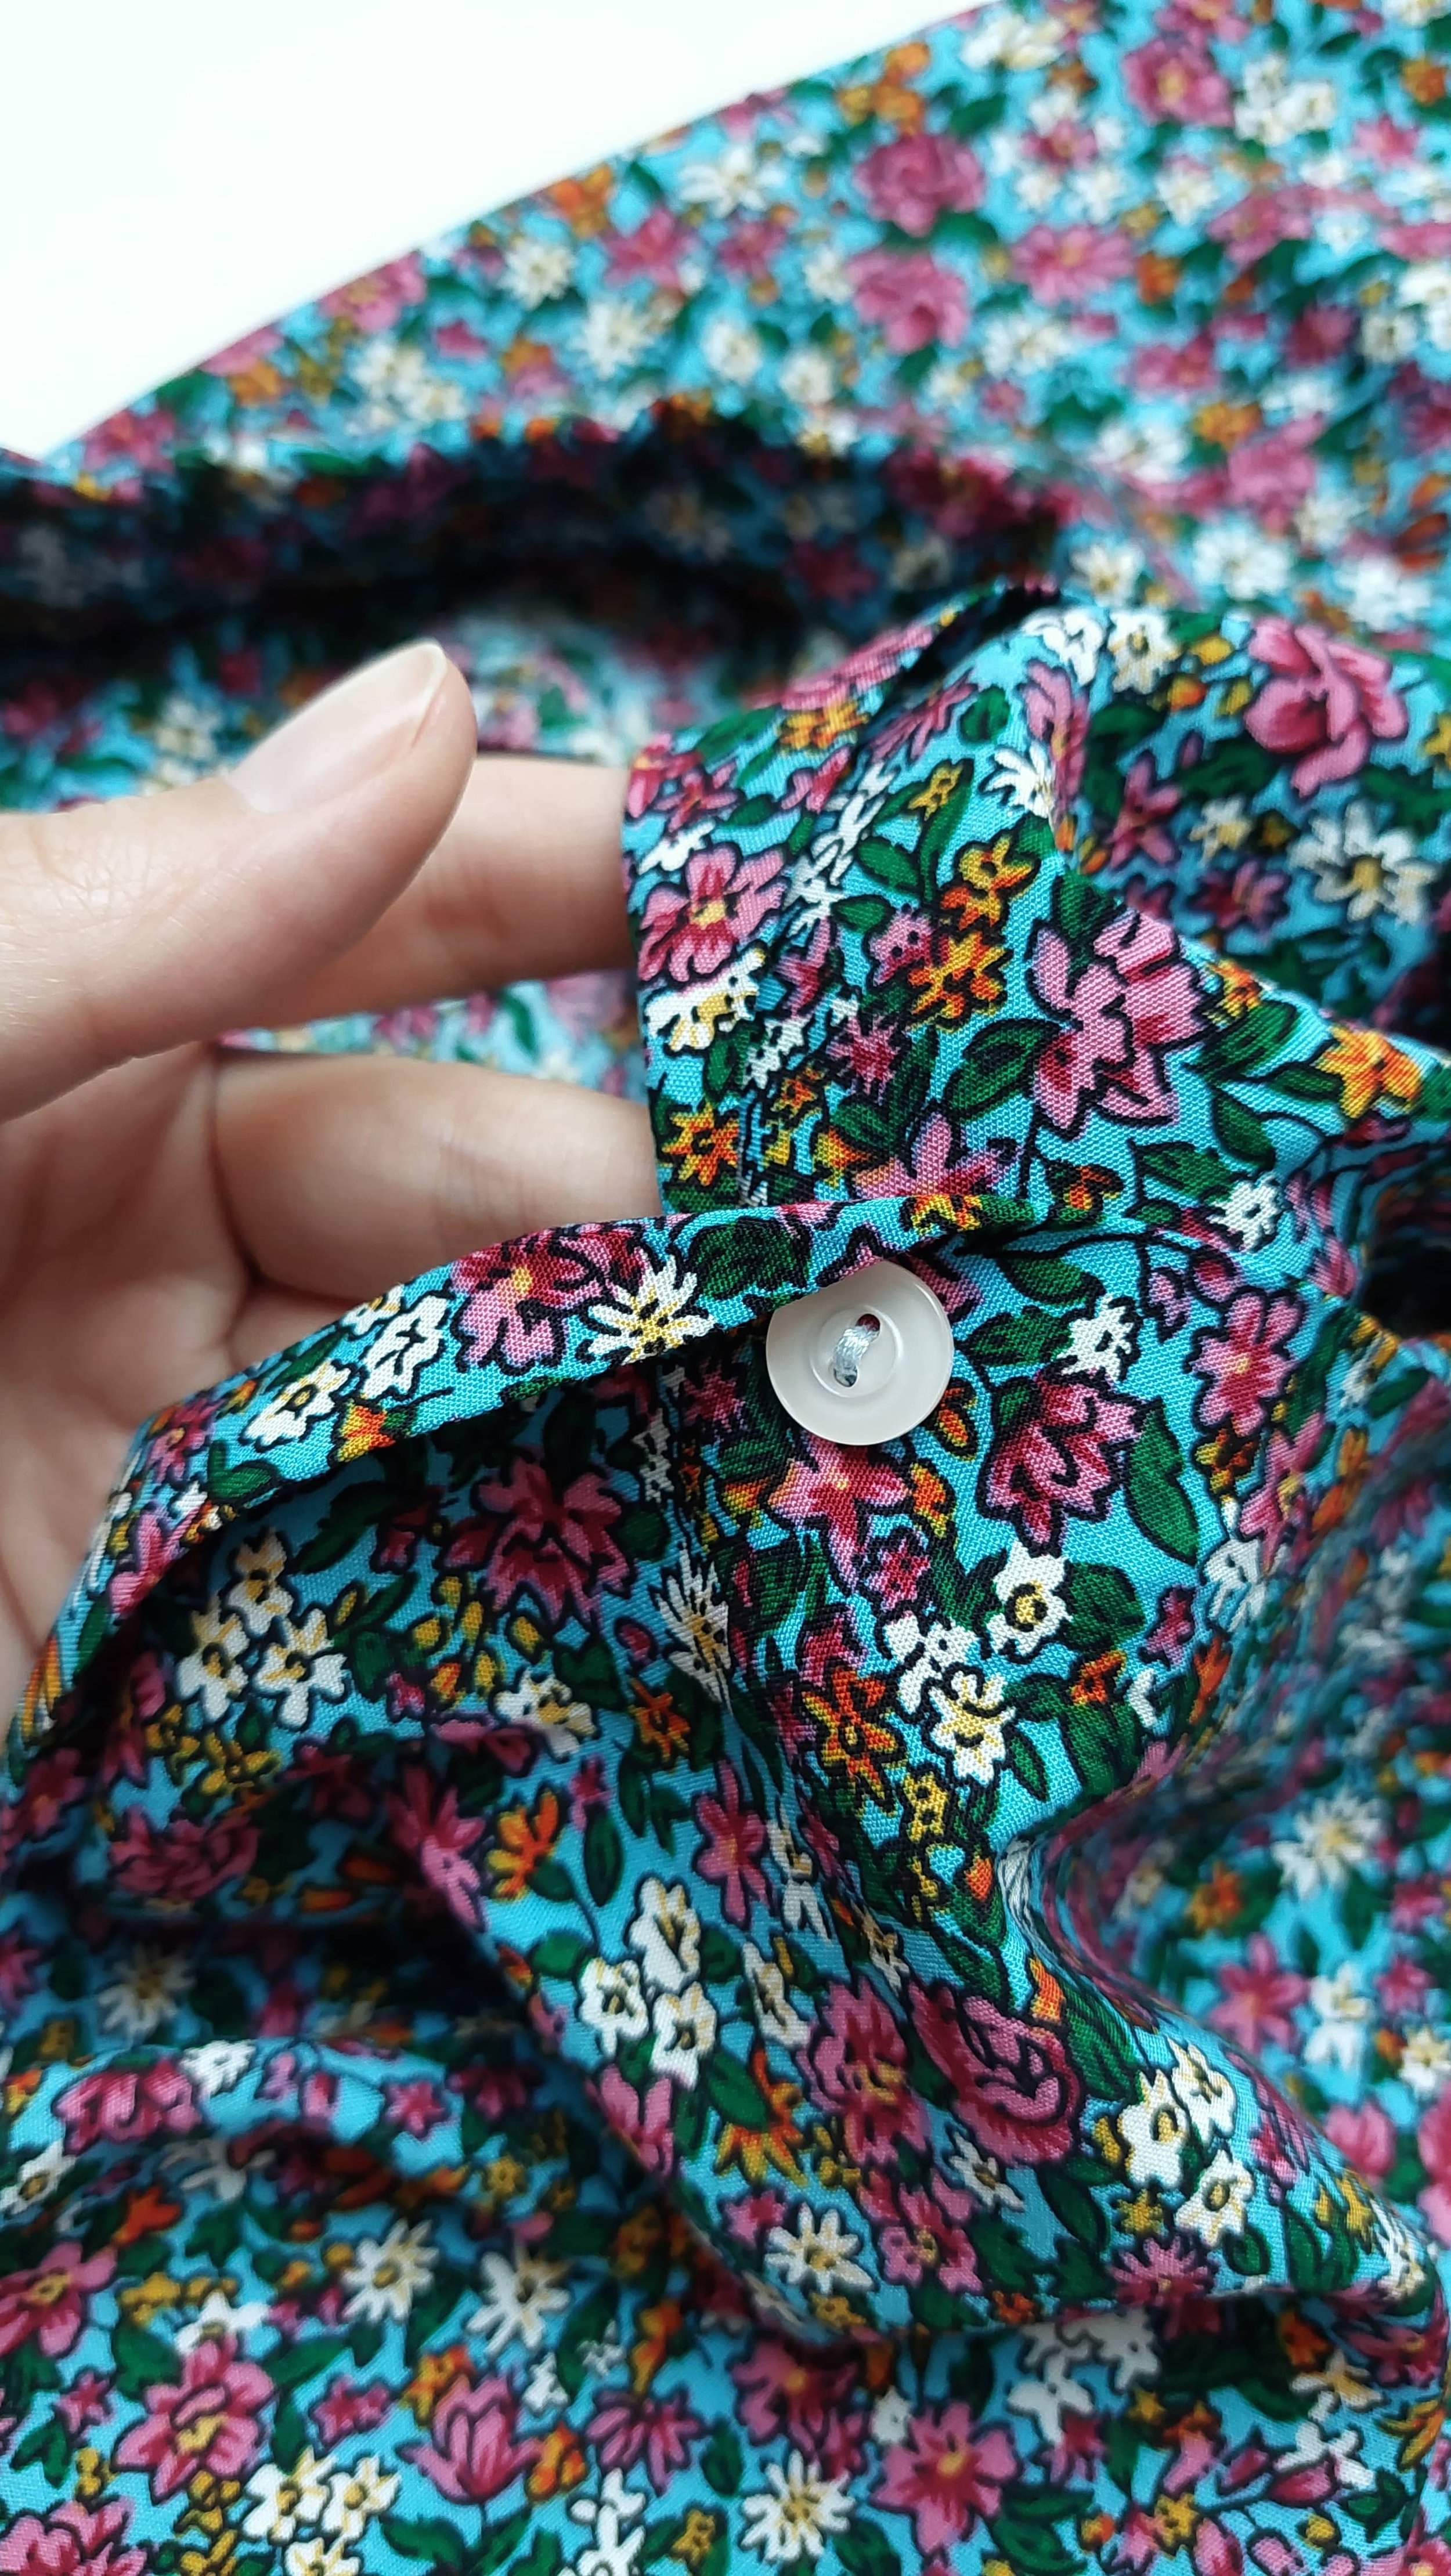
For my collar, as I was already in "I want a polished finishing without the serger" mode, I had to invent a little bit when joining the front facing with the yoke. In the original version that short edge is serged but I wanted to fold it under in order to make it as pretty as the other finishing touches I already had (the double yoke and French seams).
There was about half a cm missing there, but with some hand sewing, I managed to get a decent result (you can see a photo of this detail on the other blouse, below). While I was hand sewing it I was thinking if it was really me who had decided, voluntarily, to sew something by hand that wasn't even going to be seen on the outside...after all these years I finally have the patience to do such things, haha.
Cogí mi talla habitual (la 40) e hice la blusa tal cual pero con un par de modificaciones.
Corté dos piezas de canesú en vez de una porque me gusta que de esta manera se puede dejar las costuras de los hombros y espalda ocultas, usando de nuevo el método de burrito que mencioné en mi último post sobre el top Weiland.
Las costuras laterales del patrón llevan aberturas en la parte baja pero no las hice, directamente corté el patrón con los costados rectos, sin ese escalón que viene en el patrón original para hacer las aberturas. Después de la primera prueba, vi que la blusa me quedaba suficientemente suelta como para hacer las costuras francesas para los laterales (bieeen)
El lado largo de la vista de la solapa del cuello (y la parte donde van los botones) lo hice con un mini dobladillo por dentro en vez de dejarlo solo remallado y así conseguí tener todo limpio por dentro sin usar la remalladora.
Cambié un poco el proceso de confección del cuello.
Las instrucciones para hacer el cuello vienen detalladas en su página web como un PDF por separado y me ha gustado el método de hacerlo así con unos cortes para girar bien el márgen de costura.
En Ottobre Lab tienes en general muchas instrucciones de técnicas concretas en formato PDF, muy fáciles de consultar. Yo tenía toda una carpeta impresa con varios PDFs de ellos, para mis alumnos para cuando alguien necesitaba hacer algún detalle más complicado.
Durante el tiempo que daba las clases continuas de costura, intentaba hacer las muestras de ese tipo de detalles en retor. Así cuando hubo que enseñar por ejemplo cómo coser la cremallera de un vaquero, podía usar esas imágenes paso a paso del PDF y mi propia muestra para que sea más fácil de entender el proceso, ver el revés y cómo están cosidas todas las piezas.
De hecho es un truco que yo he recomendado mucho para aprender técnicas nuevas. Realiza primero una prueba de la técnica/detalle que vas a usar, sea un cuello, una abertura de puño de camisa o una cremallera invisible. Hacerlo en un retal, sin el estrés de arruinar tu tela definitiva, te ayuda muchísimo a la hora de probar técnicas de costura nuevas. Y si encima guardas la muestra y tu versión del paso a paso con los valiosos comentarios sobre el proceso…ya es la leche para el futuro tú, claro!
Para mi cuello como ya estaba en modo “lo quiero todo limpio sin la remalladora”, tuve que ingeniar un poco la unión de la vista delantera con el canesú. En la versión original esa parte corta va remallada pero yo lo quería con un dobladillo y que quede igual de limpio que los demás remates que ya tenía (el doble canesú y costuras francesas).
Me faltó como medio cm allí pero cosiendo a mano conseguí dejarlo bonito aún así (puedes ver foto de este detalle en la otra blusa, más abajo). Mientras lo hacía pensaba que si era de verdad yo quién había decidido, voluntariamente, coser algo a mano que ni siquiera se iba a ver por fuera…santa paciencia que me ha llegado ahora después de todos estos años, jaja.

Apart from that, I didn't change anything else. The armhole is finished with bias binding made with the same fabric. I like the concealed binding method a lot because it leaves everything nicely looking on the inside.
Before sewing the buttons, I tried the blouse on closing it with pins and it fit over my head without any problems. This means it was time for my "lazy buttonholes method", haha. It goes like this: do the test I just mentioned and if there is no need for functional buttons, well then you don’t need any funcional buttonholes either.
I simply mark where my buttons go (I don't usually follow pattern markings, I attach one on the widest part of the bust so then the blouse won’t open up right in the middle of the bust and from there I measure the other button placements according to the style and number of buttons I want to use) and sew them through the two layers.
It's not very professional (and I'm aware of that) but according to the poll I did on Instagram, there are many other people who also use this method proudly, haha. I've also been told by various persons that if their RTW blouses keep opening up in the bust area, they also sew that button through the two layers permanently to avoid discomfort. Yay for practical choices.
Aparte de esto, no cambié nada más. La sisa se remata con bies de la misma tela, el método de bies oculto (concealed bias binding en este tutorial) me gusta mucho, porque lo deja todo bonito por dentro.
Antes de poner los botones, probé la blusa sujeta con alfileres y me cabía por la cabeza sin problemas. Pues nada, a mi método de “ojales para vagas”, jaja. El método consiste en hacer la prueba que acabo de mencionar y si no hay necesidad de botones funcionales, pues no se van a hacer tampoco los ojales funcionales, jaja.
Simplemente marco dónde van mis botones (no suelo seguir indicaciones del patrón, pongo uno en la parte más ancha del pecho para luego no tener la blusa abierta justo a la mitad del pecho y de allí mido los demás según el estilo y la cantidad de botones que quiero usar) y los coso a través de las dos capas.
No es muy ortodoxo (y soy consciente de ello) pero según la encuesta que hice en Instagram, hay muchas más personas que también usan este método con orgullo, jaja. También me han dicho muchas que si las blusas compradas se les abren en la parte del pecho, también cosen ese botón a través de las dos capas permanentemente para evitar incomodidades. ¡Vivan las opciones prácticas!

I have to admit that during my sewing vacation there was a repeat project theme with almost every pattern I used, haha. So if in my last post I showed you four tops, here are two blouses.
I already knew that my wardrobe was missing lightweight and wider cut blouses for the summer, so I also took this beautiful print from Atelier Brunette with me to finally sew something with it. I bought this fabric in Barcelona when I went there on my first trip after teaching lingerie courses in Tarragona. It was a moment of great joy and really a big milestone in my career as a teacher, so I didn't doubt for a second that I was worth it, haha.
It was the first time I visited the Nunoya fabric store and I was amazed with all the beautiful fabrics they had there.
Tengo que reconocer que mis vacaciones de costura seguían la temática de proyectos en serie casi con todos los patrones que usé, jaja. Así que si salían cuatro tops de la última publicación, pues aquí salían dos blusas también.
Yo ya había visto que me faltaban en el armario blusas fresquitas y no ajustadas para el verano, así que también llevé esa belleza de estampado de Atelier Brunette para por fin coser con ella. Esta tela la compré en Barcelona cuando pasé por allí en mi primer viaje después de dar cursos de lencería en Tarragona. Era un momento de mucho subidón de ánimo y realmente un gran hito en mi vida laboral, así que no dudé ni un segundo que yo lo valía, jaja.
Era la primera vez que visitaba la tienda de telas Nunoya y flipé con todas las telas bonitas que tenían allí.


I knew their online store from before, but their physical store was so much prettier in person. You really could not compare those two experiences with each other. It was still an independent store back then (now it's part of a bigger Julián López fabric store, but it still looks good) and I saw all those beautiful fabrics from brands like Nani Iro, Atelier Brunette, See You at Six...it was amazing!
A long time ago, in Madrid there was the Black Oveja store in the Bilbao area and they had that kind of fabrics in a much smaller selection, but in general there is nothing around here that resembles Nunoya.
For my souvenir / gift for myself, I bought this fabric from Atelier Brunette. I knew the print from the internet before and in person it was even more beautiful. Andrea recently ordered fabrics from the Atelier Brunette website and said that there you can see their fabrics also filtered by colors to see which ones match each other! Please, a little more of this visual experience, and less of those ugly websites where it's hard to understand what kind of fabric you are buying.
Conocí su tienda online desde hace años pero la tienda física de ellos ganaba en persona muchísimo, no tenía nada que ver. Todavía estaba como tienda independiente (ahora es una parte de la tienda de Julián López que es más grande, pero no está mal tampoco) y veía todas esas telas preciosas de marcas como Nani Iro, Atelier Brunette, See You at Six…una pasada!
En Madrid hace mil años estaba la tienda de Black Oveja en la zona de Bilbao y tenían ese tipo de telas en una selección mucho más pequeña pero en general no hay nada por aquí que se asemeje a Nunoya.
Para mi souvenir / autoregalo por mi trabajo, me compré esta tela de Atelier Brunette. El estampado lo conocía de internet de antes y en persona era más precioso aún. Hace poco Andrea pidió telas de la página web de Atelier Brunette y dijo que allí puedes ver sus telas también filtrados por colores para ver las que combinan entre sí! Por favor, un poco más de este tipo de experiencia visual y menos de páginas web feas donde cuesta entender qué estás comprando.


So, that fabric had been in my stash for two years. I had the typical issue that, knowing that it is a special (and expensive) fabric, I couldn't find a good enough project to use it. It also happened that I had less and less time to sew (in fact, since I also started teaching courses outside Madrid, that's when personal sewing projects really took the back seat), and the truth is that I almost preferred to see it there in my fabric cabinet, looking pretty, haha.
But seeing the fabrics I was going to take to Estonia, I knew it was time. That it was silly to keep it there, as if there weren’t other fabrics I liked (first world problems, lol). Having sewn the first blouse with the 5 euro viscose, I was ready for the 20 euro one, haha.
Entonces, esa tela la tenía guardada desde hace dos años. Me pasaba la típica cosa de que sabiendo que es una tela especial (y cara), no encontraba un proyecto suficientemente guay como para usarla. También pasaba que cada vez tenía menos tiempo de coser (de hecho, desde que empecé también dar cursos fuera de Madrid, es cuando los proyectos personales de costura se quedaron en el último lugar), y la verdad es que casi prefería verla allí en mi vitrina de telas, toda bonita, jaja.
Pero al ver las telas que iba a llevar a Estonia, sabía que ya era hora, que era una tontería guardarlo más, como si no hubiera más y más telas que me gustasen (problemas del primer mundo). Pues nada, al haber hecho la primera blusa con la viscosa de 5 euros, estaba preparada para la de 20 euros, jaja.

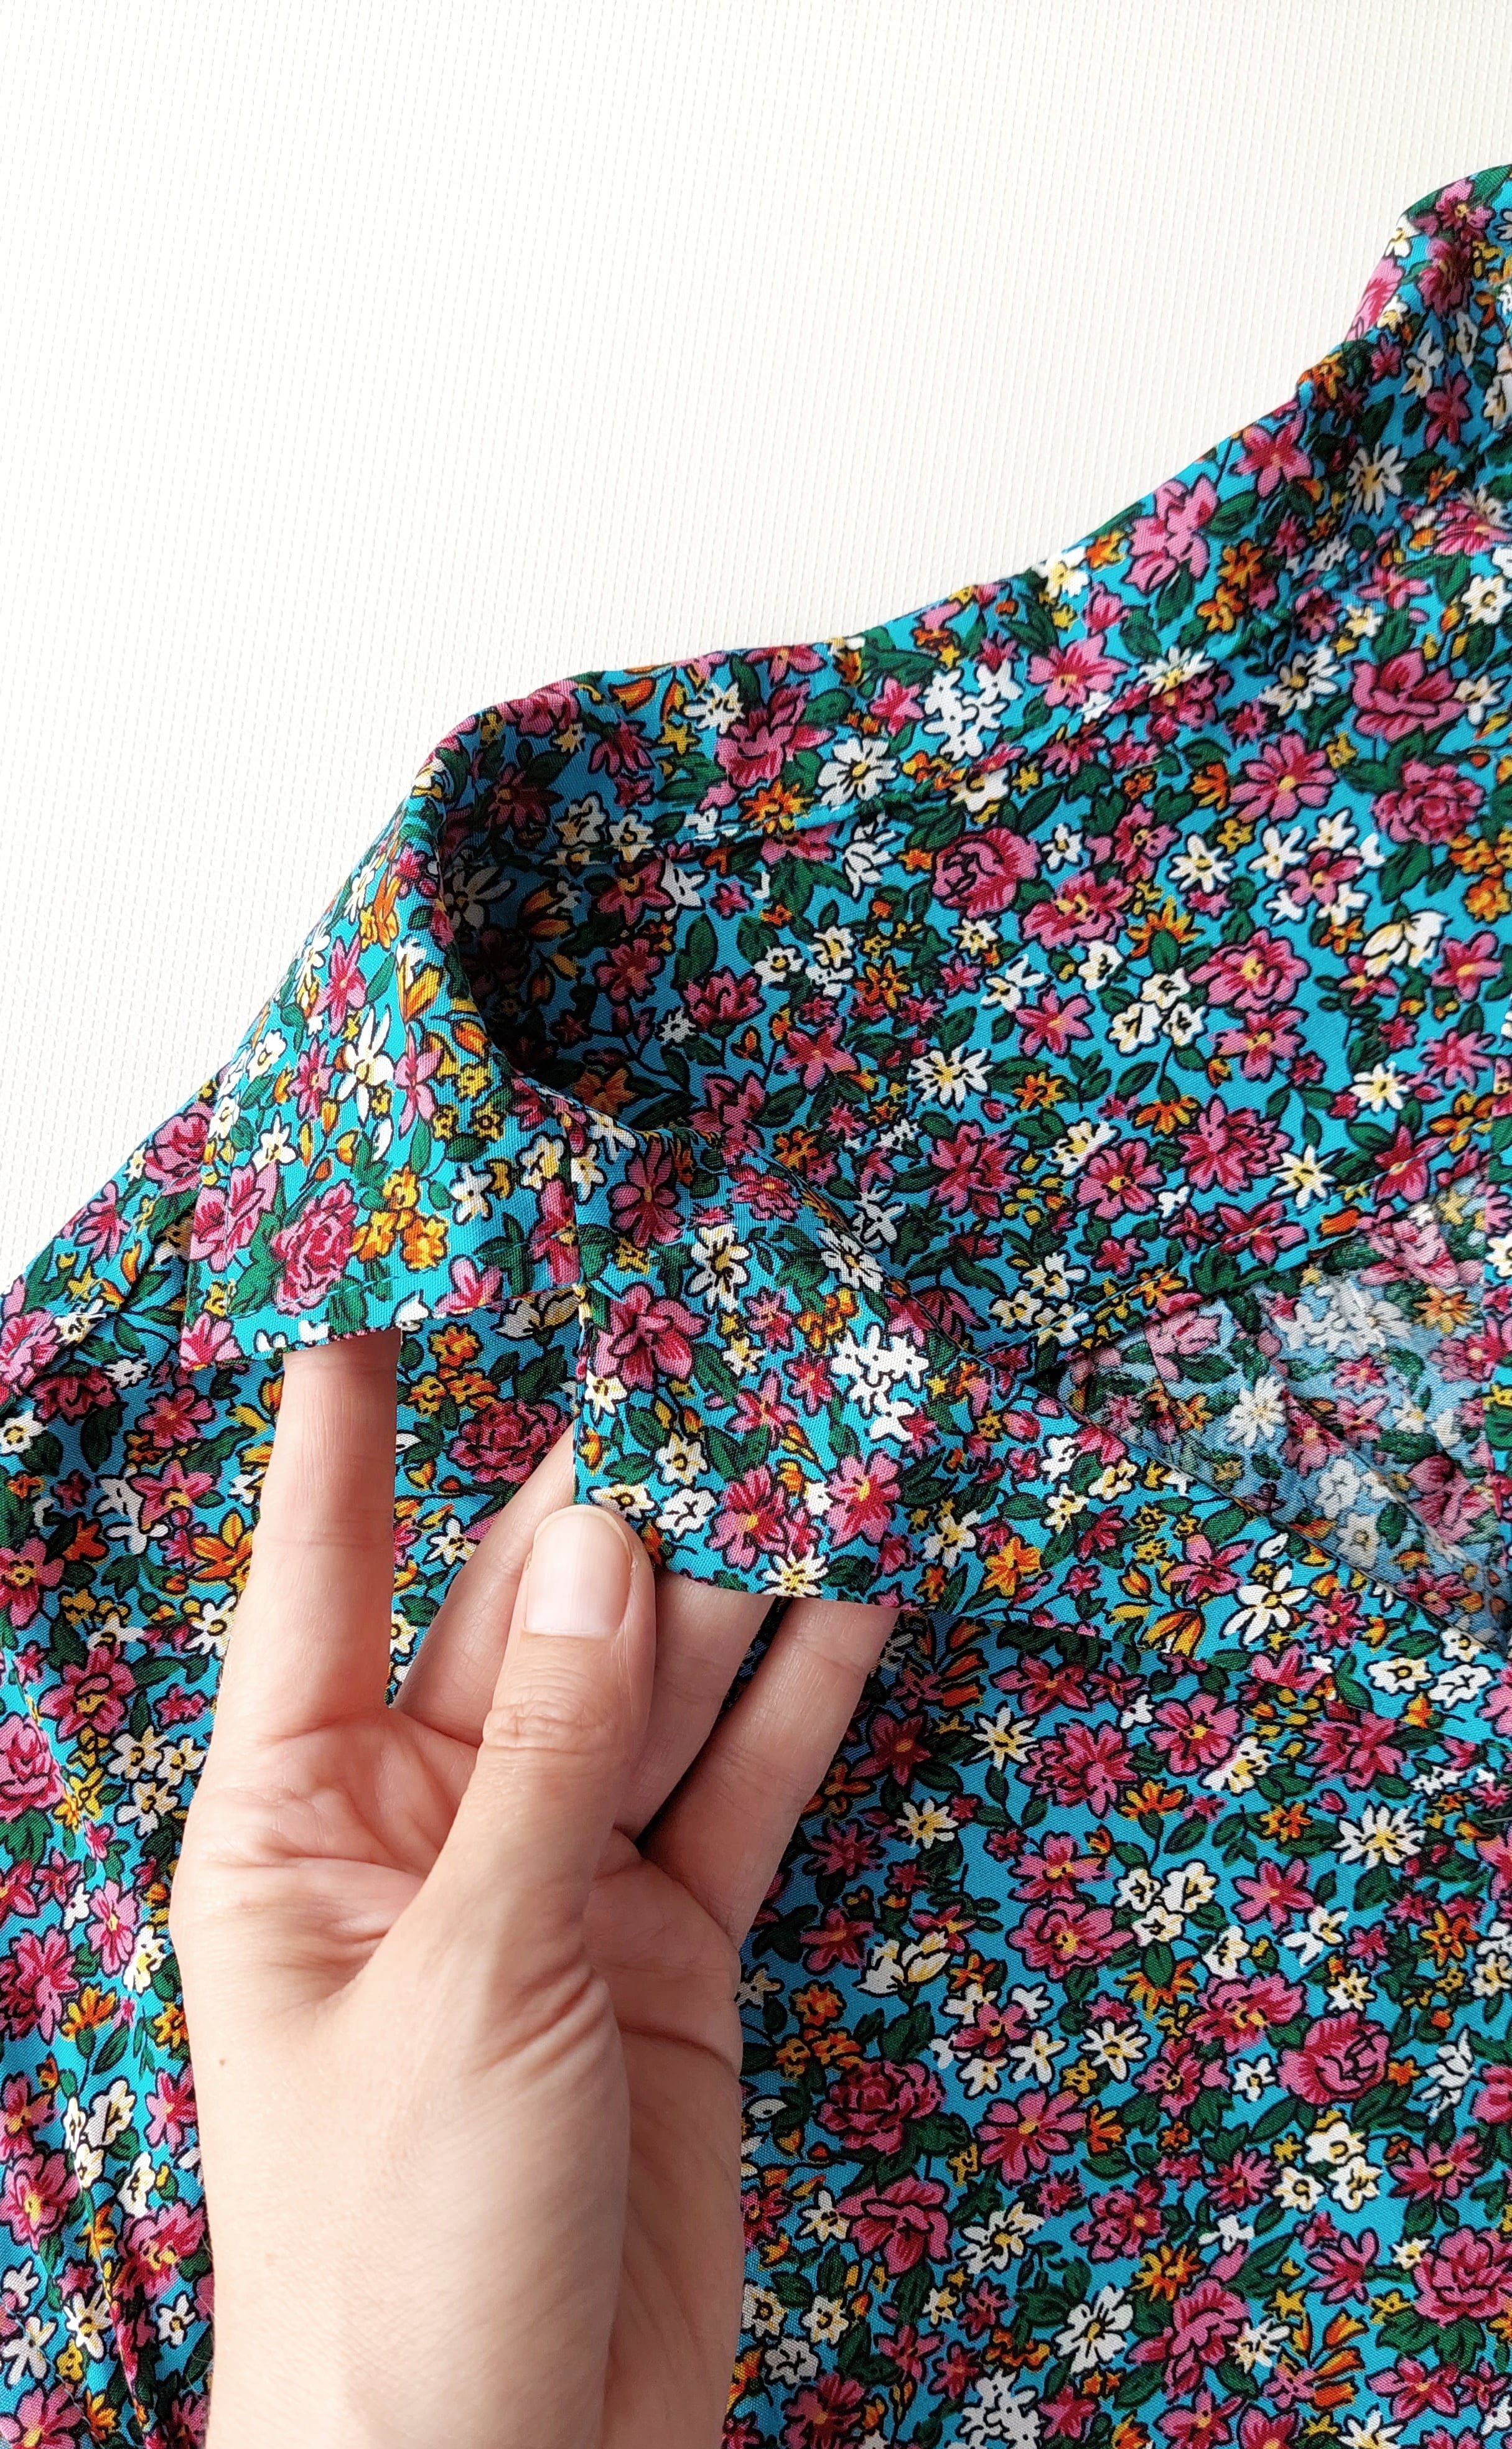
Hand sewing part of the front facing // La parte de coser a mano en la vista del delantero

Bias binding on the sleeve / dropped shoulder opening and French seams. // Cinta de bies en la abertura de la manga /del hombro caído y las costuras francesas.
I like this blouse very much and I enjoyed sewing it a lot with its French seams and bias binding. The only change after the first blouse was that I added 1 cm on the short edge of the front facing to have the fold I mentioned in the list of modifications.
I forgot to measure my piece of fabric and obviously I don't remember how much I bought, but I think it was 1,2 m (I remember thinking about it while being at the store, that with only 1 meter I won’t be able to do anything, it has to be a little more, hehe) and I used every last scrap to squeeze out the pieces and the bias tape.
La blusa me gusta mucho y disfruté un montón a la hora de coserlo dejándolo bonito con sus costuras francesas y su cinta de bies. La única modificación respecto a la primera blusa fue que añadí 1 cm en la parte corte de la vista de cuello para hacer el dobladillo que mencioné en la lista de modificaciones.
Me olvidé de medir mi pieza de tela y obviamente no recuerdo cuánto compré, pero creo que fueron 1,2 m (me suena mi reflexión en la tienda, sobre que con solo 1 metro no hago nada, tiene que ser un poco más, jeje) y usé todo hasta el último trozo para sacar las piezas y el bies.

As promised, here are some long dresses of recent times that made me move into the range of 3 meters of viscose, in the case of buying this type of fabrics, hehe.
Thefirst two are made with a pattern I traced off of a dress I bought at Oysho. I loved the way that the panels increase in width at the bottom part of the skirt and how they create a soft volume (impossible to see the panel lines with these prints). There are ties sewn at the back panel seams to adjust the waistline with a bow in the front.
This original RTW dress, that wasn't the cheapest one, had such a bad quality that the seams started to disintegrate after just a little time after wearing it. I felt so good that I could create the same style using the fabric I liked, as many times as I wanted.
The large green leaf print (a viscose bought in the remnants section of Retales Meco, in Madrid) was the wearable muslin. After that, I made the second dress with that beautiful print featuring small leaves with circles that looked a bit like fruit. The fabric is a viscose bought at Nunoya from Dashwood Studio’s Soiree collection. The designer Susan Driscoll has a style that I really like, I almost also got this bird print that totally stole my heart at Nunoya.
Como prometido, aquí van unos vestidos largos de los últimos tiempos que me hicieron pasar al rango de 3 metros de viscosa, en el caso de comprar este tipo de telas, jeje.
Los dos de arriba los hice con el patrón que saqué de un vestido que compré en Oysho. Me encantó su forma de paneles que aumentan su ancho en la parte baja y crean un volumen suave (no se ven las líneas de cortes por el estampado). Y que tenga unas cintas cosidas en la unión de los paneles de espalda para hacer como una especie de cinturón para ajustarlo más (o menos) al cuerpo con un lazo en el delantero. Ese vestido, que no era lo más barato tampoco, tenía la calidad tan mala que las costuras se empezaban a desintegrarse después de poco uso.
Qué bien me sentía por el hecho de poder reconstruir el mismo modelo en la tela que quería y tantas veces que me apetecía. La tela de hojas verdes grandes (una viscosa comprada en la parte de retales por peso de Retales Meco, en Madrid) fue la prueba. Después hice otro vestido igual con ese estampado tan bonito de hoijtas pequeñas con círculos que parecían un poco a unos frutos. La tela es una viscosa comprada en Nunoya de la colección Soiree de Dashwood Studio. La diseñadora Susan Driscoll tiene un estilo que me gusta mucho, casi me llevo también este estampado de pájaros que me robó el corazón en Nunoya.


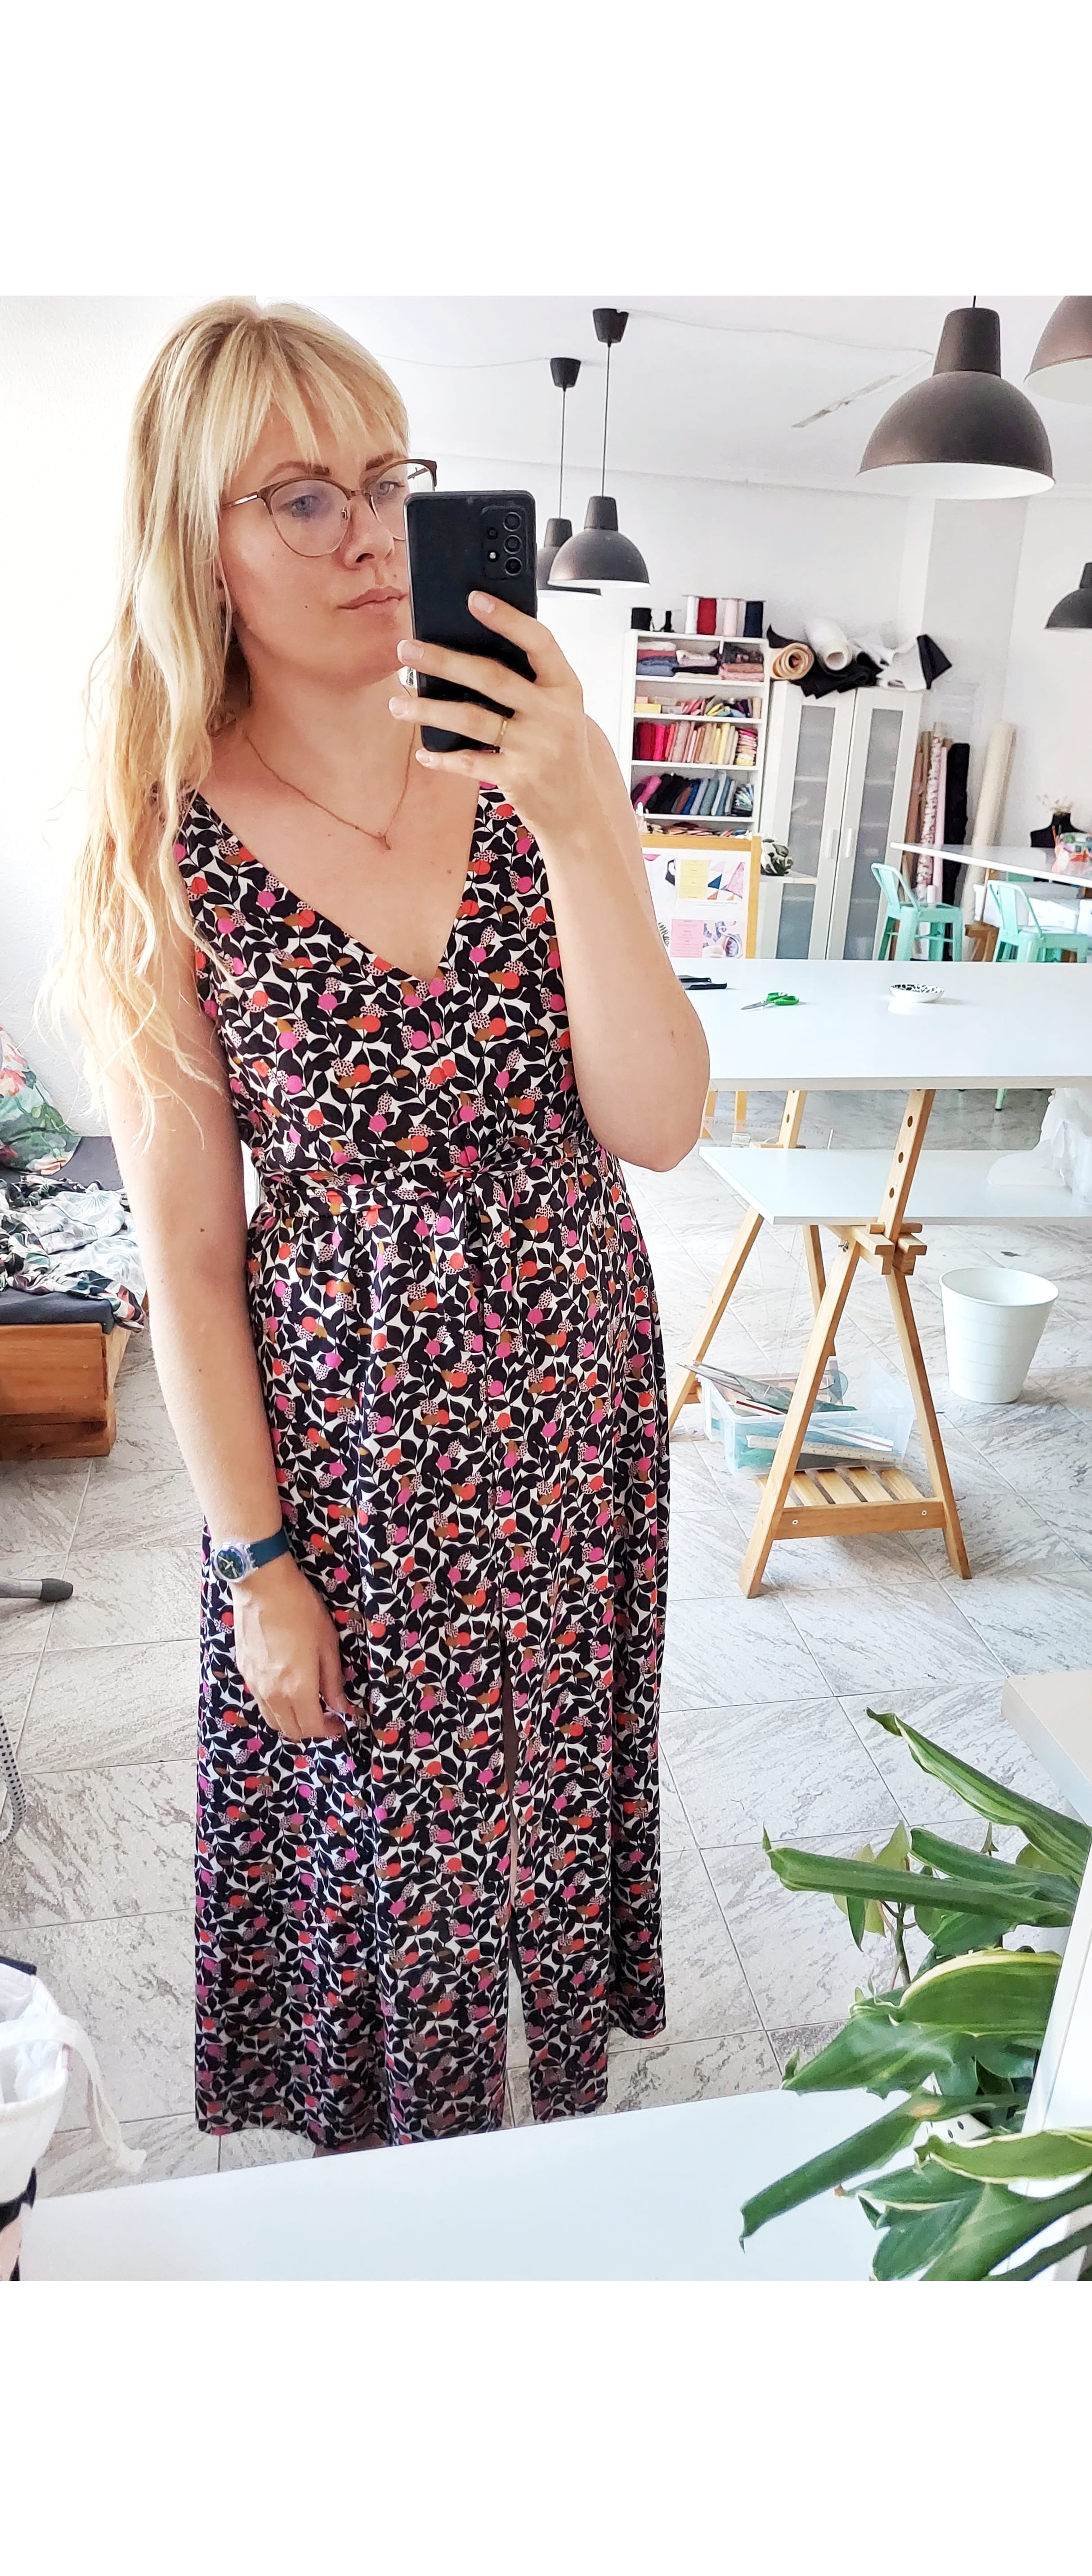
And the other two dresses are the Eve dress from Sew Over It and the Nicks dress from Closet Core. Eve is a wrap dress with a romantic vibe and my decision of making it it was directly influenced by Carme and all her dresses (her feed is pure inspiration). The fabric is a viscose from Pili Tejidos Encants.
The Nicks dress is a fairly simple style and it’s perfect for the brief spring and autumn time in Madrid, for the summer in Estonia or for the winter in Barcelona. It’s a dress with long sleeves and the skirt is formed by several gathered panels.
The pattern actually requires more than three meters of fabric but I changed the width of the last panel a little and made the first one in two pieces (the seam is almost invisible thanks to the floral print), and so I managed to make it just with three meters.
The viscose is from Stocktextil (Hospitalet, Barcelona) and as it’s a very lightweight fabric, you don't feel the weight of those three meters at all, it feels like a cloud! This dress with all those florals definitely gives a true cottage core feel, it looks like I had a role in The Little House on the Prairie, lol.
Y los otros dos vestidos son el vestido Eve de Sew Over It y el vestido Nicks de Closet Core. Eve es un vestido cruzado con un aire romántico y es la directa influencia de Carme y sus vestidos cruzados (su cuenta es inspiración pura). La tela es una viscosa de Pili Tejidos Encants.
El vestido Nicks es un modelo bastante sencillo e ideal para los dos días de entretiempo de Madrid, para el verano de Estonia o para el invierno de Barcelona. Se trata de un vestido con mangas y la parte de falda viene en varios paneles fruncidos. El patrón requiere de hecho más de tres metros de tela pero yo cambié un poco el ancho del último panel y el primero lo hice en dos piezas (ya que por el estampado floral no se notaba la costura de unión casi), y así conseguí hacerlo justo con tres metros.
La viscosa es de Stocktextil (Hospitalet, Barcelona) y al ser fina, no notas para nada los tres metros, parece una nube! Cuando te pones este vestido, con todas estas flores que lleva, parece que te teletransporta a un prado o a la serie La Casa de la Pradera, jaja.
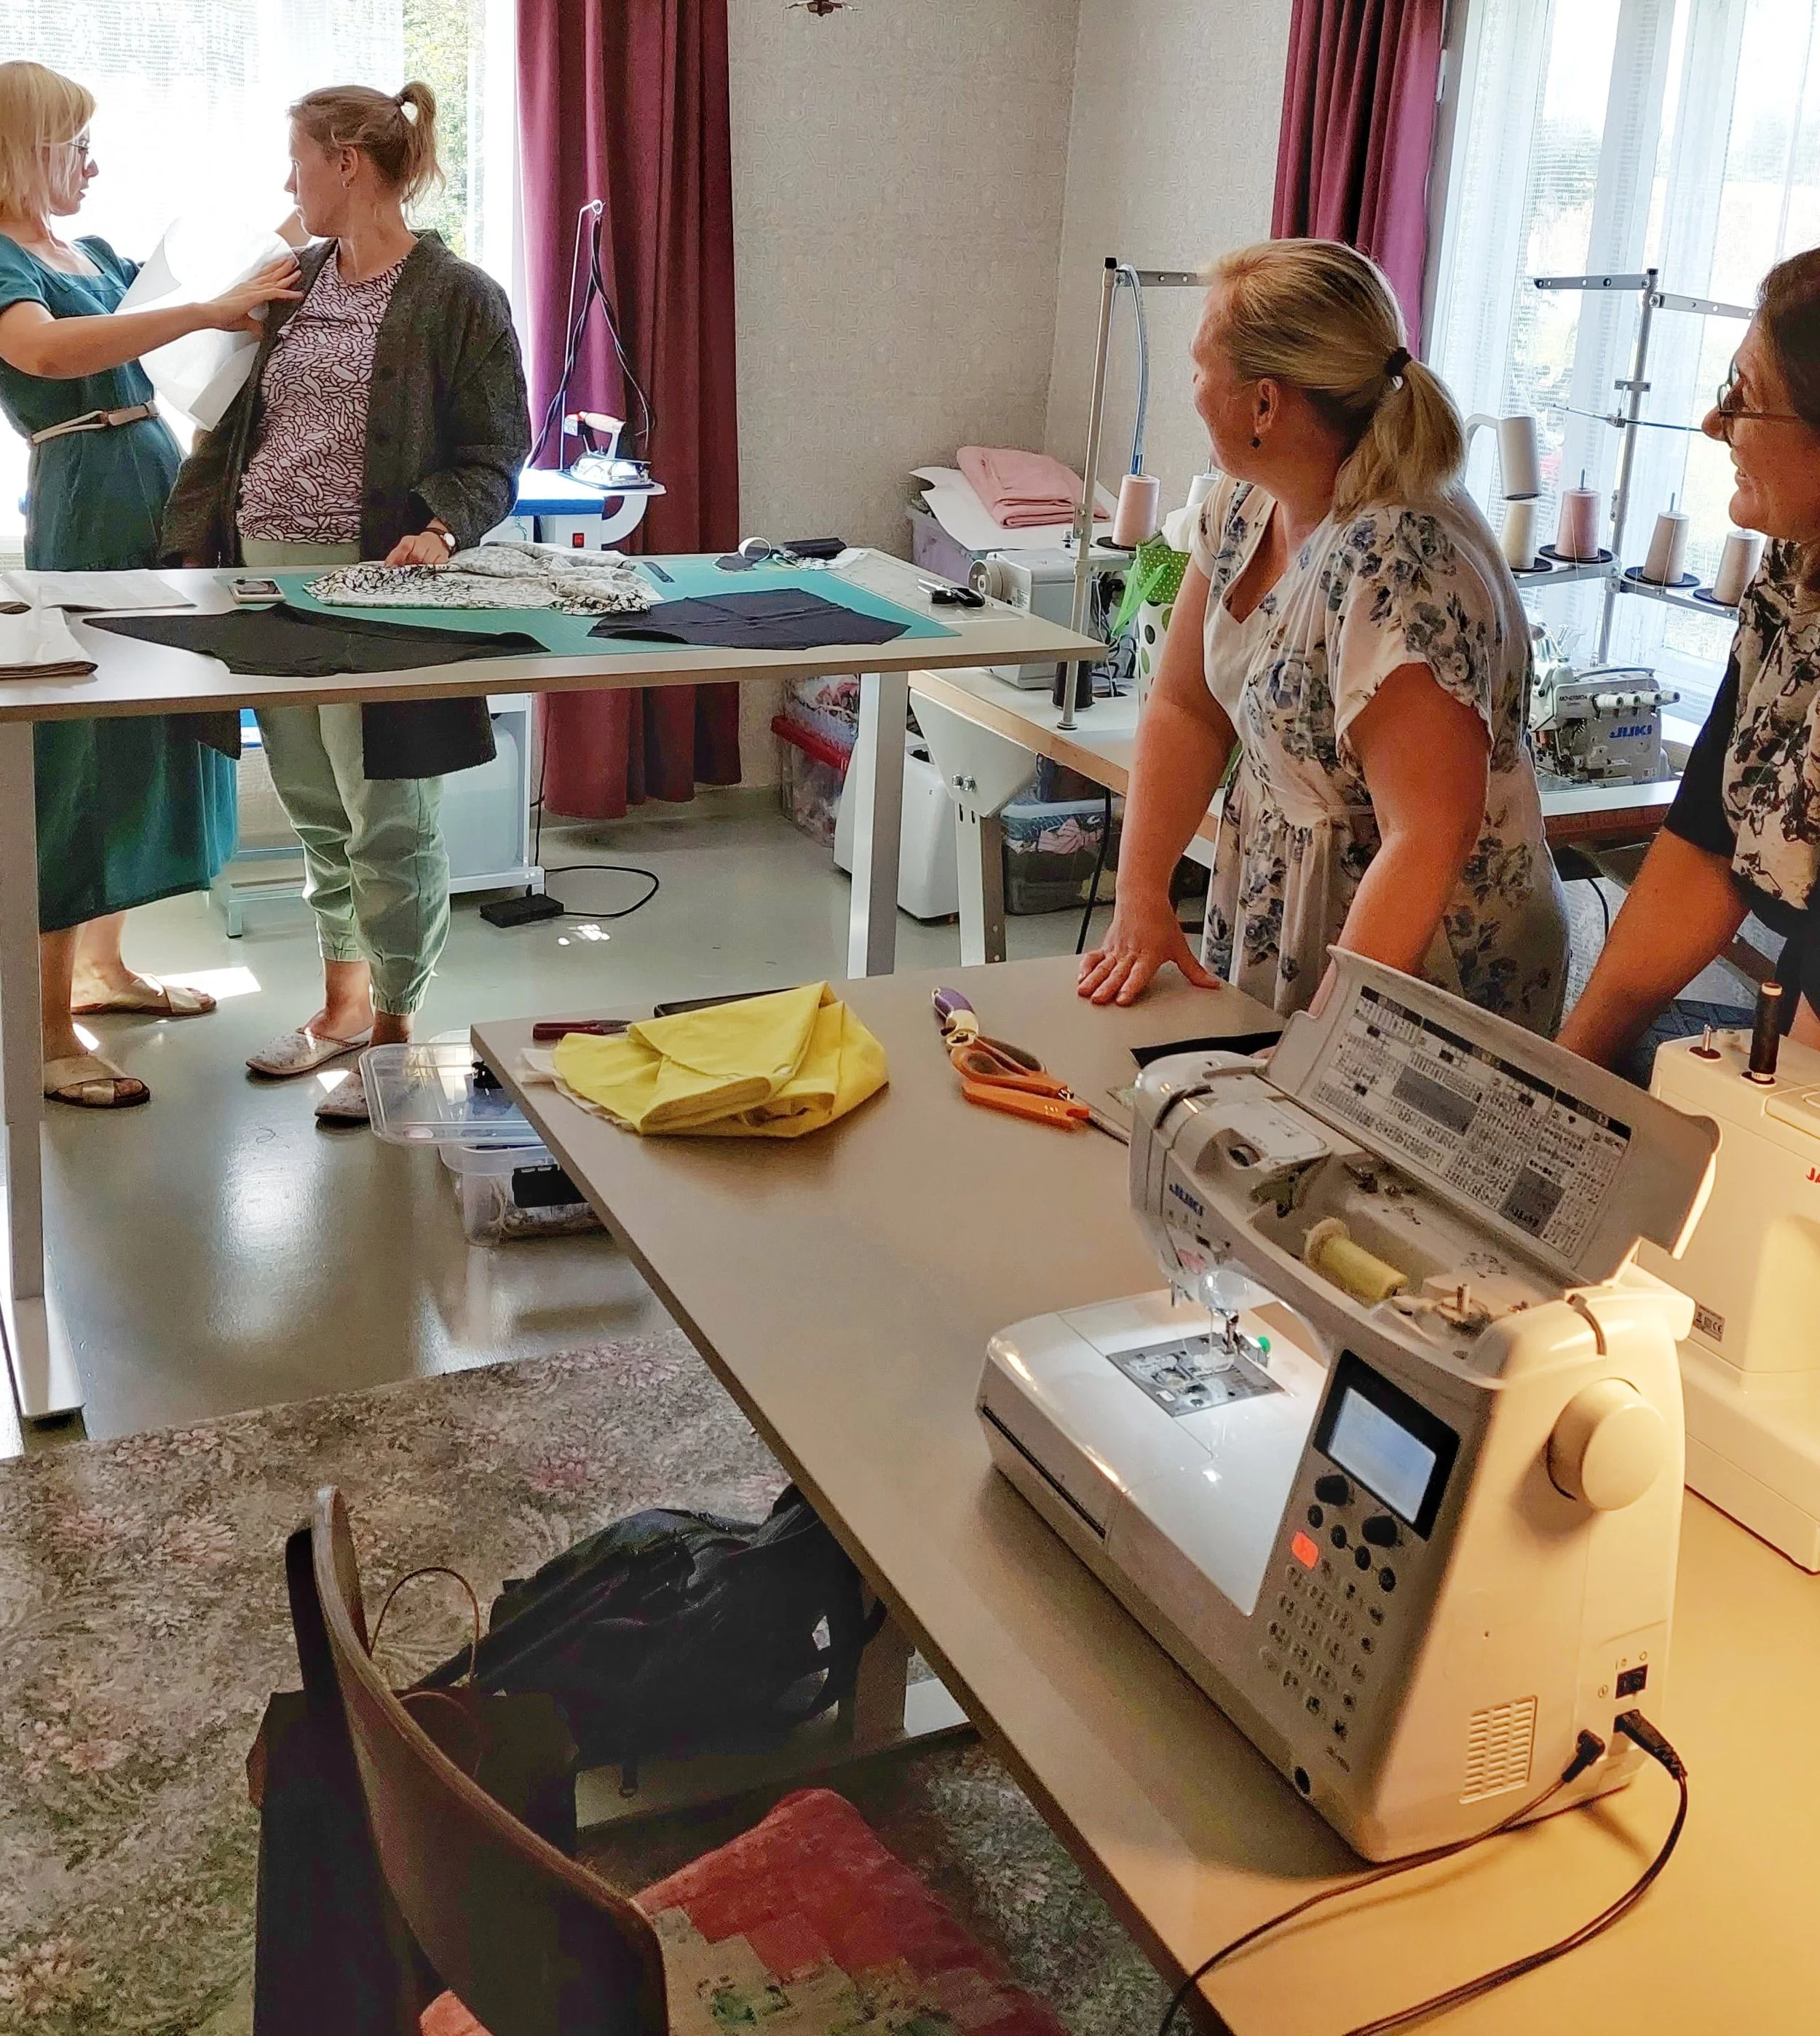
And I also wanted to add in this post the photos of the sewing meeting I organized in Estonia with some sewing friends I have there. And while I'm at it, I'll quickly tell you a little bit about that space.
I knew Mari-Liis and Silja from my lingerie courses and I met Kadri virtually during the testing process of my last bikini pattern. Tiina is a friend of theirs who also came to sew and I met her that day.
The same thing keeps happening: even if you don't know the person at all, if that person sews, you will have a lot to talk about. What a nice day in good company!
Mari-Liis also has her sewing blog The Late Night Sewist (where she posts a lot about everything she sews) and there you can see the Project Bag that she made with a yellow leather using my moms industrial Juki sewing machine.
Y también quería añadir en este post las fotos de la quedada de coser que hice en Estonia con unas amistades costuriles que tengo allí. Y de paso te cuento rápidamente un poco de ese espacio.
Uno de mis días que pasé allí en el espacio de mi madre, había quedado con unas chicas de costura. A Mari-Liis y a Silja les conocí de antes en mis cursos de lencería y a Kadri le conocí virtualmente en el test de mi último patrón de bikini. Tiina es una amiga suya que vino también a coser y le conocí ese día. Siempre pasa lo mismo, aunque no conozcas a la persona de nada, si esa persona cose, vais a tener mucho de qué hablar. Un día bonito en buena compañía que me vino genial!
Mari-Liis también tiene su blog de costura The Late Night Sewist (donde publica mucho sobre todo lo que cose) y allí puedes ver el Project Bag de Laola que ella hizo con una piel amarilla usando el Juki industrial que está allí.


The sewing room used to be my grandmother's room and both my mother and my sister have been fixing up that house with a lot of love and time. My mother meets up with her sewing friends group there during the year. And I was lucky to be able to use it as my own atelier for several days while I was in Estonia.
My mother already had the Juki industrial sewing machine and now she also has the industrial overlocker from the same company. The industrial overlockers I had worked with in the past were very fast and a bit sensitive, but this one lets you sew super smoothly (and if you want to speed things up, you've got that option too, of course), it's such an amazing machine.
There's also a simple Juki domestic sewing machine that I use for the zig-zag stitch while sewing lingerie and other small details. And the coverlock machine that comes in handy for the hems on knitted garments (I'll talk about that in my next post about PJs!).
La habitación de costura fue antes la habitación de mi abuela y tanto mi madre como mi hermana han estado arreglando esa casa con mucho cariño y tiempo. Mi madre reúne allí durante el año el grupo de sus amigas costureras. Y yo tenía suerte de poder usarlo como si fuera mi taller particular durante varios días que estuve en Estonia.
Mi madre ya tenía de antes la máquina de coser industrial de Juki y ahora también tiene la remalladora industrial de la misma casa. Las remalladoras industriales con que yo había trabajado en el pasado eran muy rápidas y un poco caprichosas, pero ésta te deja coser super suave (y si quieres velocidad, la tienes, claro), es una maravilla.
También está una máquina doméstica sencilla de Juki que yo suelo usar para coser el zig-zag para lencería y demás cosas. Y la recubridora que viene genial para los bajos en cosas de punto (de eso hablaré en mi entrada de pijamas!).

Industrial Juki straight stitch sewing machine and serger // Máquina de coser plana y remalladora industriales de Juki

Ikea Trotten table
There is also the industrial pressing station that is very comfortable to work with and then those tables that I really liked. I hate cutting on a low surface (a regular table, for example) because I'm already spoiled with only using high tables and I don't feel like having a back pain at all. So these Trotten tables from Ikea are amazing as their handle system makes it super easy to regulate the tables heigh.
When you cut fabric, you can have it higher, and when you start sewing, you can lower it and use it as a regular table. I've always used adjustable table legs (like these trestlers) for my cutting tables but the reality is that I never readjust them because I'd have to remove the table top etc. So it’s definitely a very useful piece of furniture for sewing rooms!
También está la plancha industrial que es muy cómoda para trabajar y luego esas mesas que me han gustado mucho. Odio cortar en una mesa baja (o sea en una mesa de altura normal) porque ya estoy malcriada con mesas altas y no me apetece nada el dolor de espalda. Así que estas mesas Trotten de Ikea me han parecido geniales porque su sistema de manivela para fácilmente subir y bajar la mesa te da una opción muy guay de mesa para todo.
Cuando cortas, lo tienes alto, y cuando vas a coser, lo bajas y te pones la máquina. Yo siempre he usado borriquetas de este tipo, que también son regulables pero la realidad es que no los regulo nunca porque tendría que quitar el tablero etc. Así que oyes, un mueble bien útil para esos cuartos de costura!


To wrap things up, because this post doesn't look like a novel yet (it does, but I promised long content and yes, this here is a very long content, haha), some pictures from Burdas from the 90's. Before I got to flip through the Ottobres where I got the pattern for the blouse, I saw these old Burda magazines and I had to take a look.
I know these particular magazines very well because I remember playing with them a lot as a child. Sewing didn't interest me at a time, but I did look at the photos a lot and happily spent long days in the company of those magazines, haha.
These Burdas from around year 1993 are in German and I still remember a green dress that my mother made herself with a pattern from one of them (that dress would be trendy today, it reminds me a lot of the Shelby dress from True Bias).
My mother didn't speak German, there was no Google Translate and in my house I don't remember having any German-Estonian dictionaries either. But she sewed with these patterns. Maybe you didn't have to understand the instructions word for word either, because if they were as bad as they are today, they weren't going to help you much, haha (sorry all the Burda fans out there, but I just can’t help myself).
Anyway, I wanted to find a specific magazine that day, to take the picture, but it doesn't seem to be there anymore (but I think I'll make it my mission to find it to save this childhood memory). Said issue has instructions on how to make car seat covers. There are pictures of a convertible car with brand new seat covers featuring a beautiful cherry print.
I loved that image so much. Maybe because it was so far away from my own reality. With all that snow I was never going to be able to see a convertible car in my life. I’m not sure if my fruit print fondness came form that era, but I definitely have a sweet spot for them since my early childhood, haha.
Older Burdas also came with recipes and I had to take a picture of this avocado salad. It has nothing to do with sewing but it made me laugh to see that avocado there in the 1993 magazine. The irony is that although I don't remember exactly when I ate my first avocado, I tell you it was certainly not before 2005!
I have to ask my mother, what were her thoughts in '93, while using that German magazine for her sewing projects (while also seeing that avocado, hehe). Estonia's economic situation was devastating. Two years before, in 1991, Estonia’s restoration of independence from Soviet Union took place. In 1992, each citizen was allowed to exchange the equivalent quantity of 10 euros of cash from rubles to kroon which was the new national currency. The average salary was around 35 euros per month (as a reference the average salary in 1991 in Spain was around 300 euros per month).
Para terminar, porque esta entrada no parece todavía una novela (sí que se parece pero prometí contenido largo y si, es un contenido bien largo, jaja), unas fotos de los Burda de los 90. Antes de llegar a hojear los Ottobres de donde saqué el patrón de la blusa, vi a estos viejos números de la Burda y tuve que echarles un ojo.
A estas revistas las conozco muy bien porque jugaba con ellas mucho de pequeña. No a coser, eso no me interesaba, pero sí las miraba y pasaba el día supongo, jaja. Estas revistas de alrededor del año 1993 y por allí vienen en alemán y recuerdo perfectamente un vestido verde que se hizo mi madre (sería una tendencia hoy, me recuerda mucho el vestido Shelby de True Bias).
Mi madre no sabía alemán, no hubo Google Translate y en mi casa tampoco recuerdo ningún diccionario alemán-estonio. Pero ella cosía con estos patrones. Quizás tampoco había que entender las instrucciones palabra a palabra porque si eran tan malas como hoy en día, tampoco iban a ayudarle mucho, jaja (perdonad todas las fans de Burda pero vamosaverrrr).
En fin, quería encontrar un número en concreto para hacer la foto pero no parece que está ya allí (pero creo que voy a tener como mi misión particular encontrarlo para salvar este recuerdo de mi infancia). Dicho número tiene las instrucciones de cómo hacer unas fundas de asientos de coche.
Las fotos son de un descapotable con fundas nuevas con estampado de cerezas. Amaba esa imagen tanto…quizás porque era tan lejana a mi realidad, entre la nieve no iba a poder ver un descapotable en la vida. El tema de estampados de frutas supongo que me quedará como gusto para el resto de mi vida, me encantan, jaja.
En las Burdas antiguas también venían las recetas y tenía que hacerle la foto a esta imagen de la ensalada de aguacate. No tiene nada que ver con costura pero me hizo tanta gracia ver el aguacate allí en la revista del año 93 sabiendo que aunque no recuerdo exactamente cuándo probé mi primer aguacate, te digo que no era antes de 2005 desde luego, jaja.
Tengo que preguntar a mi madre, qué pensaba en el año 93 usando esa revista alemana para coser (también viendo el famoso aguacate), mientras la situación económica de Estonia era devastadora. Dos años antes, en 1991, Estonia volvió a tener su independencia de la Unión Soviética. El año siguiente se cambió a la nueva divisa nacional, de los rublos a los kroon. Cada ciudadano pudo cambiar la cantidad de dinero en efectivo equivalente a 10 euros. El sueldo medio era de unos 35 euros al mes (como referencia, en el año 1991 en España el sueldo medio era unos 300 euros al mes).

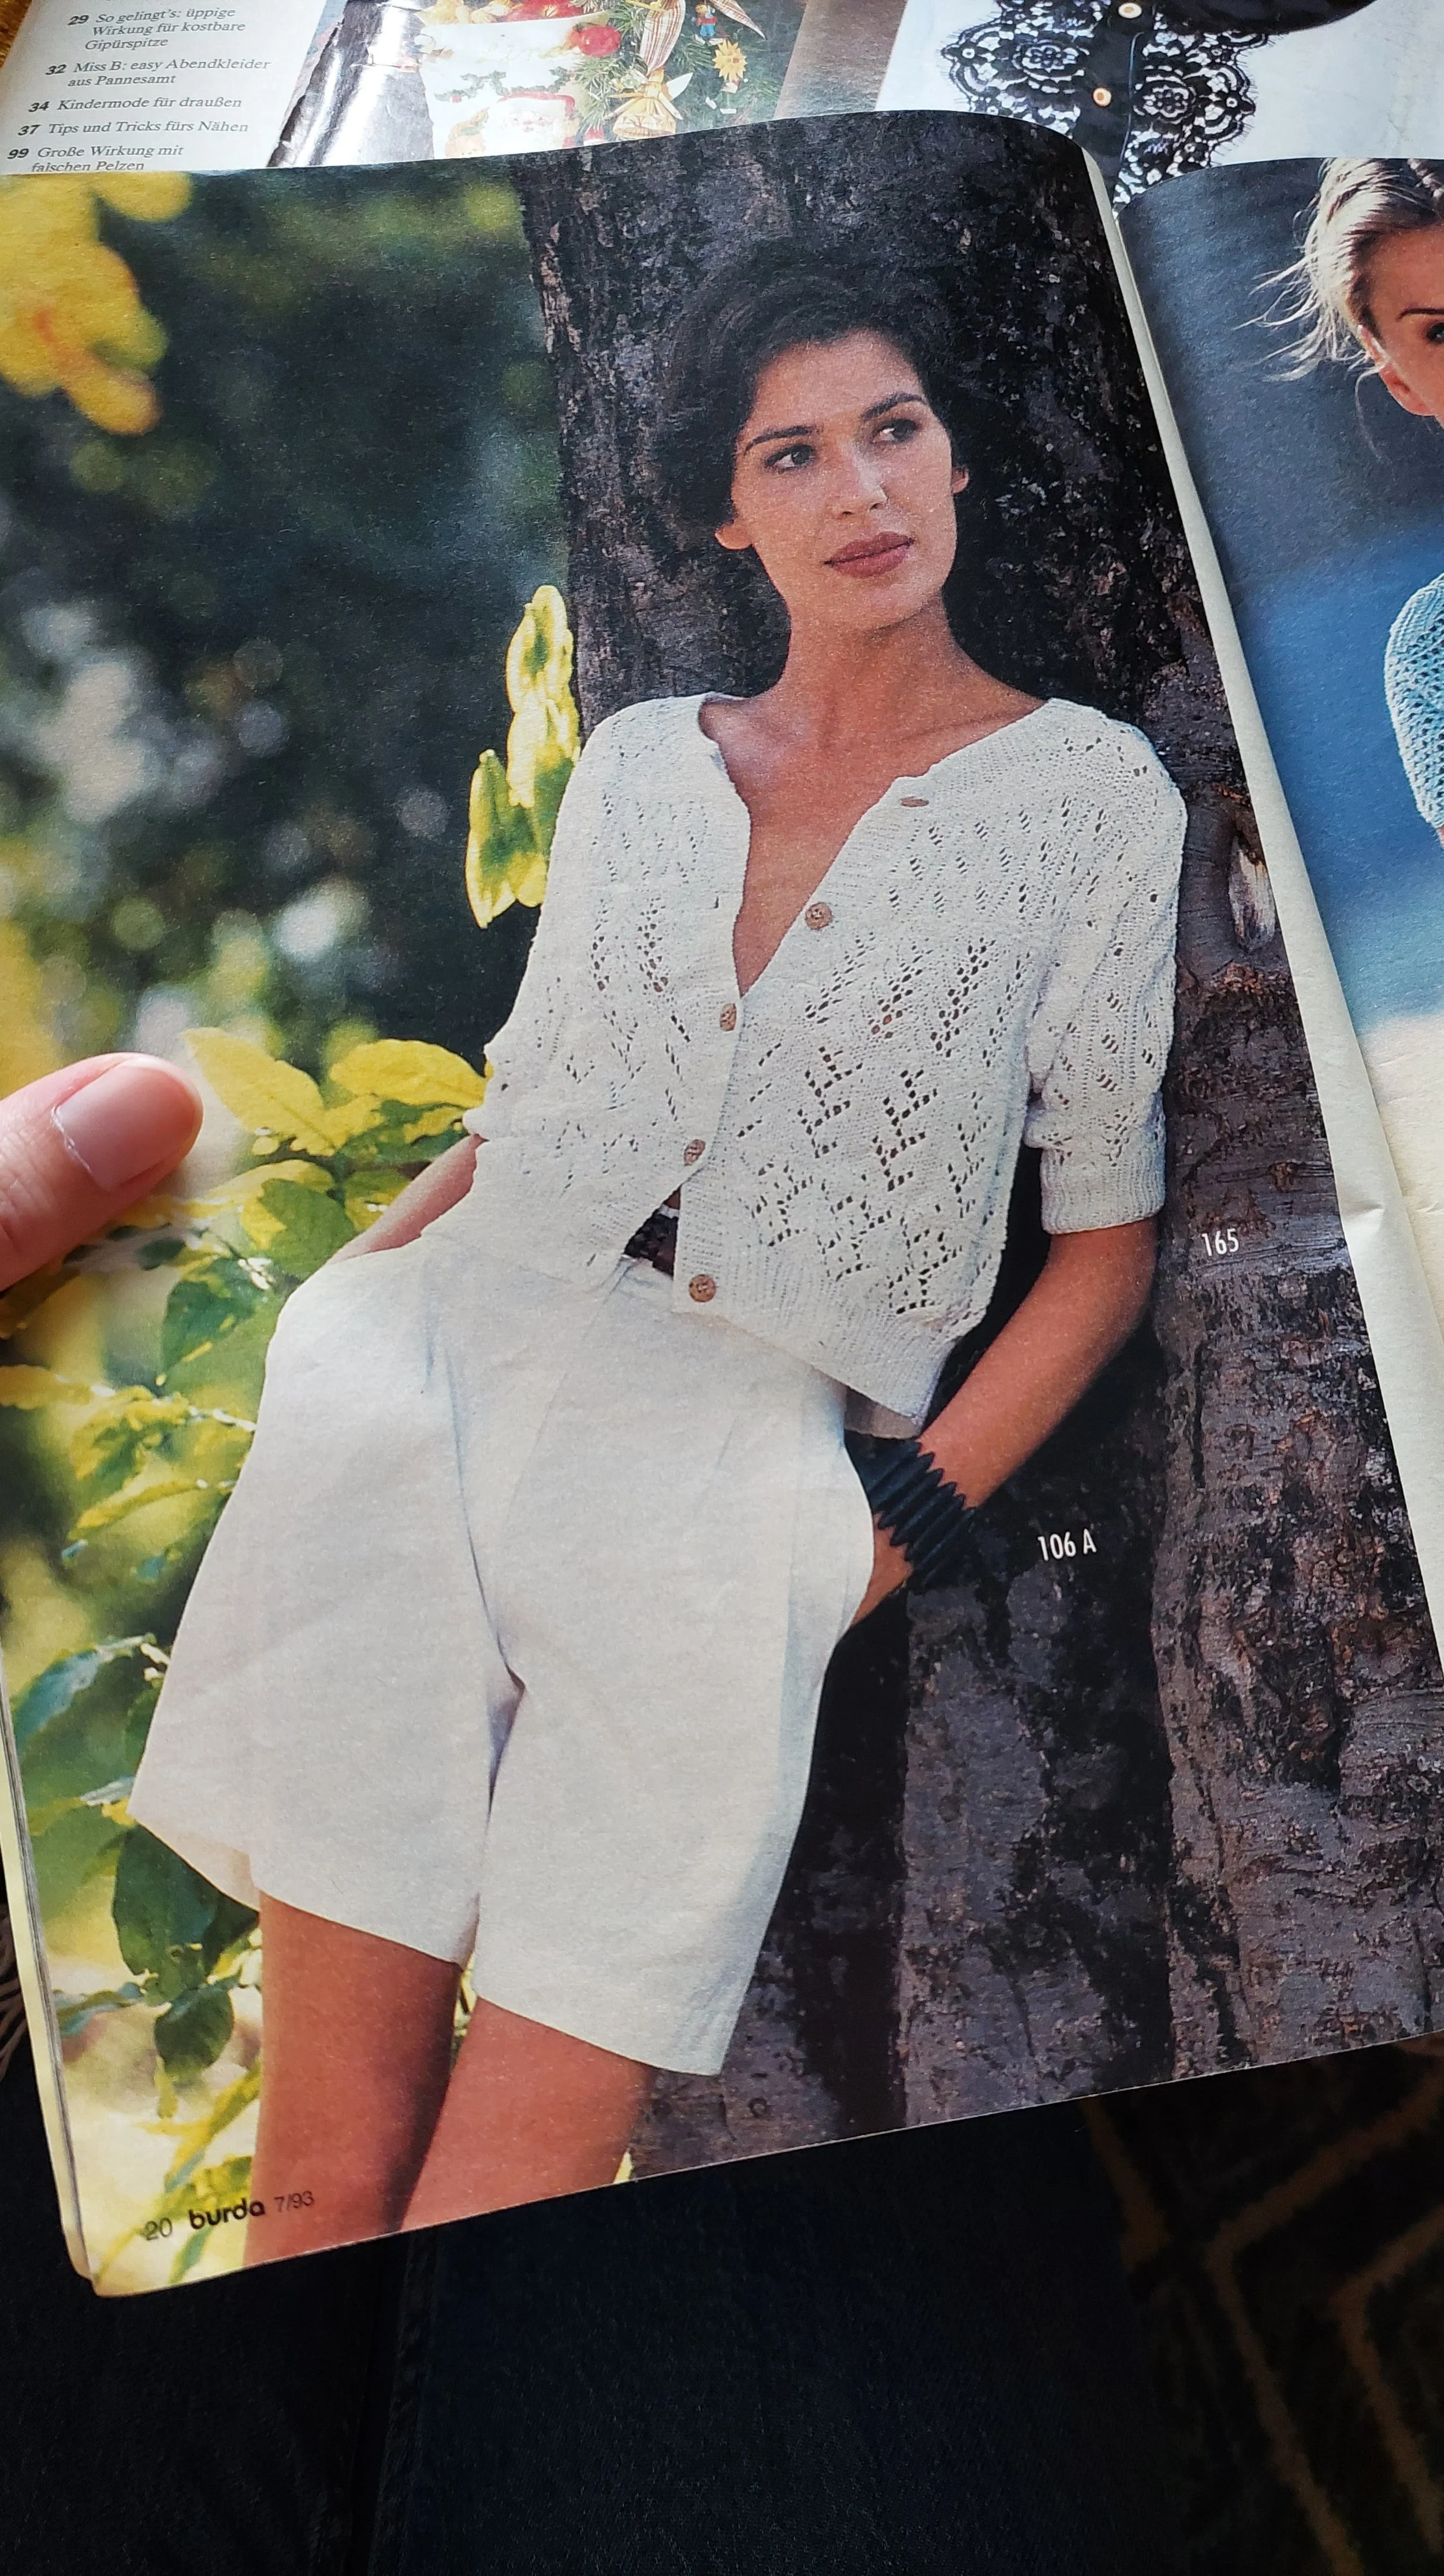
But at least there was fashion, hehe. Look at the petals on that shirt...and it wasn't even a costume, haha. I’m highlighting the other outfit, because It’s fascinating how all the trends are coming back. The same outfit can be on trend in 2023: wide pleated linen shorts and an eyelet knit top.
And that’s it for today's history lesson, thanks for reading and following along! :)
Pero por lo menos la moda se llevaba alegremente, jeje. Mira estos pétalos…y no era para el carnaval, jaja. Y el otro conjunto lo destaco porque me flipa observar cómo vuelve la moda y este conjunto podría ser uno sacado del año 2023: pantalón ancho de lino con pinzas y top de punto.
Y hasta aquí la lección de historia de hoy, gracias por leerme (tanto)! :)