
This summer I'm bringing you a couple of Hanna bikini hack tutorials (you can check all of them here scrolling down to swimwear tutorials), and here goes one about bindings. Essentially it's not brand new as I already used and showed how to do the binding technique both in this Hanna bikini flounce tutorial and in this Mara bralette bikini hack tutorial. But this time I wanted to try out other stitches so here's a little comparation about the different options and my tips for the best results. I'll first show you my stitch samples and then the finished makes.
Este verano os traigo un par de tutoriales sobre cómo modificar el Hanna bikini (podéis verlos todos aquí, bajando hasta los tutoriales sobre prendas de baño), y aquí va uno sobre los ribetes. En realidad, no es nada nuevo, ya que ya utilicé y mostré cómo coser usando ribetes tanto en este tutorial sobre el bikini con volantes como en este tutorial sobre cómo modificar el bralette Mara a un bikini. Pero esta vez quería probar otras puntadas, así que aquí tenéis una pequeña comparación entre las diferentes opciones y mis consejos para conseguir los mejores resultados. Primero cuento sobre mis muestras de puntadas y luego ya los resultados finales.
One thing I love about lingerie and swimwear is that there are so many different ways of finishings out there. I really think that beyond the very basic concepts (understanding how the stretch factor works and what you're trying to acchieve with your garment, for example), there are tons of different variations to get to the same point. So the good news is: there mostly are no (entirely) right or wrong methods, you can get creative and use what you have to create the look you want.
So, today I'm going to write about bindings because I wanted to use some contrasting effect for this Hanna bikini. Every now and then and especially when the summer season begins, I do quite a lot "window shopping" about lingerie and swimwear. In my case it goes more about looking at all the insides of the garments closely when I'm at a store and not so much about the latest trends. Don’t get me wrong, it’s nice to see what is popular for the new season, but I’m personally more interested in the technical aspects of the garments.
This year I saw the binding technique used with a three step zigzag stitch instead of the regular zigzag and as I wanted to try it out, I thought it would be a good occasion to write it down as a tutorial. Let’s go over the basic steps of this method and then I’ll show you the different stitch options I tried out.
Una de las cosas que me encanta de coser lencería y prendas de baño es que hay tantas formas diferentes de acabados. Realmente creo que, más allá de los conceptos básicos (como entender cómo funciona el factor de elasticidad y qué quieres conseguir con la prenda, por ejemplo), hay un montón de variaciones diferentes para llegar al mismo resultado. Así que la buena noticia es que, en su mayoría, no hay métodos (del todo) correctos o incorrectos, puedes echarle ganas e innovar, utilizando lo que tienes para crear el resultado que quieres.
Hoy voy a escribir sobre el tema de los ribetes porque quería tener el efecto de contraste para este Hanna bikini. De vez en cuando, y especialmente cuando comienza la temporada de verano, suelo ir a tiendas para ver lo nuevo en lencería y bikinis. En mi caso, se trata más bien de mirar de cerca el interior de las prendas cuando estoy en una tienda y no tanto de las últimas tendencias. No me malinterpretes, está guay ver lo que está de moda para la nueva temporada, pero personalmente me interesan más los aspectos técnicos de las prendas.
Este año vi la técnica de coser ribetes con una puntada de zigzag de tres pasos en lugar de la puntada en zigzag habitual y, como quería probarla, pensé que sería una buena ocasión para escribir esto como tutorial. Primero te cuento los pasos básicos y luego te enseño las diferentes opciones de puntadas que hice.

Some things to keep in mind when adding bindings to your swim project
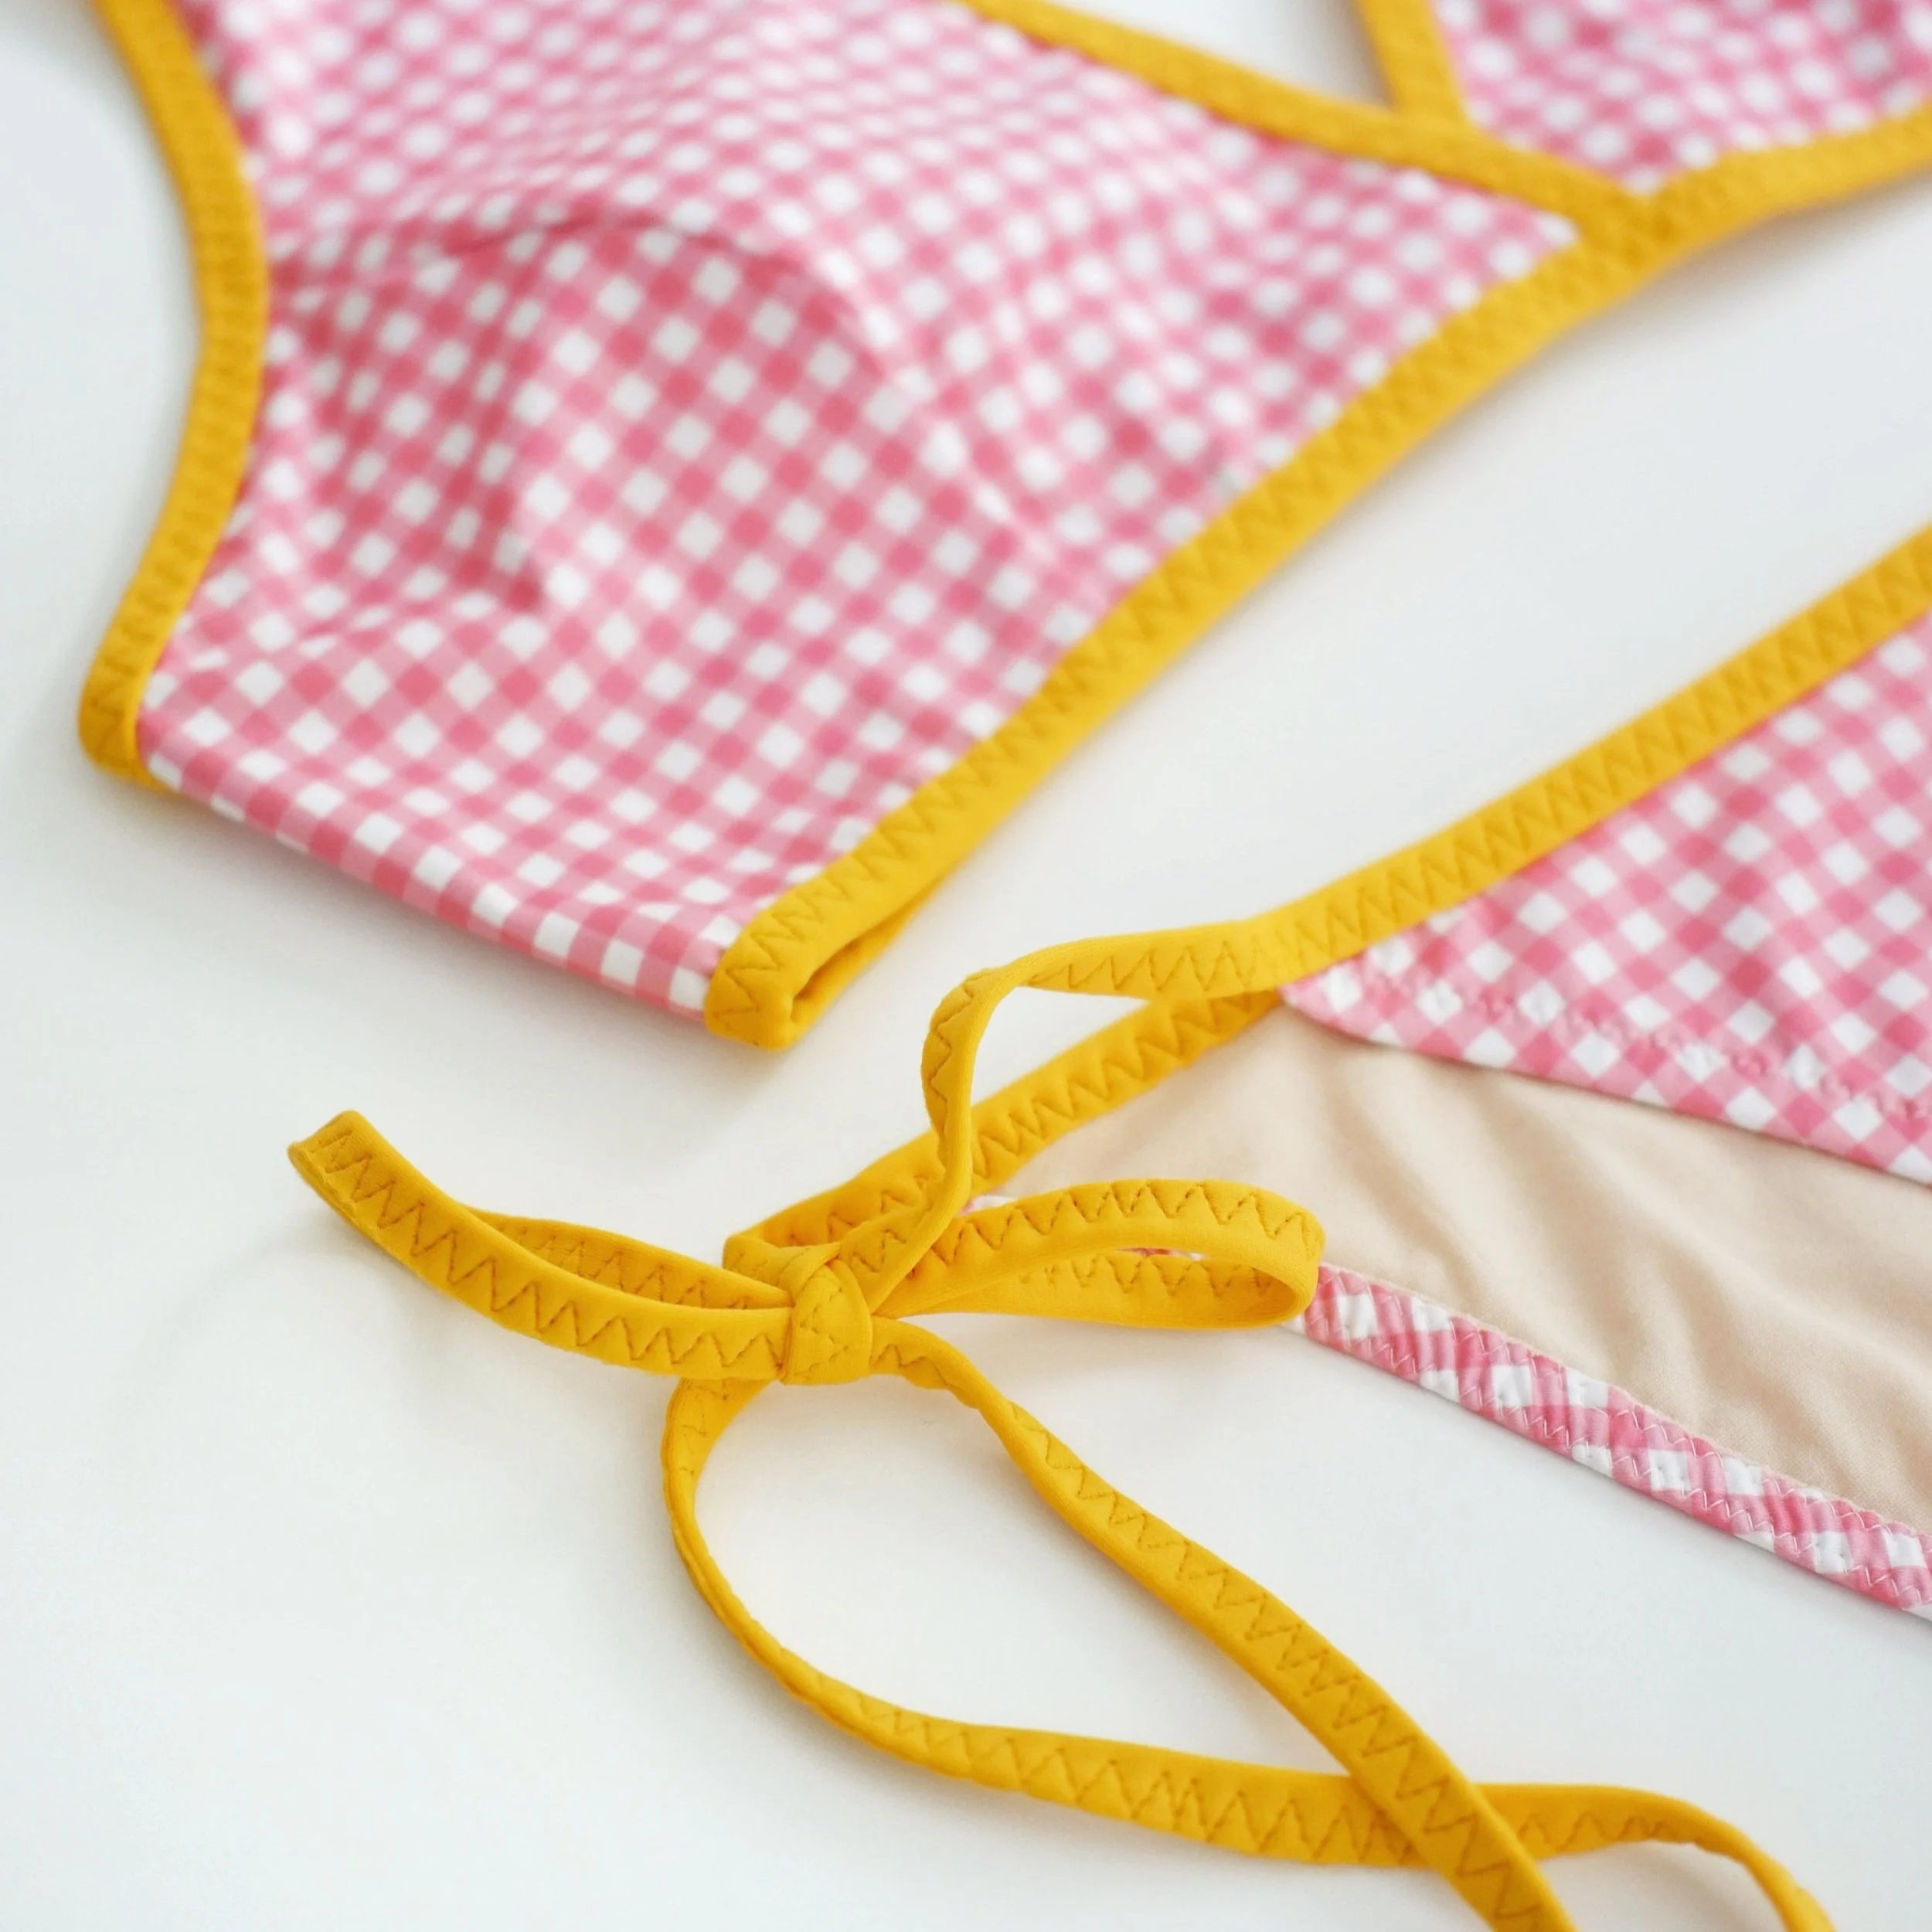
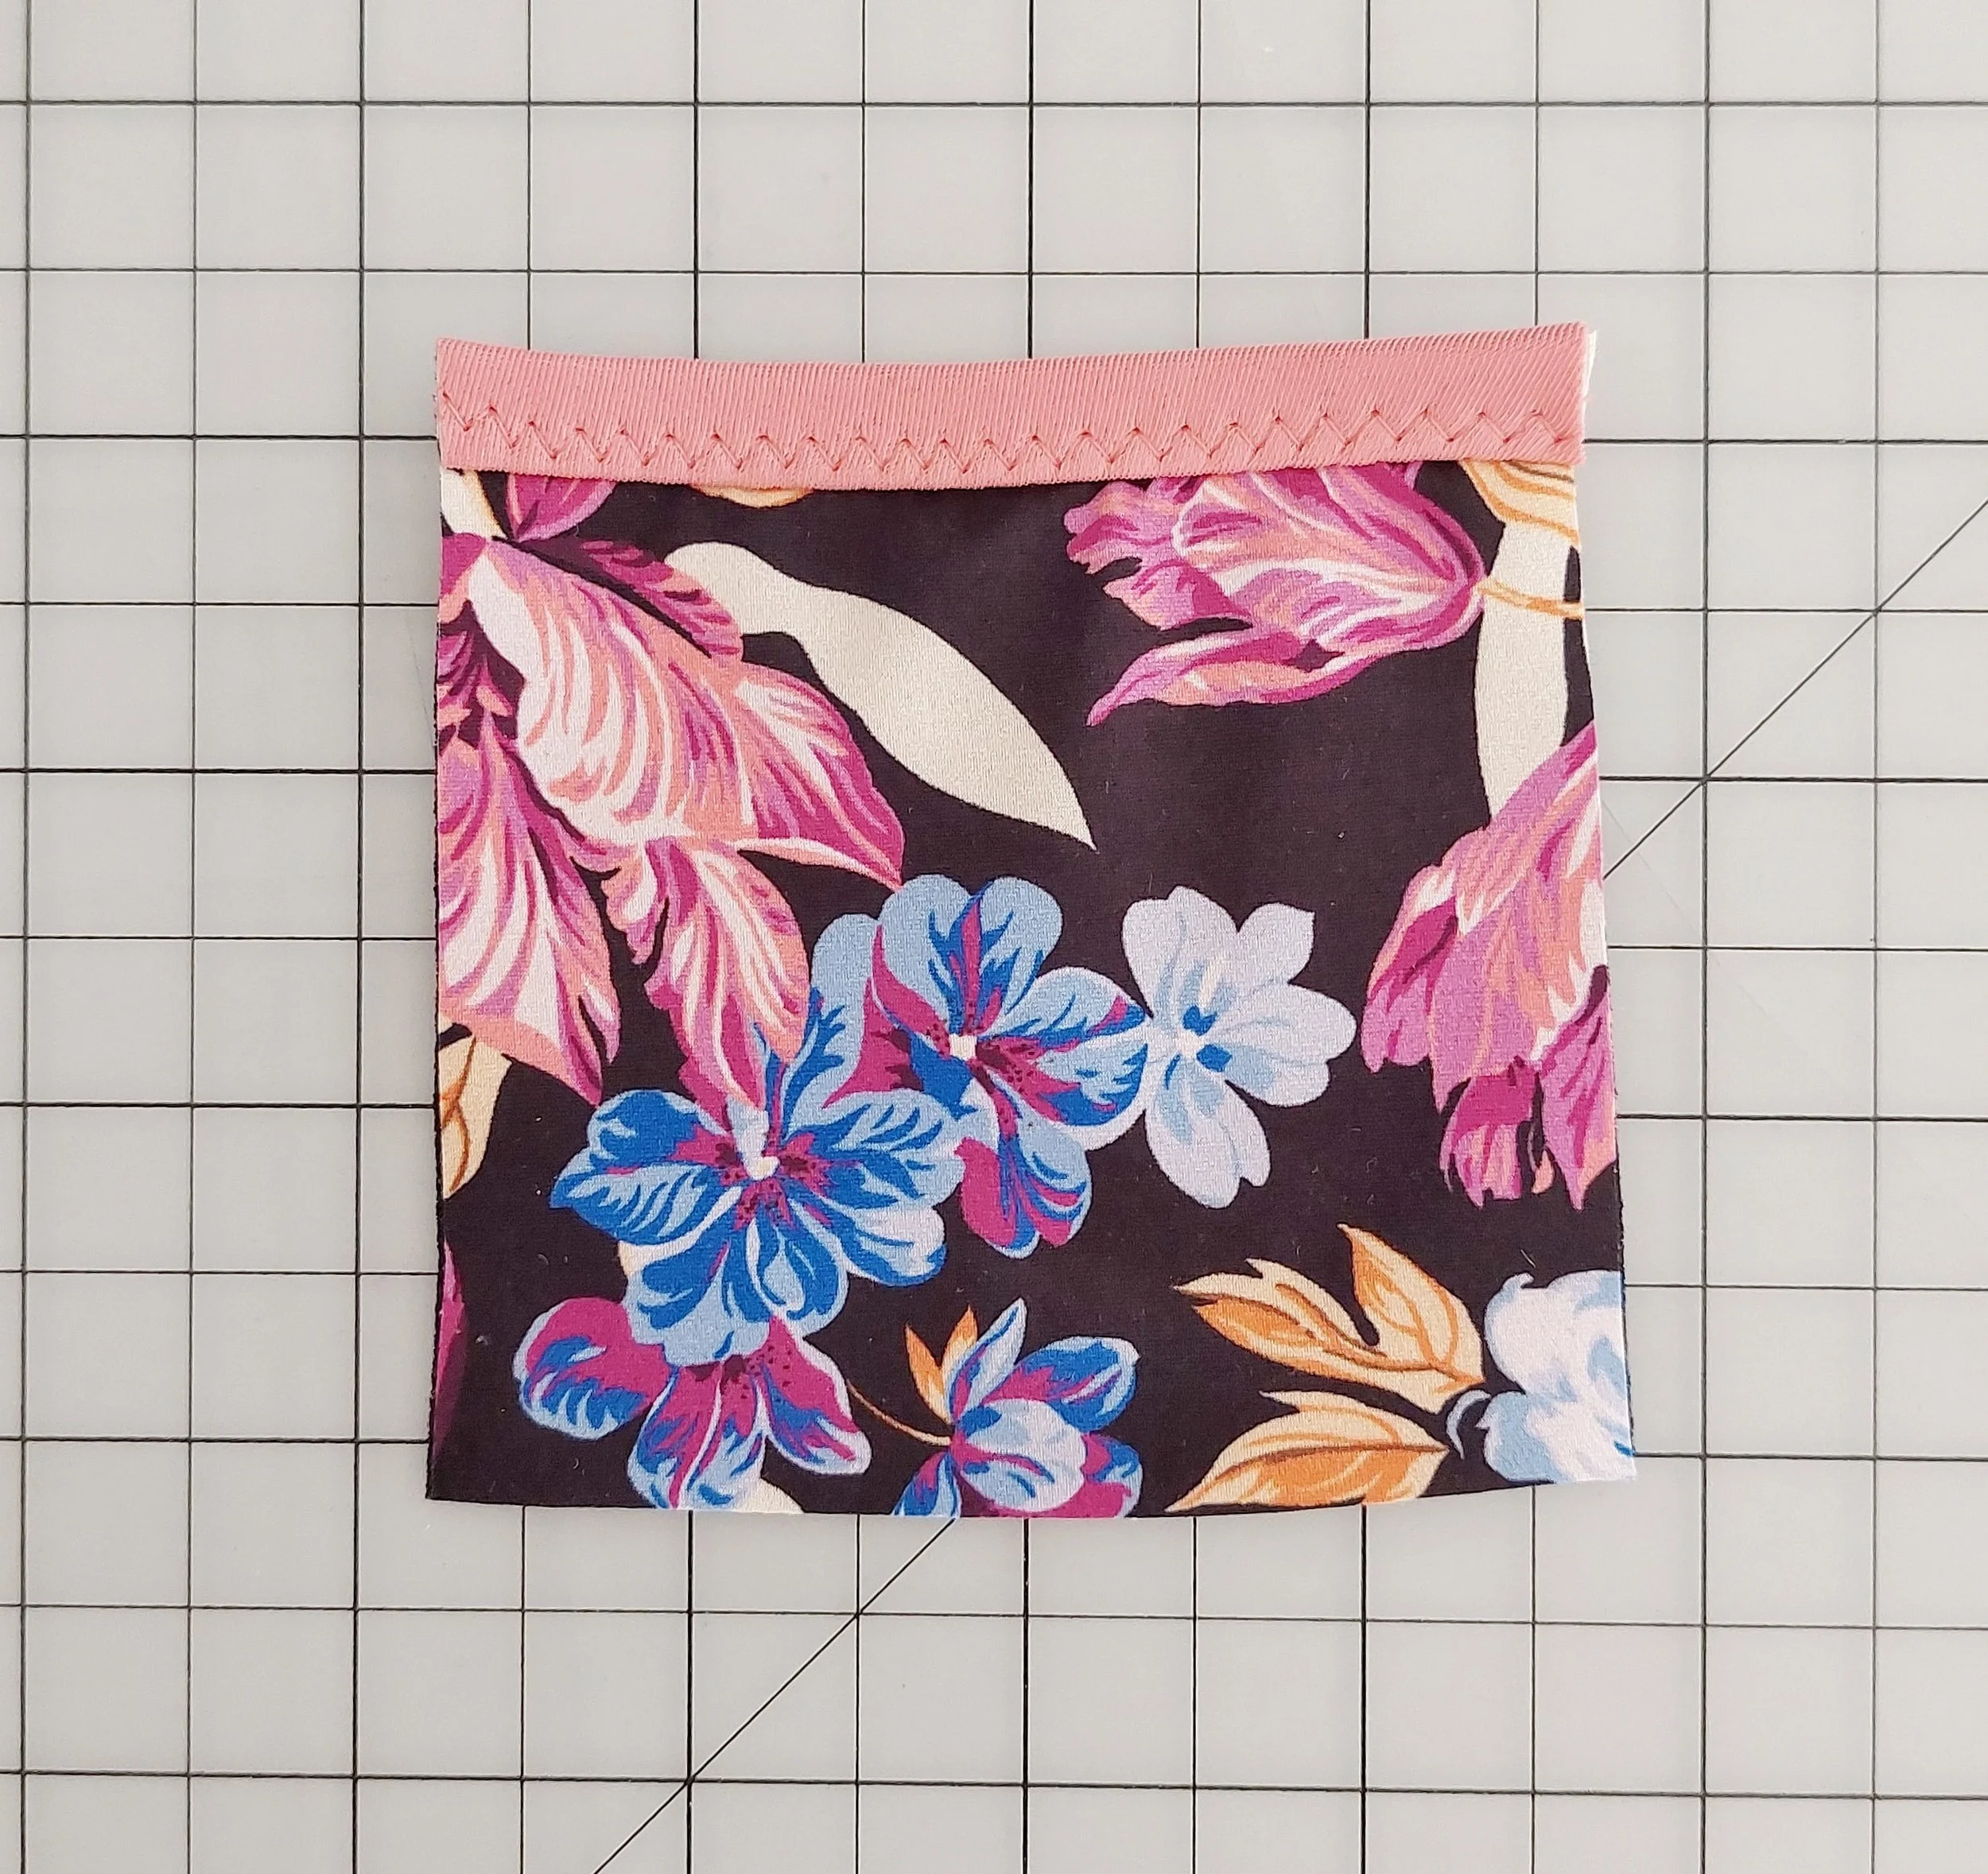
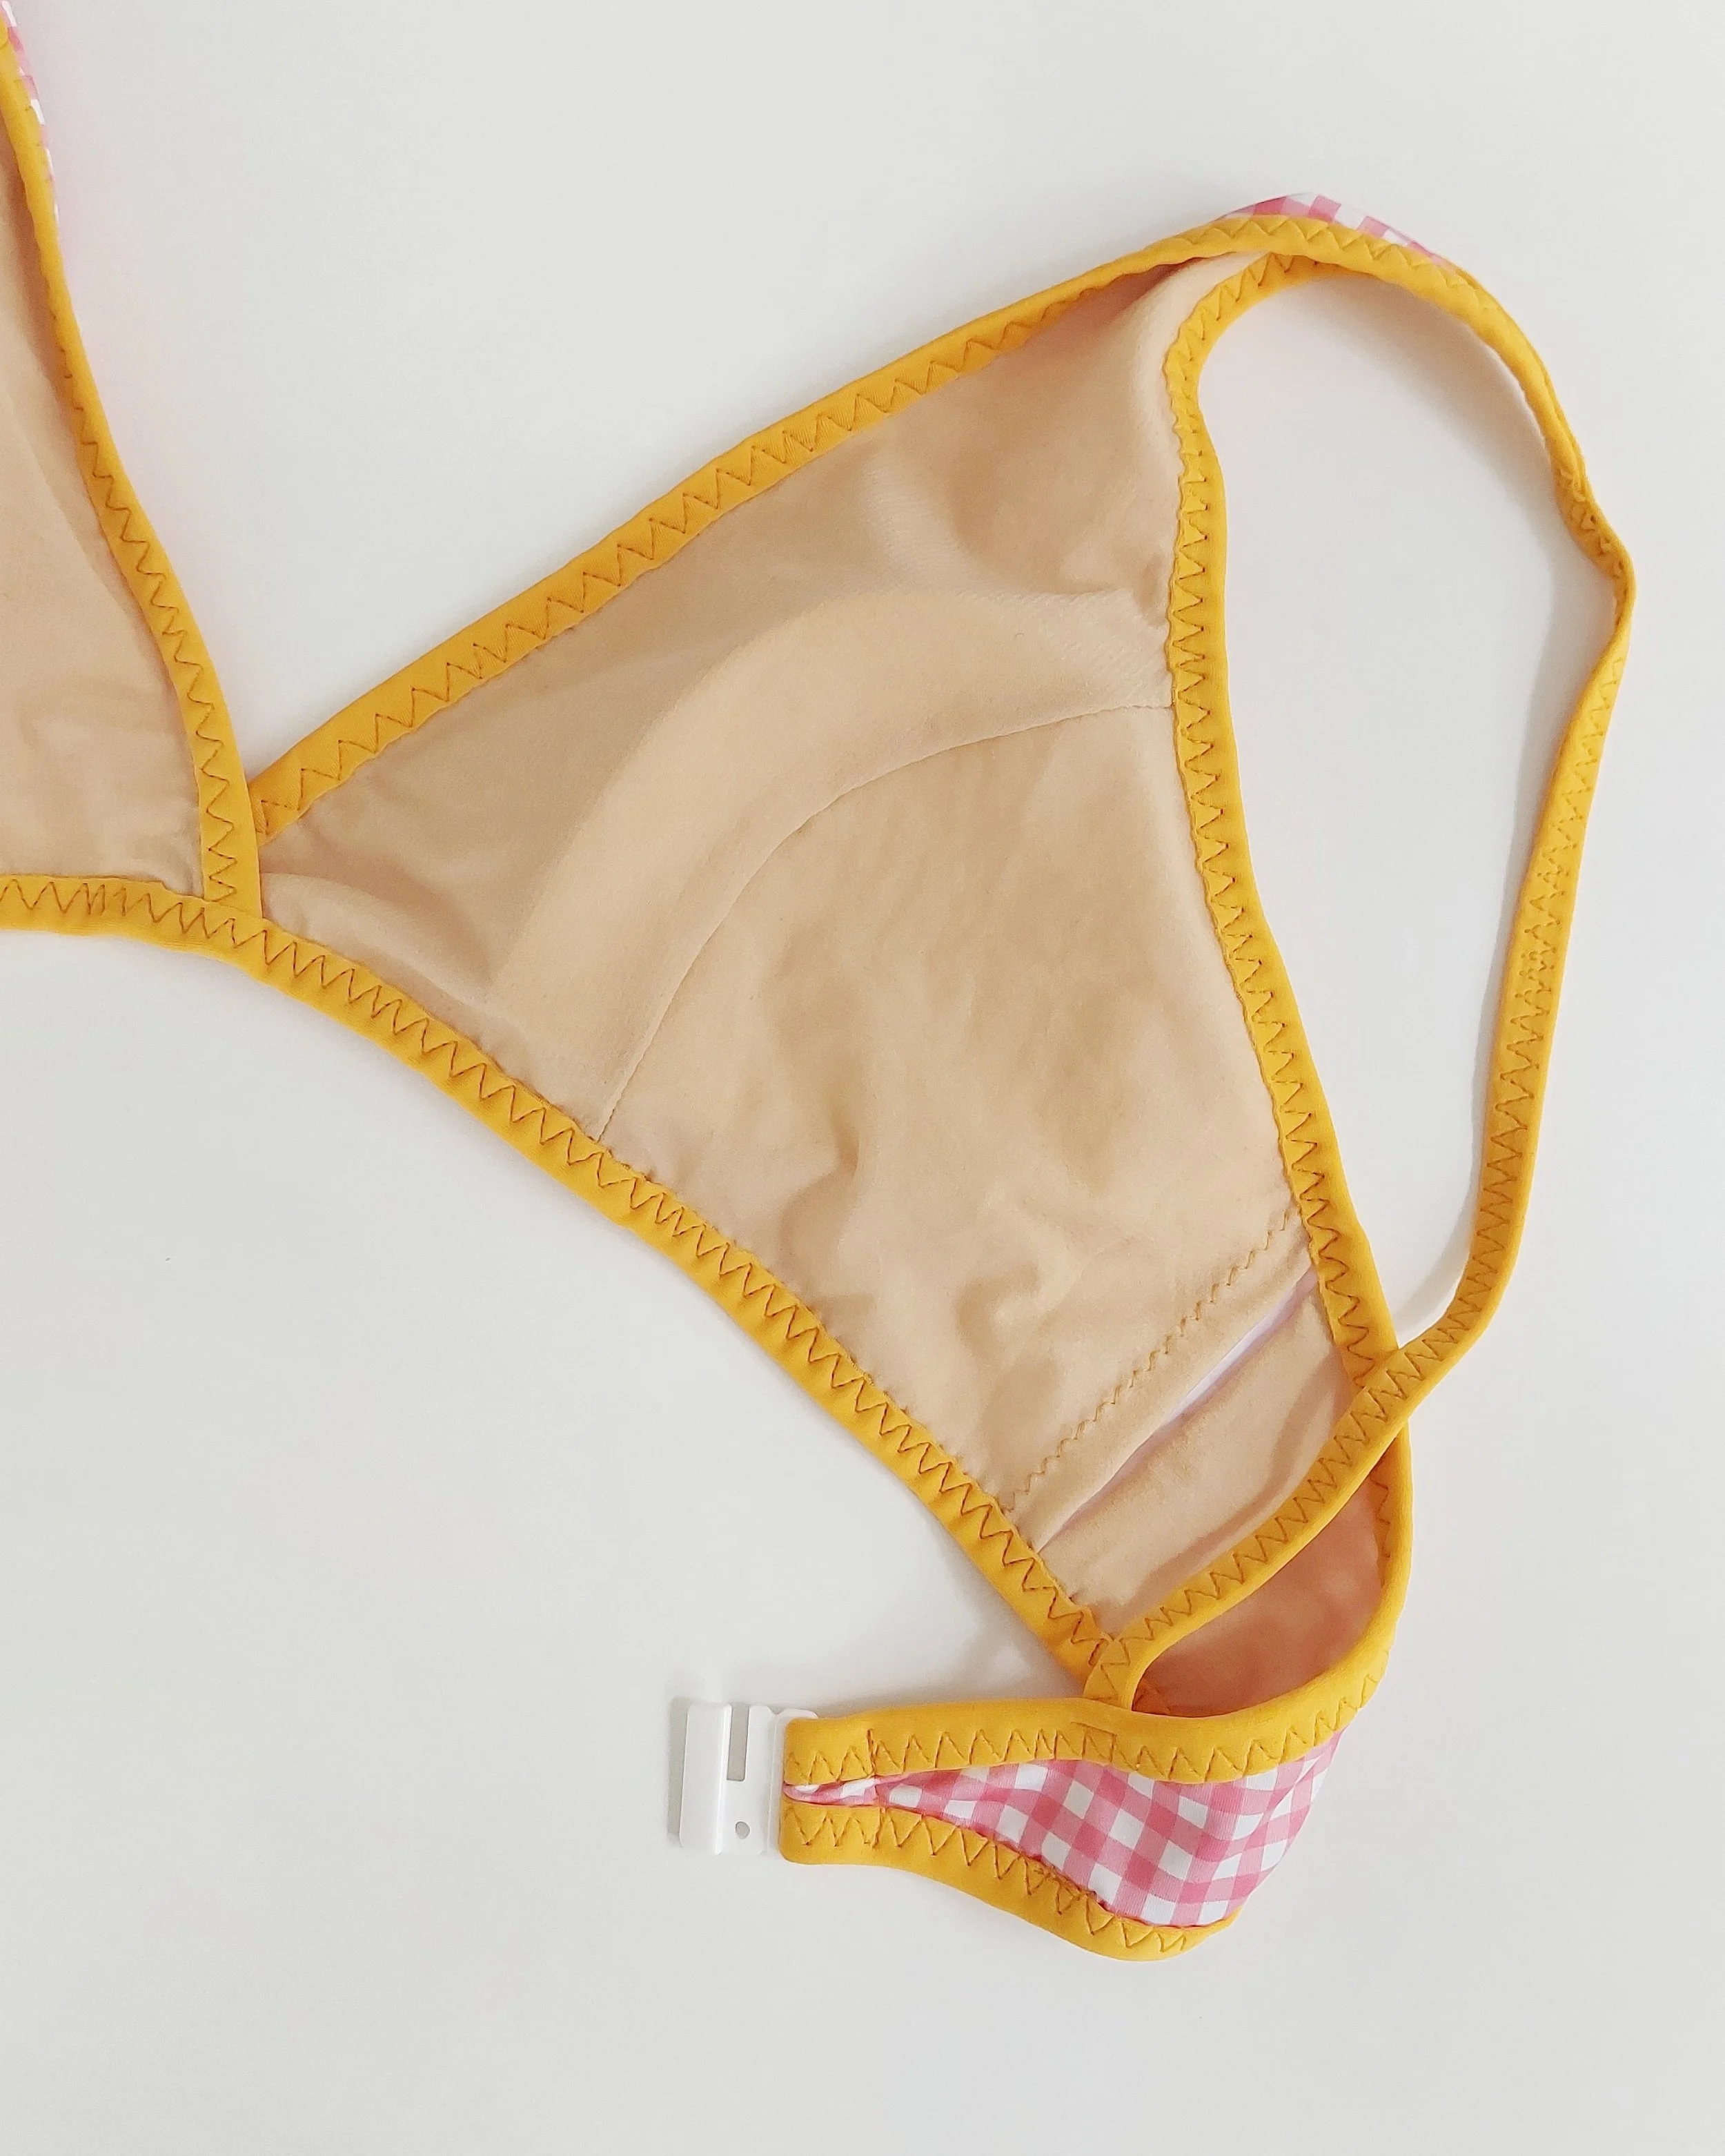
You can use the binding technique for any edge of your swimwear project (neckline, bra band, panties etc), just know that this is a bit bulkier result than just sewing the swim elastic and folding it under. In my opinion the edges that are sewn with binding are sturdier but it of course also depends on the weight of the swim fabric you’re using for your binding. For example, the sample of the floral bikini bottoms I made with black binding turned out quite bulky because that black swim fabric was heavier weight than a medium weight I would more commonly use. If you can, use a lighter weigth swim fabric for the binding strip for a flatter result.
When sewing swim elastics as usual (first pass and then folding them under with the second pass), I usually pull the elastic by about 10% and this amount works well for my patterns. When sewing elastics inside the binding, I do not pull them, as otherwise the result won’t be as flat (you can pull, I just don’t like to do it). This means that you might need to size down on the band or at least you need to try on the bikini before adding your back closure to make sure that the total length of the band won’t be too wide for you. You can chop off the extra if needed at that point.
It’s also worth to note that this technique is not complicated, but it would definitely be easier to do, if you’ve already sewn swim elastics with the traditional method. As always, try it on a scrap of fabric before starting out so you know what to look out for.
Algunas cosas que debes tener en cuenta al añadir ribetes a tu proyectos de bikinis
Puedes utilizar esta técnica en cualquier borde de tu proyecto de bikini o bañador (escote, banda del sujetador, braga etc), pero ten en cuenta que el resultado tiene algo más de grosor que si simplemente cosieras el elástico de bañador y lo doblaras por debajo. En mi opinión, los bordes cosidos con ribetes son más resistentes y gruesos, pero, por supuesto, también depende del grosor de la tela de lycra que utilices para los ribetes. Por ejemplo, la muestra de la braga del bikini floral que hice con ribetes negros quedó bastante grueso porque esa lycra negra era más gruesa que la de grosor medio que suelo utilizar. Si puedes, utiliza una lycra más ligera para la tira de ribete para tener un resultado más plano.
Cuando coso el elástico para bikinis como de costumbre (primer paso de zigzag y luego doblar por debajo con el segundo paso), suelo estirar el elástico aproximadamente un 10%, y esta cantidad funciona bien para mis patrones. Cuando coso elásticos dentro del ribete, no los estiro, ya que de lo contrario el resultado no quedaría tan plano (puedes estirarlos, pero a mí no me gusta hacerlo). Esto significa que es posible que tengas que reducir el tamaño de la banda o, al menos, probarte el bikini antes de añadir el cierre para asegurarte de que la longitud total de la banda no te queda demasiado ancha. Si es necesario, puedes cortar el exceso en ese momento.
También hay que decir que esta técnica no es complicada, pero desde luego será más fácil de hacer si ya has cosido elásticos para bañadores con el método tradicional. Como siempre, pruébalo en un trozo de tela antes de empezar para saber a qué debes prestar atención.

Cutting out your pieces
Before attaching this type of binding to your swimwear projects you have to remember to remove the seam allowance for the elastic as this method does not fold under any of it, the elastic will just be covered with the binding fabric as it works like a bias binding. If you’re using the Hanna bikini pattern, remove 1 cm from the edges where you’re sewing the elastic (1,7 cm for the band in D, E and F cups).
For the binding itself you need the lenght of the area you’re attaching it plus some extra, and if you’re making ties like I did for the bottoms, you need to estimate how much you need. The best idea is to cut the binding on the edge of your fabric where you haven’t cut anything yet to take advantage of maximum width/lenght of it (you could actually cut these strips as a first thing to be extra smart). I would not recommend attaching binding strips together to avoid bulk, so try to get the lenght you need in a continuous piece for the best results.
The width of your binding depends on the width of the elastic you use. For the 8 mm elastic I’ve used here, I cut the binding with 3,5 cm width (my elastic is just under 3/8” and my binding is 1 1/2”) wide) so I knew I had extra space to sew and I cut the rest off later on. My math for this is usually 3x width of the elastic + half a cm (1/4”) for extra room.
Corte de las piezas
Antes de coser este tipo de ribete en tus proyectos de bikini y bañador, tienes que eliminar el margen de costura de elástico, ya que con esta técnica no se dobla para debajo, sino que el elástico quedará cubierto con la tela del ribete, ya que funciona como una cinta de bies. Si utilizas el patrón de bikini Hanna, elimina 1 cm de los bordes donde vas a coser el elástico (1,7 cm para la banda en las copas D, E y F).
Para el ribete en sí, necesitas la longitud del borde donde lo vas a coser y un poco más por si acaso, y si vas a hacer lazos como hice yo para la parte de braga, tienes que calcular cuánto de tira necesitas. Lo mejor es cortar el ribete en el borde de la tela donde aún no hayas cortado nada para aprovechar al máximo su ancho y largo (de hecho, podrías cortar estas tiras como primera cosa). No recomendaría unir tiras de ribete para evitar tener que solaparlas y crear más bulto, así que intenta conseguir la longitud que necesitas en una pieza continua para no tener luego más problemas.
El ancho del ribete depende del ancho del elástico que utilices. Para el elástico de 8 mm que he utilizado aquí, corté el ribete con un ancho de 3,5 cm, así que sabía que tenía espacio extra para coser y para cortar el resto más tarde. Mi cálculo para esto suele ser 3 veces el ancho del elástico + medio centímetro para tener espacio extra.
Sewing the binding / Coser el ribete
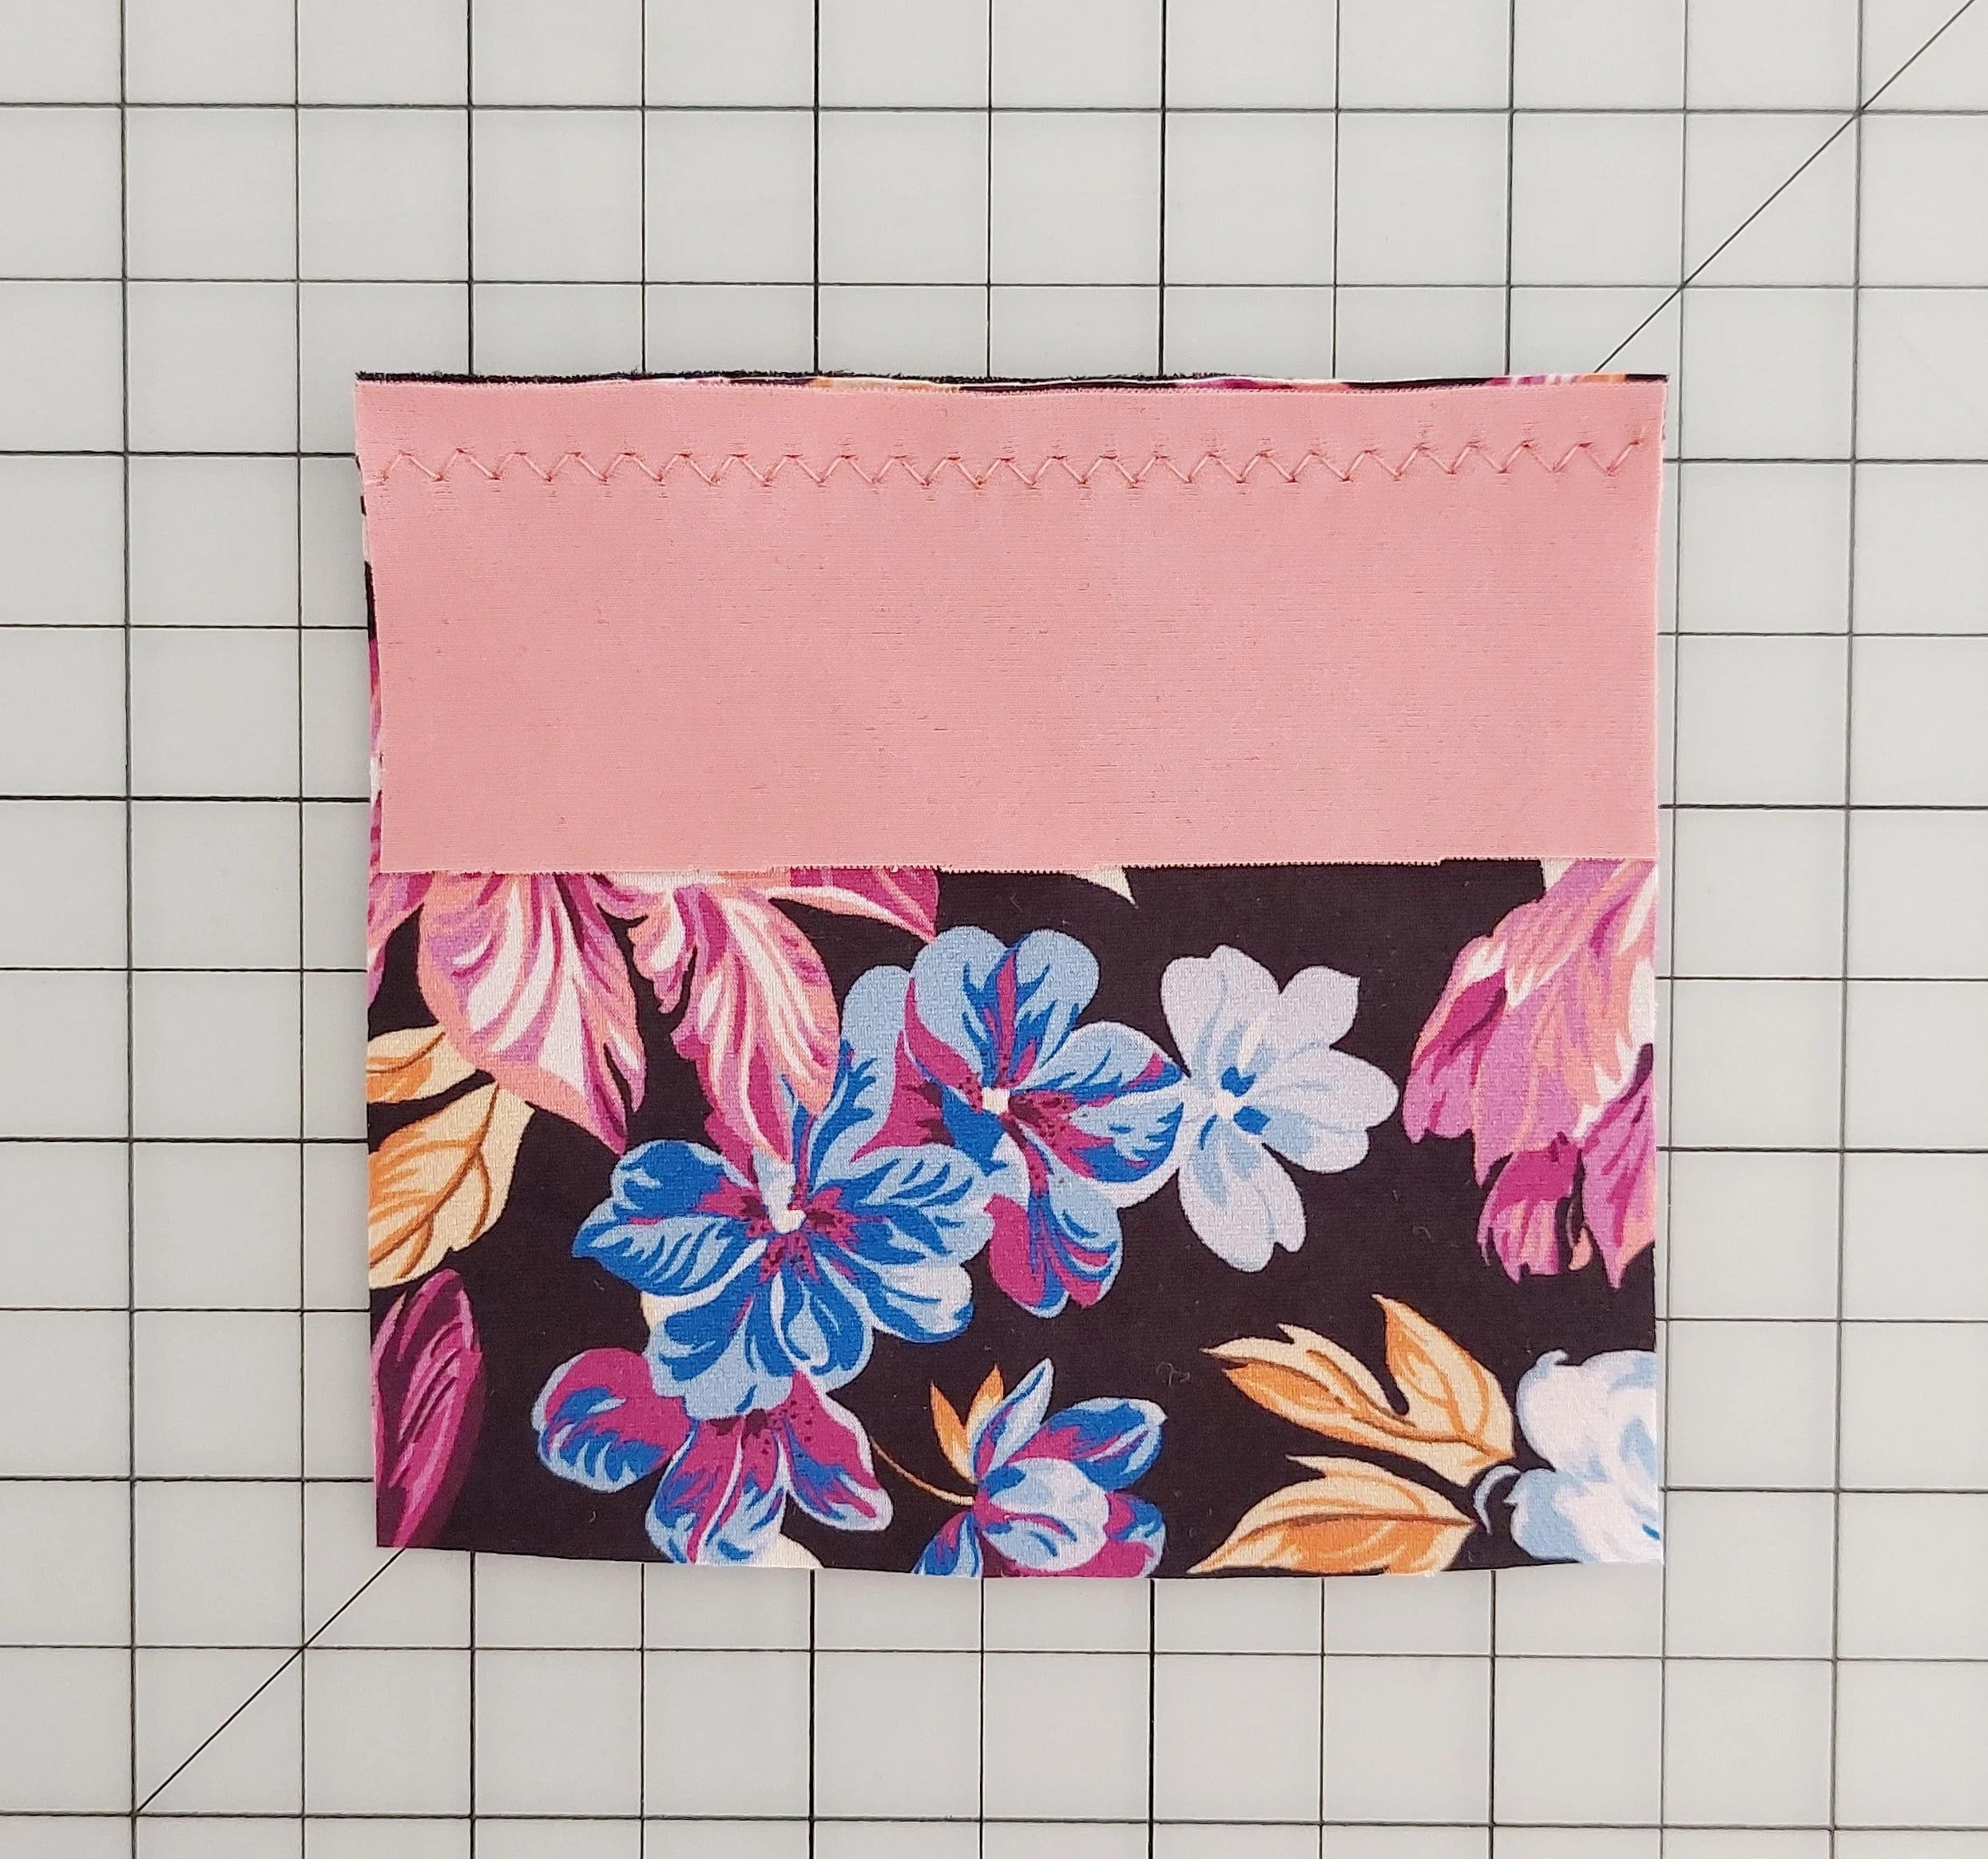
To attach the binding you would first sew it with right sides together on the edge where you want to attach it (on top of both the exterior and the lining layers), use a regular zigzag stitch (2.5 width, 2.5 lenght).
1. Para coser el ribete, primero hay que coserlo derecho con derecho al borde donde lo vas a poner (por encima de la capa exterior y del forro), utilizando una puntada en zigzag normal (2,5 de ancho y 2,5 de largo).
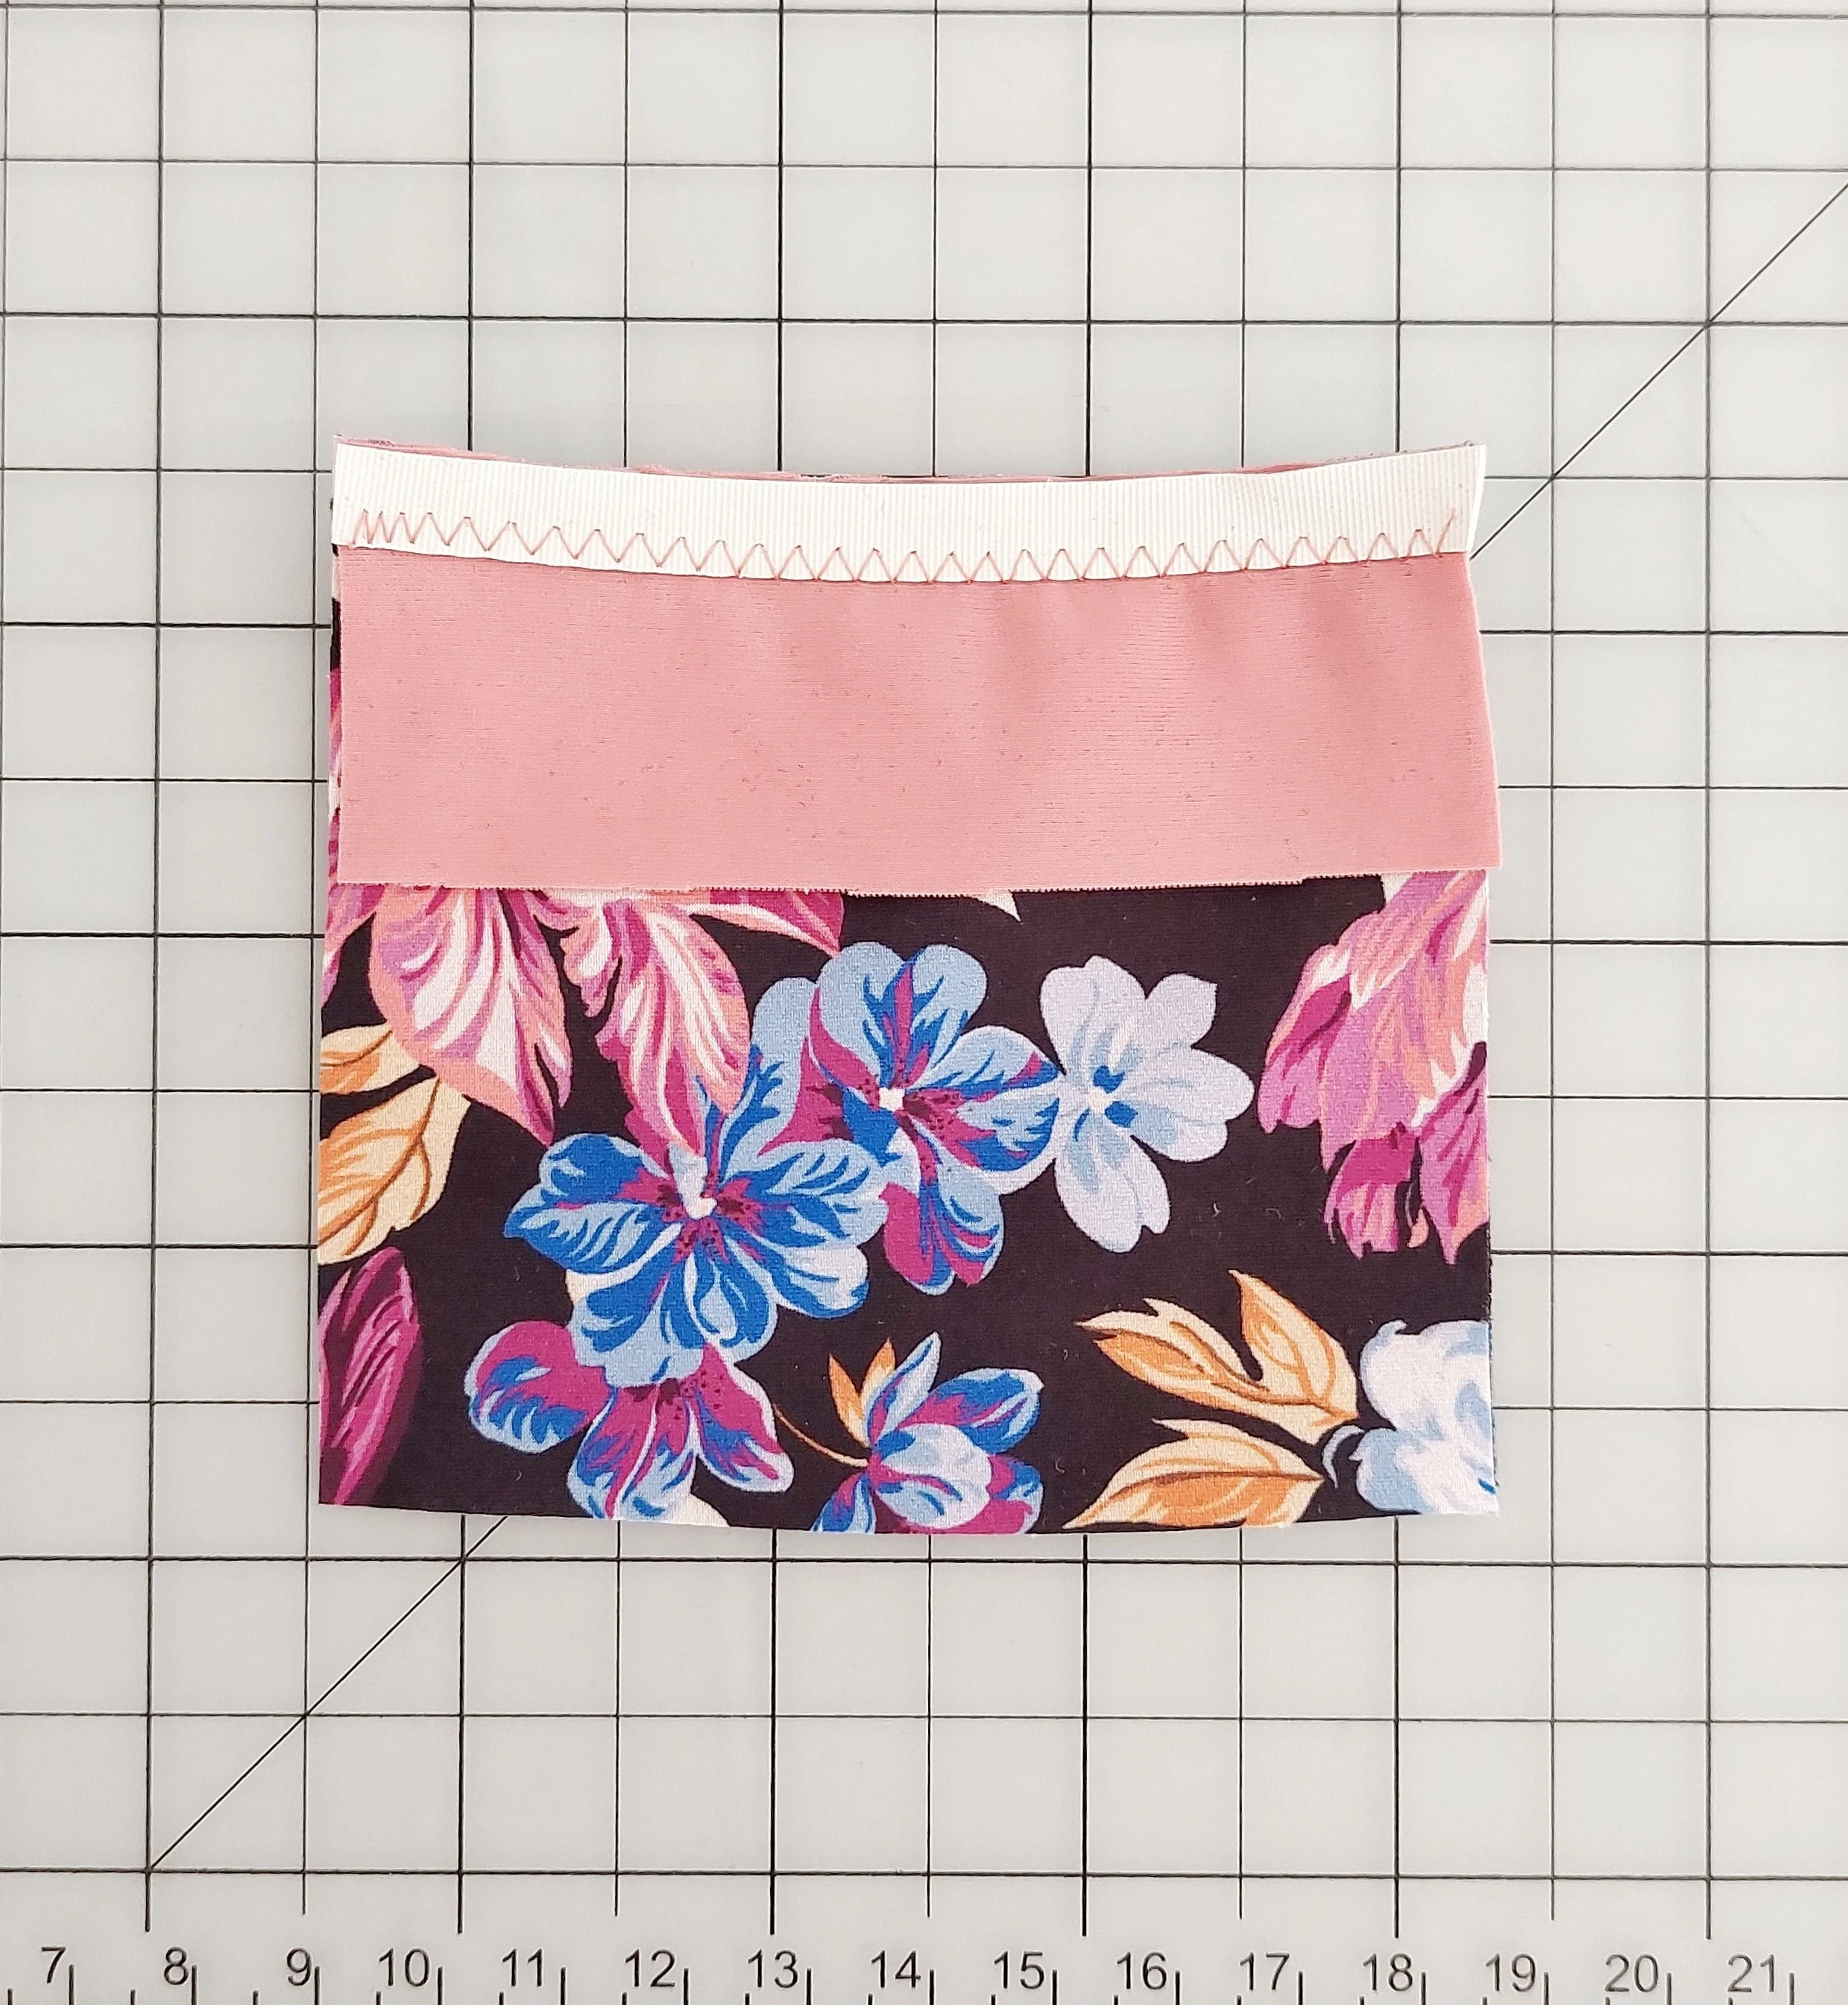
2. Then put the elastic on top of these layers and sew with the same stitch, near the left edge of the elastic (the edge that is not towards all the raw edges).
2. Luego pon el elástico sobre estas capas y cose con la misma puntada, cerca del borde izquierdo del elástico (el borde que no está hacia todos los bordes libres).
3. Now fold the binding under itself. On the right side of the work, sew on the left side of the binding, while at the same time pulling the binding slightly to the left side of your work on the wrong side, so the raw edge under there is covered with that stitching you’re doing (that’s why we have the excess width there).
3. Ahora dobla el ribete hacia abajo. En el lado derecho del trabajo, cose el lado izquierdo del ribete, mientras tiras ligeramente del ribete hacia el lado izquierdo del trabajo en el revés, de modo que el borde sin rematar queda cubierto con la costura que está haciendo por debajo (por eso tenemos ese exceso de ancho allí).
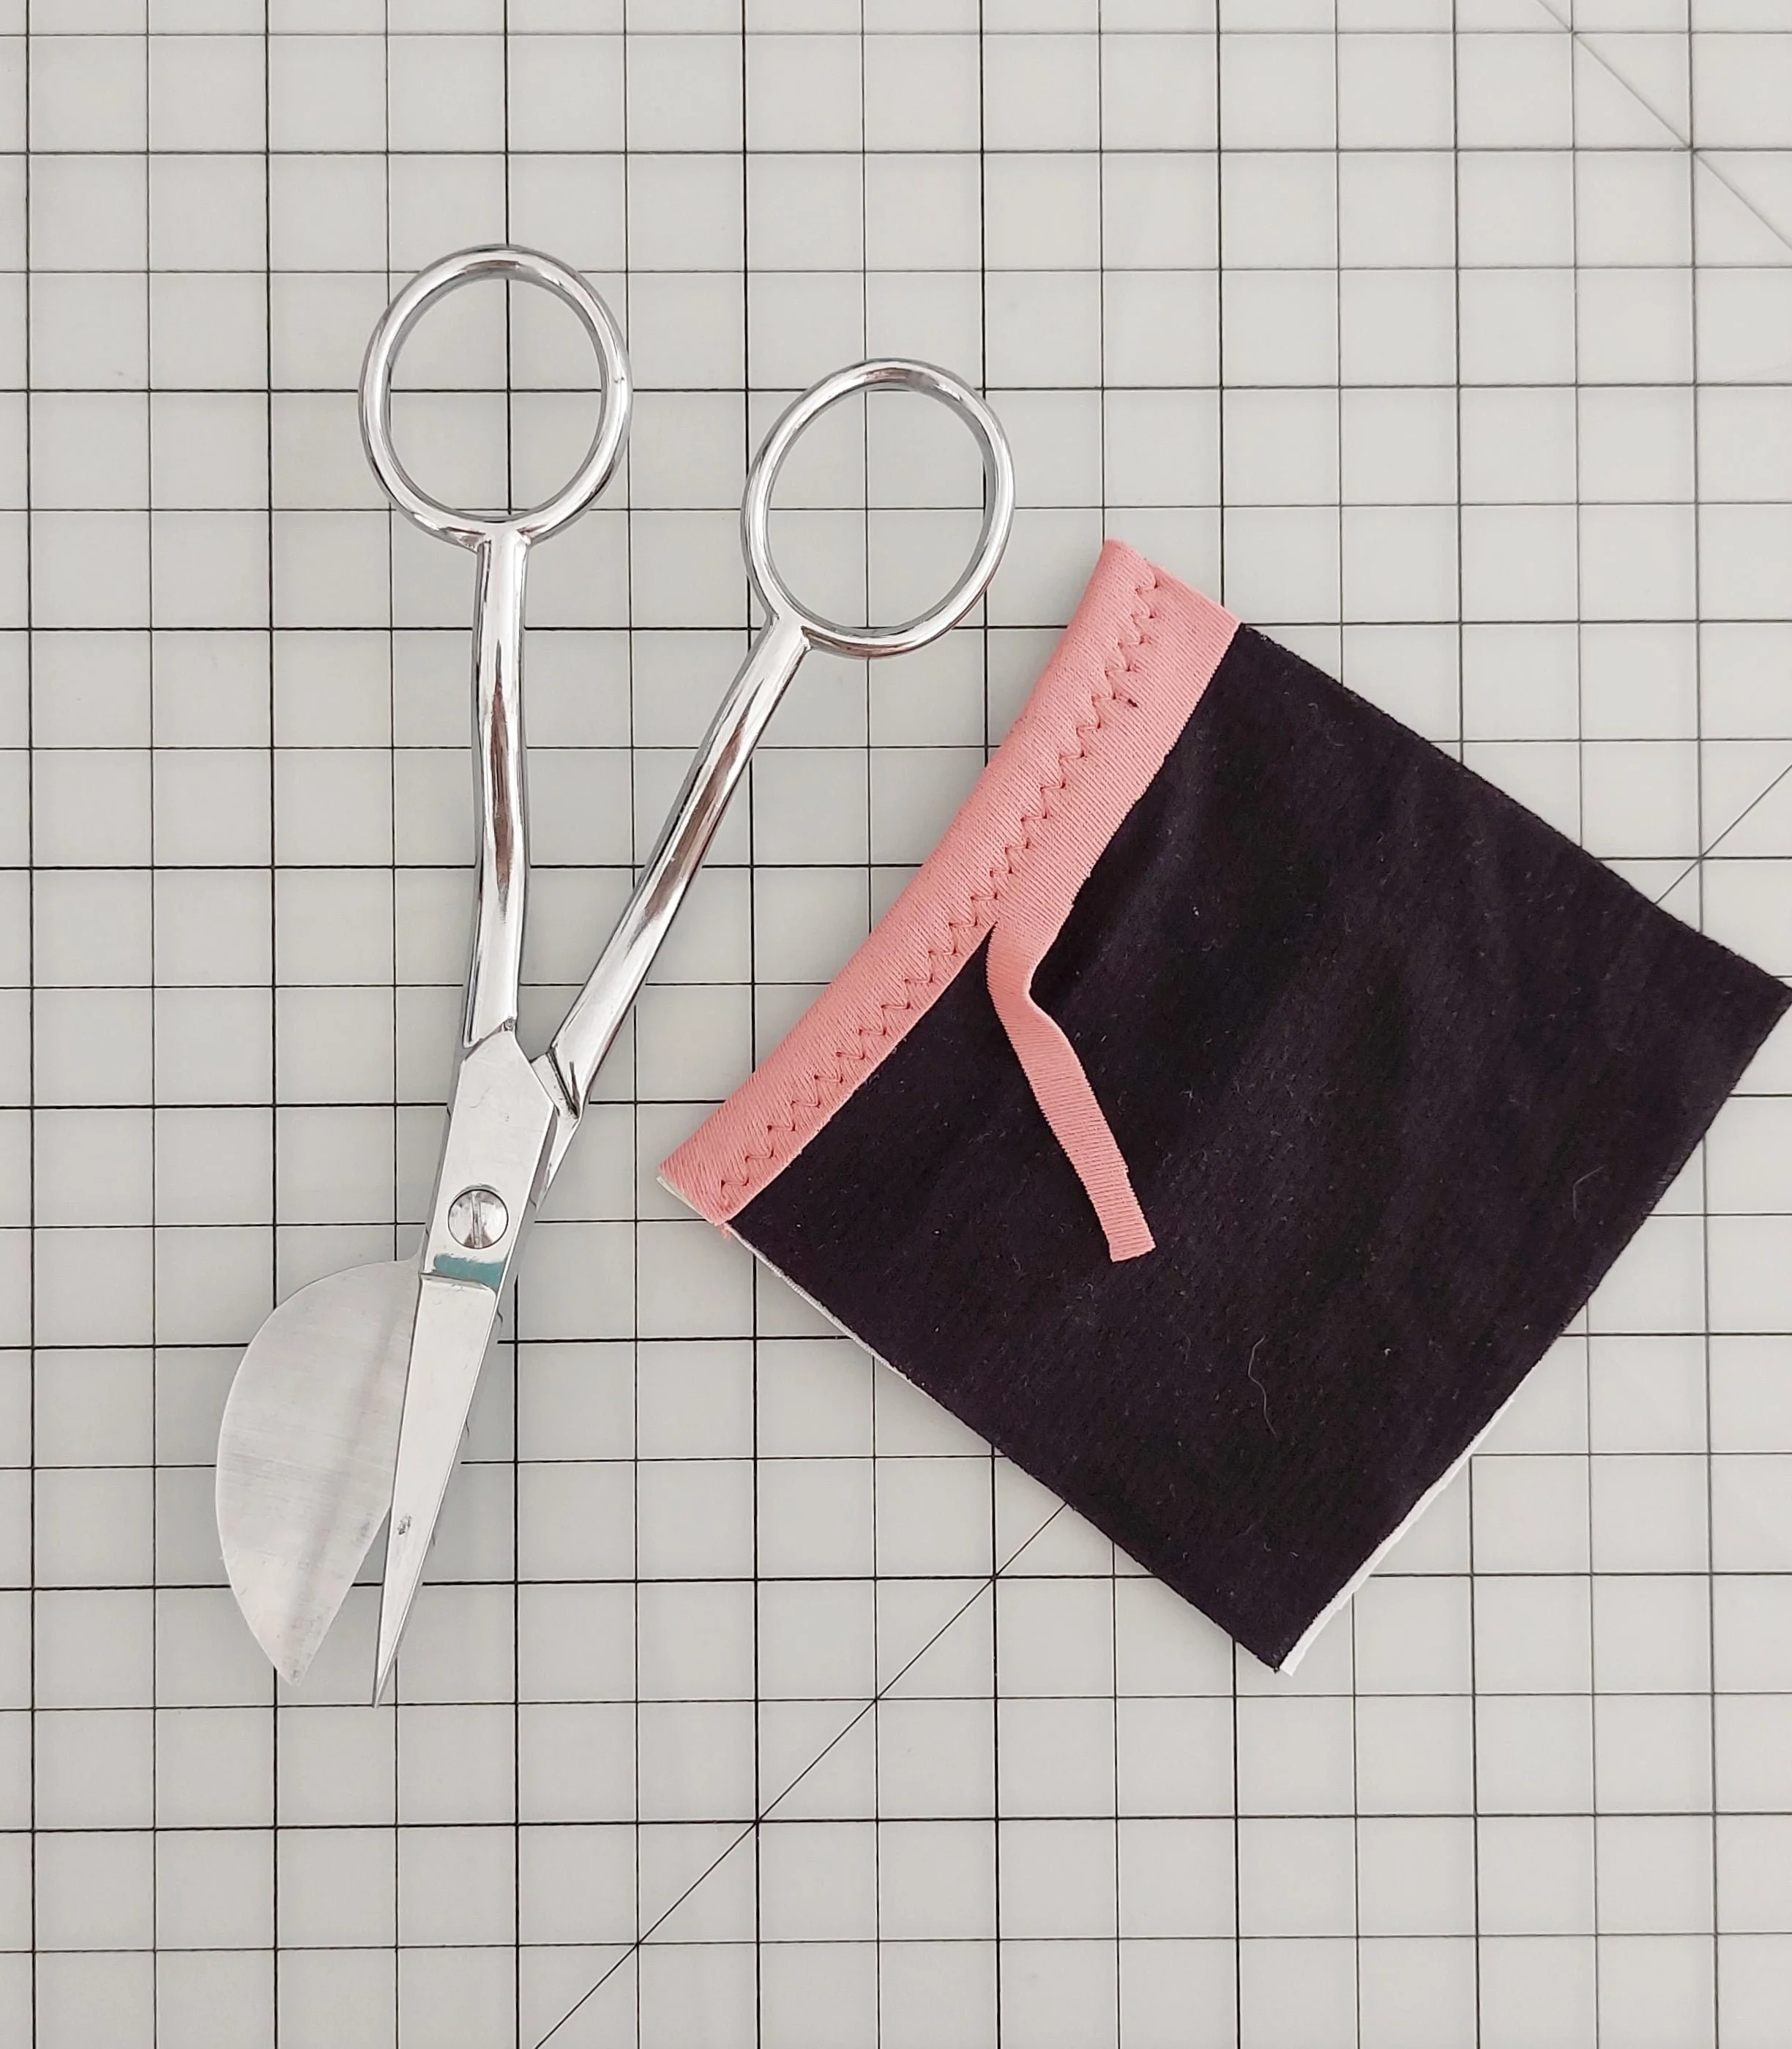
You will have excess fabric on the wrong side of your work once your stitching is done. Now just cut off the excess close to the stitching and the binding is done.
In this first example I used the same zigzag (2,5 width, 2.5 lenght) for that last stitch, that’s the only one that will be visible. It’s quite easy to work with and all the machines have it, so it’s a good option.
Una vez que hayas terminado de coser, te sobrará tela en el revés del ribete. Ahora solo tienes que cortar el exceso cerca de la costura y ya lo tienes.
En este primer ejemplo utilicé el mismo zigzag (2,5 de ancho, 2,5 de largo) para esa última puntada, que es la única que quedará visible. Es bastante fácil de hacer y todas las máquinas lo tienen, por lo que es una buena opción.
three step zigzag / el zigzag de tres pasos

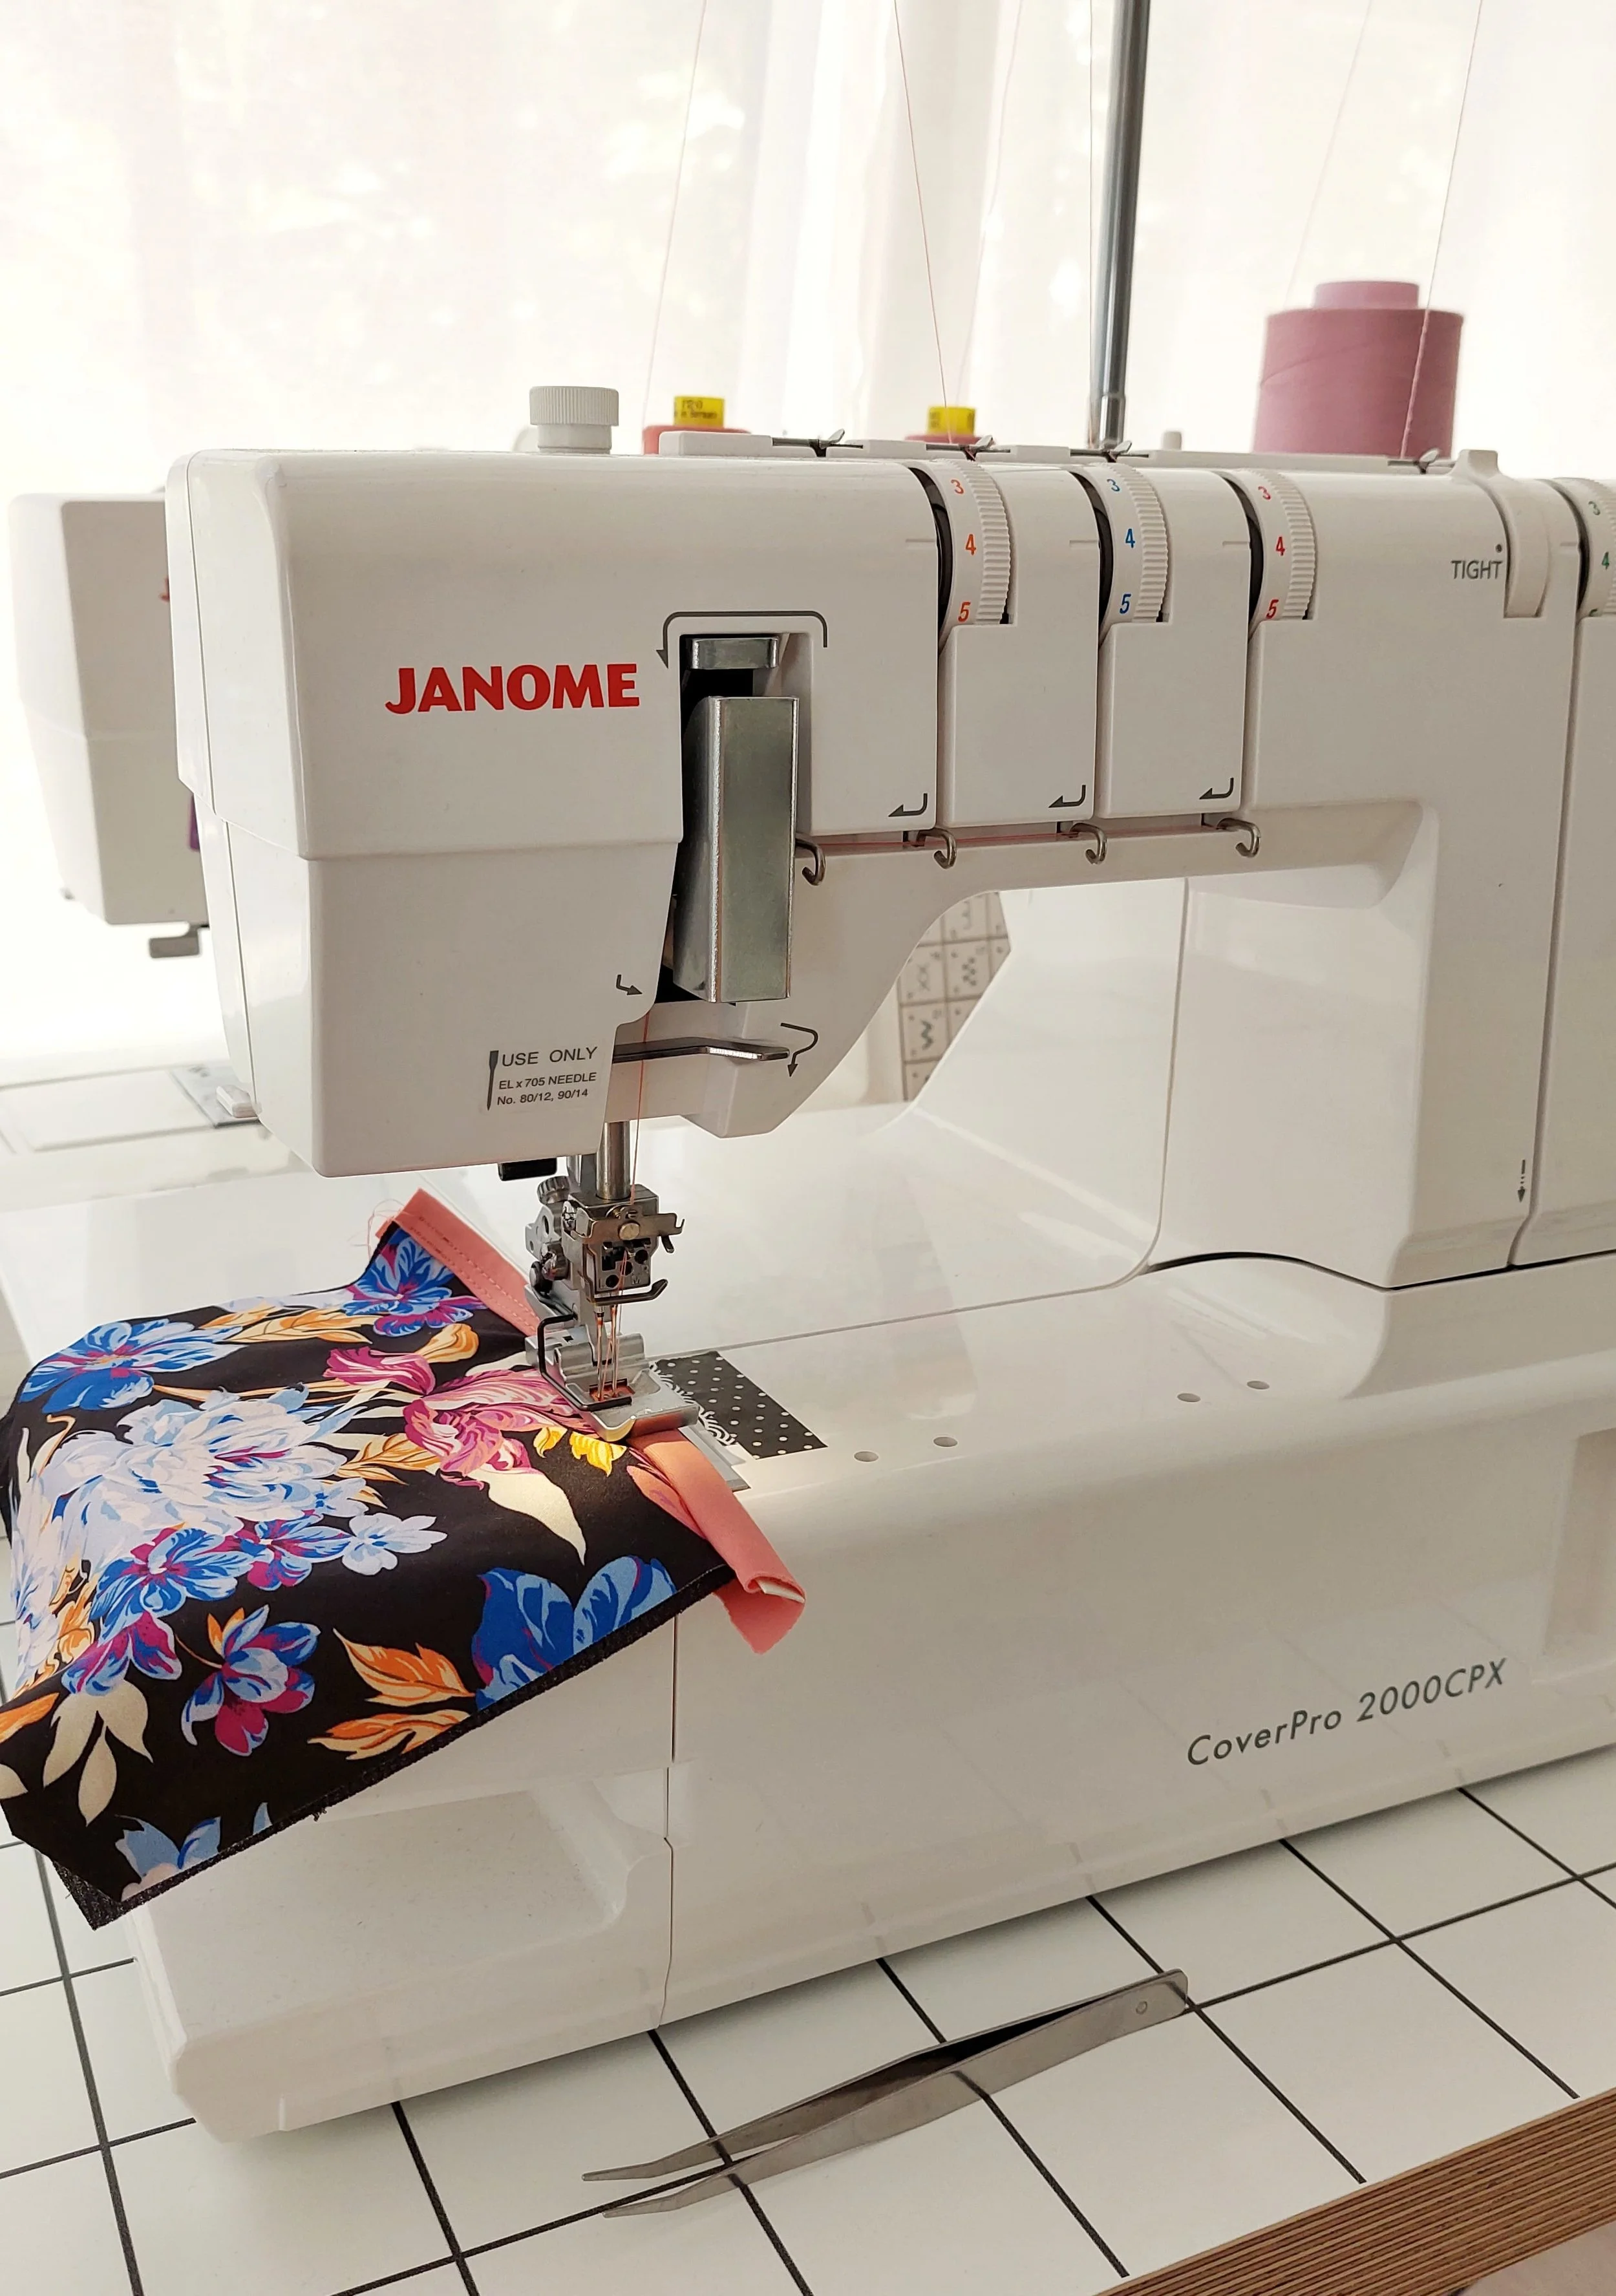
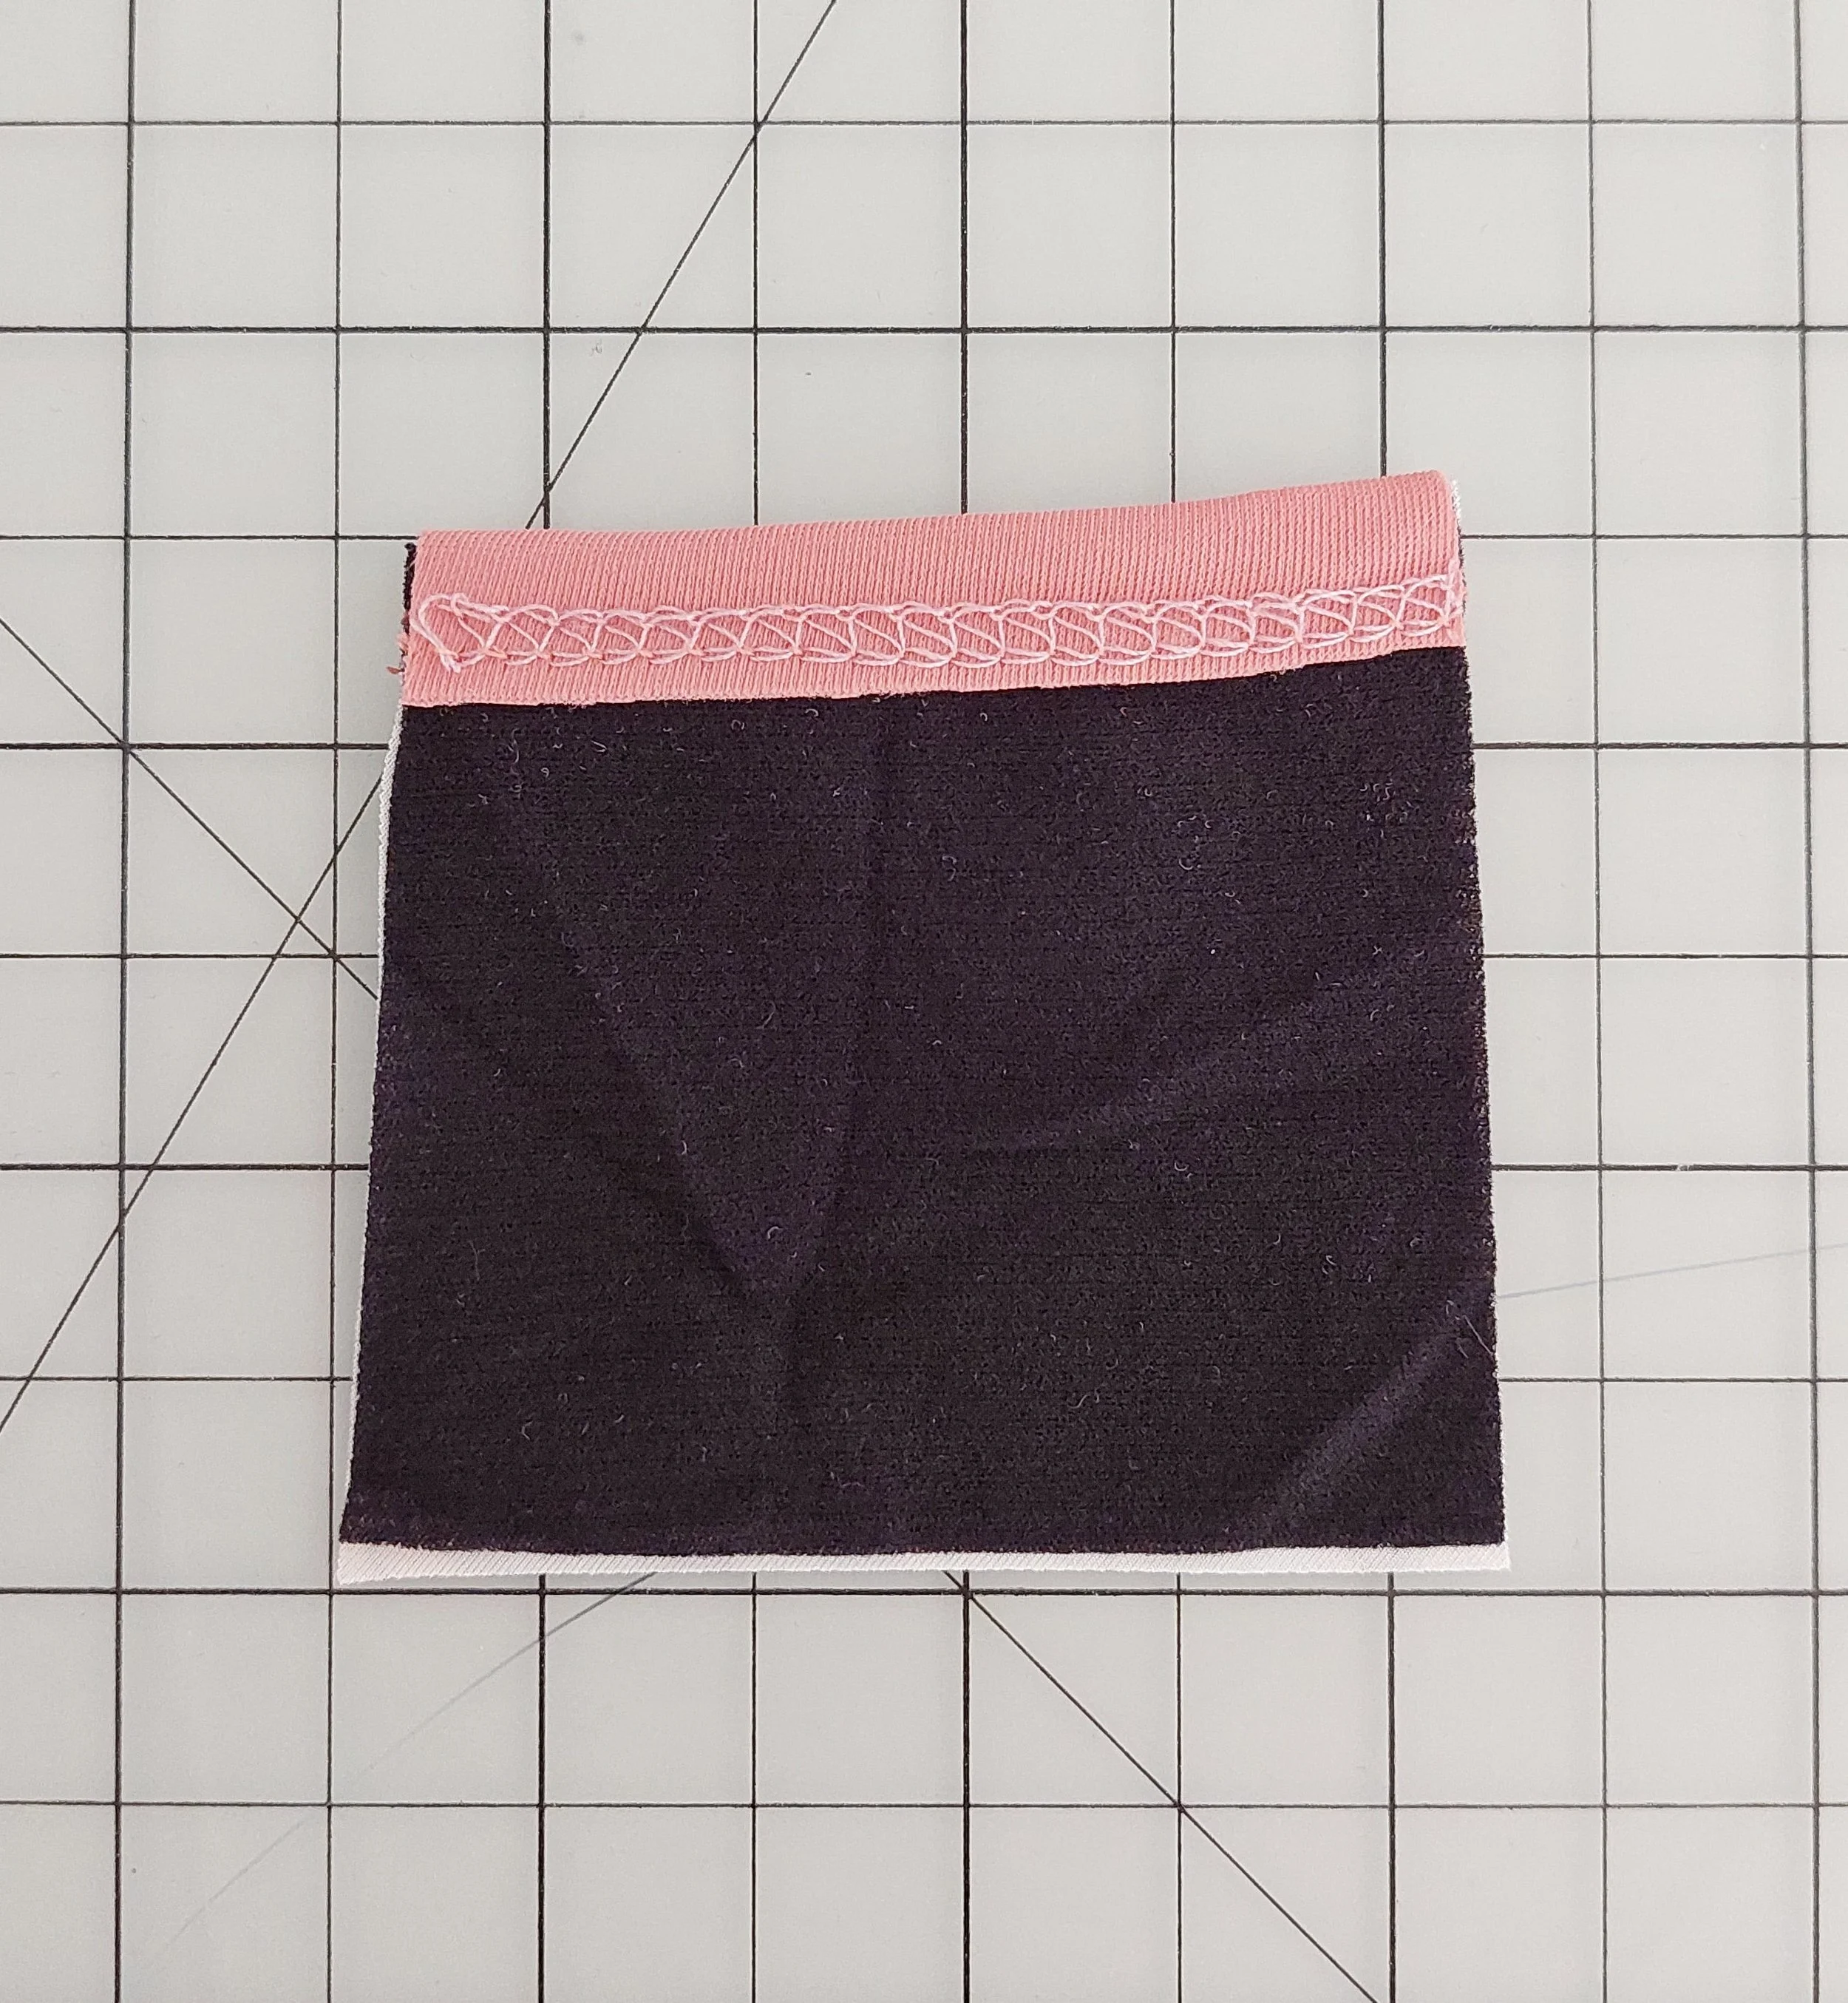
As an alternative, you can also use the three step zigzag stitch for that last stitch. I used 6 width and 1.5 lenght for my three step zigzag but you can adjust it to your liking to get a narrower stitch if you want to. Essentialy you want something that would cover almost all of the with of your binding so it depends on the width of the elastic you’re using.
Como alternativa, también puedes utilizar la puntada en zigzag de tres pasos para esa última puntada. Yo utilicé un ancho de 6 y una longitud de 1,5 para mi zigzag de tres pasos, pero puedes ajustarlo a tu gusto para tener una puntada más estrecha si lo quieres. Básicamente, lo que quieres es algo que cubra casi todo el ancho de tu ribete, por lo que depende del ancho del elástico que estés utilizando.

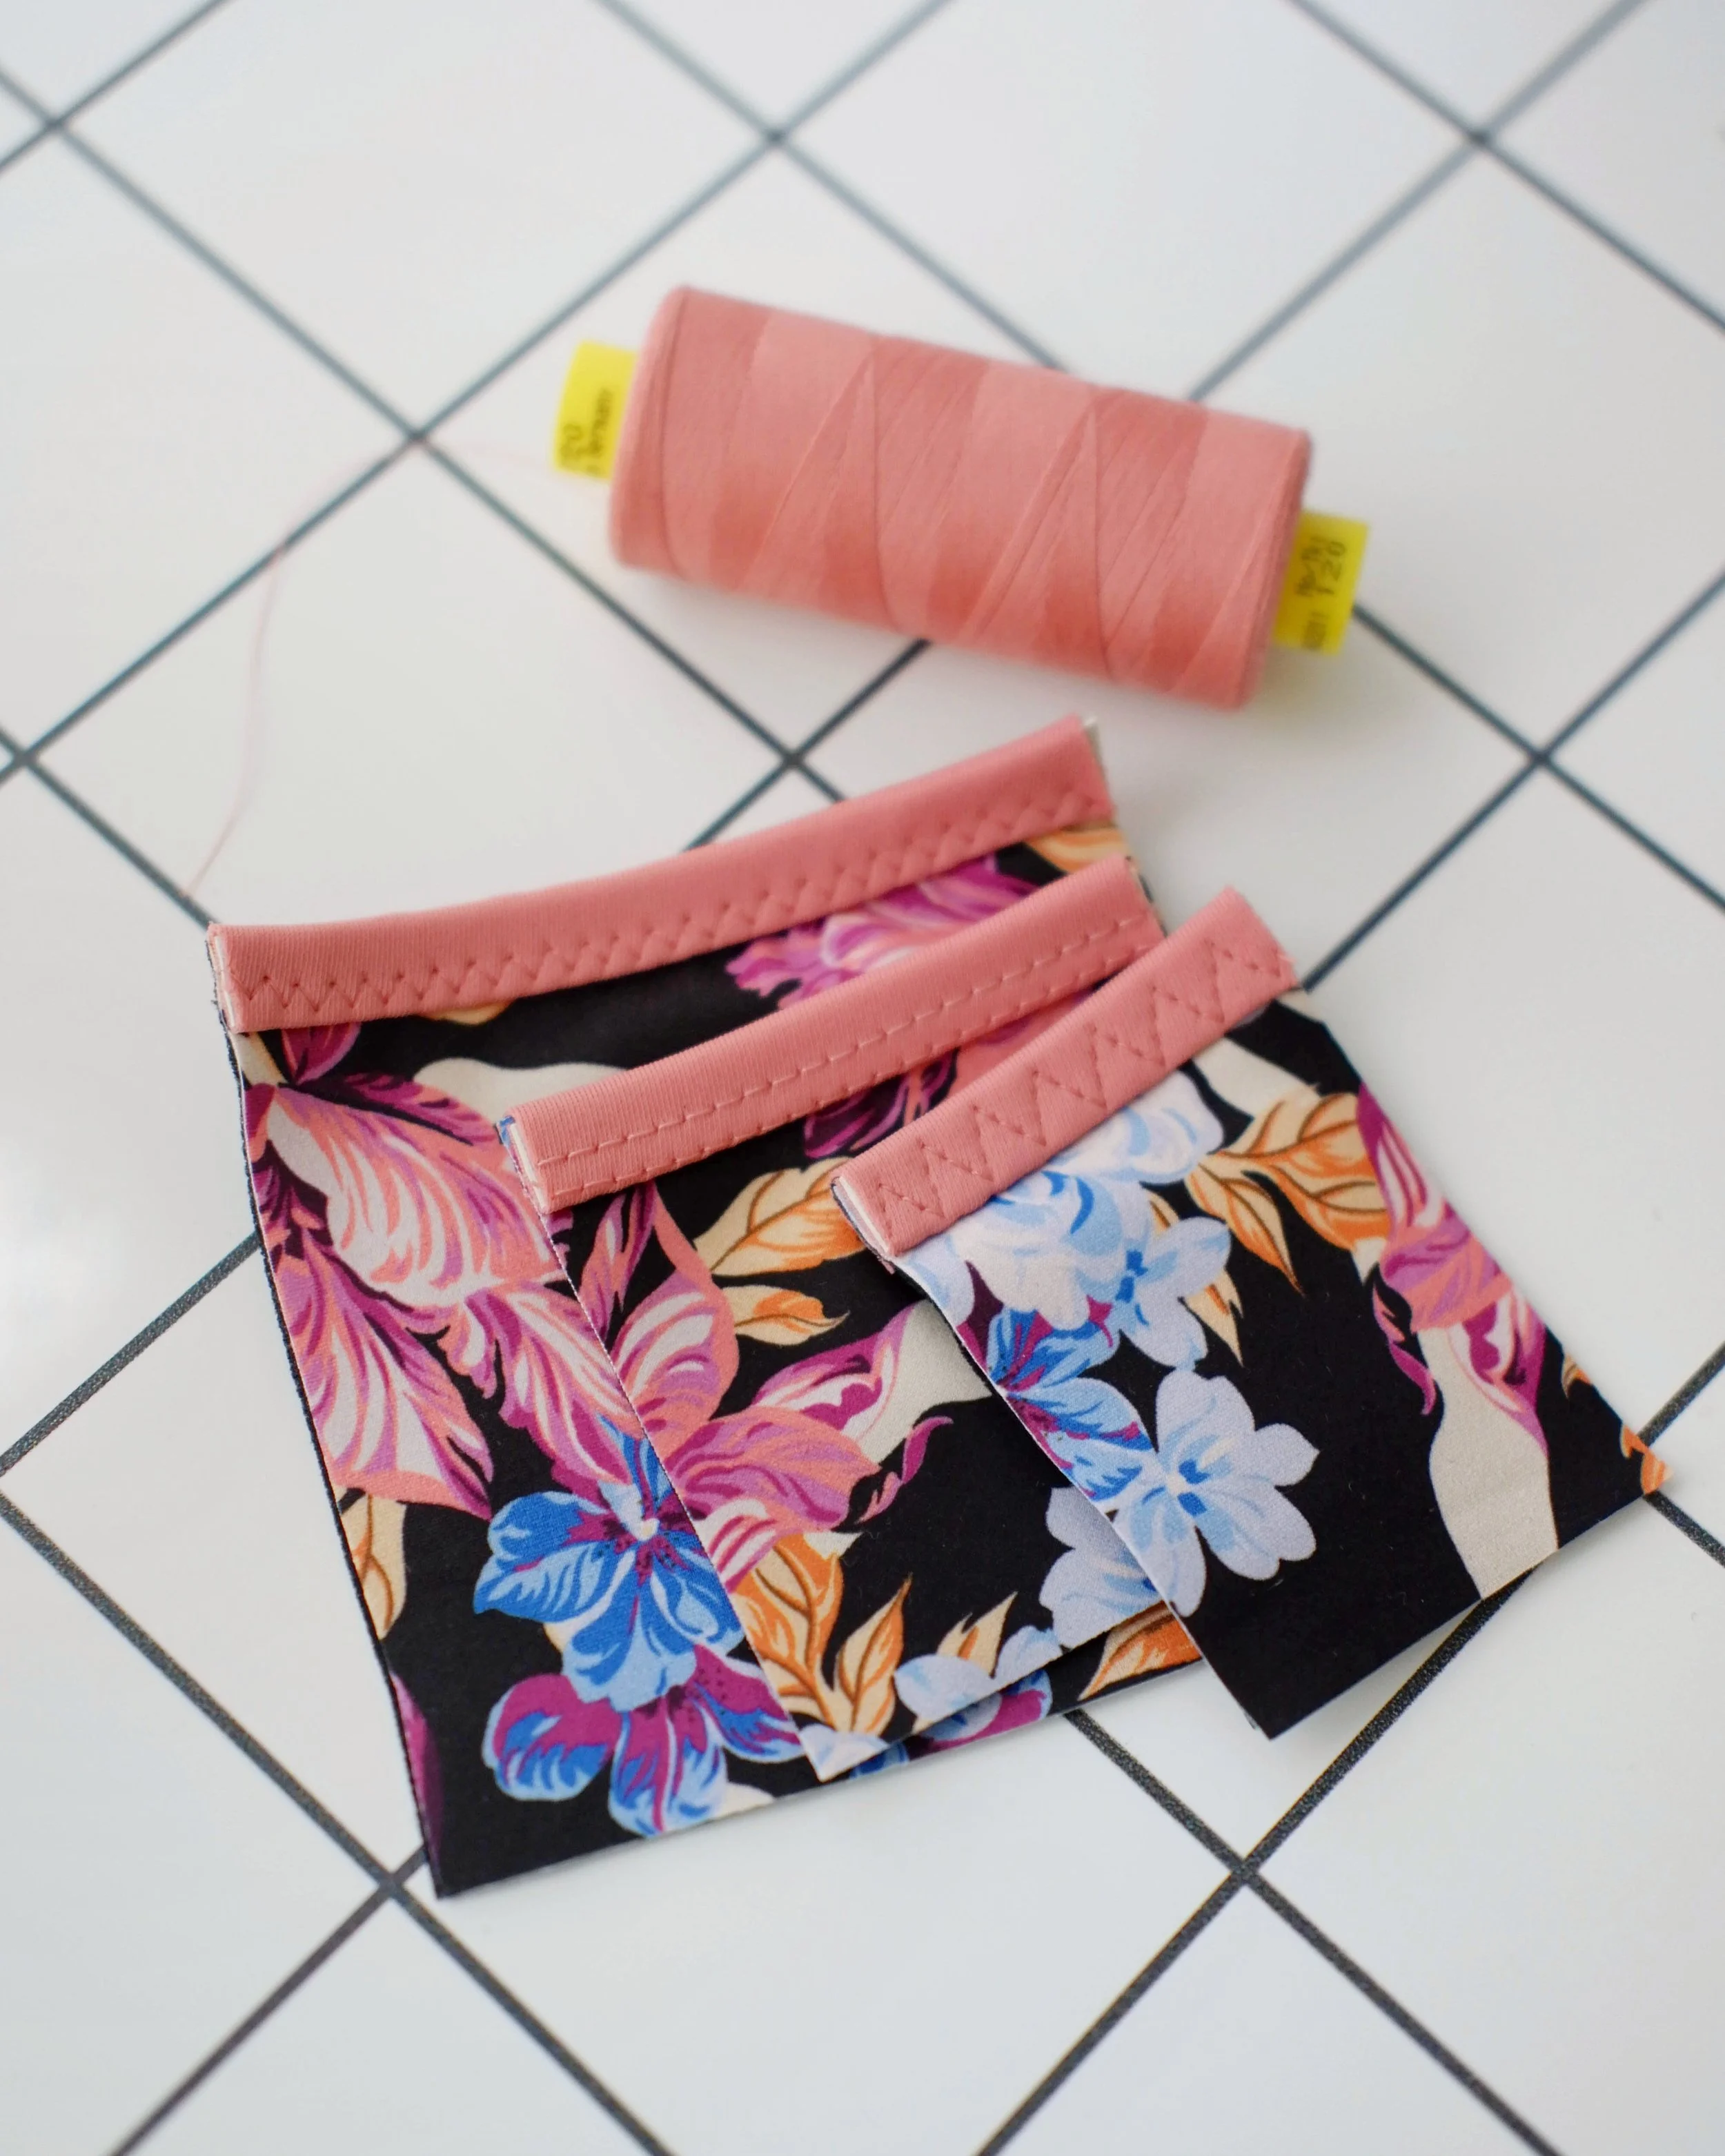
After doing both the floral bikini bottoms and the gingham color block set with a three step zigzag, I have some tips (and opinions, lol):
I love the result as it’s nice and flat and it creates a cool zigzag effect. It’s a bit more complicated, but worth the extra patience.
Try to sew the stitching in a way that it’s not completely on the edge of the binding where you have to cut away the excess fabric, because then it’s way more complicated. Keep the width of the three step zigzag about 1 mm narrower than your binding width, and try to keep it more close to the folded edge.
When cutting away the excess I found that cutting it away where there’s fabric underneith works well as I showed on the photo above, but when doing the straps, I actually liked doing it on the right side of the binding because it was easier (doesn’t sound very important but it really made a difference for me).
Compared to the regular zigzag, this one will take more practice to get an even stitching. If you are a prefectionist, you might find it complicated to tolerate the uneven width of the zigzag caused by well…being a real human who operates the machine, haha. In the industry they use the specific binding feeder so the tension and the size of the stitching on the elastic will always be uniform. I don’t have one and you probably don’t either, so you’re going to have to try your best to get the stitching more or less even and your machine will need to collaborate too (smoother machines with better feeding system will show better results here). On my black sample you can’t even see the uneven parts, but on that orange one, I had to accept that there were parts that the zigzag is a bit tighter at some points than in others. Not the end of the world for me, but I think it’s worth a notice.
Después de hacer tanto la parte de braga del bikini floral como el conjunto de cuadros vichy con un zigzag de tres pasos, tengo algunos consejos (y opiniones, jeje):
Me encanta el resultado, ya que queda bonito y plano y crea un efecto zigzag muy guay. Es un poco más complicado de coser, pero merece la pena tener un poco más de paciencia.
Intenta coser de manera que la costura no quede completamente en el borde del ribete donde hay que cortar el exceso de tela, porque entonces es mucho más complicado. Mantén el ancho del zigzag de tres pasos aproximadamente 1 mm más estrecho que el ancho del ribete e intenta mantenerlo más cerca del borde doblado.
Al cortar el exceso, descubrí que cortar donde hay tela debajo funciona bien igual como lo he hecho en la foto de arriba, pero al hacer las tiras (sin otra tela debajo), me gustó más cortar en el lado derecho del ribete porque era más fácil (no parece muy importante, pero para mí supuso una gran diferencia).
En comparación con el zigzag normal, este requiere más práctica para conseguir una costura uniforme. Si eres perfeccionista, puede que te resulte complicado tolerar el ancho desigual del zigzag causado por... bueno, por ser un ser humano real que usa la máquina, jaja. En la industria utilizan un embudo específico para ribetes, por lo que la tensión y el tamaño de la costura en el elástico siempre serán uniformes. Yo no tengo uno y probablemente tú tampoco, así que tendrás que esforzarte al máximo para conseguir una costura más o menos uniforme y tu máquina también tendrá que colaborar (las máquinas más suaves con un mejor sistema de arrastre darán mejores resultados en este caso). En mi muestra negra ni siquiera se ven las partes irregulares, pero en la naranja tuve que aceptar que había partes en las que el zigzag era un poco más apretado en algunos puntos que en otros. No es el fin del mundo para mí, pero creo que vale la pena señalarlo.

When trying out both of these zigzag options, I also wanted to try out the coverstitch to see if I preferred that method over the zigzag. I have to say that it’s my least favorite way, as sewing with the coverstitch needs more preparation and I actually find the look on the wrong side of the binding way cleaner when using either the regular zigzag or the three step zigzag. I would consider wooly nylon thread to try it out for a smoother finish, but honestly, I think that here I do prefer the zigzag: less work, better results.
Al probar estas dos opciones de zigzag, también quise probar la recubridora para ver si prefería ese método al zigzag. Tengo que decir que es mi método menos favorito, ya que coser con la recubridora requiere más preparación y, de hecho, me parece que el aspecto del revés del ribete queda mucho más limpio cuando se utiliza el zigzag normal o el zigzag de tres pasos. Consideraría utilizar el hilo espumoso (woolly nylon) para conseguir un acabado más suave, pero, sinceramente, creo que en este caso prefiero el zigzag: menos trabajo y mejores resultados.

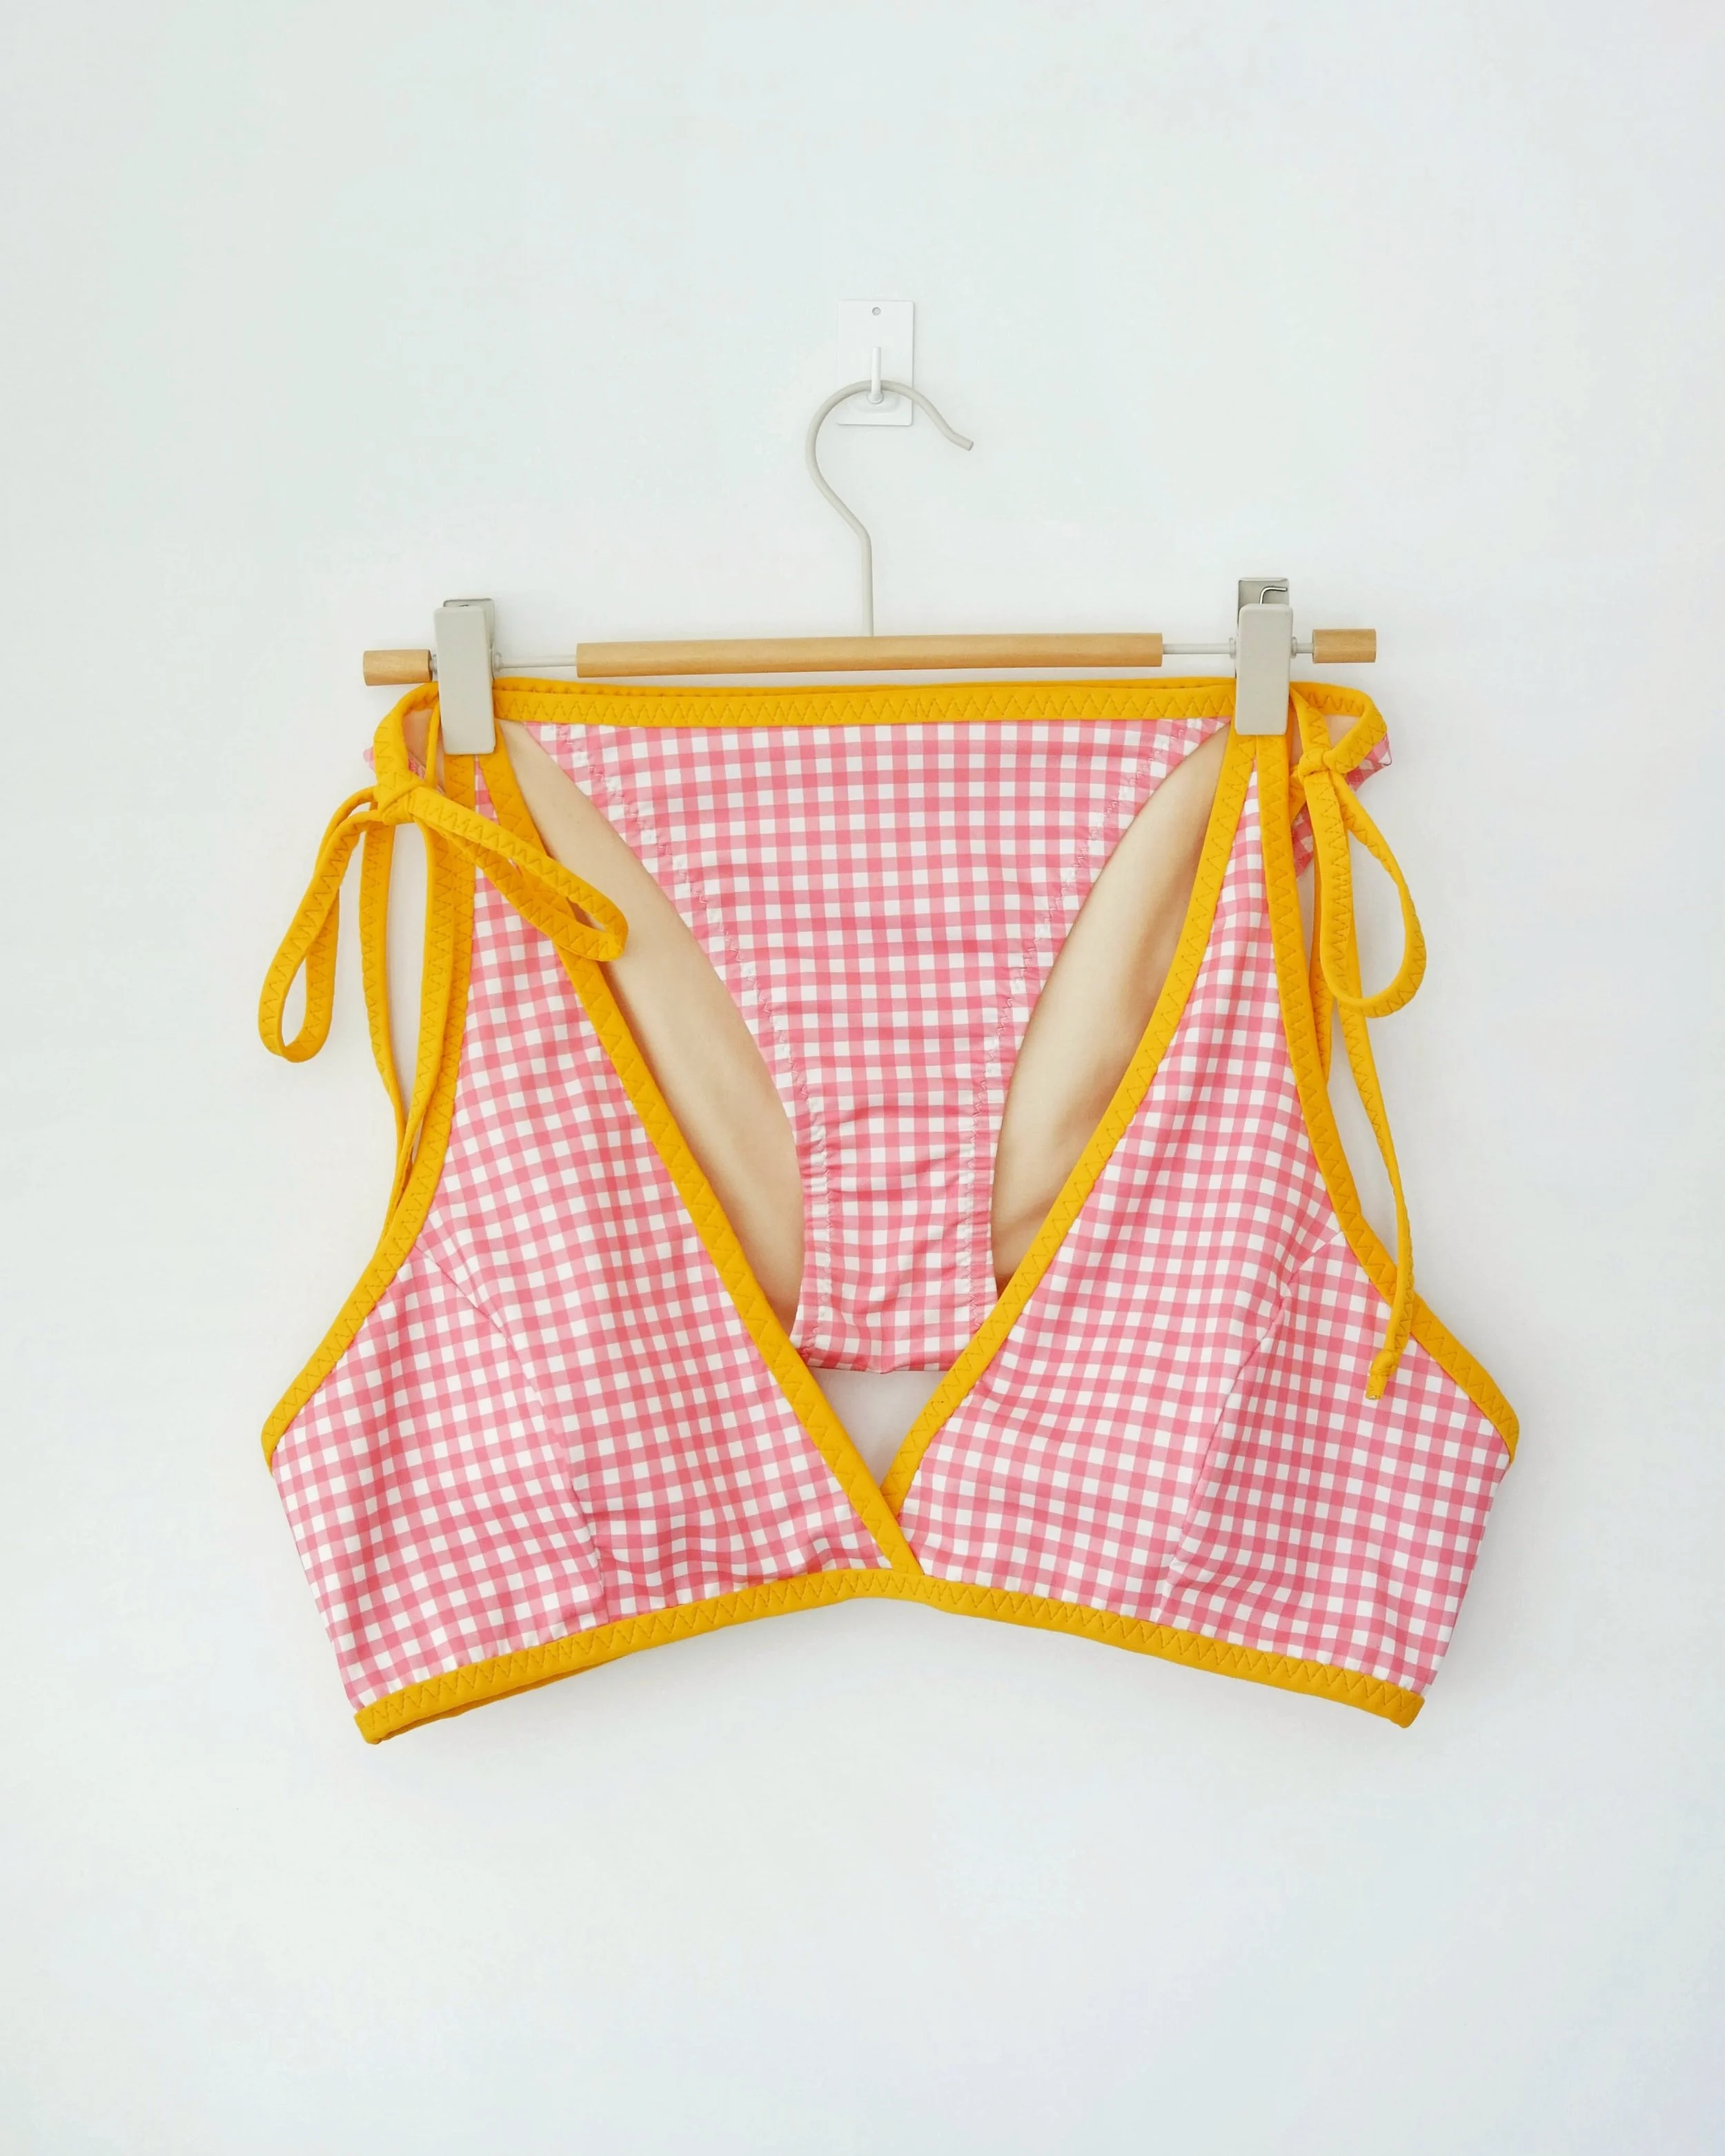
So, here I put this binding technique in action for this Hanna bikini hack. I used the wrap inner cup hack I showed in the wide band tutorial and then just added the binding to all the edges. To avoid using rings for the straps, I directly used the armhole binding as a continuos strap so the result is nice and clean for the inside too (If you’re doing it, make sure to try on the bikini before that step, to measure where you want the strap to start to make sure that the different elastic tension I mentioned before doesn’t make your cup piece too long).
For the bikini bottoms I used a strap bikini pattern that I’d like to share with you soon as a free pattern. I really don’t know if I can make it happen this August…but I’ll try my best. I think that the binding hack looks super cute with these ties on the bikini bottoms!
Así que puse en práctica esta técnica de ribeteado para esta modificación del bikini Hanna. Utilicé el tutorial de copas cruzadas que mostré en el tutorial de la banda ancha y luego simplemente añadí el ribete a todos los bordes. Para evitar usar anillas para los tirantes, utilicé directamente el ribete de la sisa como tirante continuo, de modo que el resultado es bonito y limpio también por dentro (si lo haces, asegúrate de probarte el bikini antes de ese paso, para medir dónde quieres que empiece el tirante y asegurarte de que la diferente tensión del elástico que mencioné antes no hace que la copa te quede demasiado larga).
Para la parte de abajo del bikini utilicé un patrón de bikini con tirantes de atar que me gustaría compartir con vosotras pronto como patrón gratuito. La verdad es que no sé si podré hacerlo durante este mes de agosto... pero lo intentaré. Creo que el acabado del ribete queda muy bonito con estos lazos en la braga de bikini!
I hope you like this variation and that you give the binding option a go. The Hanna bikini sewing pattern is available here. If you’re interested in more swimwear related content, you can check out these resources:
blog post about which supplies you need to sew swimwear
video guide with my 5 tips about sewing swimwear (perfect for beginners)
the list of all lingerie and swimwear related posts from this blog
Hanna bikini online course is the perfect solution for learning everything you need to know about learning how to sew swimwear, I’ll be there to help you with any questions you might have!
To stay up to date with everything new around here, sign up for my newsletter. Thanks for reading!
Espero que pruebes esta variación de ribete. Tienes el patrón de Hanna bikini disponible aquí. Si te interesa más contenido relacionado con las prendas de baño, puedes mirar estos recursos:
la entrada del blog sobre los materiales que necesitas para coser prendas de baño
video guía con mis 5 consejos para coser prendas de baño (va super bien para principiantes)
la lista de todas las entradas relacionadas con lencería y prendas de baño de este blog
el curso online de Hanna bikini junto a su comunidad de alumnas es el sitio perfecto para aprender todo relacionado con prendas de baño, estaré allí para solucionar todas tus dudas!
Para estar al día con todas las novedades, suscríbete a mi newsletter, gracias por leerme aquí!