Megan Nielsen Patterns: Rowan + Mini Briar

 
www.studiocostura.com

Hola! Hace unas semanas Wendy de CoserCosas me escribió para hacer una colaboración y hoy os cuento sobre ese proyecto. Me mandó una tela de punto orgánico muy bonita de su tienda y los patrones Rowan y Mini Briar de Megan Nielsen Patterns para que haga unas camisetas a juego para mí y para la pequeña. Normalmente no suelo hacer prendas con la misma tela para las dos pero sé que a la niña le iba a encantar y me animé ya que la tela es preciosa.


Hey! Some weeks ago Wendy from CoserCosas wrote me about a collaboration and today I'm telling you about this project. She sent me a beautiful organic knit fabric and two patterns from Megan Nielsen, the Rowan and the Mini Briar, so I could sew something for me and my little one. I usually don't make garments for both of us with the same fabric but I knew she was going to love the idea and as the fabric is so prettyI was in.

www.studiocostura.com

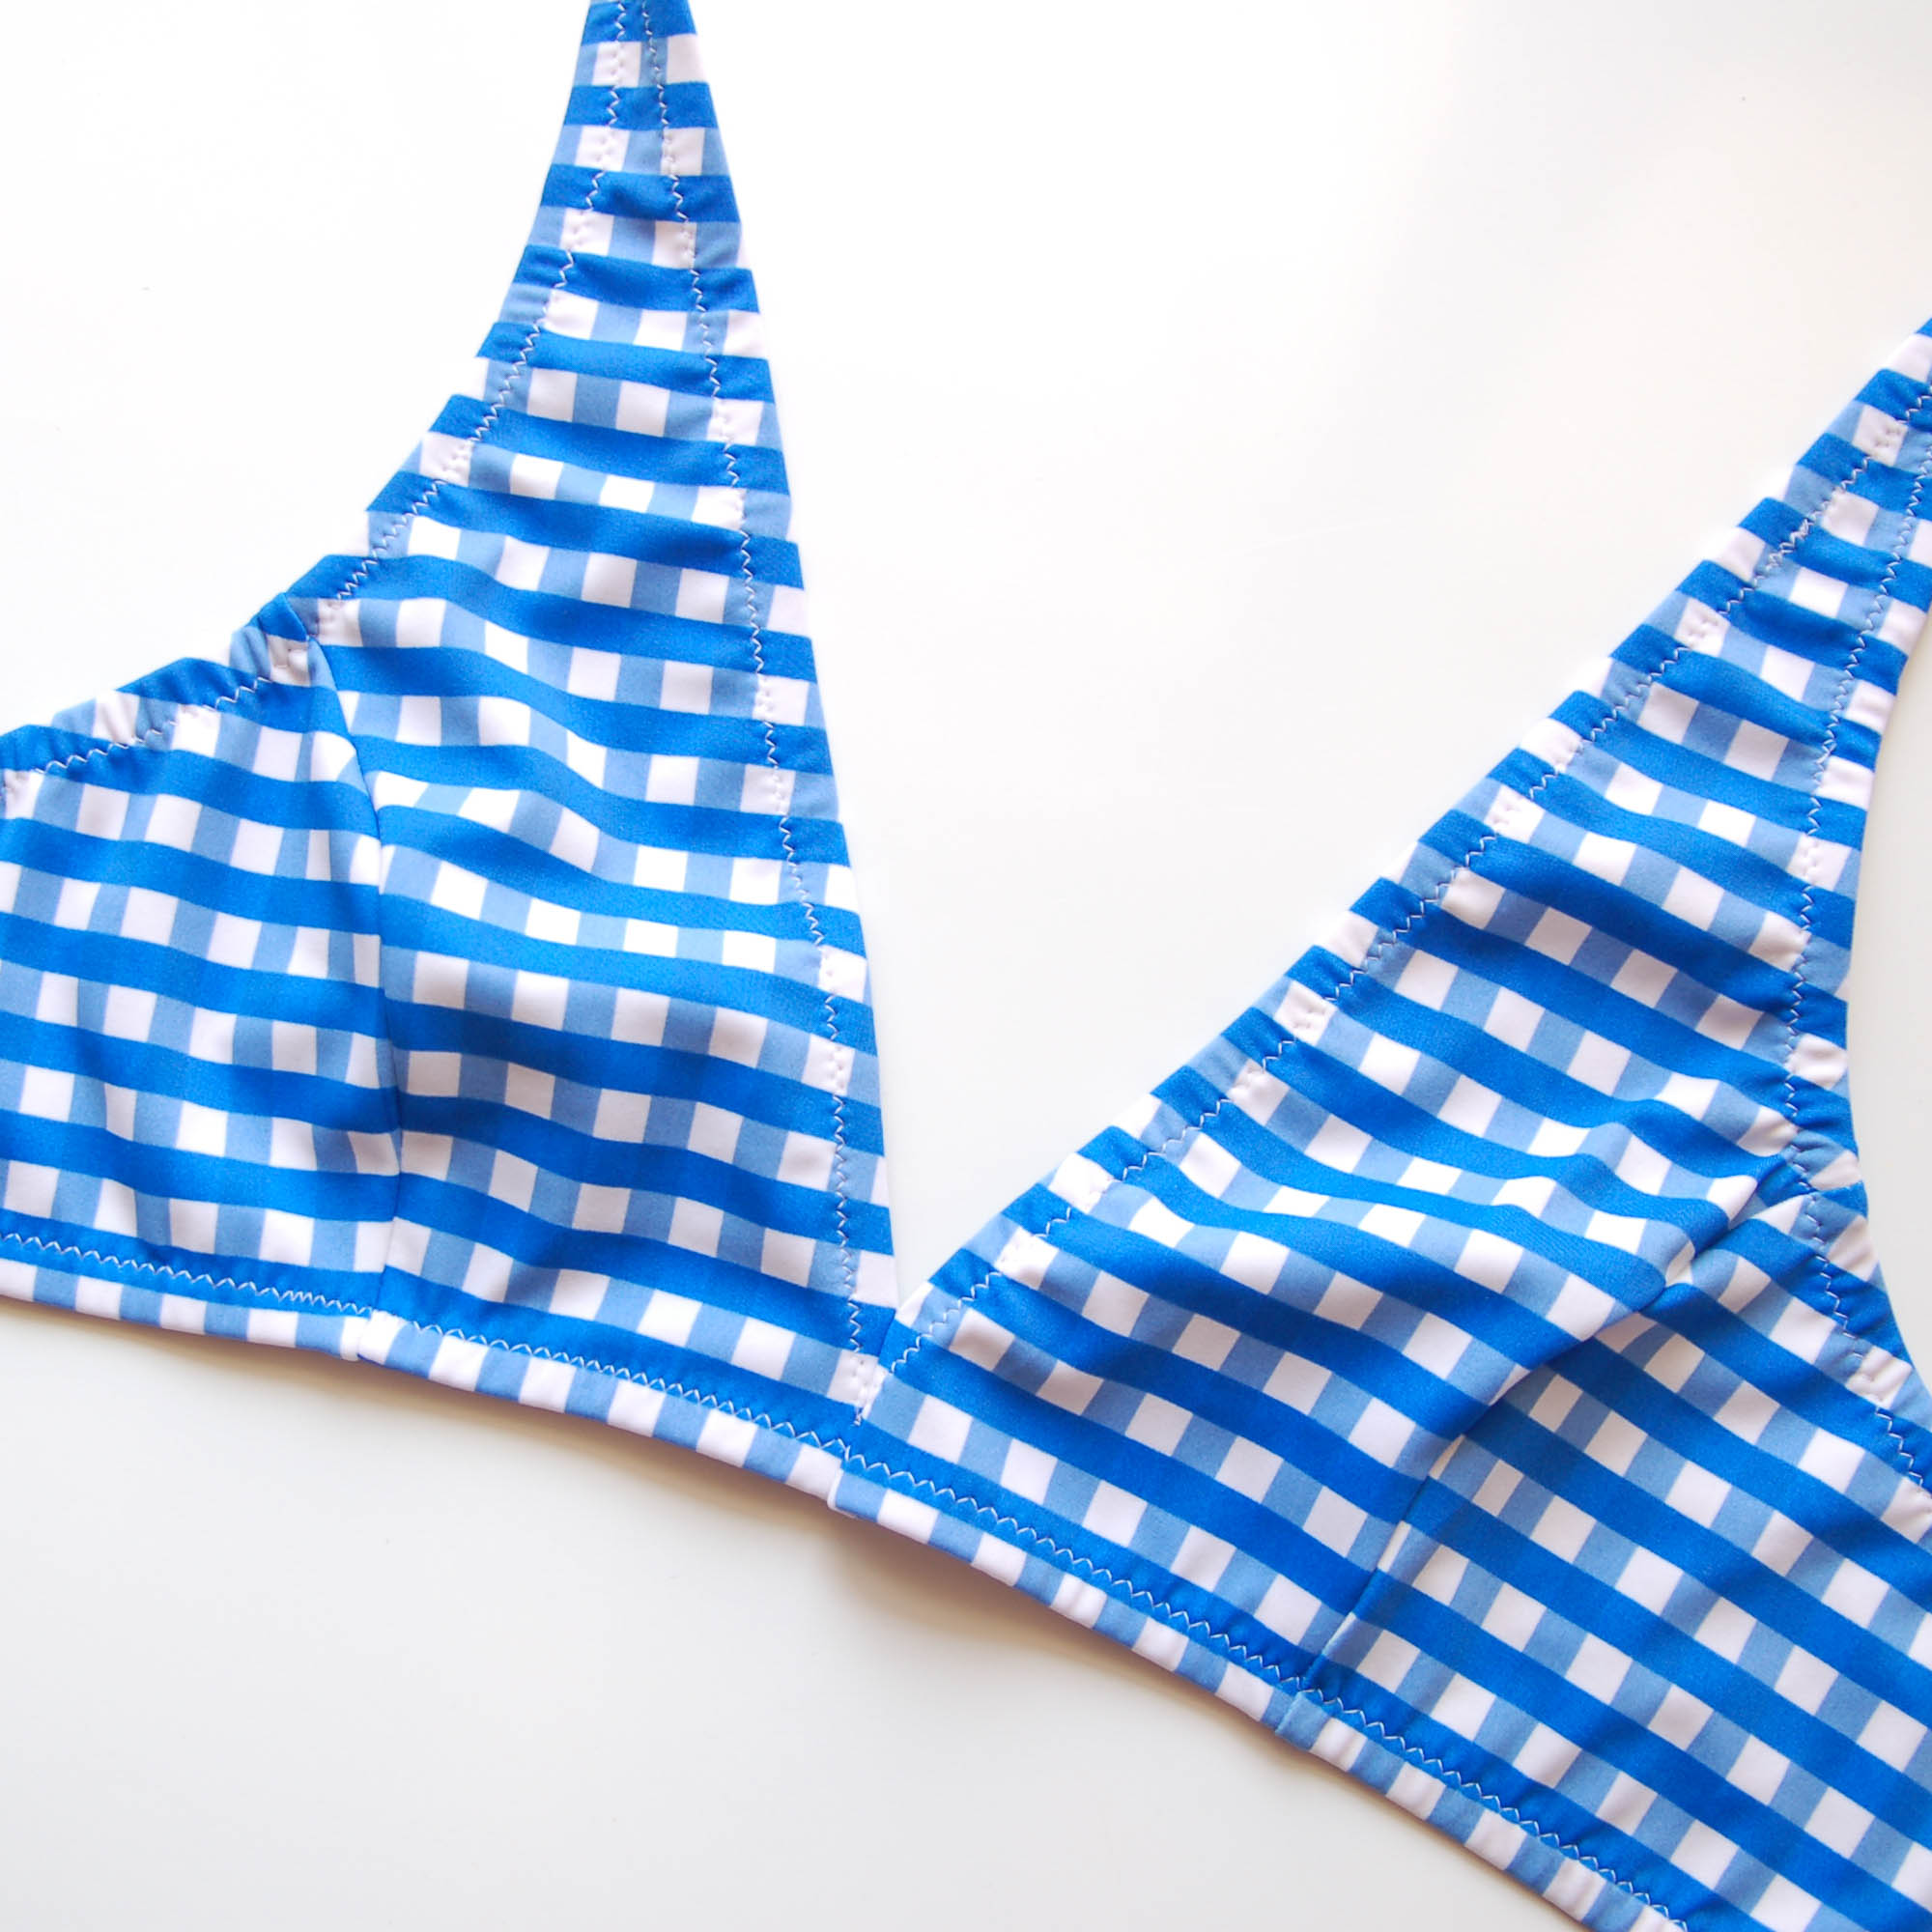
Primero hablaré sobre Mini Briar. Es un patrón de camiseta para niños que tiene dos largos de cuerpo (versión crop y la versión normal) y posibilidad de hacer la manga corta o larga para las edades 2-12 años. Yo elegí hacer la versión de camiseta corta y con la manga corta también. El corte es ancho y el patrón lleva un montón de plantillas para poder customizar la camiseta.


First I'll tell you about the Mini Briar. It's a t-shirt pattern for kids with two bodice lengths (crop top and regular length) and short/long sleeve variations for kids 2-12 years old. I chose the crop top with short sleeves. The pattern has a loose fit and it comes with lots of templates to customize your t-shirt.

www.studiocostura.com

Elegí la talla 2/3 años y ese tamaño le va muy bien a la pequeña por el ancho (ella tiene ahora 3 años y medio). Como la versión 1 que hice es tipo crop top el largo del delantero es bastante más corto que la espalda, me gusta pero creo que en su edad que todavía tiene bastante barriga de bebé me gustaría hacer el siguiente un pelín más largo para que quede mejor. La espalda tiene un largo ideal para ella ahora. Eso dicho la versión de largo "normal" de esa camiseta (la versión 3) sería ya en su caso más como túnica creo.


I chose the size 2/3 years and this size is great for my girl regarding to width (she's 3 and half years old). As I made the version 1, crop top, the front length is way shorter than the back. I like how it looks but I think that in her age when she still ha some baby belly I'd like to make it just a bit longer in the front. The back length is perfect for her now. Saying this I think that the regular length of this t-shirt (version 3) would be almost like a tunic for her at least.

www.studiocostura.com

Es un patrón básico muy fácil de coser y me parece perfecto para estampados infantiles divertidos. Me ha gustado la manera de poner la tira de cuello: te enseñan un tipo de acabado que no necesita la remalladora.


The pattern is a basic t-shirt really easy to sew and I think it's perfect for using up all those pretty kids prints. I liked the way they show how to attatch the neck binding in the instructions: you get a neat finish on both of the sides without using a serger.

www.studiocostura.com

"La sesión de fotos" ha sido más o menos como lo esperaba así que mucho no hemos sacado, jaja, pero ella sí que sabe como mejor enseñar la espalda de una prenda... Ese corte ancho me encanta y ya tengo pensado un par de ellas más para este verano!


"The photo session" was more or less as I expected so we didn't get lots of good material out of it, hehe, but at least she's very convincing when showing the back of the garment... I really like the loose fit of this pattern and I've already tought about more t-shirts I'd like to make her for this summer!

www.studiocostura.com

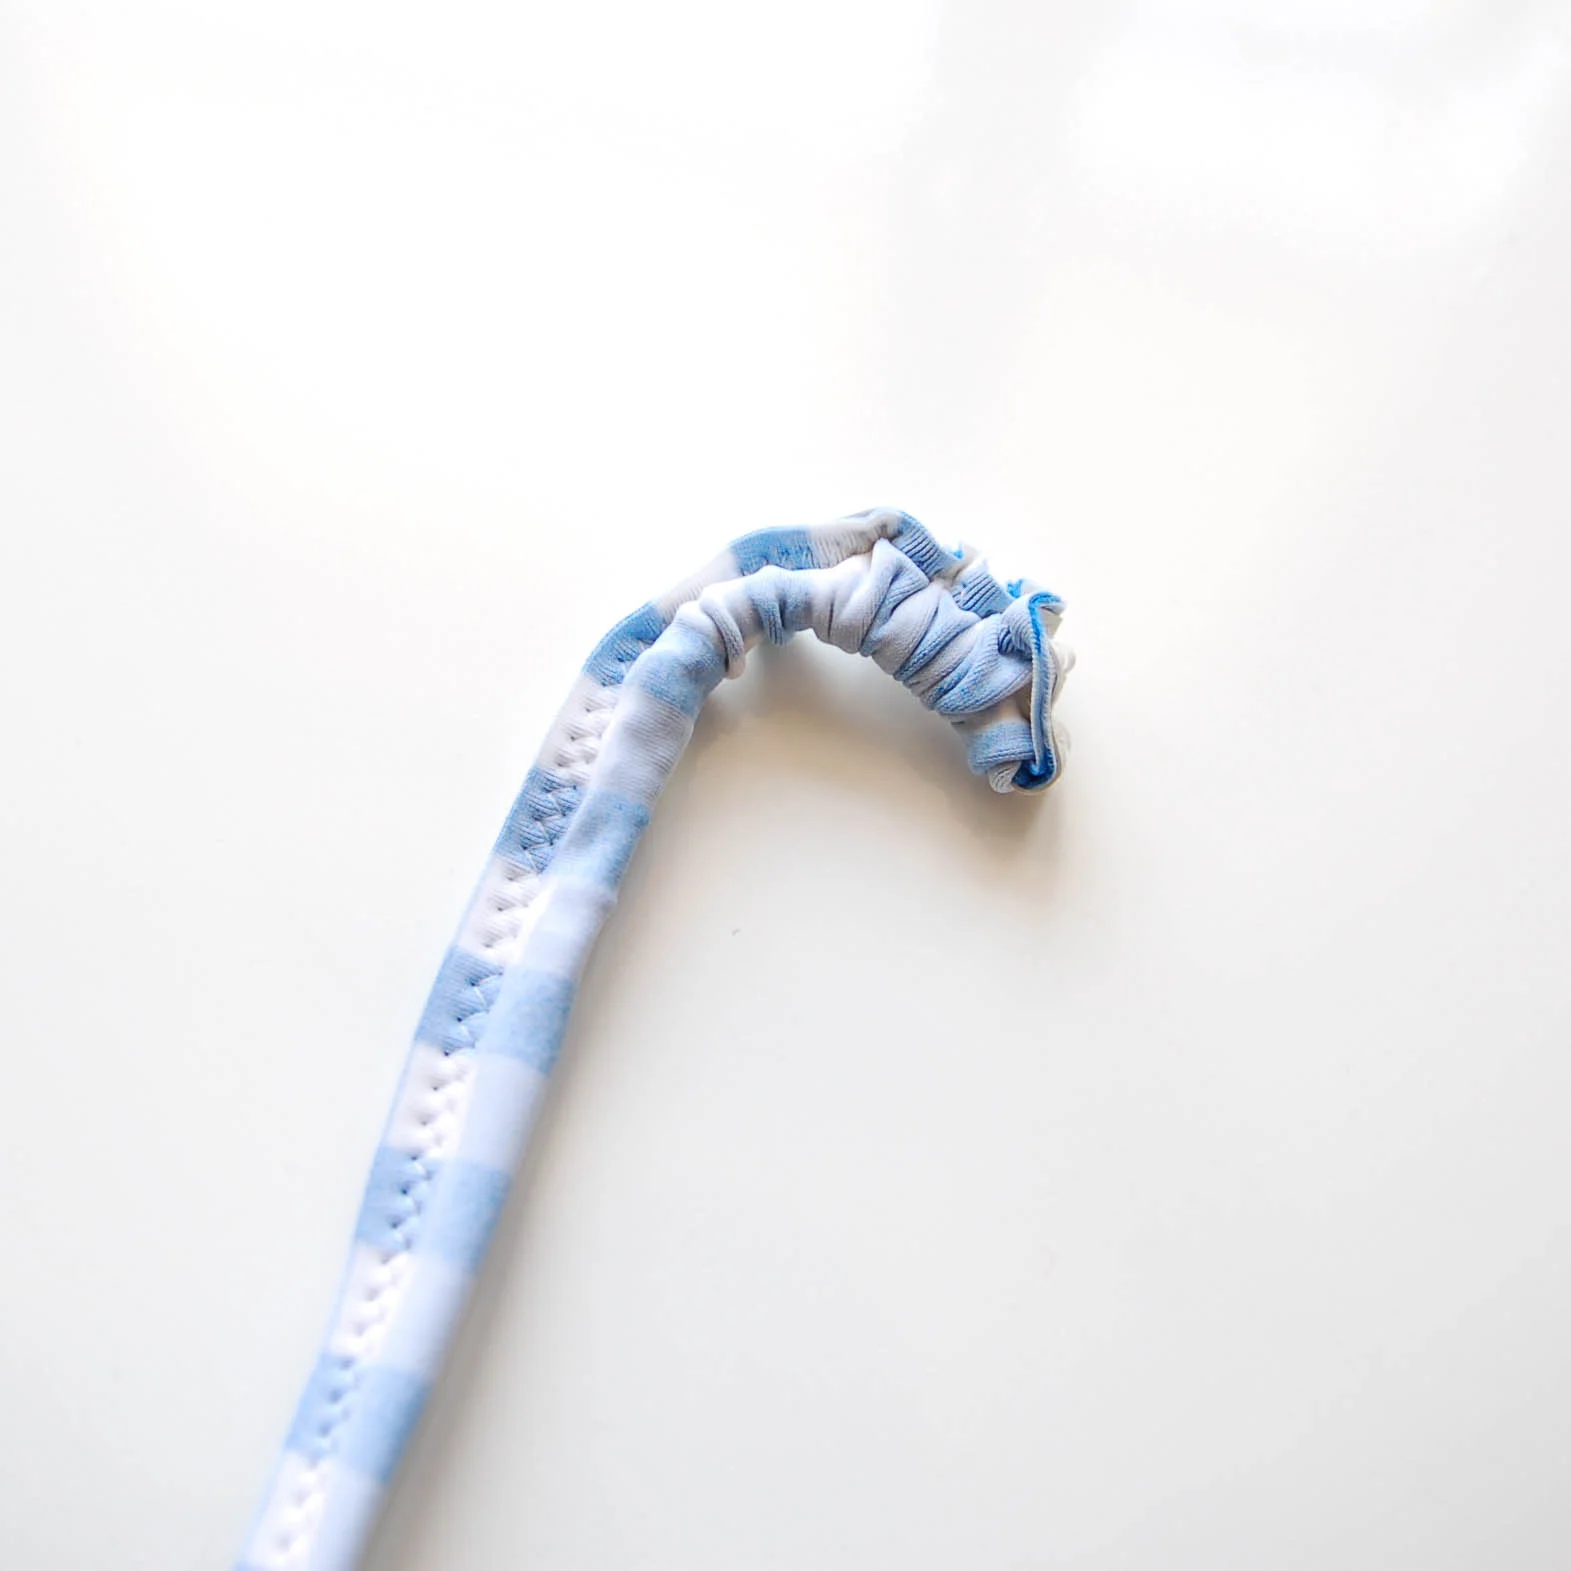
El patrón para la camiseta de mujer es el Rowan. Es un patrón que tiene versiones para hacer la camiseta con tres tipos de cuellos y largos de mangas diferentes + el patrón de body. Según mi medida de pecho debería ser la talla S en este patrón pero no confiaba mucho ya que veía la prenda muy ajustada así que por si acaso corté un M. Cuando estaba viendo las piezas ya lo sabía...iba a ser muuuy ajustada, jaja. Así que en vez de coserlo con los margenes de 1.5 cm que lleva el patrón directamente sólo usé 0.6 cm de remalladora. Eso me dio el extra margen que necesitaba para poder caber dentro de la camiseta, jaja. La construcción era fácil y las instrucciones claras. Lo único que cambié era abrir un pelín el cuello para hacerlo de otra forma.


The womens t-shirt pattern is the Rowan. The pattern has three neckline finishing options and three sleeve lengths + a version to make a bodysuit. According to my bust measurement I should be a size S in their chart but I was a bit sceptic about that seeing the cut of this garment very close fitting. Just in case I cut the size M. Once I saw the pattern pieces cut out I saw it clearly...it was going to be veeery close fitting, hehe. So instead of using a 1.5 cm seam allowances that come with the pattern I serged the edges using only 0.6 cm. This extra fabric made it possible to fit myself inside this garment, haha. The construction was easy and the instructions were very clear. The only thing I changed was to widen the neckline a bit to change its form.

www.studiocostura.com

Me quedó demasiado pequeña? Pues no, según los gustos claro...está ajustada tal como  está patronada así que bien pero con este patrón hay que ver muy bien qué telas usar. La tela de punto que he usado tiene 50% de elasticidad y el patrón requiere "por lo menos 40% de elasticidad". Creo que para mejor comodidad estaría bien usar telas con más elasticidad y más finas, especialmente hablando de bodys. Me gustaría probar a hacer el body por ejemplo con un punto de viscosa que tiene un poco más de elasticidad y es más finita.


Did it end up too small? Well no, it really depends on your likes too...it is close fitted as the pattern is drafted this way so you really have to pay attention on using the right fabrics. I used a knit with a 50% stretch and the pattern says you should use a knit with "at least 40% of stretch". I think that stretchier and finer knits would give better results, especially when talking about sewing a bodysuit. I'd like to make a bodysuit with a viscose spandex knit for example as these usually are finer and a bit stretchier.

www.studiocostura.com

Así que aquí estamos con nuestras camisetas iguales iguales. Ya tengo pensado hacerle a la niña más camisetas con este patrón y para mí un body. Hace seis meses dije que nunca voy a llevar un body. Y hoy pienso que igual para el invierno podría ser una perfecta capa protectora contra el frío, jaja. Ya os contaré!

Podéis ver todas las telas bonitas que tiene CoserCosas en su tienda online!


So here we are with our matching t-shirts. I've already tought about making several t-shirts for my girl with this pattern and a bodysuit for myself. Six months ago I said I'd never wear a bodysuit. Today I'm thinking about making one to have a protective layer of clothing against the cold in the winter, haha. I'll keep you updated about that!

You can see all the pretty fabrics that CoserCoses has in her online shop!


Studio Costura Lingerie Sewing Club: Tany et La Mode

 
www.studiocostura.com

Hola! Hoy os presento un proyecto que tenía ya ganas de hacer desde hace tiempo y por fin es realidad. Desde que empecé con mi tienda de materiales de costura para coser lencería he "conocido" a muchas costureras con mucho talento, hay tanta inspiración en Instagram y en los blogs. Me gusta mucho la idea de que compartimos la información, técnicas y opiniones sobre este tema porque de eso podemos aprender todas (y así animamos a quienes todavía no han probado eso de coser lencería!). Como el tema de comunidad de costura me encanta quería hacer algo más de mi parte y se me ocurrió que igual que hay otras tiendas que trabajan con blogueras de costura podría yo hacer eso también con mi pequeña tienda. Y así nació la idea de hacer una serie de posts mensuales sobre coser lencería. Contacté con un par de personas cuyas creaciones de lencería me han encantado y les conté mi idea, todas han dicho que sí así que ya tengo muchas ganas de ver qué van a coser. 

La idea básicamente es que Studio Costura Shop invita cada mes a una costurera que haga algo con nuestros materiales y que escriba un post sobre su proyecto. Ellas eligen qué patrones quieren usar y qué encajes/telas disponibles en la tienda les mandamos. Como cada persona tiene su estilo y gustos seguramente vamos a ver proyectos de lencería muy distintos por aquí. También les preguntaré un poco sobre su trayectoria en la costura, qué les hace coser lencería y otras cositas para conocerlas más. Aquí va el primer post de series "Studio Costura Lingerie Sewing Club", espero que os guste la iniciativa!


Hey! Today I'm presenting you a project that I've been planning for a long time and finally it's live. Since I started with my lingerie supplies shop I've "met" so many talented makers and there's so much inspiration over at Instagram and on the blogs. I really like the idea that we all share the information, techniques and opinions about this subject because that way we all can learn about making lingerie (and that will also encourage new people to take up lingerie sewing too!). As I love the idea of sewing community I wanted to do something more to be part of it so it occured to me that like other shops who collaborate with sewing bloggers I could do the same with my little store. So this is how the idea of guest posts about sewing lingerie was born. I wrote to some people whos lingerie makes I've been loving so far and proposed the idea, all of them said yes so I'm really looking forward to see what they will make.

The idea is that Studio Costura Shop invites every month one seamstress to make a lingerie project with our materials and that they will share a guest post about it here on the blog. They pick a pattern they like and we'll send them the lace/fabric they choose from the shop. As every person has their own unique style I'm sure we'll see very different lingerie makes over here. I'll also ask them a bit about their sewing journey, what makes them sew lingerie and some more stuff to know a bit more about them. So here goes the first post in this new series "Studio Costura Lingerie Sewing Club", I hope you like the idea!

inspiración & materialesinspiration & supplies (5).jpg

El primer post de este club lo ha escrito Tany, una costurera que vive en Portugal y tiene el popular blog de costura Couture et Tricot *(en portugues y en inglés) donde enseña sus creaciones realmente increíbles y muy desarrolladas (también podéis seguirla en Instagram para ver cómo cose chaquetas, pantalones, abrigos...esta mujer puede con todo!). Sabía que quería invitarle a que participe en este proyecto después de ver la lencería que ha cosido y me ha encantado ver sus versiones. Antes de leer su post te dejo una pequeña entrevista con ella.

*Tany me ha dicho que muchas veces los navegadores no visualizan el contenido de su blog cuando tienes los bloqueadores de anuncios puestos: si no ves su página desactiva esa función y sale el contenido

The first post in these series is written by Tany, a seamstress living in Portugal who has a popular sewing blog called Couture et Tricot *(in Portuguese and in English) where she shows us her incredible fashion forward creations (you can also follow her at Instagram where she's sharing about making her own jackets, pants, coats...this woman can do anything and everything!) I knew I wanted to ask her to participate in this project after seeing her beautiful lingerie makes and I love  the versions she has made. Before reading about her project I'll leave you with a little interview with her.

* Tany told me that many times the internet browsers don't show the content of her blog if you have the advertising blocking system on: if you don't see her webpage deactivate the ad blocks and you'll see the content


Cuéntame un poco sobre tu trayectoria en la costura: cuándo empezaste a coser y cuales son tus cosas favoritas para coser?

Empecé a coser de muy temprana edad (tenía 11-12 años). Mi madre tenía una máquina de coser pero nunca lo usaba. Mi vecina era modista y solía pasar tiempo en su casa después del colegio por las tardes. Una vez le pedí que me enseñe cómo enhebrar la máquina de coser y ese mismo día sorprendí a mi madre con un sencillo bolso con el cierre de cordon hecho por mí (usé la máquina de mi madre después de engrasarla - me he manejado muy bien con las máquinas siempre!). Mi vecina también me enseñó cómo copiar y cortar los patrones de BurdaStyle y muy poco después estaba ya rebuscando en la colección de las telas que tenía mi madre (incluso usé algunas sábanas que ella tenía!). Lo que más me ha gustado coser desde siempre han sido prendas que me podría poner. Desarrollé un gusto por proyectos que sean un reto para mí así que lo que más me encanta coser son chaquetas y abrigos.

Por qué empezaste a coser lencería? Te pareció difícil? Qué referencias/patrones recomendarías a la gente que quiere empezar a coser lencería?

Siempre admiraba a unas blogueras de costura que también hacían lencería, sin embargo sabía que no iba a encontrar los materiales específicos aquí donde vivo (encaje, elásticos etc). Hace un par de años conocí a la plataforma educacional americana Craftsy.com. Un día vi que Beverly Johnson tenía allí cursos sobre coser lencería y decidí probarlo. En los materiales de clase encontré la lista de tiendas online que venden materiales para coser lencería y había una en Europa que representaba los patrones de Beverly así que compré mi primer kit de lencería y el patron de esa tienda que se llama Bwear.se (el patrón era el patrón clásico de sujetador de Beverly Johnson, el que ella usa en su curso; también compré el kit específico para este patrón y aros en mi talla). Después de un par de sujetadores de prueba conseguí que me quede bien y estaba asombrada de lo rápido y fácil que se puede hacer un sujetador de buena calidad. Expandí mis conocimientos buscando en internet y en YouTube y encontré blogs y páginas web excelentes con un montón de información sobre coser lencería. Empecé a coser toda mi ropa interior incluyendo sujetadores, braguitas y bralettes; ya no compro lencería. Pienso que la oferta online de kits y materiales es excelente y también existen muchos patrones muy buenos, especialmente en el formato de pdf que yo considero más prácticos y accesibles. Para las que empiezan desde cero recomiendo ir a un curso presencial o hacer un curso específico online, especialmente hablando de coser sujetadores. Si ya tienes conocimientos de costura la mayoría de patrones pdf ofrecen instrucciones muy buenos y te enseñan las técnicas necesarias. Bralettes y braguitas son proyectos fáciles y divertidos y cualqueiera que sabe manejar la máquina domestica puede coserlos con bastante facilidad. El aspecto que más cuesta es coser los elásticos correctamente pero hay mucha información online y en YouTube que te explican eso (en castellano recomiendo mucho el canal de YouTube de Hugo Quili)

Cual es tu proyecto de lencería favorito que has cosido hasta ahora?

Tengo que decir que mi último conjunto de sujetador y braguita. Me queda SUPER BIEN y el encaje es precioso! Usé el kit de encaje para el sujetador y braguitas de Studio Costura Shop e hice el sujetador Berkeley de Orange Lingerie y la braguita Stella de Studio Costura! Creo que es uno de mis trabajos favoritos hasta ahora de lencería DIY!


Tell me a little about your sewing journey: when did you start to sew and what are your favourite things to make?


I started to sew when I was very young (11-12 years old). My mother had a sewing machine but never used it. My next-door neighbor was a dressmaker and I used to spend some time after school at her place. One time I asked her to teach me how to thread the sewing machine and in that same day I surprised my Mom with a self-made simple draw-string bag (I used my mother's sewing machine after oiling it myself - I have always been good with machines!). My neighbor also taught me how to copy and cut BurdaStyle patterns and very soon after I was raiding my mother's storage for fabrics (I even used some of her bed-sheets!). My favorite things to make have always been clothes that I could wear. I developed a taste for challenging projects so I love sewing jackets and coats the most.

Why did you start sewing lingerie? Did you find it difficult? What resources/patterns would you recommend for people interested in trying out lingerie sewing?

I have always admired a few sewing bloggers who were also able to sew lingerie, yet I knew I couldn't find the specific materials locally (lace, elastics, etc.). A few years ago I was introduced to American Learning Platform Craftsy.com. One day I noticed Beverly Johnson's courses on sewing bras and decided to try them out. In the class materials I found a list of bramaking online suppliers, including one in Europe who represented Beverly's line of patterns, so I ordered my first bra-making kit and pattern from this supplier, Bwear.se (the pattern was the classic bra pattern from Beverly Johnson, the one used in her class; I also got the specific kit for that pattern and the wires in my size). After a couple of trial bras I was able to get the fit right for me and I was amazed by how quickly and easily I could produce a good quality bra. I expanded my knowledge research to the Internet and YouTube and found excellent blogs/websites with plenty of information on lingerie making. I started making all my lingerie, including bras, panties and bralettes; I no longer buy my lingerie. I think the online offer for kits and materials is excellent and there's also a variety of very good patterns available, specially in pdf format which I consider more practical and accessible. For the absolute beginner I would strongly recommend taking a workshop or a good online course, specially on bra-making. If you are not new to sewing, most pdf patterns offer excellent instructions and cover the needed techniques. Bralettes and panties are fun and easy projects and anyone who knows how to operate a domestic sewing machine can take those with relative ease. The most challenging aspect is sewing the elastics correctly, yet there are excellent resources online and Youtube videos covering those techniques (in Spanish I highly recommend Hugo Quili's YouTube channel).

What is your favourite lingerie make you've sewn so far? 

I have to say my last bra&panties set! It fits WONDERFULLY and the lace is so gorgeous! I used a lingerie lace kit for panties&bra from Studio Costura Shop and made the Berkeley bra from Orange Lingerie and matching Stella panties from Studio Costura! I believe it's one of my best work so far in DIY lingerie!


conjunto de lencería de lunares (bralette hanna y dos versiones de la braguita stella)

Polka-dot lingerie set (Hanna Bralette and two versions of Stella panties)

www.studiocostura.com

Conozco a Karu de Studio Costura desde hace tiempo y cuando me escribió sobre la idea de coser un conjunto de lencería usando los materiales de su tienda y escribir un post para su blog inmediatamente dije que sí! Ya había comprado antes de su tienda y la selección de kits y la calidad de materiales en mi opinión es muy buena. Pude elegir cualquier patrón según mi gusto pero ya tenía interés en probar sus patrones pdf así que me lancé y compré también los patrones de bralette Hanna y la braguita Stella. Estoy muy contenta por haberlo hecho porque coser estas prendas ha sido una experiencia muy buena! Ya que mi último proyecto de costura fue una camisa vestido de lunares me pareció que la opción perfecta es el kit de tela de punto con lunares junto con un poco de puntilla elástica.


I’ve known Karu from Studio Costura for a while and when she approached me with the idea of making a lingerie set using materials from her shop and write a guest post about it I immediately said yes! I’ve ordered from her shop before and the quality of the materials along with the kits selection is great in my opinion. I could have chosen any lingerie pattern of my preference but I was already interested on trying her downloadable pdf patterns so I jumped ahead and ordered the Hanna Bralette and the Stella panties. I am very glad I did because sewing these items has been such an enjoyable experience! Since my latest sewing project was a polka-dot shirt-dress, her polka-dot jersey kit seemed like the perfect choice, along with some black lace trim for edging.

K002 (1).JPG

Empezamos con el bralette Hanna: me parece que el patronaje está muy bien hecho y las instrucciones son fáciles de seguir incluso si eres principiante en coser lencería. Junto con las instrucciones también me parecieron muy útiles e inspiradores los posts de variaciones que tiene Karu en su blog. Ya que no iba a hacer el bralette con encaje no usé la pieza de patrón D (el forro de la copa interior) y en vez de eso lo forré todo con tul elástico, lo mismo hice con la copa exterior y la banda. Después cosí la puntilla elásica al borde de la copa interior (cosí dos filas de puntada de zig-zag para poder coger un poco la parte de las ondas de la puntilla pero hubiera podido quedarme con una fila cerca del borde de la tira de la puntilla y eso hubiera sido suficiente también). En vez de coser/pasar la remalladora para juntar las piezas de copa interior y exterior entre sí las cosí de la manera que se queden como en sandwitch y el resultado es muy limpio en esta costura:


Let’s start with the Hanna Bralette: I found it a very well drafted pattern with excellent and easy to follow instructions, even if you are a beginner at sewing your own lingerie. Along with the instructions I also found Karu’s blog posts on some of the variations very useful and inspiring. Since I wasn’t going to sew a full lace version I didn’t need pattern piece D (the inner cup lining) and instead I lined the entire inner cup with mesh lining, the same as did with the outer cup and band pieces. Then I applied the edge lace trim to the inner cup edge (I added two rows of zigzag stitches so I could catch some of the lace scallops but I could have stitched a single row of zigzag stitches along the inner edge of the lace, it would work just fine). Instead of stitching/serging the lined inner cups to the outer cups I sandwiched the seams between the outer cup fabric and lining, thus obtaining a very neat finish on the cup seam:

www.studiocostura.com

Tenía que volver a ajustar el ancho de la banda para poner un cierre más estrecho (siempre tienes que mirar eso antes porque los patrones van con medidas genéricas y los cierre varian mucho):


I had to readjust the width of the back band at its ends to accommodate the narrower hook and eye closure (you should always check it because patterns are generic and the closures width may vary a lot):

www.studiocostura.com

Estaba muy contenta con cómo queda y lo cómodo que es el bralette Hanna y estoy bastente segura que no va a ser la última vez que lo haga!


I was very pleased with both the fit and the wearing comfort of the Hanna Bralette and I am pretty sure this won’t be my last take on it!

www.studiocostura.com

La braguita Stella (versión 2, hecho para el encaje elástico): En vez de usar encaje lo que hice fue poner la puntilla elástica tanto a las piezas delanteras como traseras donde el patrón indica que va el borde de encaje. El resto de proceso de costura está muy bien explicado en las instrucciones y la única cosa que hice diferente fue la manera de juntar la pieza trasera con la entrepierna (hice el método de sandwitch allí para meter la pieza trasera entre las capas de entrepierna y así conseguí un resultado muy limpio).


The Stella panties (version 2, intended for stretch lace): Instead of the lace I edged the fabric with the lace trim on the back and front pieces, where the pattern indicates to align with the lace scalloped edge; all the remaining construction process is very well explained in the instructions and the only thing I did differently was the way I attached the crotch piece to the back of the panties (I turned it inside out and sandwiched the back pieces in it, encasing the seam allowances inside of the crotch and obtaining a very clean seam finish).

www.studiocostura.com

Al final me quedó suficiente tela de punto para hacer por lo menos un par más de braguitas y añadiendo algo de elástico hice la versión 1 de la braguita Stella (hecho para las telas de punto), también usé lo que me quedaba de la puntilla negra para adornarla.


Lastly there was enough polka dot jersey fabric in the kit for at least another pair of panties so I added some elastics and was able to produce Stella version 1 (intended for stretch fabric), not without using the remnants of the lace edge trim to embellish it!

www.studiocostura.com

Espero que os haya gustado mi proyecto y que os inspiréis para hacer vuestra lencería también! Puedo aseguraros que es muy gratificante y nada difícil! Gracias a todos por leer! (Puedes leer el post completo en el blog Couture et Tricot.)


Hope you like my makes and feel inspired to make your own lingerie projects as well! I can assure you that it’s very gratifying and not at all difficult! Thank you all for reading! (You can read the full post over at the blog Couture et Tricot.)


www.studiocostura.com

Me han encantado las variaciones que Tany hizo con los patrones, no había pensado eso de usar la puntilla elástica para hacer la versión de encaje de la braguita Stella. Del otro kit que le mandamos también hizo este conjunto de Berkeley + Stella que ha quedado super bonito! De nuevo, muchas gracias Tany por participar y también por contarnos sobre tu experiencia en coser lencería! Podéis seguirla en su blog y en su Instagram! También tiene un blog de moda aparte que podéis ver.

Los materiales que ha usado ella de Studio Costura Shop son:

- patrón de bralette Hanna

- patrón de braguita Stella

- kit de tela de punto con lunares

- puntilla elástica negra

- kit de encaje con beige y azul


I loved the variations that Tany made with the patterns, I didn't think of using the lace trim for the lace version of Stella panties before. From the other kit that we send her she also made this Berkeley + Stella set that looks amazing! Again, thank you so much Tany for participating and also for sharing more about your experience about sewing lingerie with us! You can follow her at her blog and over at her Instagram account! She also has a separate blog about her fashion makes you can check out!

The materials she used from Studio Costura Shop are:

- Hanna bralette pattern

- Stella panties pattern

- polka dot jersey kit

- black narrow scalloped lace

- beige and blue lace kit


Hanna bikini II

 
inspiración & materialesinspiration & supplies (1).jpg

Hola! Hoy seguimos cosiendo el bikini con el patrón de bralette Hanna. En el anterior post cortamos las piezas y las unimos derecho con derecho tanto las piezas de lycra como las de forro.

Hey! Today we'll be sewing the bikini with the Hanna bralette pattern. In the last tutorial you've cut out the pieces and sewn them together with right sides together both in the lycra fabric and the lining.

elásticos/elastics

www.studiocostura.com

Coloca la capa exterior con el derecho hacia abajo y el forro con el derecho hacia arriba. La versión azul lo he cosido sin unir anteriormente las piezas y no me ha parecido complicado, si quieres puedes sujetar las capas con alfileres. En la versión rosa sí que uní el exterior con el forro usando la remalladora y uniendo todos los lados antes de poner los elásticos. Este paso es opcional y la verdad es que antes siempre lo solía hacer así, primero remallando, pero luego he visto que casi me gusta más saltar ese paso.


Put the fabric layer with the right side down and the lining on top of it with the right side up. In the blue sample I didn't sew the layers together before attatching the elastics and I didn't find it difficult to sew that way, you can however pin the layers together. In the pink sample I did overlock all the sides together. This is the method I used to use for sewing swimwear, overlocking first the sides, but I actually like it more without the overlock. So that step is completely optional.

www.studiocostura.com

Vamos a coser el elástico de bañador. Si al coser los elásticos de lencería primero se cose en el derecho de la prenda y luego lo doblamos hacia el revés, en el bañador el método es un poco distinto. Como la idea es que el elástico no se vea, lo que hacemos es que primero lo cosemos en el revés encima del forro y luego lo doblamos otra vez encima de sí mismo y así no se ve nada de elástico luego. Para que el borde de elástico se quede dentro del doblez y que no se vea lo suelo colocar aprox 2 mm del borde de la tela. Cose un zig-zag (2.5 de ancho, 2.5 de largo) en el lado del elástico que queda hacia el interior de la prenda (en el lado izquierdo). Tira ligeramente del elástico mientras coses (los elásticos de baño suelen ser firmes así que no tires mucho porque esto hace que la prenda se queda demasiado ajustada). Es importante usar la aguja de punta de bola y un hilo de calidad, antes siempre se me saltaba la puntada o se me rompía el hilo en este paso y al cambiar el hilo no he tenido más problemas.


We'll be sewing the swimwear elastic now. When sewing lingerie elastics you first sew on the first zig-zag row on the right side of the garment, then turn the work over and sew on the wrong side. On swimwear it goes a bit differently as we don't want to see the elastic once it's sewn on. What we'll do is first we'll sew it on the wrong side on top of the lining and then fold it over itself so you won't see any of the elastic once the bikini is done. In order to not see the elastic edge I put the elastic aprox 2 mm from the fabric edge. Using a zig-zag stitch (2.5 length, 2.5 width) sew on the side of the elastic that is towards the inside of the garment (on the left side). Pull the elastic slightly while you sew (swimwear elastics tend to be quite firm so you don't want to pull too much otherwise the bikini will be too fitted). It's important to use a stretch needle and a good quality thread, I used to have lots of problems with the stitching popping and the thread breaking while sewing on the elastics but once I changed the thread and it's all ok now.

www.studiocostura.com

Así es como queda la primera pasada del zig-zag. Ahora dobla la tela encima de sí mismo justo donde el borde de elástico y cose la segunda pasada de zig-zag (2.5 de ancho, 2.5 de largo) en el borde libre.


This is how the first row of zig-zag looks like. Now fold the fabric on top of itself exactly where the elastic edge is and sew the second zig-zag row (2.5 width, 2.5 length) on the free edge of the fabric.

www.studiocostura.com

Así es como quedan las dos pasadas de zig-zag. Repite con todos los lados y aplica el elástico también al otro lado de bikini (la otra copa).


This is how both of the rows look like. Now do the same with all of the sides and also sew on the elastic to the other side of the bikini (the other cup).

centro delantero /center front

www.studiocostura.com

Así se ven las piezas del derecho una vez cosido el elástico. Coloca las copas derecho con derecho y une con alfileres la costura central. Cose primero a máquina normal con puntada recta (2.5 de largo) a 6 mm del borde. Si quieres, puedes rematar con la remalladora.


This is how the pieces look on the right side once you've sewn all the elastics on. Put the cups with right sides together and sew the central seam. First sew it on your domestic machine with a straigth stitch (2.5 length) with a 6 mm seam allowance and then you can overlock it if you wish.

www.studiocostura.com

Así es como queda la costura central una vez terminada.

Once the central seam is sewn it looks like this.

www.studiocostura.com

En el caso de usar arandela para la parte central dobla el margen de la pieza de copa a través de la arandela por unos 2 cm. Cose con la puntada recta o zig-zag (lo que prefieras) en el revés para sujetar el doblez. Haz lo mismo con el otro lado y ya está terminado la unión con la arandela.


In case you are using a ring for the central part you'll need to fold the cup center seam allowance trough the ring for about 2 cm. Stitch the seam allowance in place using a straight or small zig-zag stitch on the wrong side of the bikini. Do the same with the other side and it's finished.

www.studiocostura.com

Si quieres hacer un lazo para la unión de las copas tienes que hacer un patrón según la forma que quieras. Te doy las medidas aproximadas que he usado yo pero lo puedes cambiar según lo que te guste: largo 25 cm, ancho en la parte más ancha 5 cm y en la parte más estrecha 3 cm. Hay que añadir también margen de costura alrededor de la pieza.

Corta dos piezas con la forma de lazo y ponlas derecho con derecho. Cose alrededor con un zig-zag pequeño dejando una abertura para dar la vuelta en la parte central recta. Da la vuelta y cierra la abertura con la puntada recta en el derecho.


If you'd like to use a bow tie for the center front of the bikini you'll need to make a pattern with a form you prefer. I'm giving you the measurements I used but you can alter them as you wish: length 25 cm, width in the widest part 5 cm and in the narrowest part 3 cm. You'll need to add seam allowance around the piece too.

Cut two pieces with the new pattern and put them with right sides facing. Using a small zig-zag stitch sew all around the bow leaving a small opening in the central part where there's no curve. Turn it around and close the opening with a straight stitch.

www.studiocostura.com

Haz el lazo y ya está! Dependiendo del largo de la pieza que hagas y su forma queda de una u otra manera, puedes experimentar.


Make a bow tie and that's it! The results will vary according to the length and the form of the bow you'll cut so you can experiment there.

cierre de espalda / back closure

www.studiocostura.com

Para poner el cierre de la espalda coloca el cierre con el derecho hacia ti para no confundir del lado una vez que lo abres. Pasa el final de la banda a través del cierre por 2 cm y cose con una puntada recta varias veces para asegurarlo en su sitio.


To put the closure on the back put the closure with the right side facing up  so you won't get confused once you open it. Pass the ending of the band piece trough the closure for about 2 cm and sew it on with a straight stitch using several rows to secure it in place.

www.studiocostura.com

Haz lo mismo en el otro lado y ya está!

Do the same on the other side and it's done!

www.studiocostura.com

Si quieres usar lazos para cerrar la espalda tienes que cortar las piezas para eso. De nuevo te doy las medidas aproximadas que he usado yo pero puedes variar el tamaño y la forma. Mide el largo que tiene el final de tu banda ahora y usa esta medida para cortar el lazo. La pieza es como lo ves en la foto pero doble (la parte de abajo va en lomo). El largo que ha usado es de 20 cm, la parte más ancha de 10 cm y la parte más estrecha 6 cm (después de dobla ya se queda la mitad). Añade margen de costura a todos los lados menos abajo porque se corta en doblez.

Para tener un acabado limpio a la hora de coser la tira vamos a coserlo en dos partes. Primero coloca la pieza de la tira "envolviendo" el final de la banda. Dobla la tira por la mitad con el derecho por dentro y sujeta con los alfileres el final de la banda dentro de la tira. En un lado la banda va a estar justo donde el doblez de la tela y en el otro lado le va a sobrar el margen de costura de la tira que necesitamos para unir la tira entre sí.


If you'd like to use a bow tie on the back you'll need to cut pieces for that. Again I'll give you the measurements I used but you can modify the length and the form. Measure the length of the ending of your band piece and use this measurement to cut your piece. The piece is like the one you see on the photo but double (the lower part is cut on fold). I've used a 20 cm lenght with a widest part of 10 cm and the narrowest part 6 cm (once it's sewn it will be the half). Add seam allowance to all sides apart from the lower part as it will be cut on fold.

To have a neat finish once you sew the tie on we'll sew it in two parts. First put the tie piece in a way it "goes around" the band piece. Fold the tie piece in half with right sides together and using pins put the band piece inside the tie. One side of tha band will be exatly where the tie piece is on fold and the other side of the band will have the seam allowance of the tie extending so we can sew it together.

www.studiocostura.com

Cose la parte de unión vertical y unos centímetros de la tira con la puntada recta o con un pequeño zig-zag. Ahora dale la vuelta y ves que la parte de la unión de la tira y la banda ha quedado limpio y sin mucho bulto.


Sew the vertical union seam and some more centimeters of the tie with a straight or small zig-zag stitch. Now turn the tie inside out and you'll see that the union is neat with less bulk.

www.studiocostura.com

Ahora hay que cerrar el resto de la tira así que vuelve a colocar la tira doblandolo con el derecho hacia dentro y sujeta con los alfileres la parte curvada hasta donde puedas dejando una abertura para luego poder dar la vuelta. Cose o remalla esa parte y dale la vuelta. Cierra la abertura con la puntada recta o pequeño zig-zag y la tira está terminada. Vuelve a hacer lo mismo con el otro lado.


Now we'll need to close the rest of the tie so fold the remaining part withe right sides together and pin in place the curved part leaving a opening so we can later turn the work inside out. Sew or overlock this part and turn it inside out. Close the opening with a little zig-zag or straight stitch and the tie is finished. Repeat with the other side.

www.studiocostura.com

Así queda el lazo una vez terminado. Como dije antes, puedes variar el largo y la forma de las tiras para hacerlo de manera que prefieras tú.


This is how the bow tie looks onece finished. As I told you before you can vary the length and the form and make it as you wish.

tirantes / straps

www.studiocostura.com

Si prefieres cerrar los tirantes también con un nudo vuelve a hacer lo mismo que antes. Esta vez mide el ancho que tiene el final del tirante para hacer el patrón para cortar las tiras.


If you wish to have the same type of closure for the neck you should repeat the same steps as with the band. This time measure the width of the cup piece ending and make a pattern piece according to that measurement.

www.studiocostura.com

Si quieres poner los tirantes dobla el final de la pieza de la copa a través de la arandela y cose con puntada recta. Corta dos tiras de lycra aprox 35 cm de largo y el ancho tres veces el ancho de tu elástico. Yo he usado el elástico de 8 mm así que corté las tiras de 2,5 cm de ancho.


If you'd like to use straps fold the cup piece ending trough a ring and secure it in place with a straight stitch. Cut two strips of lycra aprox 35 cm long and the width should be three times the width of your elastic. I've used a 8 mm elastic so I cut my strips 2,5 cm wide.

www.studiocostura.com

Dobla la tira por la mitad con el derecho hacia dentro y coloca en el borde derecho el elástico. Cose con un zig-zag (2,5 de ancho, 2.5 de largo) en el lado izquierdo del elástico. No hace falta tirar esta vez.


Fold the strip in half with the right sides facing inside and put the elastic where the raw edges are. Stitch in place using a zig-zag stitch (2.5 width, 2.5 length) on the left side of the elastic. Don't pull the elastic this time.

www.studiocostura.com

Con la ayuda de un imperdible da la vuelta al tirante. Aunque parece que es muy estrecho para poder dar la vuelta vas a ver que como lycra es elástico sí que puedes hacerlo.


Using a safety pin turn the straps inside out. It might look very narrow to do so but as the fabric stretches you'll see it's not so hard.

www.studiocostura.com

Pasa el tirante a través de la arandela y cose el doblez con la puntada recta. En este punto realmente podrías incluso dejar las tiras así y usarlos para hacer un lazo en el cuello, sólo tendrías que rematar el final del tirante o doblandolo o haciendo un nudo por ejemplo.


Fold the strap trough the ring and secure it in place with a straight stitch. At that point you could actually leave the straps that way and just tie them on the neck, you'll only need to finish off the other end of the strap by either folding it under or making a small knot.

www.studiocostura.com

En este paso vamos a coser los tirantes en su sitio fijo, estaría bien si alguien te puede ayudar a medir exactamente el largo de tirante para que estés cómoda. Una vez que sepas el largo de tirante marca un punto 5 cm desde el final de la banda y cose allí en el revés en el borde encima del elástico el tirante.


At this step we'll sew on the straps in their place so it would be helpful if someone could help you to measure the exact length. Once you know the exact length of the straps make a mark 5 cm form the band ending for the strap position. Sew the strap in place on the wrong side of the bikini on top of the elastic on the upper edge.


www.studiocostura.com

Y así queda terminado el bikini! Puedes variar todas las opciones que te he enseñado aquí para hacerlo a tu gusto. Yo siempre miro las pendas que ya tengo para ver qué es lo que me gusta y qué me gustaría cambiar...hay un montón de posibilidades, así que espero que este tutorial te ha animado para coser un bikini este verano!


And the bikini is done! You can vary all the opstions I showed you to make it your own. I always look at the ready made garments to see what parts I like and what I'd like to change...there are so many possibilities so I hope that this tutorial has inspired you to make yourself a bikini this summer!


Hanna bikini I

 
inspiración & materialesinspiration & supplies (23).png

Edited on 7th of June 2022:

The Hanna bikini is now available as a separate pattern with lots of improvements and four styles of bikini bottoms. If you already own a Hanna bralette pattern you can of course follow this tutorial here but if you’d like to get more specific information about sewing a whole bikini set I’d suggest you to get the Hanna bikini pattern! It’s available in English and in Spanish.

Hola! Hoy os traigo un tutorial que tenía pensado desde hace tiempo ya y como el verano casi está aquí, qué mejor momento que ahora. Os voy a enseñar cómo hacer un bikini con el patrón de bralette Hanna! Es muy fácil y de hecho quizás para las personas que tienen un poco de miedo a empezar a coser lencería, este podría ser un buen punto de partida porque es más sencillo y los materiales son más fáciles de encontrar. Para empezar y para que os animéis os muestro un montón de modelos para la inspiración!


Hey! Today I'm bringing you a tutorial that I wanted to show you guys for a long time now and as the summer is almost here it's right about time now. I'll show you how to make a bikini with the Hanna bralette pattern! It's very easy and it's actually a good project for those of you who are a bit afraid to start sewing lingerie as it's easier o sew and the materiales are easier to find too. To start things off and to make you want to sew your own bikinis I'll show you some inspirational images!

1.jpg
3.jpg
2.jpg
4.jpg
6.jpg
5.jpg
7.jpg
8.jpg
9.jpg
10.jpg

Todas las fotos son de mi carpeta de Pinterest donde iré subiendo más cosas cuando vea algo por el estilo así que podéis buscar allí más inspiración. Lazos, piezas redondas o cuadradas para unir las copas, volantes, tirantes cruzados...hay un montón de posibilidades y puedes hacer el bikini exactamente como a ti más te guste.


All the photos are from my Pinterest page and I'll be adding more there so you can follow along for more inspiration there. Bow ties, round or square details to join the cups, flounces, crossed straps...there are so many possibilities and you can make yourself the bikini exactly as you'd like to.

www.studiocostura.com

He dividido este tema en dos posts, así que hoy os hablo de materiales, de cómo modificar el patrón, el corte y cómo empezar a unir las piezas y mañana será ya sobre los detalles. Os muestro diferentes formas de coser el bikini con este patrón con dos ejemplos diferentes pero obviamente podéis elegir lo que más os gusta y cambiar cosas. El ejemplo azul tiene el centro delantero cerrado y encima un lazo, los tirantes igual que el bralette Hanna y el cierre de plástico. El ejemplo blanco y rosa tiene en el centro delantero una arandela y tanto la espalda como el cuello se cierran con un lazo. 


I divided this topic into two posts, today I'll be talking about materiales, how to hack the pattern, cutting the pieces and joining them. Tomorrow I'll show you all the details. I'll show you the diferent ways to sew a bikini top with this pattern using two different variations but you can of course choose to mix and match the closures etc. The blue sample has a closed center front with a bow tie, straps like in the original Hanna bralette version and a plastic closure. The white and pink sample has a ring detail in the center front and both back and neckline are closed with a bow tie.

www.studiocostura.com

Para coser el bikini en el formato más básico lo que se necesita es tela de bañador/lycra. En las tiendas hay variedades y podéis encontrar cosas interesantes, las muestras las he hecho con unos retales que tenía ya en casa. Justo al hacer el tutorial conocí también una tienda de Madrid que tiene unas lycras muy bonitas, se llama Donnatela. Ellos me ofrecieron una colaboración, así que os enseñaré en breve también unos modelos con sus telas que tienen unos estampados muy bonitos que no se ven en muchos sitios.

Luego necesitas forro de bañador, es un punto que suele venir en color crudo y en negro (lo que he usado es de Ribes y Casals). Y para los elásticos se usa el elástico de bañador o también llamado goma virgen/goma gaucho. Es un elástico resistente al cloro y al sol, especial para baño. Este lo compré en Pontejos y es de 8 mm de ancho, también lo tienen a muy buen precio en Seoane Textil. Si quieres usar cierres o detalles como arandelas o formas cuadradas los puedes normalmente encontrar en mercerías (de nuevo las que he usado son de Pontejos).


To sew the bikini you'll need a bikini/lycra fabric. There are many varieties in the fabric shops and you can find interesting stuff. I made the samples with some fabric I had at home but just when making the tutorial I was contacted by a fabric shop called Donnatela so I'll be showing you also samples I made with their fabrics that have very nice prints. Then you'll need a swimwear lining, it 's a knit fabric that usually comes in nude or black. For the elastic you need swimwear elastic that's resitant to chlorine and sun. If you'd like to use closures or other details you'll need them as well.

www.studiocostura.com

Las modificaciones del patrón son muy fáciles. Yo he usado un elástico de 8 mm de ancho así que en general no tengo que cambiar los márgenes de costura porque luego veis que al coser dejo un mini margen de 2 mm en el borde así que con este ancho de elástico y este patrón que tiene 1 cm para los márgenes de elástico todo va bien. Si tu elástico es más ancho/estrecho, tienes que modificar según eso todos los márgenes donde va a ir elástico.

Yo he preferido escotar un poco el delantero y he movido el punto de centro delantero más abajo (en mi caso dejé 3 cm desde el bajo). Este paso es opcional, si te gusta cómo queda el patrón original o incluso quieres subir el escote lo puedes hacer perfectamente. Simplemente marca el nuevo punto de altura de escote y vuelve a dibujar la línea recta.

Una vez que tienes tu patrón tal como lo quieres hay que añadir a la línea de escote 1 cm de margen de costura porque en el patrón original no lo lleva porque va con encaje.


The modifications on the pattern pieces are very easy. I have used a 8 mm wide elastic so in general I don't need to change my seam allowances as you'll see once I sew on the elastic I'll leave a mini seam allowance of 2 mm. This means that I'm using exactly these 10 mm that the Hanna pattern includes already. If your elastic is wider/narrower you'll need to alter the seam allowances according to the width of your elastic.

I wanted to make the neckline a bit lower so I moved the center front point lower (in my case I left 3 cm from the hemline). This step is optional, if you like how the original pattern fits you don't need to move this point and if you'd like to get more coverage you can even raise this point. Just mark where you'd like your neckline to end and draw a new line ending in the original spot where the strap ends.

Once you'll have the pattern as you like add a 1 cm seam allowance to the neckline side as in the original version there's no seam allowance because there's the lace scalloped edge.

 
www.studiocostura.com
 

En la versión de blanco y rosa he usado una arandela para el detalle del centro delantero, si quieres hacer eso tienes que dar un margen extra en esta zona. Usando el patrón que has creado con añadir el margen de costura al escote en el paso anterior tienes que dar ahora un margen para poder doblar la tela a través de la arandela. El ancho de ese margen es aprox 2 cm para que puedas doblar y el largo depende de tamaño de arandela (o pieza cuadrada) que vayas a usar. Es una forma como ves en el dibujo.


In the white and pink sample I've used a ring in the center front so if you'd like to do the same you need to add some more seam allowance there too. Using the pattern you just created in the last step with the new seam allowance add a piece of "extension" to this pattern aprox 2 cm wide in order to be able to fold it down once you sew the ring on. The length of the extension depends on the diameter of your ring (or a square piece if you are using one). It should be something like on the drawing.

www.studiocostura.com

Si eliges cerrar tu bikini con lazos no hace falta cambiar nada en la pieza de la banda. Si eliges poner un cierre tienes que hacer más largo al patrón para que puedas doblar la banda a través del cierre para poder coserlo. También mide el ancho de tu cierre y ajusta el final de la banda que tenga el ancho: 2 cm para el elástico + el ancho del cierre.


If you choose to close your bikini with a bow tie you don't need to alter the band piece. If you want to use a closure you need to make the band piece aprox 2 cm longer as you'll need that seam allowance in order to fold the piece under to instert the closure. Also measure the length of your closure and make the band ending the same length: it should be the length of your closer + 2 cm for the elastics.

www.studiocostura.com

Corta las piezas de lycra y del forro, dos veces cada pieza de patrón en las dos telas. Vas a a necesitar las piezas A, B y C, el forro D no hace falta.

Cut the pieces from lycra and form the lining, two pieces of each pattern piece from both fabrics. You'll need the pieces A, B and C, the lining piece D is not neeed.

www.studiocostura.com

Une las piezas de lycra A, B y C derecho con derecho en un lado y en el otro lado independientemente (digamos el lado derecho de bikini y el lado izquierdo de bikini) con la remalladora o en la máquina con un pequeño zig-zag (2 de ancho, 2 de largo). Haz lo mismo con las piezas de forro.

Ya está para hoy. Mañana ponemos los elásticos, cierres, lazos etc. Espero que las fotos de inspiración os han dado ideas y que probáis a coser bikinis, es muy fácil!


Sew the lycra pieces A, B and C together right sides facing on both sides (one side will be the right side of the bikini and the other one will be the left side) using an overlocker or a small zig-zag stitch (2 width, 2 length). Do the same with the lining pieces.

That's it for today. Tomorrow we'll sew on the elastics, closures, bows etc. I hope that the inspirational images made you want to sew your own bikinis too, it really is very easy!