Studio Costura Lingerie Sewing Club: Gabriella from @gabriella_kaikaina_handmade

 
www.studiocostura.com

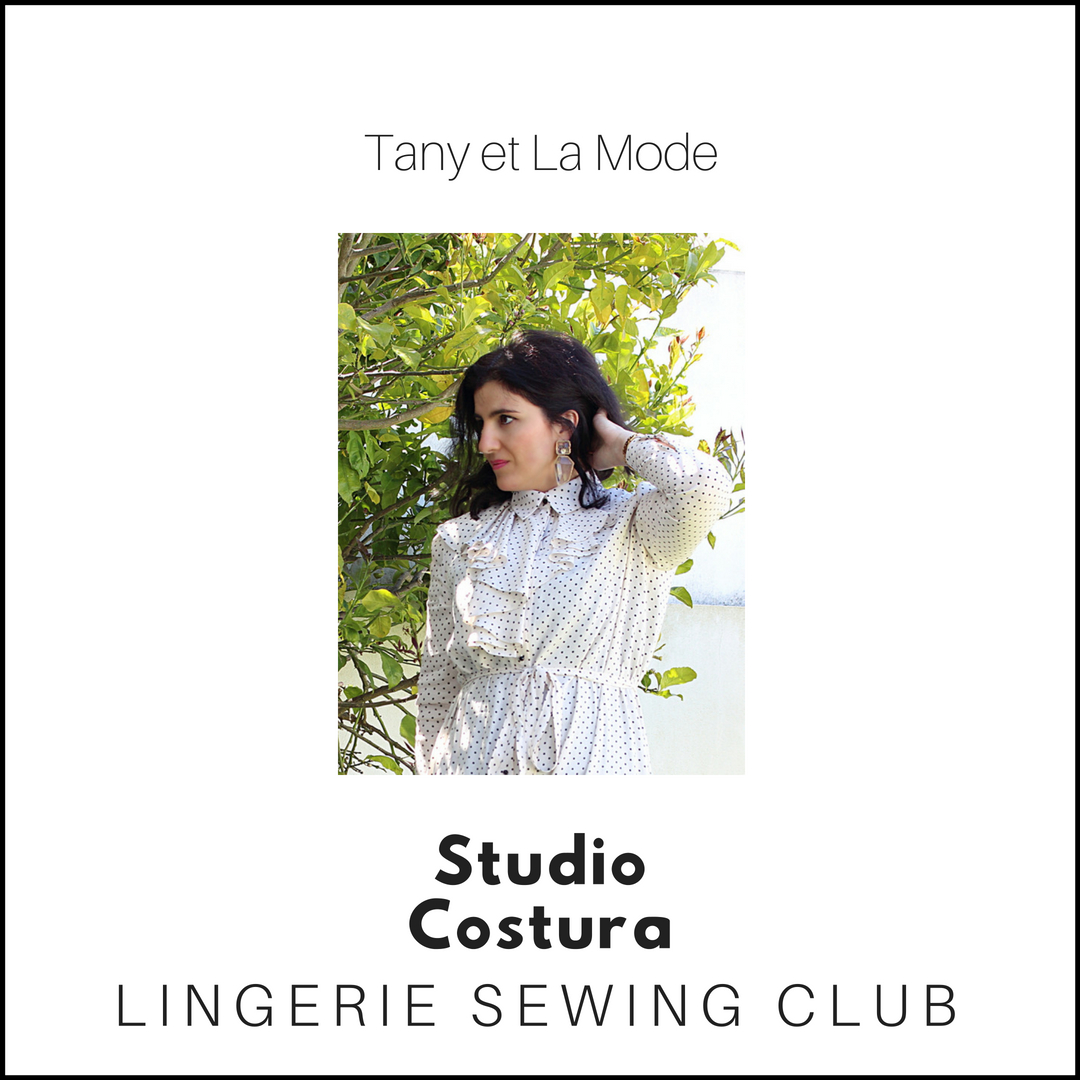
Hola! Es la hora de presentaros el post de agosto en la serie de Studio Costura Lingerie Sewing Club, este mes mi invitada es Gabriella. Ella fue una de mis primeras clientas cuando abrí Studio Costura Shop y desde entonces he sido muy fan de sus costuras de lencería. Podéis ver sus proyectos en Instagram siguiendola en @gabriella_kaikaina_handmade. Para empezar le pregunté un poco más sobre su mundo de costura.

Hey! It's time for the August post in the Studio Costura Lingerie Sewing Club series, this month my guest is Gabriella. She was one of my first customers when I opened up Studio Costura Shop and I've been a big fan of her lingerie sewing adventures ever since. You can find her makes at Instagram by following @gabriella_kaikaina_handmade. First of all I asked her some questions about her sewing story.


Cuéntame un poco sobre tu trayectoria en costura: cuándo empezaste a coser y qué son tus cosas favoritas para coser?

Aprendí a coser en el colegio. No me imagino mi madre sin que haga alguna manualidad pero tengo que reconocer que realmente no me gustó para nada coser! De hecho lo odiaba. Los unicos patrones disponibles por aquella época recuerdo que eran de Burda (no había internet). Hasta hoy no me gustan los patrones que hay que calcar, los patrones en formato pdf son la mejor cosa que se ha inventado : -)

Hace más o menos seis años quería coserme una falda, tenía un estilo en mente. Durante una visita a Londres compré tres bonitas telas de Liberty por si acaso un día podría coser una falda. Una vez vuelta en casa por fin me fui a unas clases de costura donde me apunté solo para tres meses para coser las tres faldas. Estaba segura de que nunca más iba a coser de nuevo! Qué equivocada estaba! Hoy en día hay tantas costureras vendiendo patrones modernos tan fantásticos y yo no pude creer mis ojos, era como si hubiera descubierto un mundo nuevo. Estaba cosiendo prendas otra vez y nunca pensé que cosería lencería.

por qué empezaste a coser lencería? te pareció difícil? qué recursos/patrones recomendarías a gente que está interesada en aprender a coser lencería?

Siempre estoy buscando nuevos desafíos y en el final del 2016 cosí mi primer sujetador y me encantó! Aún así no entendí nada de los materiales que hacía falta para coser lencería. Pasé días y semanas buscando en Google para aprender sobre eso.

Desde luego recomiendo comprar los kits para empezar con los proyectos de lencería. Eso es lo que hice yo y sin eso no hubiera aprendido sobre todos los materiales que necesitaba. Uno de mis primeros kits lo compré a ti Karu, no sé si recuerdas, pero en aquel entonces adjuntabas un A4 explicando todos los materiales que vienen en el kit. Entonces empecé a escribir mi "diario de lencería" donde guardaba muestras de todos los materiales que usaba y para qué servían. Era una tarea muy difícil, inglés no es mi lengua materna pero sabía que la mejor información en internet lo encontraba en inglés. Hasta hoy yo que hablo el aleman suizo, me cuesta entender las instrucciones en aleman :-)

Cuál es tu proyecto de lencería favorito hasta ahora?

Diría que para el 2018 es el sujetador Berkeley. Aunque estoy enamorada de los bralettes también. Y como era la hora de tener un reto de nuevo...este verano me he enganchado a coser prendas de baño. Me encantaaa! Si estás ineteresada, puedes encontrar mis proyectos en IG @gabriella_kaikaina_handmade.


Tell me a little bit about your sewing journey: when did you start to sew and what are your favourite things to make? 

I already learned sewing at school. I can not imagine my mother without doing any handicraft. I have to admit that I actually didn’t like sewing at all! In fact I hated it. The only pattern available at that time, I remember, was Burda (there was no internet). Still today I can’t stand any pattern that I have to trace with paper.  Pdf patterns are the best ever invention:-) 

About six years ago I wanted to sew my own skirt, a style I had in mind. During a visit to London I bought three beautiful Liberty lawn fabrics just in case one time I might sew a skirt. Back home I finally attended a sewing class which I signed up for three months only just to sew three skirts. I was sure I will never ever sew again! How wrong I was! Today with so many great seamstresses all over the world selling fantastic modern patterns, I didn't believe my own eyes, it was like a whole new world opened to me. I was sewing mostly clothing and once again I thought that I will NEVER sew lingerie at all.


Why did you start sewing lingerie? Did you find it difficult?  What resources/patterns would you recommend to people who are interested to try out sewing lingerie?


I am always looking for new challenges and by the end of 2016 I sewed my very first bra and I loved it! Despite that I didn’t understand anything about all those supplies required. I spent days and weeks googling to learn all about it.

I definitely would suggest to purchase lingerie kits for your projects. That is what I did and without this I would have not learned about all those different supplies needed. One of my first kits I purchased by you Karu, I don't know if you still remember, but you included a A4 letter explaining every single supply for what it is needed for. I then wrote myself a “bra making” journal, where I added examples of any lingerie supplies, such as all different elastics and fabrics to explain the use of it. It was really hard work. English is not my mother language but I knew that I will get the best information on the web in English. Even today, I am speaking Swiss German, I have difficulties understanding German instructions :-)


What is your favorite lingerie make you've sewn so far?

I would say for 2018 it is the beautiful Berkely bra. However, I am getting full in love with bralettes too. And…..as it was time to challange myself again, I got addicted sewing swimwear this summer. Love love love it! If you are interested you find all my makings on IG @gabriella_kaikaina_handmade.


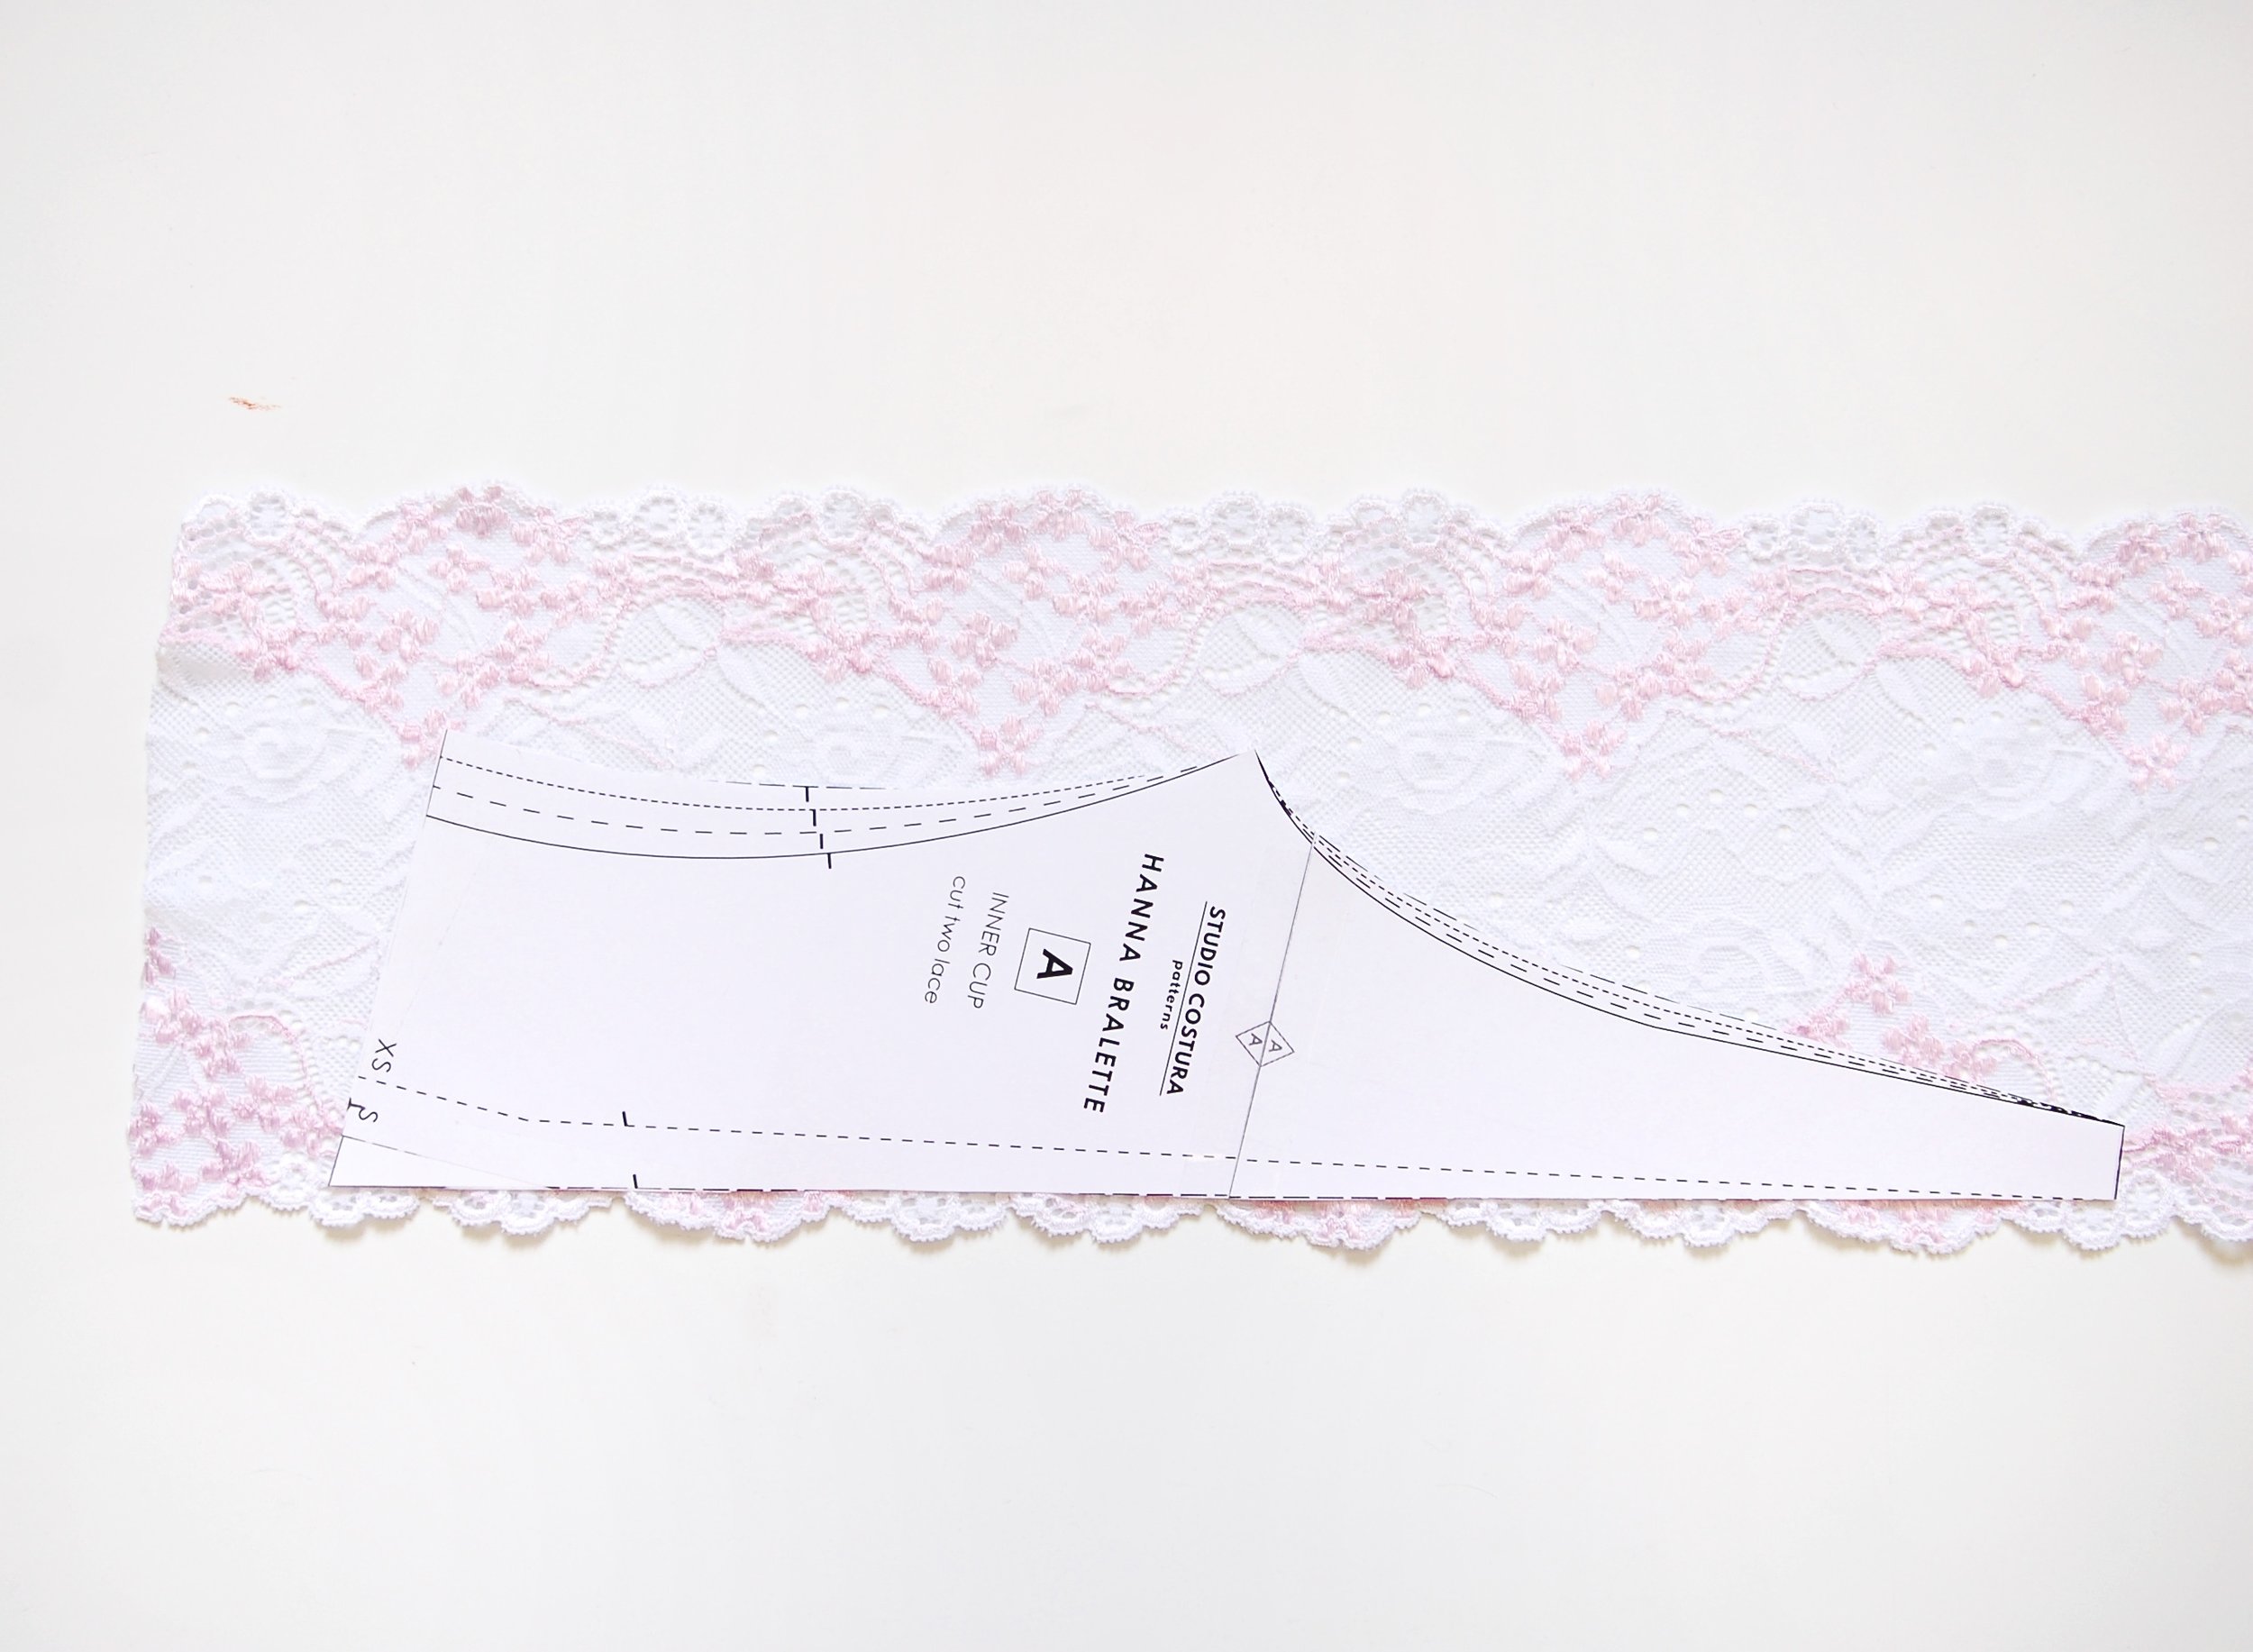
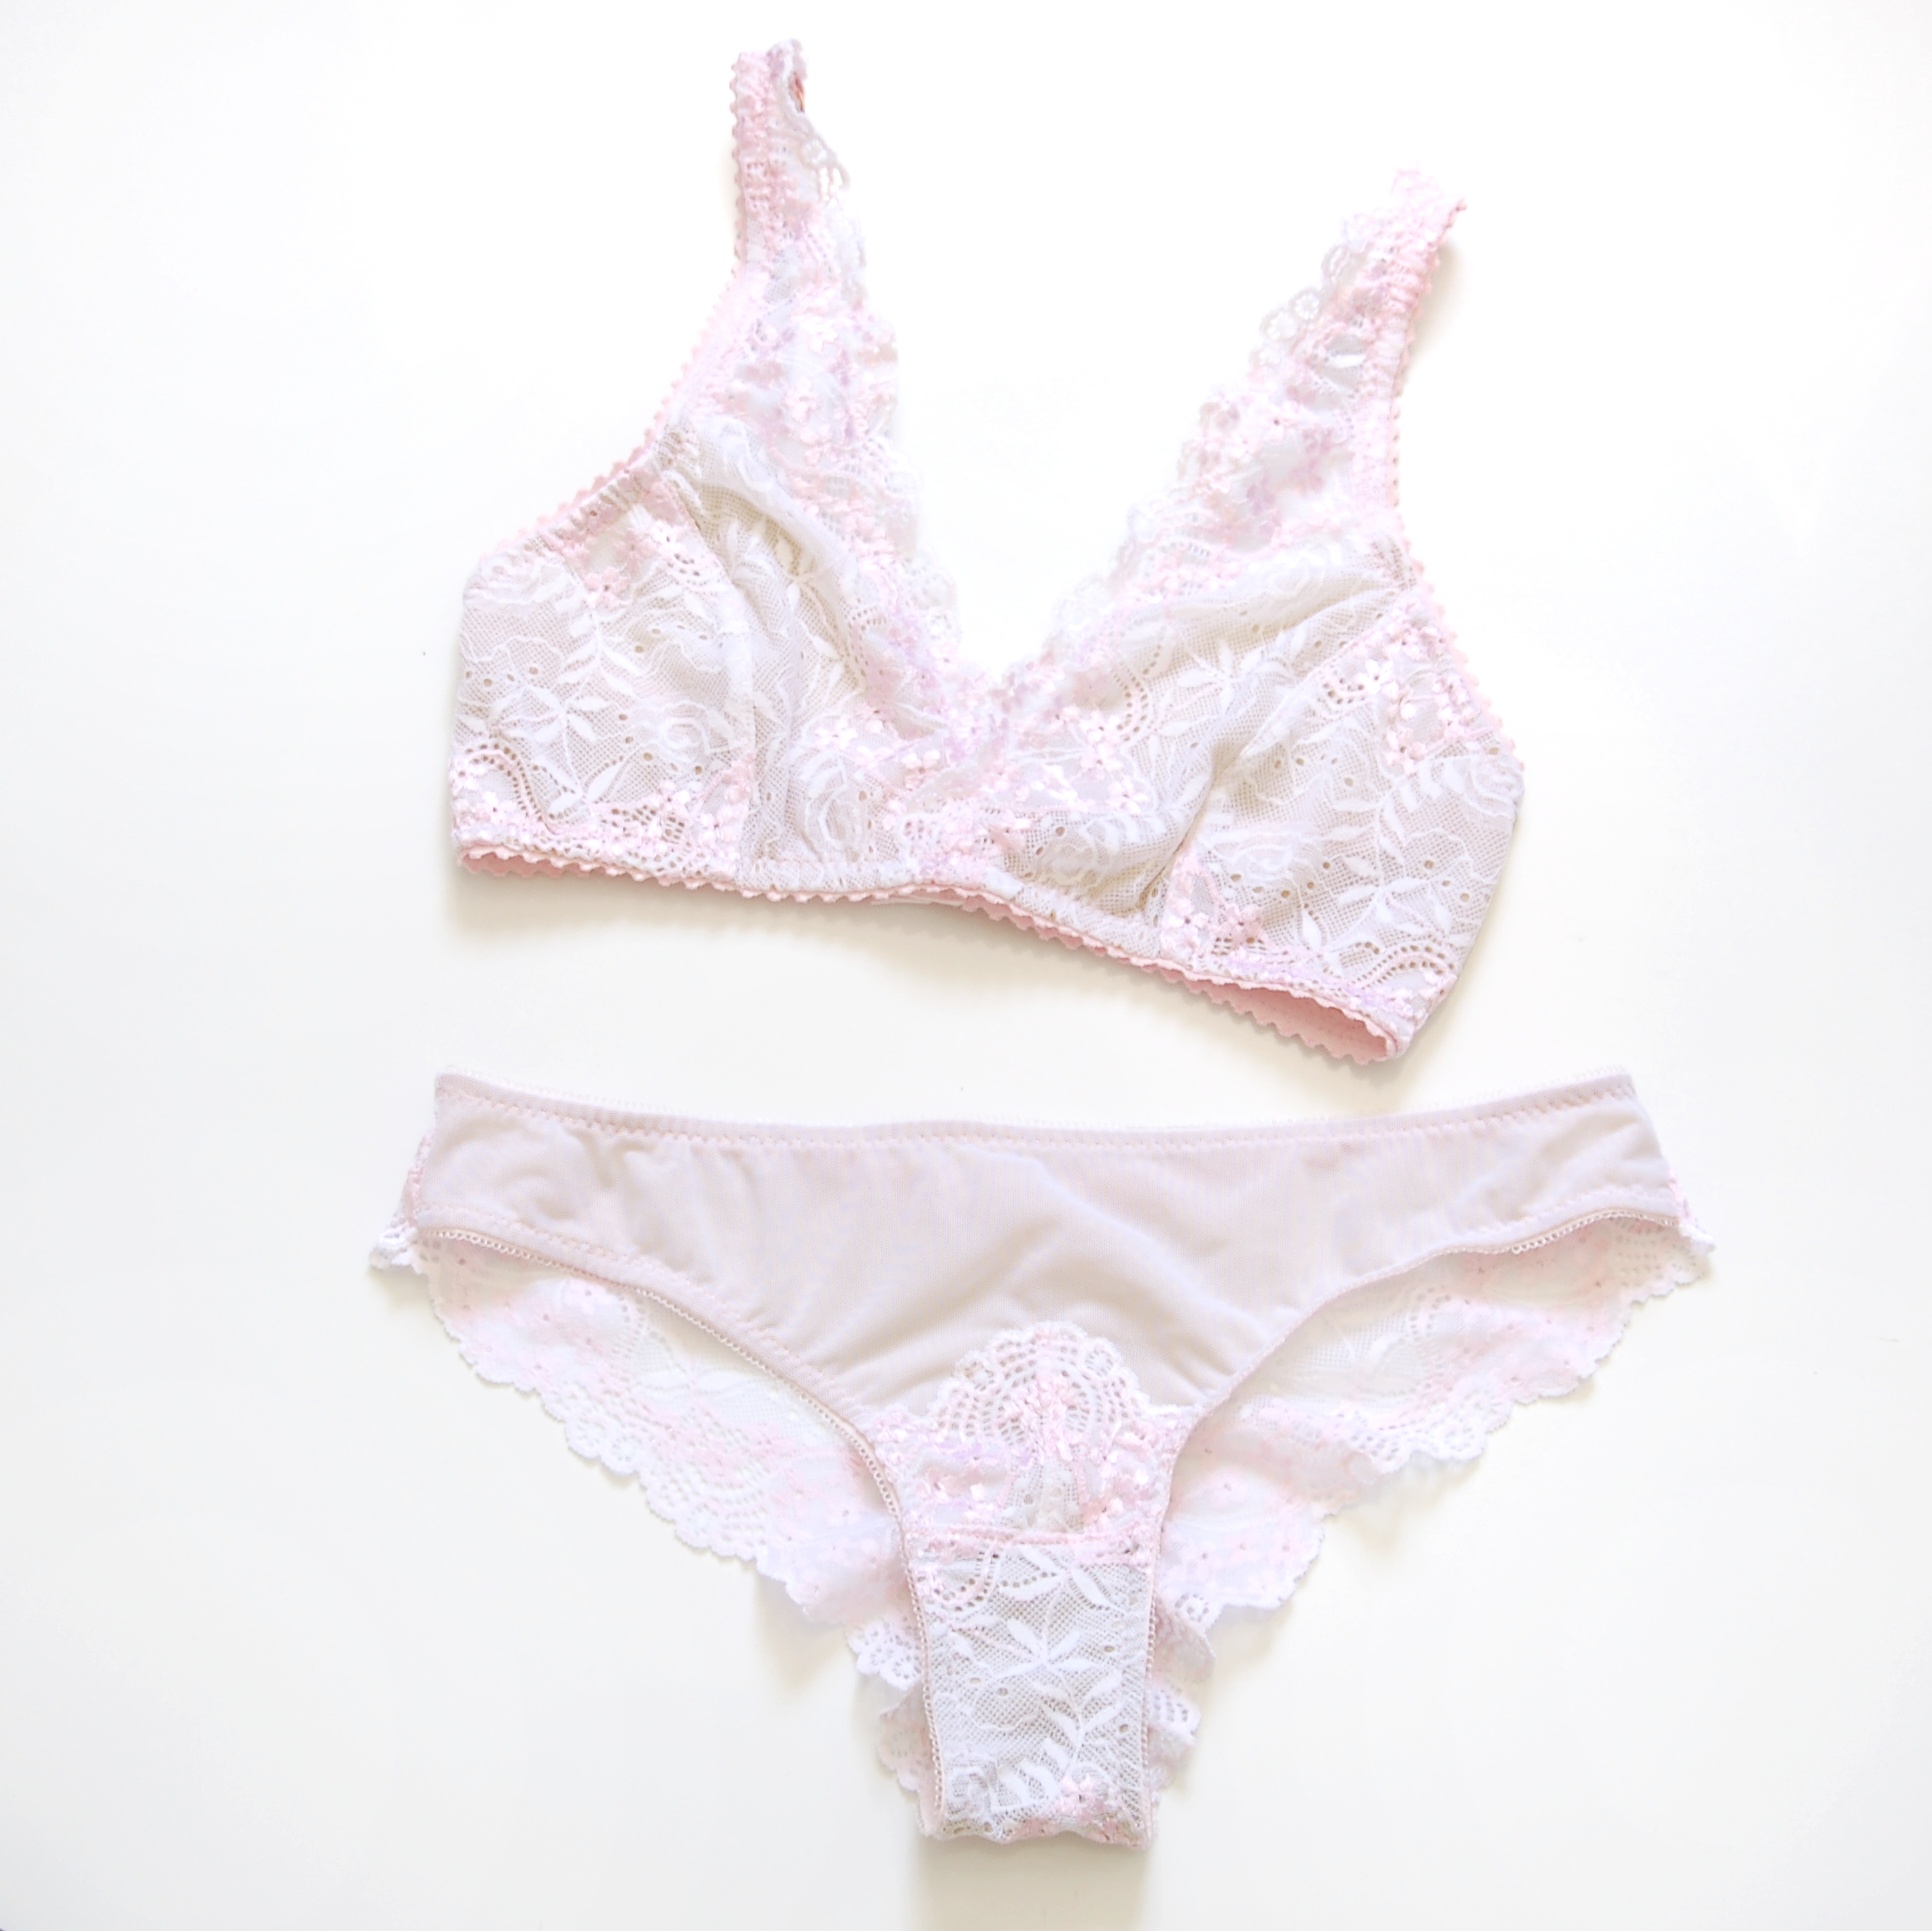
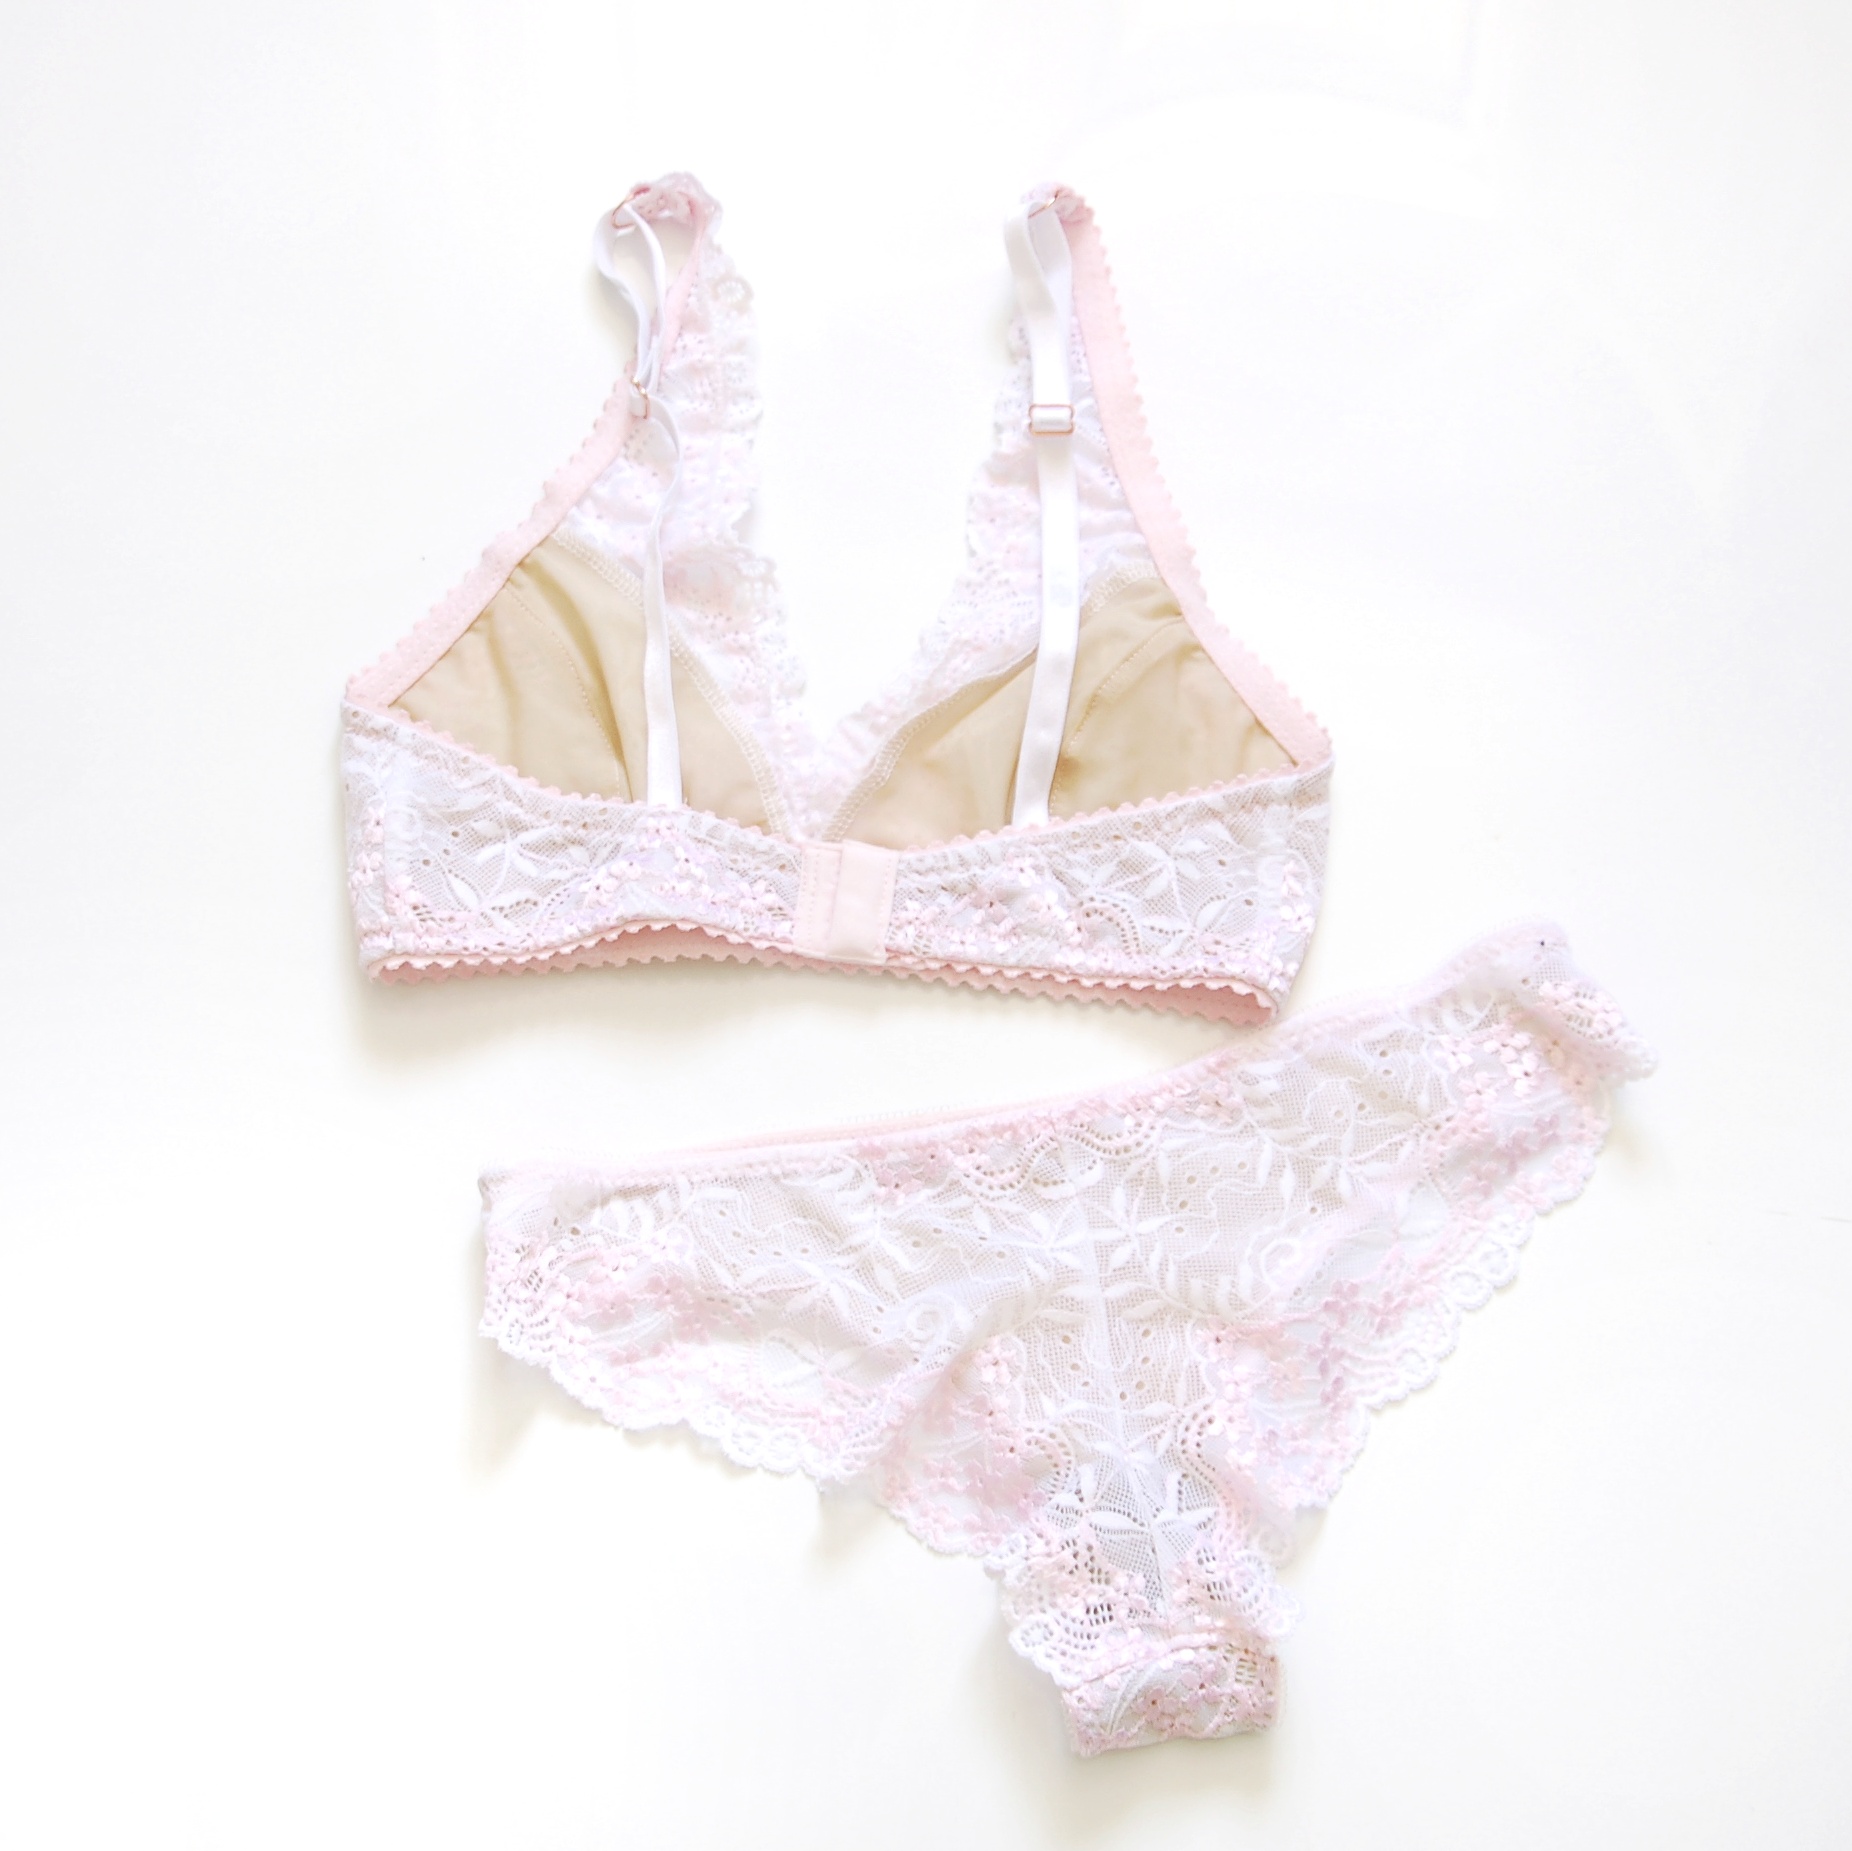
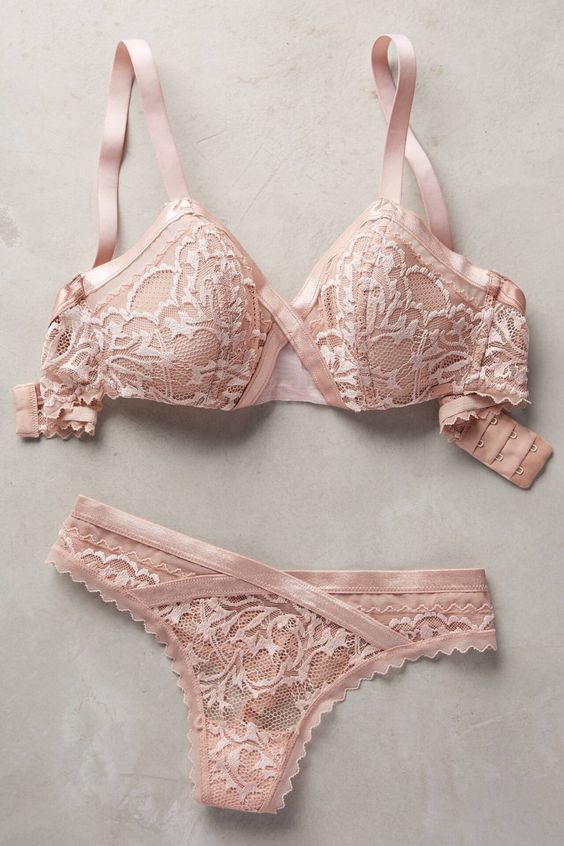
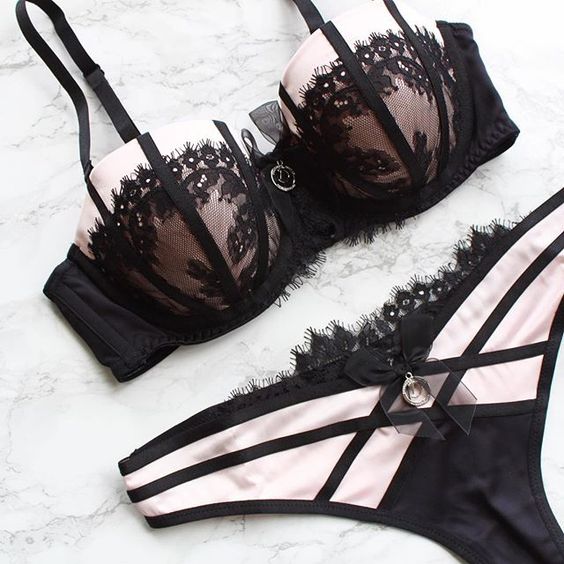
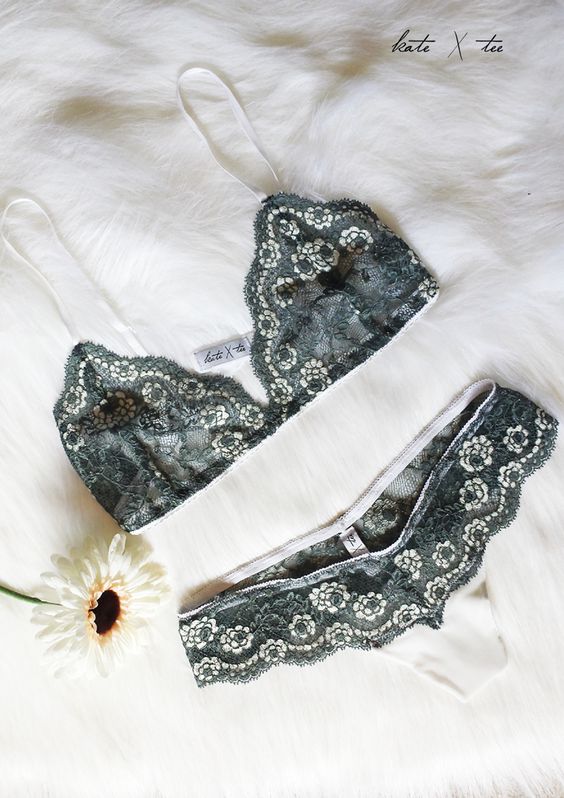
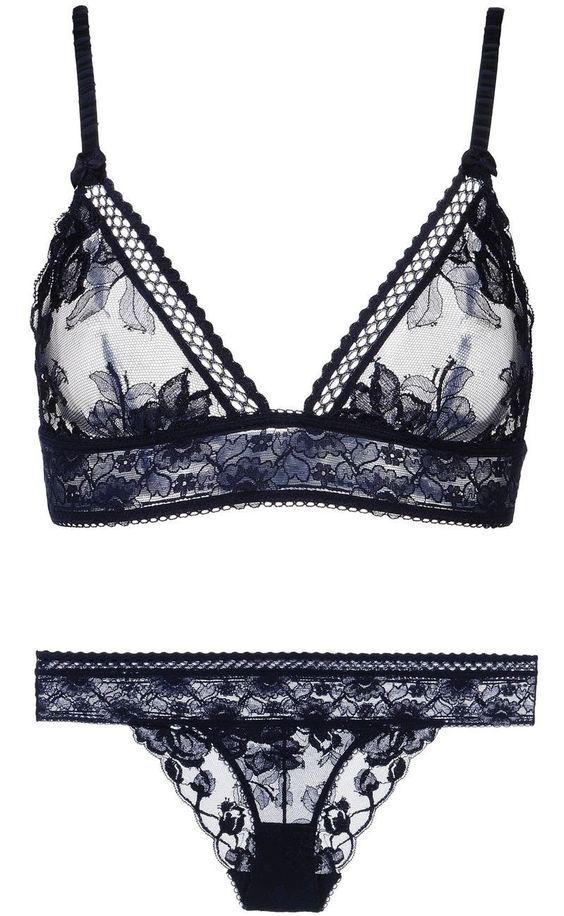
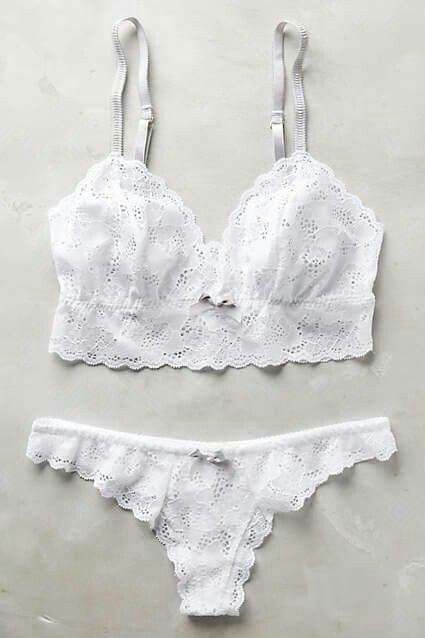
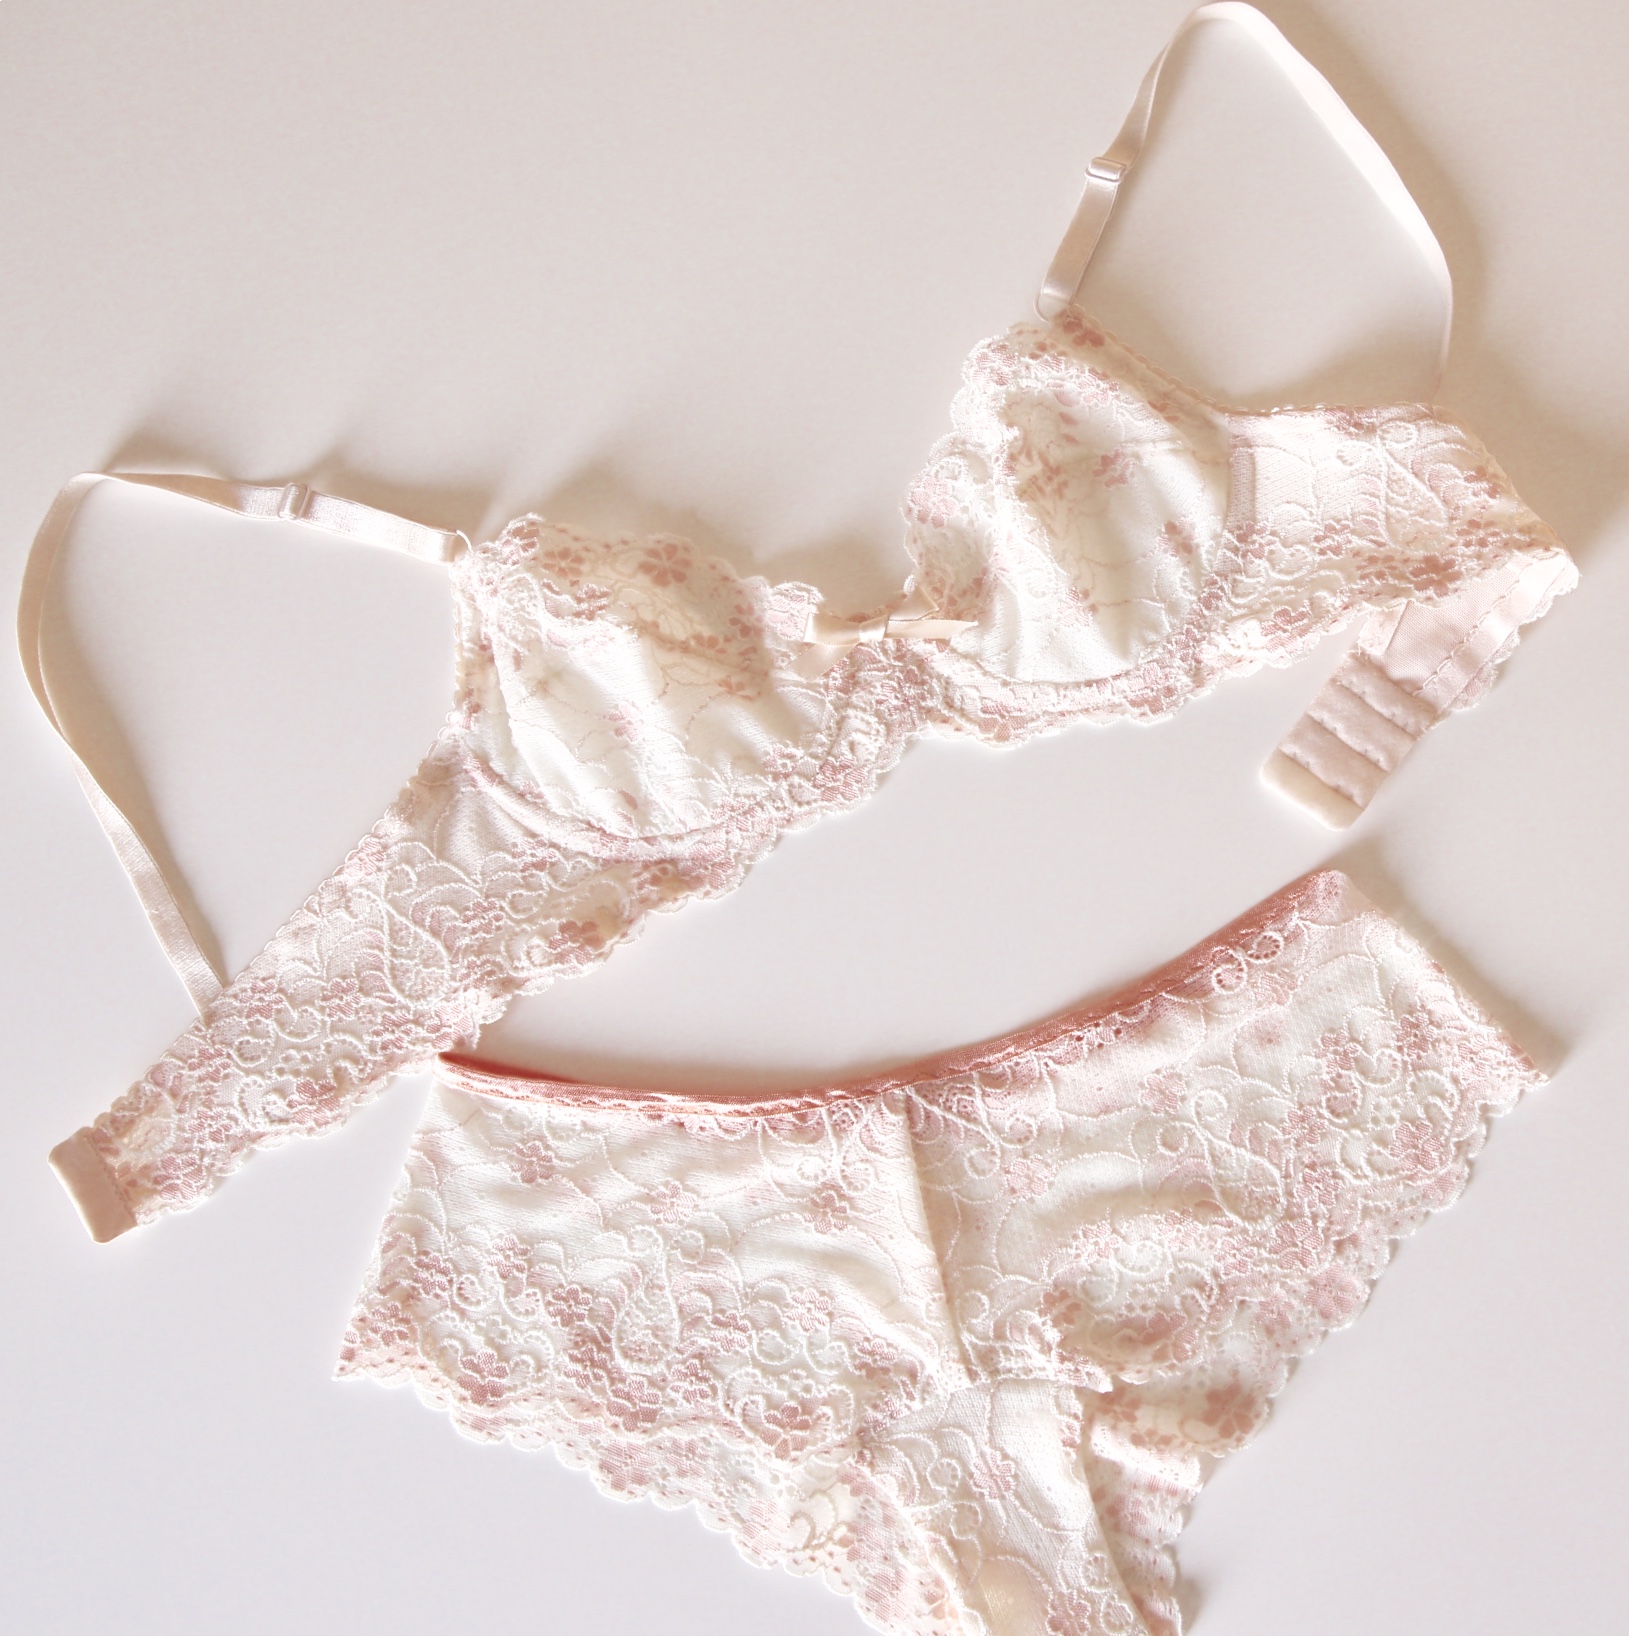
sujetador berkeley y las braguitas bella en melocotón y marfil // Peach and ivory berkeley bra and bella panties

www.studiocostura.com

Karu me sorprendió con preguntarme que si quería participar en su nuevo proyecto donde ella colabora con costureras de todo el mundo. Es un proyecto genial y espero que va a ayudar a ver a cualquiera que tenga ineterés en coser lencería que es posible y la gente con experiencia puede tener ideas para la creatividad también.

Elegí de su tienda el encaje de color coral por la frescura de ese color y luego también el suave melocotón con marfil. Estaba deseando que llegue el paquete para ver cómo se veían los materiales en la vida real. Para mí es el encaje que elige el patrón perfecto, no yo. Así que cuando vi este encaje de color melocotón inmediatamente sabía que iba a coser un sujetador Berkeley y las braguitas Bella en conjunto.


Karu surprised me by asking if I would love to participate in her new project where she is collaborating with seamstresses worldwide. This is an absolutely great project and I hope that it will help to open eyes to anyone to get a taste in lingerie sewing or for experienced people to add some creativity.

I have chosen a fresh coral lace and a creamy peach colored lace from Karu’s Etsy shop. Eagerly as always I was awaiting for the mail to arrive in my letter box to see how the fabric looks like in reality. To me it is the lace which is choosing the perfect pattern, not me. So, when I saw the creamy peach lace I was immediately sure that I will sew a Berkeley bra and for the panties the Bella Lace Pantie seemed to be appropriate.

www.studiocostura.com

2018 es definitivamente mi año de coser lencería. No puedo parar, no voy a parar! Me encanta el patrón de sujetador Berkeley y merece mucho la pena usarlo con encajes con puntilla. Este es el sujetador que de verdad muestra muy bien los bonitos encajes. Mi talla es 24A y queda super bien, no tenía que modificar el patrón para nada. Para las braguitas Bella yo prefiero subir de talla (cosa que hago con todos los patrones de braguita) porque me gusta que mis braguitas estén "sueltos", no me gusta sntir los elásticos junto a mi cuerpo.


2018 is definitely my lingerie sewing year. I can't stop, won't stop! The Berkeley bra has definitely crossed my heart and it is worth to use with beautiful scalloped lace. This is the bra which really brings out the most beautiful scalloped lace. My size is a 34A and the fit is just perfect, no alternation needed. For the Bella panties I prefer to go up a size (which I do with all pantie patterns) just because I like to wear my panties “loose” I do not like to feel any elastics around my body.

www.studiocostura.com

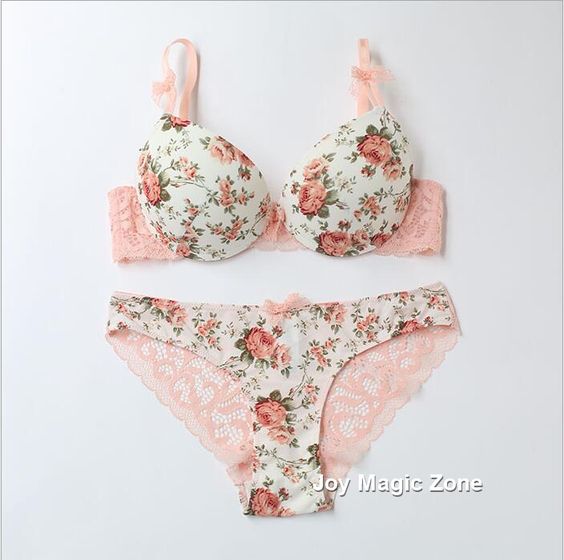
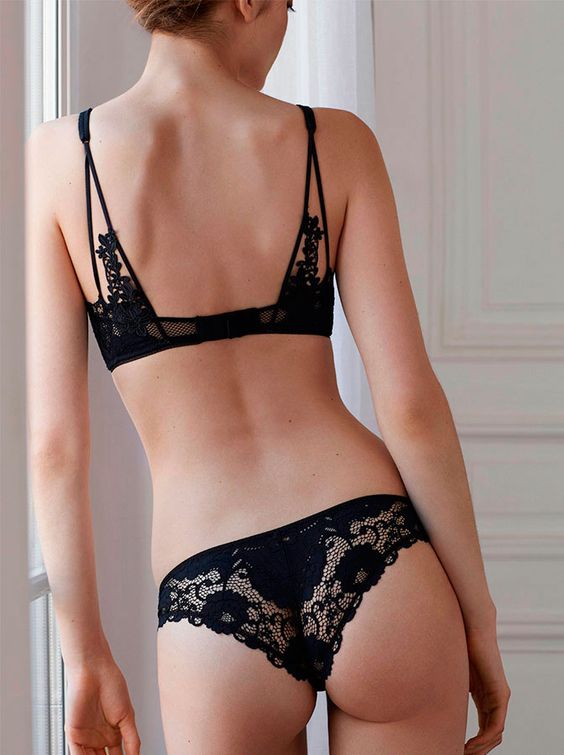
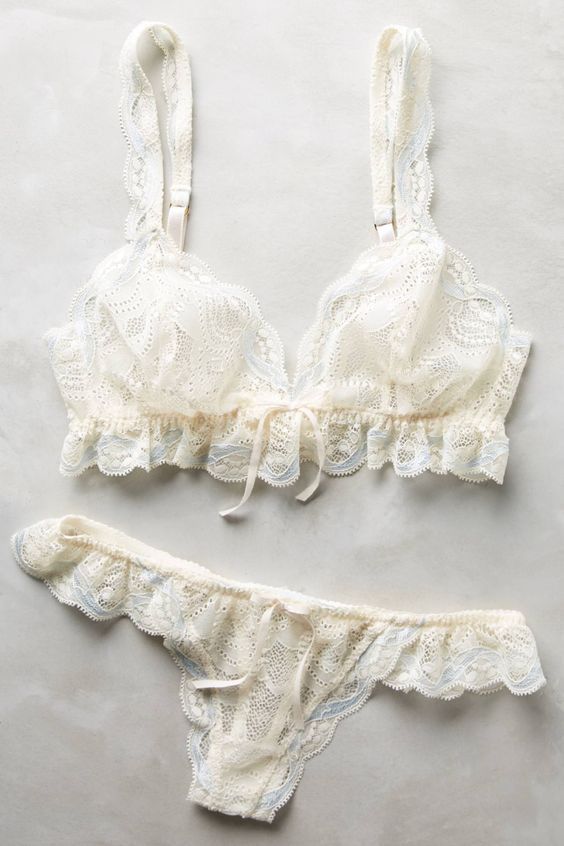
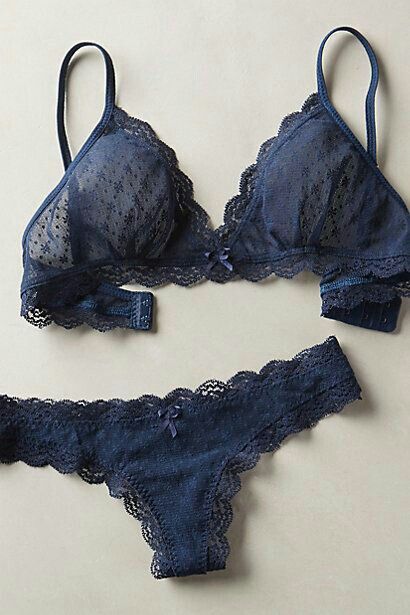
bralette barrett y las braguitas watson en coral y blanco // coral and white barrett bralette and watson panties

www.studiocostura.com

Para el encaje coral elegí el bralette Barrett con el conjunto de braguita Watson. Incluso me sobra encaje para coser un bralette Hanna después.


For the coral lace the Barrett Bralette seemed to be my choice with a matching Watson pantie. And I even have some lace left with which I will be sewing a Hanna Bralette later.

www.studiocostura.com

Me encanta mi bralette Barrett tan veraniego con el kit en color coral. La combinación con el tul y los elásticos blancos le da un aire muy de verano. Como dije antes, no me gustan mucho los elásticos así que en las braguitas Watson solo cosí el elástico para la cinturilla. Las aberturas de las piernas los cosí con el margen de costura de 5 mm sin poner elásticos y me encanta como queda.

Nunca pensé que es posible que es posible ajustar el patrón de lencería solo un poquito y que el resultado sea exactamente como tú quieras.


Oh, I am so in love with my summer coral lace Barrett Bralette. The combination with white mesh and elastics gives it a real summer feeling. As I already mentioned I do not like elastics around my body, on the Watson pantie I only added elastic on the waist, however for the leg opening I only made a 5 mm seam without adding elastic and the fit is perfect. 

I would have never thought that it is possible with lingerie sewing to adjust the pattern slightly and make it with your own preferences.

www.studiocostura.com

Gracias Gabriella por compartir estos bonitos conjuntos de lencería! Los materiales que ha usado de Studio Costura Shop son:

- el kit de lencería en melocotón y marfil

- el kit de lencería en coral (ahora con elásticos en color melocotón y tul en color carne)

Los patrones que ha usado son:

- el sujetador Berkeley de Orange Lingerie

- la braguita Bella de Evie la Luve

- el bralette Barrett de Madalynne

- la braguita Watson de Cloth Habit

Studio Costura Lingerie Sewing Club es un proyecto de posts en mi blog donde cada mes invito costureras de todo el mundo para que cosan lencería con los materiales de mi tienda. Las invitadas pueden elegir los materiales que quieran y pueden hacer el proyecto que quieran. Espero que estos posts os inspiran a coser vuestra propia lencería también! Puedes ver todos los posts aquí.


Thank you Gabriella for sharing these pretty lingerie makes! The supplies she used from Studio Costura Shop were:

- peach and ivory bramaking kit

- coral bramaking kit (now with peach findings and nude mesh)

The patterns she used were:

- Berkeley bra from Orange Lingerie

- Bella panties from Evie la Luve

- Barrett bralette from Madalynne

- Watson panties from Cloth Habit

Studio Costura Lingerie Sewing Club is a monthly guest post project where I invite seamstresses from all over the world to sew some pretty lingerie with the materials from my shop. The guests can choose the supplies they like and they can use any pattern they want to. I hope these posts inspire you to sew your own lingerie too! You can find all the posts here.


Encaje cruzado para el bralette Hanna // Crossed lace for Hanna bralette

 
www.studiocostura.com

Hola! Hace mucho que no he cosido un bralette Hanna y como tenía que hacer una muestra en talla S para el curso, aproveché e hice un tutorial con una variación. Se trata de una cosa muy simple pero le da un toque diferente al patrón: en vez de tener la costura central he cruzado las piezas de encaje. Os voy a contar cómo hacerlo, es muy sencillo. Esta parte es una variación del coseconmigo de bralette Hanna, tienes todos los posts aquí.


Hey! It's been a while since I last sewed a Hanna bralette and as I needed to make one in size S for a course I tought it would be a good occasion to make a tutorial about a variation too. It's a very simple hack but the result looks very pretty: instead of having a normal front center seam I have overlapped the lace pieces. I'll tell you how to do it,it's very easy. This post is a variation of the Hanna bralette sewalong, you can see the rest of the posts here.

www.studiocostura.com

Para empezar hay que hacer un cambio a la pieza de patrón A (la copa interior). Para poder cruzar las piezas hay que alargar la línea de encaje (el borde recto y largo) hacia abajo y al mismo tiempo alargar también la línea de bajo hasta que las dos líneas se cruzan. Ahora tienes una nueva pieza de patrón que termina en pico. Otra cosa que hay que marcar es el centro del cruce, así sabemos colocar luego las dos piezas correctamente. Para eso marca un piquete 6 mm desde la costura central original hacia la izquierda (hacia dentro). Este piquete va a estar en la misma línea que el piquete original más arriba que antes indicaba donde hay que colocar el encaje.


To start you need to change the pattern piece A (the inner cup). In order to overlap the pieces you need to make the side where the scalloped lace edge is (the straight long line) longer, continuing the line downwards and at the same time you need to continue the hem line outwards until those two lines meet. Now you have a new pattern piece which ends in a triangular form. The other thing you need to mark is the center of the overlap so you'll know how to position the pieces later on. To do that mark a notch 6 mm from the original center seam to the left side (towards the inside of the pattern). This notch will be aligned with the original notch that you have above (the one that indicates where you need to position the lace scalloped edge).

www.studiocostura.com

Cuando cortamos el encaje esta vez no hace falta mirar donde cae el piquete original (como en este tutorial). Da un poco igual donde colocas la pieza, sólo recuerda que la línea recta del patrón vaya junto el borde más bajo de la puntilla. Yo coloqué mi patrón para que el final (el pico nuevo de este patrón) se quede a la mitad de la puntilla porque así se crea más efecto de cruce ya que el encaje es un poco más ancho allí.


When you cut the lace piece this time you don't need to match the original notch with the scallop (like in this tutorial). It doesn't really matter where you put the piece on lace, just remember that the pattern piece has to be aligned with the lower part of the scallops. I put my pattern piece so that the ending of the pattern piece (the new triangle part) is aligned with the wider scallop so when the pieces cross each other there will be a slightly wider overlap.

www.studiocostura.com

Corta todas las piezas como siempre y cose el elástico transparente en la línea de encaje (esta vez desde abajo del todo hasta arriba y al revés en la otra pieza). Juntando los nuevos piquetes que hicimos para marcar el centro junta las dos capas de la copa interior para que las piezas solapen. Cose en el borde de abajo para sujetar las capas y que estén en la posición correcta.


Cut all the pieces as you do normally and sew the transparent elastic to the inside of the scalloped edge of the lace (this time you start from the hem line until you reach the end and the other way around with the other piece). Align the new notches that you marked to know where the center seam is and that way you know where the overlap is. Sew the two pieces together on the hemline so they won't move before you attatch the band elastic.

www.studiocostura.com

Realmente todo lo que viene después es lo mismo que en la versión original. Cose las piezas de forro de la copa interior como siempre (allí no hace falta cruzar piezas). Lo que puedes hacer para que el cruce de las piezas de encaje no se abra es hacer unos pespuntes para unir el forro con el encaje. Hazlo en la parte superior del centro de forro y así todo va a estar en su sitio. 


What comes next is actually the same as in the original version. Sew the inner cup lining pieces as usually (you don't need to overlap pieces here). To avoid that the overlapping pieces "open up" once you wear the bralette you can sew a little bartack to join the two layers: the lining and the lace. Do it in the upper center part of the lining pieces and everything will stay in its place.

www.studiocostura.com

Y ya está, de allí ya puedes seguir con las instrucciones normales hasta completar el bralette. Yo hice también una braguita conjunto ya que me sobraba un poco de encaje. Usé el patrón de la braguita Mia y como no tenía mucho encaje hice la parte trasera con lo que me quedaba y de unos retales pequeños saqué también un detalle delantero (puedes ver cómo usar trocitos de encaje para este tipo de adornos en este tutorial). 


And that's it, now you can follow the instructions as always to finish off your bralette. I also made a matching pantie as I had some leftover lace. I used the Mia panties pattern and as I didn't have enough lace for the entire pantie I used lace for the back pieces and also made a small detail for the front (you can see different ways of using lace scraps for this kind of details in this tutorial).

www.studiocostura.com

Ha quedado muy bonito, este encaje es un poco diferente al tener tanto el blanco como rosa. Para forrar el bralette y para la parte delantera de las braguitas usé esta vez tul elástico para tener un efecto más transparente.  Espero que os ha gustado esa pequeña transformación, tengo ganas de probarlo también con telas de punto y con el bikini, puede quedar muy bonito!


The result is very pretty, this lace is a bit different as it has both pink and white colors on it. To line the bralette and the front of the panties I used stretch mesh this time to have a bit of transparency. I hope you liked this little hack, I'd like to try it out also with knit fabrics and bikinis, I think it can look very cute!

www.studiocostura.com
 

La braguita Mia con tul elástico // Mia panties with stretch mesh

 
www.studiocostura.com

Hola! Esto viene con retraso ya que había prometido el tutorial desde hace semanas pero aquí lo tienes: el tutorial para hacer la braguita Mia con tul elástico. Realmente es tan fácil que veis que sólo hay un paso, jaja. Para poder hacer este tipo de braguitas necesitas tul elástico. Este material viene en diferentes grosores y como lo vamos a cortar doble (que allí está la clave!) no se recomienda tul que no sea fino, más que nada por comodidad. Seguramente se vende en más sitios pero por ejemplo en Ribes y Casals hay bastante variedad en colores lisos.


Hey! I've had a bit of delay but here's the tutorial that I promised you some weeks ago: how to use stretch mesh for Mia panties. It's actually so easy that you only have one step, hehe. To make a pair like this you need stretch mesh. This material comes in different weights and as we'll use the double layer of it (there's the key!) I do recommend using only light weight mesh, it's a question of comfort after all. 

www.studiocostura.com

Vamos a cortar! Y aquí como ya os dije está la única parte diferente de las instrucciones normales. Lo que hacemos es usar la pieza trasera de la versión de encaje y en vez de cortarlo normal, lo que hacemos es doblar el tul (la verdad es que no me fijo mucho en la dirección ya que tiene elasticidad en dos direcciones) y cortarlo al doblez poniendo la parte recta del patrón al doblez del tul. Esto hace que no hace falta rematar este borde con elástico porque ya queda bonito con el tul doblado. Es importante usar la pieza del patrón para encaje porque allí ya no hay margenes para elásticos.


Let's cut! As I told you it's the only different part from the regular instructions. What we'll do is to use the lace version back piece but instead of cutting it as usual we'll fold the mesh (I don't really think about the stretch direction here as this fabric has a 4 way stretch anyway). You then cut the piece putting the long straight line of the pattern piece on the fold of the mesh fabric. This means we don't need to put the elastic on the back piece leg openings as the doube mesh already makes a pretty finishing. It's important to use the lace pattern piece as this one doesn't have the seam allowances for the elastics.

www.studiocostura.com

Después de cortar dos veces la pieza trasera al doblez lo que sigue es igual que en las instrucciones de la versión de encaje. Lo único es que tienes que mantenerla pieza bien doblada y tratarlo como si fuera una capa. Si ves que se resbala mucho (al unir el centro trasero tienes realmente 4 capas de tul que se mueven) puedes antes unir las dos capas entre sí para que quede bien doblado y luego ya tratar las piezas como siempre. 


After cutting the back piece two times on fold you just follow the lace version instructions of the pattern. The only thing you need to be careful is that you maintain the back pieces well aligned and you need to treat the folded pattern piece as one. If it slides too much (when you sew the back center seam you actually have 4 layers of mesh moving around) you can first sew the folded piece together and then sew as usual.

www.studiocostura.com

Y eso es todo! Super fácil y es una buena manera de construcción de braguitas para las que prefieren que no se note el elástico en la parte trasera de la braguita. Yo hice el primer par todo con tul y en el siguiente mezclé tul con encaje. Espero que os guste la idea y que lo probáis, queda muy bonito! El patrón de la braguita Mia lo tenéis en mi tienda.


And that's it! It's super easy and it's the perfect hack for those who prefer not having visible pantie lines. I made the first version entirely from mesh and combined the second version with lace. I hope you like the idea and that you'll give it a try, it really looks very pretty! The Mia panties pattern is available at my shop.


Studio Costura Lingerie Sewing Club: Novita from Very Purple Person

 
www.studiocostura.com

Empezamos con el mes y estoy de vuelta con un nuevo post de Studio Costura Lingerie Sewing Club. Como os dije en el primer post, este es un proyecto de colaboración que hago con costureras de todo el mundo. Mi tienda de materiales para coser lencería les ofrece el encaje y todo lo que necesitan y ellas hacen el proyecto que quieran y luego escriben un post sobre su proyecto.

El mes pasado vimos los conjuntos de Tany de Portugal y este mes vamos a viajar muy lejos: a Japón. Novita es una costurera con mucho talento que escribe el popular blog de costura llamado Very Purple Person. Su blog era uno de los primeros blogs de costura que empecé a leer una vez que descubrí este maravilloso mundo de costura online así que tenía muchas ganas de tener a ella en esta colaboración. Novita ha escrito mucho sobre coser lencería en su blog y deberíais ir a leer sus posts porque ha experimentado con muchos patrones distintos y ha compartido bastante información muy útil para las que estén interesadas en coser lencería. Antes de leer sobre su proyecto le hice unas preguntas para saber más de su camino en costura.


It's the beginning of a new month again so I'm back with the next post on the Studio Costura Lingerie Sewing Club. As I told you in my first post in these series it's a project where I'm collaborating with seamstresses from all over the world. My lingerie sewing supplies shop is offering materials for lingerie sewers and they will make whatever they like and then write a post about it.

Last month we saw the lingerie project from Tany from Portugal and this month we'll be travelling all the way to Japan. Novita is a talented seamstress behind the popular sewing blog Very Purple Person. Her blog was one of the first ones I started to read when I first found out about this amazing online sewing community so I was more than thrilled to have her over to show her makes. She has written a lot about lingerie over at her blog and you should definitely check out her projects because she's been experimenting with many different patterns and she has shared lots of valuable information for anyone interested in sewing their own lingerie. Before heading over to her project I asked her some questions to know more about her sewing journey.


Cuéntame un poco sobre cómo empezaste: cuándo aprendiste a coser y qué son tus cosas favoritas para coser?

Aprendí a coser hace más o menos 21 años cuando tenía 25 años. Primero cosí algunos muñecos a mano. Entonces empecé a usar la máquina de coser y a hacer prendas simples usando los libros usados japoneses de costura. Estudié un año en la escuela de moda ESMOD Jakarta y me gradué en1998. Por desgracia tuve que dejar de coser después de esto porque estuve demasiada ocupada con el trabajo. En 2008 me mudé a Japón y desde entonces volví a coser y así hasta ahora.

Mis cosas favoritas para coser son lencería y vaqueros.

POR QUÉ EMPEZASTE A COSER LENCERÍA? TE PARECIÓ DIFÍCIL? QUÉ REFERENCIAS/PATRONES RECOMENDARÍAS A LA GENTE QUE QUIERE EMPEZAR A COSER LENCERÍA?

Tengo una historia larga de autoexploración con el tema de coser mi propia lencería. Estuve llevando la talla incorrecta de sujetador durante años antes de empezar a aprender y entender cómo funciona el tallaje en sujetadores. Donde yo vivo en Japón casi todos los sujetadores tienen un foam muy grueso en las copas, mi talla en este momento es 30F y no es fácil de encontrar por aquí. Así que hace 7 años empecé a coser mis propios sujetadores y el primero lo hice en talla 30B que está lejos de mi verdadera talla pero aún así me pareció que me quedaba mejor que los sujetadores que compraba en las tiendas.

Coser sujetadores no me parece difícil pero encontrar el patrón adecuado sí que lo es. Para empezar recomiendo para las principiantes los cursos de Beverly Johnson en Craftsy. Son maravillosos y cubren casi todos los temas relacionados con coser lencería.

CUAL ES TU PROYECTO DE LENCERÍA FAVORITO QUE HAS COSIDO HASTA AHORA?

Mis costuras de lencería que más me gustan son todas mis braguitas de talle alto con la parte trasera de encaje o de tul doblado. Las llevo abajo de los leggings cuando hago ejercicio, encaje y tul doblado no crean líneas que se vean abajo de los leggings.


Tell me a little bit about your sewing journey: when did you start to sew and what are your favourite things to make?

I learned to sew about 21 years ago when I was 25. At first I sewed some dolls by hand. Then I started to use sewing machine, making simple clothes using used Japanese sewing pattern books. I went for a one year study in a fashion school, ESMOD Jakarta, and graduated in 1998. Unfortunately I had to stop sewing after that because I was too busy with work. In 2008, I moved to Japan and restarted sewing until now. 

My favorite things to make are lingerie and jeans!

Why did you start sewing lingerie? Did you find it difficult?  What resources/patterns would you recommend to people who are interested to try out sewing lingerie?

I have a long journey of self-exploration in lingerie sewing. I had been wearing the wrong bra size for years before I started to learn and understand how bra sizing works. Where I live in Japan, almost all bras have thick padding in the cups. My size at the moment is 30F and it is not an easy size to find here. So I began making my own bras 7 years ago, the first one was in size 30B which is far from my right size, but I thought it fit me better than a store-bought bra.

I don’t find making bras difficult, but finding the right pattern is surely difficult. For beginners, I recommend Beverly Johnson’s classes on Craftsy. They are really wonderful and covering almost every aspect of lingerie making.

What is your favorite lingerie make you've sewn so far?

My favorite lingerie makes are all my high-waisted panties with lace back or folded mesh back. I wear them under my leggings for exercise. The lace or folded mesh back doesn’t show under the leggings.


El conjunto coral: merckwaerdigh bhs10 yla braguita stella

the coral lingerie set: Merckwaerdigh BHS10 and stella panties


www.studiocostura.com

Hace mucho tiempo que no he cosido lencería para mí! Necesito urgentemente unos sujetadores nuevos ya que los antiguos ya no me valen, mi cuerpo ha cambiado desde que hago ejercicio regularmente. Por mi suerte Karu de Studio Costura Shop me invitó a participar en su Lingerie Sewing Club. Es una serie de posts escritos por blogeras de costura que cosen con los materiales de Studio Costura Shop.


It has been ages since I made myself some lingerie! I’m in dire need of some new bras since the old ones don’t fit me anymore. My body has changed since I exercise regularly. Lucky for me, Karu from Studio Costura invited me to join her Lingerie Sewing Club. It is a series of posts on her blog by sewing bloggers who make lingerie projects using materials from Studio Costura shop.

www.studiocostura.com

Elegí dos kits de lencería, el primero es con el encaje elástico con color coral y los elásticos blancos. El kit viene con todos los materiales necesarios para coser un sujetador y un par de braguitas.


I chose two bra kits, the first one is the coral red stretch lace with white notions. The kit comes with all the necessary materials to make one bra and a pair of panties.

www.studiocostura.com

El bralette lo hicecon mi patrón favorito Merckwaerdigh BHS10 y cambié el patrón para la talla 30F. En vez de usar el forro blanco usé uno en color carne que tenía en casa.


The bralette is made with my favorite pattern, Merckwaerdigh BHS10, altered into size 30F. Instead of white lining, I used my own nude colored lining.

www.studiocostura.com

El patrón de braguita es la Stella de Studio Costura. Es un patrón básico con el corte hipster con dos opciones de la parte trasera: con telas de punto o con encaje. Yo usé el de encaje y en vez de terminar la cinturilla con elástico usé el mismo encaje elástico para hacer la cinturilla más alta.

Así es cómo me quedan las braguitas:


The pantie pattern is Stella panties by Studio Costura. It’s a basic hipster cut panties pattern with two back options: knit back or stretch lace back. I made the stretch lace back and instead of finishing the waistline with elastic, I used the stretch lace to make a waistband and created  high-waist panties.


This is how the high-waisted panties on my body:

www.studiocostura.com

elconjunto morado y verde: el sujetador berkeley y la braguita stella

the purple and green lingerie set: the berkeley bra and stella panties

www.studiocostura.com


El segundo kit es para sujetadores con aros con este bonito encaje verde y morado y elásticos negros. Usé un patrón que no había probado antes, el sujetador Berkeley de Orange Lingerie. Es un patrón con copas de dos piezas con el borde de la puntilla en la parte de arriba y también en la parte de la banda del sujetador. El patrón también tiene una parte de extra soporte dentro de las copas (power bar) y los tirantes en forma de T.


The second kit is an underwire bra kit with  this beautiful green and purple stretch lace and black notions. I used a pattern that I hadn’t tried before, The Berkeley bra by Orange Lingerie. It is a pattern for two-piece cup underwire bra with lace edge on upper cups and bottom edge of the bra. The pattern also has internal power bar on each cup and T-back straps.

www.studiocostura.com

Hicela talla 32DD y cambié la espalda para que tenga la forma de tirantes que salen en curva en vez de la forma en T. También usé el forro en color carne en vez del negro.
 

I made size 32DD and changed the back into scoop back that I prefer over T-back. The bra also has nude-colored lining instead of black.

www.studiocostura.com


Las braguitas son del patrón Stella de nuevo, esta vez terminados la cinturilla con elástico como pone en las instrucciones. Realmente me gusta más mi versión de braguita alta como en la versión coral pero no tenía suficiente encaje ya que para coser este sujetador hacía falta mucho encaje.

Así es cómo me quedan las braguitas Stella:


The panties are the Stella panties again, this time with picot elastic finishing per instruction. Actually I prefer my high-waist lace modification like the coral one, but I didn't have enough lace since this underwired bra used a lot of lace.
 

This is how the Stella panties on me:

www.studiocostura.com

Estoy encantada con mis dos nuevos conjuntos de lencería! Gracias Karu por los bonitos kits!

- el patrón de bralette es Merckwaerdigh BHS10, cambiado ala talla 30F

- el patrón del sujetador con aros es Berkeley de Orange Lingerie (PDF), talla 32DD

- el patrón de braguitas es Stella de Studio Costura (PDF) vesrión 2, talla 36


I'm very pleased with my new two lingerie sets! Thank you Karu for the beautiful kits!


- Soft bra pattern is Merckwaerdigh BHS10, altered to size 30F

- Bra pattern is Berkeley bra by Orange Lingerie (PDF), size 32DD

- Panties pattern is Stella panties by Studio Costura (PDF) version 2, size 36

www.studiocostura.com

Me encantaron los dos conjuntos de Novita: nunca había pensado en cambiar así las braguitas Stella pero queda muy mono y es una modificación muy fácil si te gustan las braguitas de talle más alto. Debería probar a hacerlo! Y el sujetador Berkeley tiene un corte super bonito de las copas, desde luego perfecto para enseñar encajes bonitos. Lo bueno de ese patrón es que también da soporte incluso para copas más grandes gracias a su construcción de copas.

Podéis ver más de las costuras de Novita en su blog y en su cuenta de Instagram. Muchas gracias por participar Novita!

Los materiales que ella ha usado de Studio Costura Shop son:

-el kit coral y blanco con recubrearos

-el kit morado y verde con recubrearos


I loved both sets that Novita made: I didn't think of this hack on Stella panties before, but it looks very cute and it's a very easy modification if you're into higher waisted panties. I should definitely give it a try! And the Berkely bra ha such a beautiful cut on the cups, definitely perfect for showing off pretty lace. The nice thing about this pattern is that it looks very delicate but the power bar on the cups give good support even for bigger cup sizes. 

You can see more of Novita's sewing over at her blog and her Instagram account. Thank you so much for participating, Novita!


The materials she used from Studio Costura Shop are:

- coral and white kit with underwire channeling

- purple and green kit with underwire channeling


Inspiración para la braguita Mia // Inspiration for Mia panties

 
www.studiocostura.com

Hola! Hoy os traigo unas ideas para que os inspiréis para coser con el nuevo patrón de braguita Mia. Pero antes quería también recordaros que cuando publiqué mi primer patrón de braguita Stella escribí unos posts que os pueden inetersar. Tenéis el post sobre los materiales (que sería lo mismo tanto para Stella como para Mia), sobre cómo coser con bies elástico y puntillas, cómo modificar el patrón y más sobre ideas para usar encaje. Todos estos posts están juntos en la página de CoseConmigo de la braguita Stella.


Hey! Today I'm bringing you some ideas for inspiration for sewing Mia panties, my latest sewing pattern. But before I wanted to remind you that when I published my first pantie pattern Stella I wrote some posts that might also interest you. There's a post about the materials you need (both Mia and Stella patterns use the same materials), about how to sew with FOE and scalloped edge lace trims, about how to hack the pattern and about more ideas on using lace scraps. All of these posts are together on the SewAlong page of Stella panties.

Y aquí van unos modelos que me han gustado y que son solo un punto de partida para que hagáis vuestra propia interpretación. Todas las fotos son de mi carpeta de Pinterest donde iré añadiendo más cositas cuando vea algo bonito por las redes. Me gusta mucho cómo queda la tela de punto con encaje: partiendo el patrón en dos como en la foto de arriba a la izquierda o usando el delantero de punto y el trasero de encaje como en la foto de abajo a la izquierda. La idea de cruzar el elástico como en la foto de arriba a la derecha me parece también super original, eso sí que lo tengo que probar!


Here are some styles that I've liked and these are just a starting point to make your own interpretations. All the photos are from my Pinterest board where I'll add the pictures that inspire me on the web. I really like combining lace with knit fabrics: you can split the pattern like on the upper left photo or use knits for the front and lace for the back like on the photo above on the left. The idea of crossing elastics like on the upper right photo also looks very original, I really have to try it out!

Estampados florales en fondo negro son mis favoritos para lencería y lo mismo digo por la combinación de rosa y negro.


Floral prints on black background are my favourites for lingerie and the same goes with the pink and black combo.

Cada encaje y tul crean un efecto distinto, tienes muchas posibilidades de jugar con las variaciones.


Every lace and stretch mesh create a different effect, there are a lot of playing room for many possibilities.

Quizás añadir frunces no es lo más práctico si piensas por ejemplo llevar pantalones ajustados...pero bajo de los vestidos de verano podrían ir perfectamente. Me encanta este aire romántico!


Maybe adding the ruffles is not a very practical idea if you're planning to wear these panties under tight pants...but under a summer dress it could be another story. I love those romantic vibes!

Os enseñé bastantes maneras de usar trocitos de encaje en este tutorial para la braguita Stella pero este modelo azul me ha dado aún más ideas: combinar el encaje con tul queda super bonito. Tengo que hacer una muestra para el próximo tutorial (que por cierto sale esta semana!).


Espero que os hayan gustado estas muestras y os animéis a coser un par...como siempre digo: es un proyecto rápido y sencillo, pero hace mucha ilusión tener algo así de delicado hecho por ti :)


I showed you quite many ways about how to use lace scraps on this tutorial for Stella panties but this blue set gave me even more ideas: using lace with stretch mesh always looks so good. I need to make a sample like this for the upcoming tutorial (which by the way will be published this week!).

I hope you liked these inspoirational images and that you'll sew a pair yourself...as I always say: it's a fast and easy project but it really gives such a nice feeling to make something delicate like this for yourself :)


Nuevo patrón: braguita Mia // New pattern: Mia panties

 
www.studiocostura.com

Ha llegado de nuevo el tiempo...de presentar el nuevo patrón de lencería! Esta vez os traigo la braguita Mia, es una braguita con corte brasileño y viene en dos versiones: para telas de punto y para encajes con puntilla.


It's that time again...I'm presenting you my new lingerie pattern! Here are the Mia panties, a brazilian cut pattern that comes in two versions: for knit fabrics and for scalloped edge stretch lace.

www.studiocostura.com

El corte trasero de estas braguitas tiene un poco de curva, así se crea el efecto que "enseña un poco más" que por ejemplo mi otro patrón Stella. El delantero tiene los elásticos y el trasero en la versión de encaje tiene la puntilla que queda muy bonito.


The back pieces of this pattern are a bit curved, this way you'll have an effect of "showing abit more" than for example in my other pantie pattern Stella. The front has elastics sewn in and the back in the lace version has a beautiful scalloped lace edge.

www.studiocostura.com

Las instrucciones están muy claras, no tengas miedo si nunca has cosido lencería. Siempre intento escribir las instrucciones de la manera que cualquiera que sea el nivel de costura de la persona lo pueda entender. Dale una oportunidad y verás que no es nada difícil!


The instructions are very clear, don't be afraid if you haven't sewn lingerie before. I try to always write instructions in a way that people with any level of sewing skills can understand them. Give this pattern a try and you'll see it's not so difficult!

www.studiocostura.com

Puedes usar telas de punto con elastano, lycras, tul elástico...tienes muchas posibilidades! Me encantan los estampados florales para estas braguitas, en esta muestra he usado punto de viscosa que es mi favorito ya que es super cómodo :)


You can use knits with spandex, lycras, stretch mesh...there are endless possibilities! I love floral prints for panties, I made this sample using a viscose knit, one of my favourites as it's so comfortable :)

www.studiocostura.com

Otra cosa que me encanta de este patrón es que puedes combinar telas de punto con encaje y no tienes que modificar nada en el patrón. Simplemente coges el delantero de la versión de punto y el trasero de la versión de encaje. Me parece una combinación muy bonita.


The other thing that I love about this pattern is that you can mix and match knits with lace and you don't need to make any modifications on the pattern pieces. Just take the front piece from the knit version and the back piece from lace version. I think that this combination looks really pretty.

www.studiocostura.com

Espero que os guste el nuevo patrón y tengo muchas ganas de ver vuestras versiones! El patrón en formato digital lo tenéis en mi tienda de Etsy y allí también tenéis materiales para poder coserlo. Si estáis buscando algo específico o por ejemplo encaje por metros me podéis escribir como siempre. En breve sacaré también un tutorial extra para este patrón aquí en el blog para que tengáis aún más posibilidades de hacer las braguitas 100% a vuestro gusto.


I hope you like the new pattern and I can't wait to see your versions! The digital pattern is in my Etsy shop and there you also have all the materials to sew lingerie. If you are looking for something specific or want to buy lace per meter just write me. I'll soon write a tutorial with an extra modification for this pattern here at the blog too so you'll have even more possibilities to make a pair of undies 100% as you like them.

www.studiocostura.com
braguita mia en castellano
mia panties in english
 

Megan Nielsen Patterns: Rowan + Mini Briar

 
www.studiocostura.com

Hola! Hace unas semanas Wendy de CoserCosas me escribió para hacer una colaboración y hoy os cuento sobre ese proyecto. Me mandó una tela de punto orgánico muy bonita de su tienda y los patrones Rowan y Mini Briar de Megan Nielsen Patterns para que haga unas camisetas a juego para mí y para la pequeña. Normalmente no suelo hacer prendas con la misma tela para las dos pero sé que a la niña le iba a encantar y me animé ya que la tela es preciosa.


Hey! Some weeks ago Wendy from CoserCosas wrote me about a collaboration and today I'm telling you about this project. She sent me a beautiful organic knit fabric and two patterns from Megan Nielsen, the Rowan and the Mini Briar, so I could sew something for me and my little one. I usually don't make garments for both of us with the same fabric but I knew she was going to love the idea and as the fabric is so prettyI was in.

www.studiocostura.com

Primero hablaré sobre Mini Briar. Es un patrón de camiseta para niños que tiene dos largos de cuerpo (versión crop y la versión normal) y posibilidad de hacer la manga corta o larga para las edades 2-12 años. Yo elegí hacer la versión de camiseta corta y con la manga corta también. El corte es ancho y el patrón lleva un montón de plantillas para poder customizar la camiseta.


First I'll tell you about the Mini Briar. It's a t-shirt pattern for kids with two bodice lengths (crop top and regular length) and short/long sleeve variations for kids 2-12 years old. I chose the crop top with short sleeves. The pattern has a loose fit and it comes with lots of templates to customize your t-shirt.

www.studiocostura.com

Elegí la talla 2/3 años y ese tamaño le va muy bien a la pequeña por el ancho (ella tiene ahora 3 años y medio). Como la versión 1 que hice es tipo crop top el largo del delantero es bastante más corto que la espalda, me gusta pero creo que en su edad que todavía tiene bastante barriga de bebé me gustaría hacer el siguiente un pelín más largo para que quede mejor. La espalda tiene un largo ideal para ella ahora. Eso dicho la versión de largo "normal" de esa camiseta (la versión 3) sería ya en su caso más como túnica creo.


I chose the size 2/3 years and this size is great for my girl regarding to width (she's 3 and half years old). As I made the version 1, crop top, the front length is way shorter than the back. I like how it looks but I think that in her age when she still ha some baby belly I'd like to make it just a bit longer in the front. The back length is perfect for her now. Saying this I think that the regular length of this t-shirt (version 3) would be almost like a tunic for her at least.

www.studiocostura.com

Es un patrón básico muy fácil de coser y me parece perfecto para estampados infantiles divertidos. Me ha gustado la manera de poner la tira de cuello: te enseñan un tipo de acabado que no necesita la remalladora.


The pattern is a basic t-shirt really easy to sew and I think it's perfect for using up all those pretty kids prints. I liked the way they show how to attatch the neck binding in the instructions: you get a neat finish on both of the sides without using a serger.

www.studiocostura.com

"La sesión de fotos" ha sido más o menos como lo esperaba así que mucho no hemos sacado, jaja, pero ella sí que sabe como mejor enseñar la espalda de una prenda... Ese corte ancho me encanta y ya tengo pensado un par de ellas más para este verano!


"The photo session" was more or less as I expected so we didn't get lots of good material out of it, hehe, but at least she's very convincing when showing the back of the garment... I really like the loose fit of this pattern and I've already tought about more t-shirts I'd like to make her for this summer!

www.studiocostura.com

El patrón para la camiseta de mujer es el Rowan. Es un patrón que tiene versiones para hacer la camiseta con tres tipos de cuellos y largos de mangas diferentes + el patrón de body. Según mi medida de pecho debería ser la talla S en este patrón pero no confiaba mucho ya que veía la prenda muy ajustada así que por si acaso corté un M. Cuando estaba viendo las piezas ya lo sabía...iba a ser muuuy ajustada, jaja. Así que en vez de coserlo con los margenes de 1.5 cm que lleva el patrón directamente sólo usé 0.6 cm de remalladora. Eso me dio el extra margen que necesitaba para poder caber dentro de la camiseta, jaja. La construcción era fácil y las instrucciones claras. Lo único que cambié era abrir un pelín el cuello para hacerlo de otra forma.


The womens t-shirt pattern is the Rowan. The pattern has three neckline finishing options and three sleeve lengths + a version to make a bodysuit. According to my bust measurement I should be a size S in their chart but I was a bit sceptic about that seeing the cut of this garment very close fitting. Just in case I cut the size M. Once I saw the pattern pieces cut out I saw it clearly...it was going to be veeery close fitting, hehe. So instead of using a 1.5 cm seam allowances that come with the pattern I serged the edges using only 0.6 cm. This extra fabric made it possible to fit myself inside this garment, haha. The construction was easy and the instructions were very clear. The only thing I changed was to widen the neckline a bit to change its form.

www.studiocostura.com

Me quedó demasiado pequeña? Pues no, según los gustos claro...está ajustada tal como  está patronada así que bien pero con este patrón hay que ver muy bien qué telas usar. La tela de punto que he usado tiene 50% de elasticidad y el patrón requiere "por lo menos 40% de elasticidad". Creo que para mejor comodidad estaría bien usar telas con más elasticidad y más finas, especialmente hablando de bodys. Me gustaría probar a hacer el body por ejemplo con un punto de viscosa que tiene un poco más de elasticidad y es más finita.


Did it end up too small? Well no, it really depends on your likes too...it is close fitted as the pattern is drafted this way so you really have to pay attention on using the right fabrics. I used a knit with a 50% stretch and the pattern says you should use a knit with "at least 40% of stretch". I think that stretchier and finer knits would give better results, especially when talking about sewing a bodysuit. I'd like to make a bodysuit with a viscose spandex knit for example as these usually are finer and a bit stretchier.

www.studiocostura.com

Así que aquí estamos con nuestras camisetas iguales iguales. Ya tengo pensado hacerle a la niña más camisetas con este patrón y para mí un body. Hace seis meses dije que nunca voy a llevar un body. Y hoy pienso que igual para el invierno podría ser una perfecta capa protectora contra el frío, jaja. Ya os contaré!

Podéis ver todas las telas bonitas que tiene CoserCosas en su tienda online!


So here we are with our matching t-shirts. I've already tought about making several t-shirts for my girl with this pattern and a bodysuit for myself. Six months ago I said I'd never wear a bodysuit. Today I'm thinking about making one to have a protective layer of clothing against the cold in the winter, haha. I'll keep you updated about that!

You can see all the pretty fabrics that CoserCoses has in her online shop!


Studio Costura Lingerie Sewing Club: Tany et La Mode

 
www.studiocostura.com

Hola! Hoy os presento un proyecto que tenía ya ganas de hacer desde hace tiempo y por fin es realidad. Desde que empecé con mi tienda de materiales de costura para coser lencería he "conocido" a muchas costureras con mucho talento, hay tanta inspiración en Instagram y en los blogs. Me gusta mucho la idea de que compartimos la información, técnicas y opiniones sobre este tema porque de eso podemos aprender todas (y así animamos a quienes todavía no han probado eso de coser lencería!). Como el tema de comunidad de costura me encanta quería hacer algo más de mi parte y se me ocurrió que igual que hay otras tiendas que trabajan con blogueras de costura podría yo hacer eso también con mi pequeña tienda. Y así nació la idea de hacer una serie de posts mensuales sobre coser lencería. Contacté con un par de personas cuyas creaciones de lencería me han encantado y les conté mi idea, todas han dicho que sí así que ya tengo muchas ganas de ver qué van a coser. 

La idea básicamente es que Studio Costura Shop invita cada mes a una costurera que haga algo con nuestros materiales y que escriba un post sobre su proyecto. Ellas eligen qué patrones quieren usar y qué encajes/telas disponibles en la tienda les mandamos. Como cada persona tiene su estilo y gustos seguramente vamos a ver proyectos de lencería muy distintos por aquí. También les preguntaré un poco sobre su trayectoria en la costura, qué les hace coser lencería y otras cositas para conocerlas más. Aquí va el primer post de series "Studio Costura Lingerie Sewing Club", espero que os guste la iniciativa!


Hey! Today I'm presenting you a project that I've been planning for a long time and finally it's live. Since I started with my lingerie supplies shop I've "met" so many talented makers and there's so much inspiration over at Instagram and on the blogs. I really like the idea that we all share the information, techniques and opinions about this subject because that way we all can learn about making lingerie (and that will also encourage new people to take up lingerie sewing too!). As I love the idea of sewing community I wanted to do something more to be part of it so it occured to me that like other shops who collaborate with sewing bloggers I could do the same with my little store. So this is how the idea of guest posts about sewing lingerie was born. I wrote to some people whos lingerie makes I've been loving so far and proposed the idea, all of them said yes so I'm really looking forward to see what they will make.

The idea is that Studio Costura Shop invites every month one seamstress to make a lingerie project with our materials and that they will share a guest post about it here on the blog. They pick a pattern they like and we'll send them the lace/fabric they choose from the shop. As every person has their own unique style I'm sure we'll see very different lingerie makes over here. I'll also ask them a bit about their sewing journey, what makes them sew lingerie and some more stuff to know a bit more about them. So here goes the first post in this new series "Studio Costura Lingerie Sewing Club", I hope you like the idea!

inspiración & materialesinspiration & supplies (5).jpg

El primer post de este club lo ha escrito Tany, una costurera que vive en Portugal y tiene el popular blog de costura Couture et Tricot *(en portugues y en inglés) donde enseña sus creaciones realmente increíbles y muy desarrolladas (también podéis seguirla en Instagram para ver cómo cose chaquetas, pantalones, abrigos...esta mujer puede con todo!). Sabía que quería invitarle a que participe en este proyecto después de ver la lencería que ha cosido y me ha encantado ver sus versiones. Antes de leer su post te dejo una pequeña entrevista con ella.

*Tany me ha dicho que muchas veces los navegadores no visualizan el contenido de su blog cuando tienes los bloqueadores de anuncios puestos: si no ves su página desactiva esa función y sale el contenido

The first post in these series is written by Tany, a seamstress living in Portugal who has a popular sewing blog called Couture et Tricot *(in Portuguese and in English) where she shows us her incredible fashion forward creations (you can also follow her at Instagram where she's sharing about making her own jackets, pants, coats...this woman can do anything and everything!) I knew I wanted to ask her to participate in this project after seeing her beautiful lingerie makes and I love  the versions she has made. Before reading about her project I'll leave you with a little interview with her.

* Tany told me that many times the internet browsers don't show the content of her blog if you have the advertising blocking system on: if you don't see her webpage deactivate the ad blocks and you'll see the content


Cuéntame un poco sobre tu trayectoria en la costura: cuándo empezaste a coser y cuales son tus cosas favoritas para coser?

Empecé a coser de muy temprana edad (tenía 11-12 años). Mi madre tenía una máquina de coser pero nunca lo usaba. Mi vecina era modista y solía pasar tiempo en su casa después del colegio por las tardes. Una vez le pedí que me enseñe cómo enhebrar la máquina de coser y ese mismo día sorprendí a mi madre con un sencillo bolso con el cierre de cordon hecho por mí (usé la máquina de mi madre después de engrasarla - me he manejado muy bien con las máquinas siempre!). Mi vecina también me enseñó cómo copiar y cortar los patrones de BurdaStyle y muy poco después estaba ya rebuscando en la colección de las telas que tenía mi madre (incluso usé algunas sábanas que ella tenía!). Lo que más me ha gustado coser desde siempre han sido prendas que me podría poner. Desarrollé un gusto por proyectos que sean un reto para mí así que lo que más me encanta coser son chaquetas y abrigos.

Por qué empezaste a coser lencería? Te pareció difícil? Qué referencias/patrones recomendarías a la gente que quiere empezar a coser lencería?

Siempre admiraba a unas blogueras de costura que también hacían lencería, sin embargo sabía que no iba a encontrar los materiales específicos aquí donde vivo (encaje, elásticos etc). Hace un par de años conocí a la plataforma educacional americana Craftsy.com. Un día vi que Beverly Johnson tenía allí cursos sobre coser lencería y decidí probarlo. En los materiales de clase encontré la lista de tiendas online que venden materiales para coser lencería y había una en Europa que representaba los patrones de Beverly así que compré mi primer kit de lencería y el patron de esa tienda que se llama Bwear.se (el patrón era el patrón clásico de sujetador de Beverly Johnson, el que ella usa en su curso; también compré el kit específico para este patrón y aros en mi talla). Después de un par de sujetadores de prueba conseguí que me quede bien y estaba asombrada de lo rápido y fácil que se puede hacer un sujetador de buena calidad. Expandí mis conocimientos buscando en internet y en YouTube y encontré blogs y páginas web excelentes con un montón de información sobre coser lencería. Empecé a coser toda mi ropa interior incluyendo sujetadores, braguitas y bralettes; ya no compro lencería. Pienso que la oferta online de kits y materiales es excelente y también existen muchos patrones muy buenos, especialmente en el formato de pdf que yo considero más prácticos y accesibles. Para las que empiezan desde cero recomiendo ir a un curso presencial o hacer un curso específico online, especialmente hablando de coser sujetadores. Si ya tienes conocimientos de costura la mayoría de patrones pdf ofrecen instrucciones muy buenos y te enseñan las técnicas necesarias. Bralettes y braguitas son proyectos fáciles y divertidos y cualqueiera que sabe manejar la máquina domestica puede coserlos con bastante facilidad. El aspecto que más cuesta es coser los elásticos correctamente pero hay mucha información online y en YouTube que te explican eso (en castellano recomiendo mucho el canal de YouTube de Hugo Quili)

Cual es tu proyecto de lencería favorito que has cosido hasta ahora?

Tengo que decir que mi último conjunto de sujetador y braguita. Me queda SUPER BIEN y el encaje es precioso! Usé el kit de encaje para el sujetador y braguitas de Studio Costura Shop e hice el sujetador Berkeley de Orange Lingerie y la braguita Stella de Studio Costura! Creo que es uno de mis trabajos favoritos hasta ahora de lencería DIY!


Tell me a little about your sewing journey: when did you start to sew and what are your favourite things to make?


I started to sew when I was very young (11-12 years old). My mother had a sewing machine but never used it. My next-door neighbor was a dressmaker and I used to spend some time after school at her place. One time I asked her to teach me how to thread the sewing machine and in that same day I surprised my Mom with a self-made simple draw-string bag (I used my mother's sewing machine after oiling it myself - I have always been good with machines!). My neighbor also taught me how to copy and cut BurdaStyle patterns and very soon after I was raiding my mother's storage for fabrics (I even used some of her bed-sheets!). My favorite things to make have always been clothes that I could wear. I developed a taste for challenging projects so I love sewing jackets and coats the most.

Why did you start sewing lingerie? Did you find it difficult? What resources/patterns would you recommend for people interested in trying out lingerie sewing?

I have always admired a few sewing bloggers who were also able to sew lingerie, yet I knew I couldn't find the specific materials locally (lace, elastics, etc.). A few years ago I was introduced to American Learning Platform Craftsy.com. One day I noticed Beverly Johnson's courses on sewing bras and decided to try them out. In the class materials I found a list of bramaking online suppliers, including one in Europe who represented Beverly's line of patterns, so I ordered my first bra-making kit and pattern from this supplier, Bwear.se (the pattern was the classic bra pattern from Beverly Johnson, the one used in her class; I also got the specific kit for that pattern and the wires in my size). After a couple of trial bras I was able to get the fit right for me and I was amazed by how quickly and easily I could produce a good quality bra. I expanded my knowledge research to the Internet and YouTube and found excellent blogs/websites with plenty of information on lingerie making. I started making all my lingerie, including bras, panties and bralettes; I no longer buy my lingerie. I think the online offer for kits and materials is excellent and there's also a variety of very good patterns available, specially in pdf format which I consider more practical and accessible. For the absolute beginner I would strongly recommend taking a workshop or a good online course, specially on bra-making. If you are not new to sewing, most pdf patterns offer excellent instructions and cover the needed techniques. Bralettes and panties are fun and easy projects and anyone who knows how to operate a domestic sewing machine can take those with relative ease. The most challenging aspect is sewing the elastics correctly, yet there are excellent resources online and Youtube videos covering those techniques (in Spanish I highly recommend Hugo Quili's YouTube channel).

What is your favourite lingerie make you've sewn so far? 

I have to say my last bra&panties set! It fits WONDERFULLY and the lace is so gorgeous! I used a lingerie lace kit for panties&bra from Studio Costura Shop and made the Berkeley bra from Orange Lingerie and matching Stella panties from Studio Costura! I believe it's one of my best work so far in DIY lingerie!


conjunto de lencería de lunares (bralette hanna y dos versiones de la braguita stella)

Polka-dot lingerie set (Hanna Bralette and two versions of Stella panties)

www.studiocostura.com

Conozco a Karu de Studio Costura desde hace tiempo y cuando me escribió sobre la idea de coser un conjunto de lencería usando los materiales de su tienda y escribir un post para su blog inmediatamente dije que sí! Ya había comprado antes de su tienda y la selección de kits y la calidad de materiales en mi opinión es muy buena. Pude elegir cualquier patrón según mi gusto pero ya tenía interés en probar sus patrones pdf así que me lancé y compré también los patrones de bralette Hanna y la braguita Stella. Estoy muy contenta por haberlo hecho porque coser estas prendas ha sido una experiencia muy buena! Ya que mi último proyecto de costura fue una camisa vestido de lunares me pareció que la opción perfecta es el kit de tela de punto con lunares junto con un poco de puntilla elástica.


I’ve known Karu from Studio Costura for a while and when she approached me with the idea of making a lingerie set using materials from her shop and write a guest post about it I immediately said yes! I’ve ordered from her shop before and the quality of the materials along with the kits selection is great in my opinion. I could have chosen any lingerie pattern of my preference but I was already interested on trying her downloadable pdf patterns so I jumped ahead and ordered the Hanna Bralette and the Stella panties. I am very glad I did because sewing these items has been such an enjoyable experience! Since my latest sewing project was a polka-dot shirt-dress, her polka-dot jersey kit seemed like the perfect choice, along with some black lace trim for edging.

K002 (1).JPG

Empezamos con el bralette Hanna: me parece que el patronaje está muy bien hecho y las instrucciones son fáciles de seguir incluso si eres principiante en coser lencería. Junto con las instrucciones también me parecieron muy útiles e inspiradores los posts de variaciones que tiene Karu en su blog. Ya que no iba a hacer el bralette con encaje no usé la pieza de patrón D (el forro de la copa interior) y en vez de eso lo forré todo con tul elástico, lo mismo hice con la copa exterior y la banda. Después cosí la puntilla elásica al borde de la copa interior (cosí dos filas de puntada de zig-zag para poder coger un poco la parte de las ondas de la puntilla pero hubiera podido quedarme con una fila cerca del borde de la tira de la puntilla y eso hubiera sido suficiente también). En vez de coser/pasar la remalladora para juntar las piezas de copa interior y exterior entre sí las cosí de la manera que se queden como en sandwitch y el resultado es muy limpio en esta costura:


Let’s start with the Hanna Bralette: I found it a very well drafted pattern with excellent and easy to follow instructions, even if you are a beginner at sewing your own lingerie. Along with the instructions I also found Karu’s blog posts on some of the variations very useful and inspiring. Since I wasn’t going to sew a full lace version I didn’t need pattern piece D (the inner cup lining) and instead I lined the entire inner cup with mesh lining, the same as did with the outer cup and band pieces. Then I applied the edge lace trim to the inner cup edge (I added two rows of zigzag stitches so I could catch some of the lace scallops but I could have stitched a single row of zigzag stitches along the inner edge of the lace, it would work just fine). Instead of stitching/serging the lined inner cups to the outer cups I sandwiched the seams between the outer cup fabric and lining, thus obtaining a very neat finish on the cup seam:

www.studiocostura.com

Tenía que volver a ajustar el ancho de la banda para poner un cierre más estrecho (siempre tienes que mirar eso antes porque los patrones van con medidas genéricas y los cierre varian mucho):


I had to readjust the width of the back band at its ends to accommodate the narrower hook and eye closure (you should always check it because patterns are generic and the closures width may vary a lot):

www.studiocostura.com

Estaba muy contenta con cómo queda y lo cómodo que es el bralette Hanna y estoy bastente segura que no va a ser la última vez que lo haga!


I was very pleased with both the fit and the wearing comfort of the Hanna Bralette and I am pretty sure this won’t be my last take on it!

www.studiocostura.com

La braguita Stella (versión 2, hecho para el encaje elástico): En vez de usar encaje lo que hice fue poner la puntilla elástica tanto a las piezas delanteras como traseras donde el patrón indica que va el borde de encaje. El resto de proceso de costura está muy bien explicado en las instrucciones y la única cosa que hice diferente fue la manera de juntar la pieza trasera con la entrepierna (hice el método de sandwitch allí para meter la pieza trasera entre las capas de entrepierna y así conseguí un resultado muy limpio).


The Stella panties (version 2, intended for stretch lace): Instead of the lace I edged the fabric with the lace trim on the back and front pieces, where the pattern indicates to align with the lace scalloped edge; all the remaining construction process is very well explained in the instructions and the only thing I did differently was the way I attached the crotch piece to the back of the panties (I turned it inside out and sandwiched the back pieces in it, encasing the seam allowances inside of the crotch and obtaining a very clean seam finish).

www.studiocostura.com

Al final me quedó suficiente tela de punto para hacer por lo menos un par más de braguitas y añadiendo algo de elástico hice la versión 1 de la braguita Stella (hecho para las telas de punto), también usé lo que me quedaba de la puntilla negra para adornarla.


Lastly there was enough polka dot jersey fabric in the kit for at least another pair of panties so I added some elastics and was able to produce Stella version 1 (intended for stretch fabric), not without using the remnants of the lace edge trim to embellish it!

www.studiocostura.com

Espero que os haya gustado mi proyecto y que os inspiréis para hacer vuestra lencería también! Puedo aseguraros que es muy gratificante y nada difícil! Gracias a todos por leer! (Puedes leer el post completo en el blog Couture et Tricot.)


Hope you like my makes and feel inspired to make your own lingerie projects as well! I can assure you that it’s very gratifying and not at all difficult! Thank you all for reading! (You can read the full post over at the blog Couture et Tricot.)


www.studiocostura.com

Me han encantado las variaciones que Tany hizo con los patrones, no había pensado eso de usar la puntilla elástica para hacer la versión de encaje de la braguita Stella. Del otro kit que le mandamos también hizo este conjunto de Berkeley + Stella que ha quedado super bonito! De nuevo, muchas gracias Tany por participar y también por contarnos sobre tu experiencia en coser lencería! Podéis seguirla en su blog y en su Instagram! También tiene un blog de moda aparte que podéis ver.

Los materiales que ha usado ella de Studio Costura Shop son:

- patrón de bralette Hanna

- patrón de braguita Stella

- kit de tela de punto con lunares

- puntilla elástica negra

- kit de encaje con beige y azul


I loved the variations that Tany made with the patterns, I didn't think of using the lace trim for the lace version of Stella panties before. From the other kit that we send her she also made this Berkeley + Stella set that looks amazing! Again, thank you so much Tany for participating and also for sharing more about your experience about sewing lingerie with us! You can follow her at her blog and over at her Instagram account! She also has a separate blog about her fashion makes you can check out!

The materials she used from Studio Costura Shop are:

- Hanna bralette pattern

- Stella panties pattern

- polka dot jersey kit

- black narrow scalloped lace

- beige and blue lace kit