
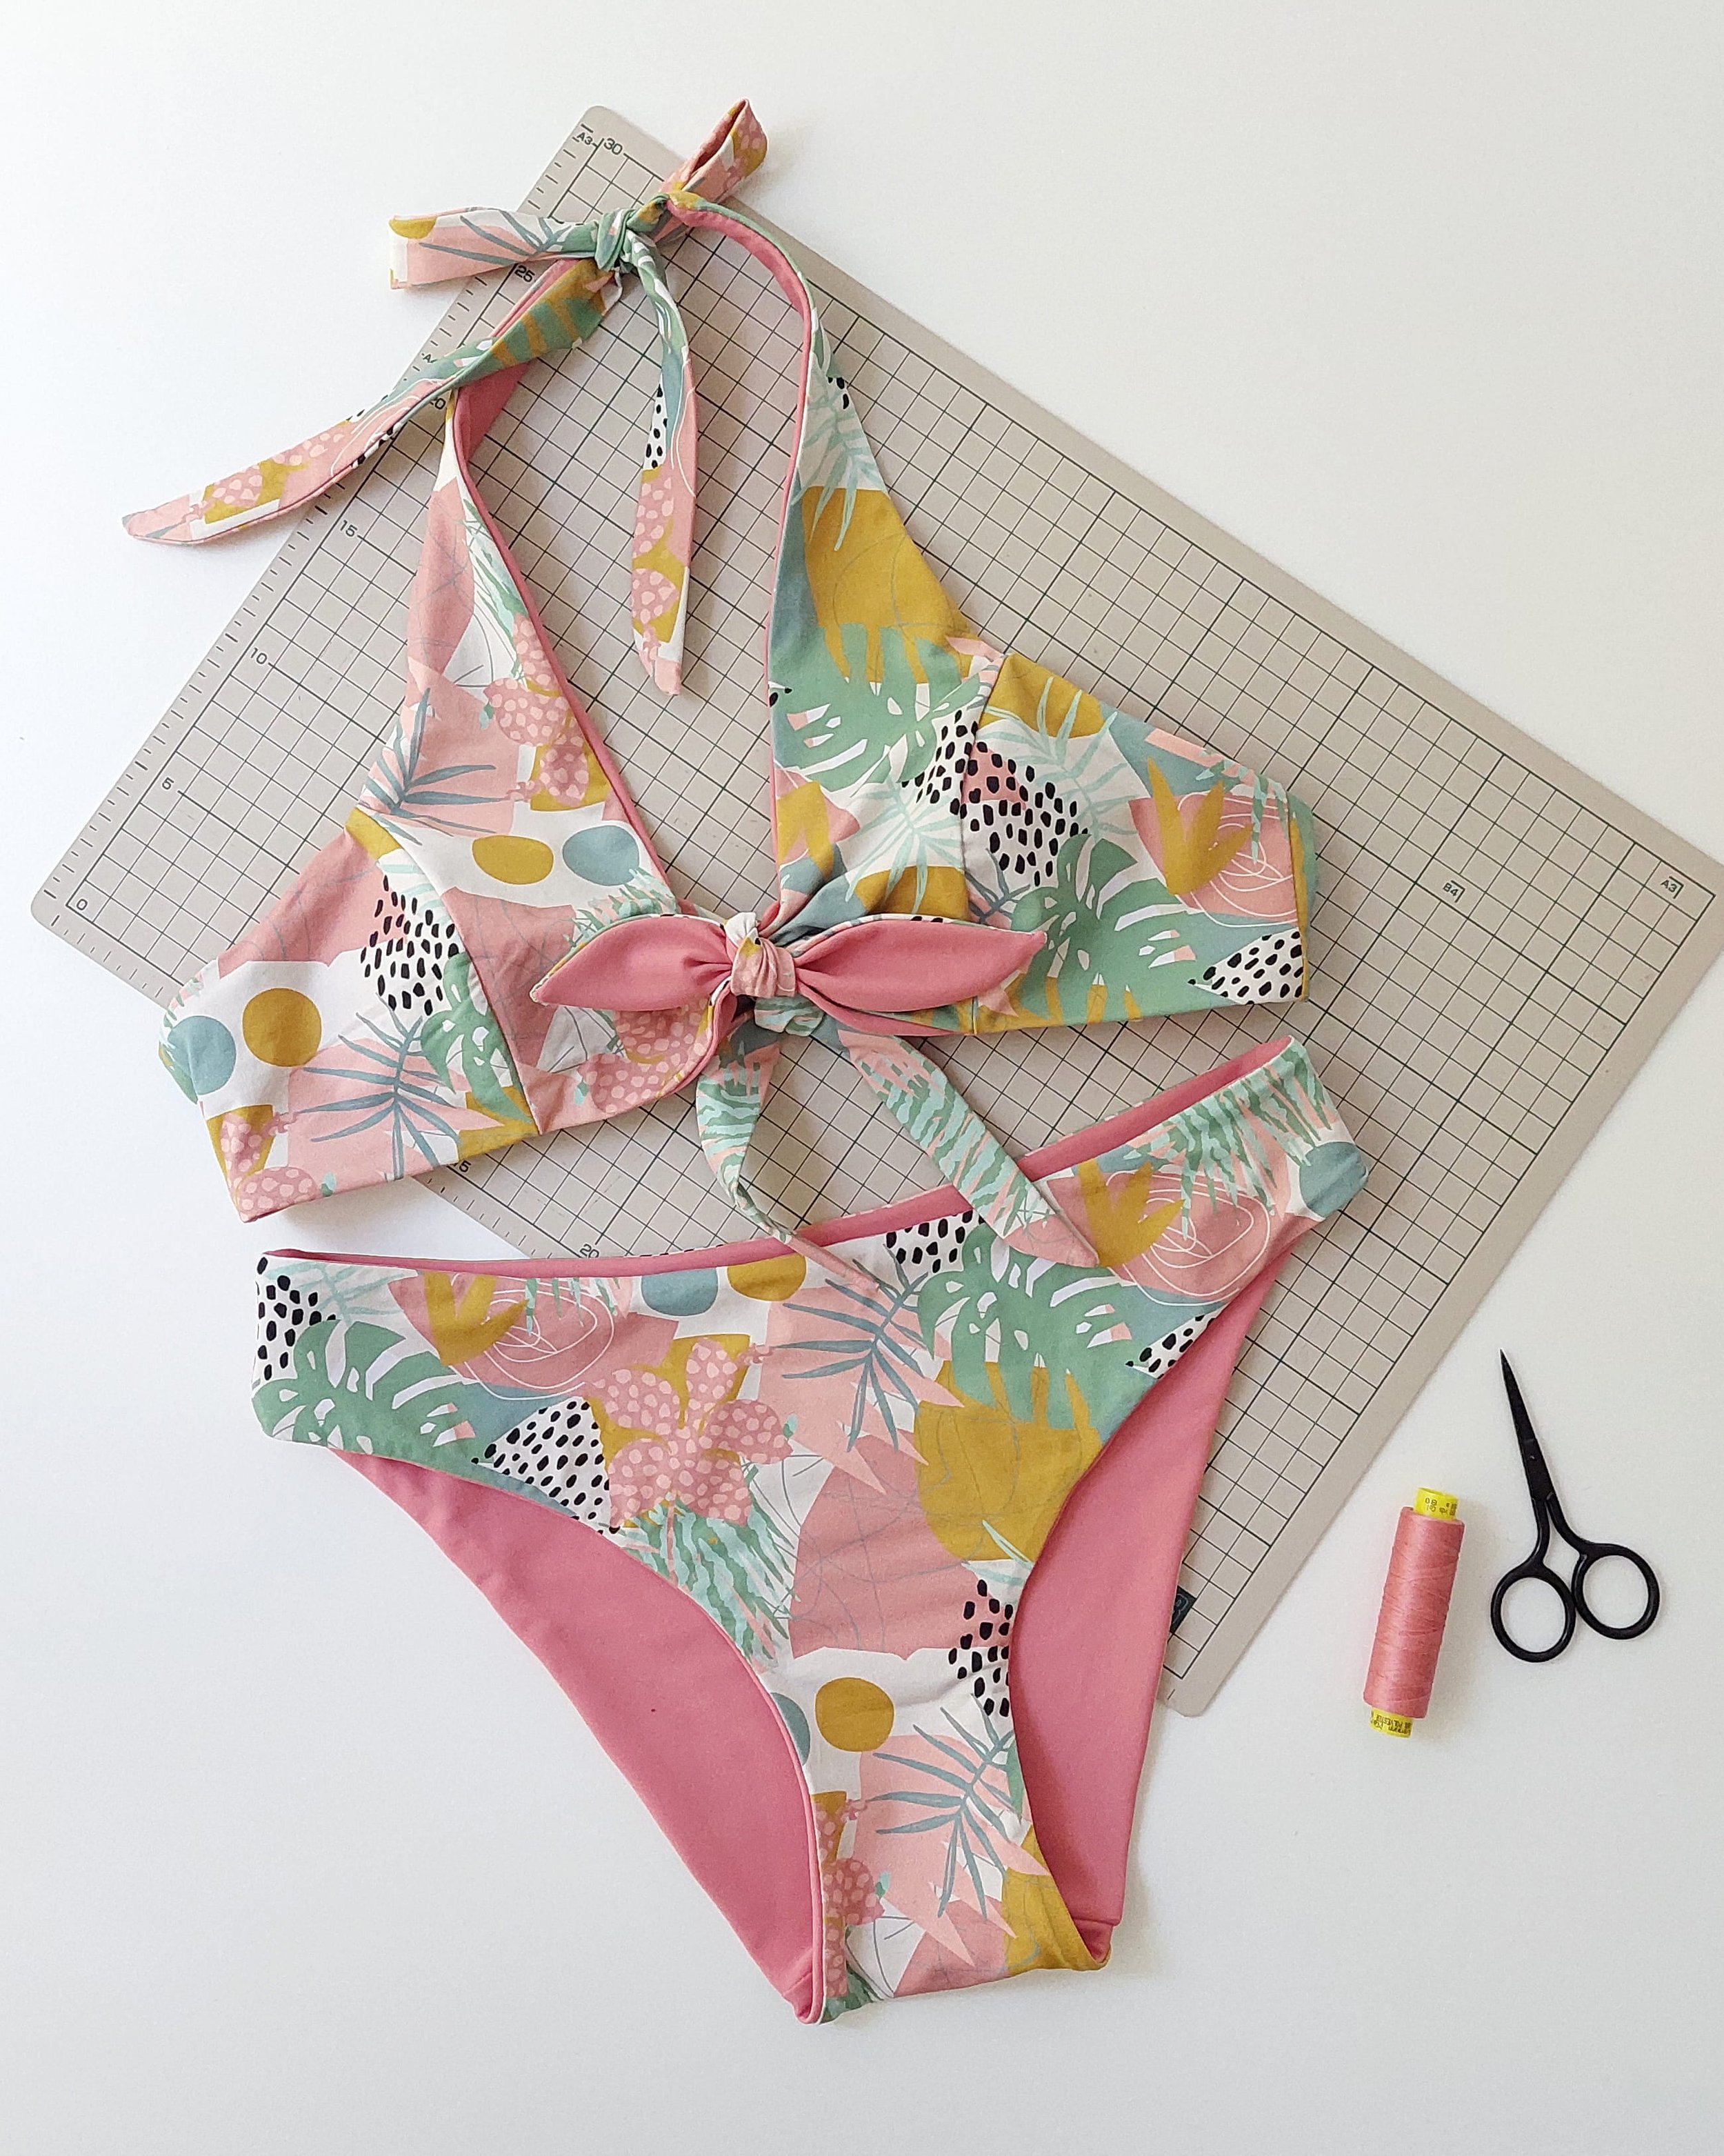
Summer greetings! Here goes my annual contribution to the swimwear sewing education here on the blog. This time I wanted to play around with the idea of turning the Hanna bikini into a reversible swimsuit (find the sewing pattern here). This tutorial can be applied to any swimwear pattern.
Saludos veraniegos! Aquí va mi aportación anual a los tutoriales sobre prendas de baño aquí en el blog. Esta vez quería experimentar con la idea de convertir el bikini Hanna en un bikini reversible (este patrón está disponible aquí). Si eres alumna del curso online del bikini Hanna, puedes encontrar este tutorial en formato de vídeo aquí. Si no lo tienes todavía, te recomiendo mucho que te apuntes, ya que en este curso encontrarás mucha información detallada sobre cómo coser trajes de baño. Tanto este tutorial como el curso online se pueden aplicar a cualquier patrón de bikinis y bañadores.
Why is this method different? / Por qué este método es diferente?
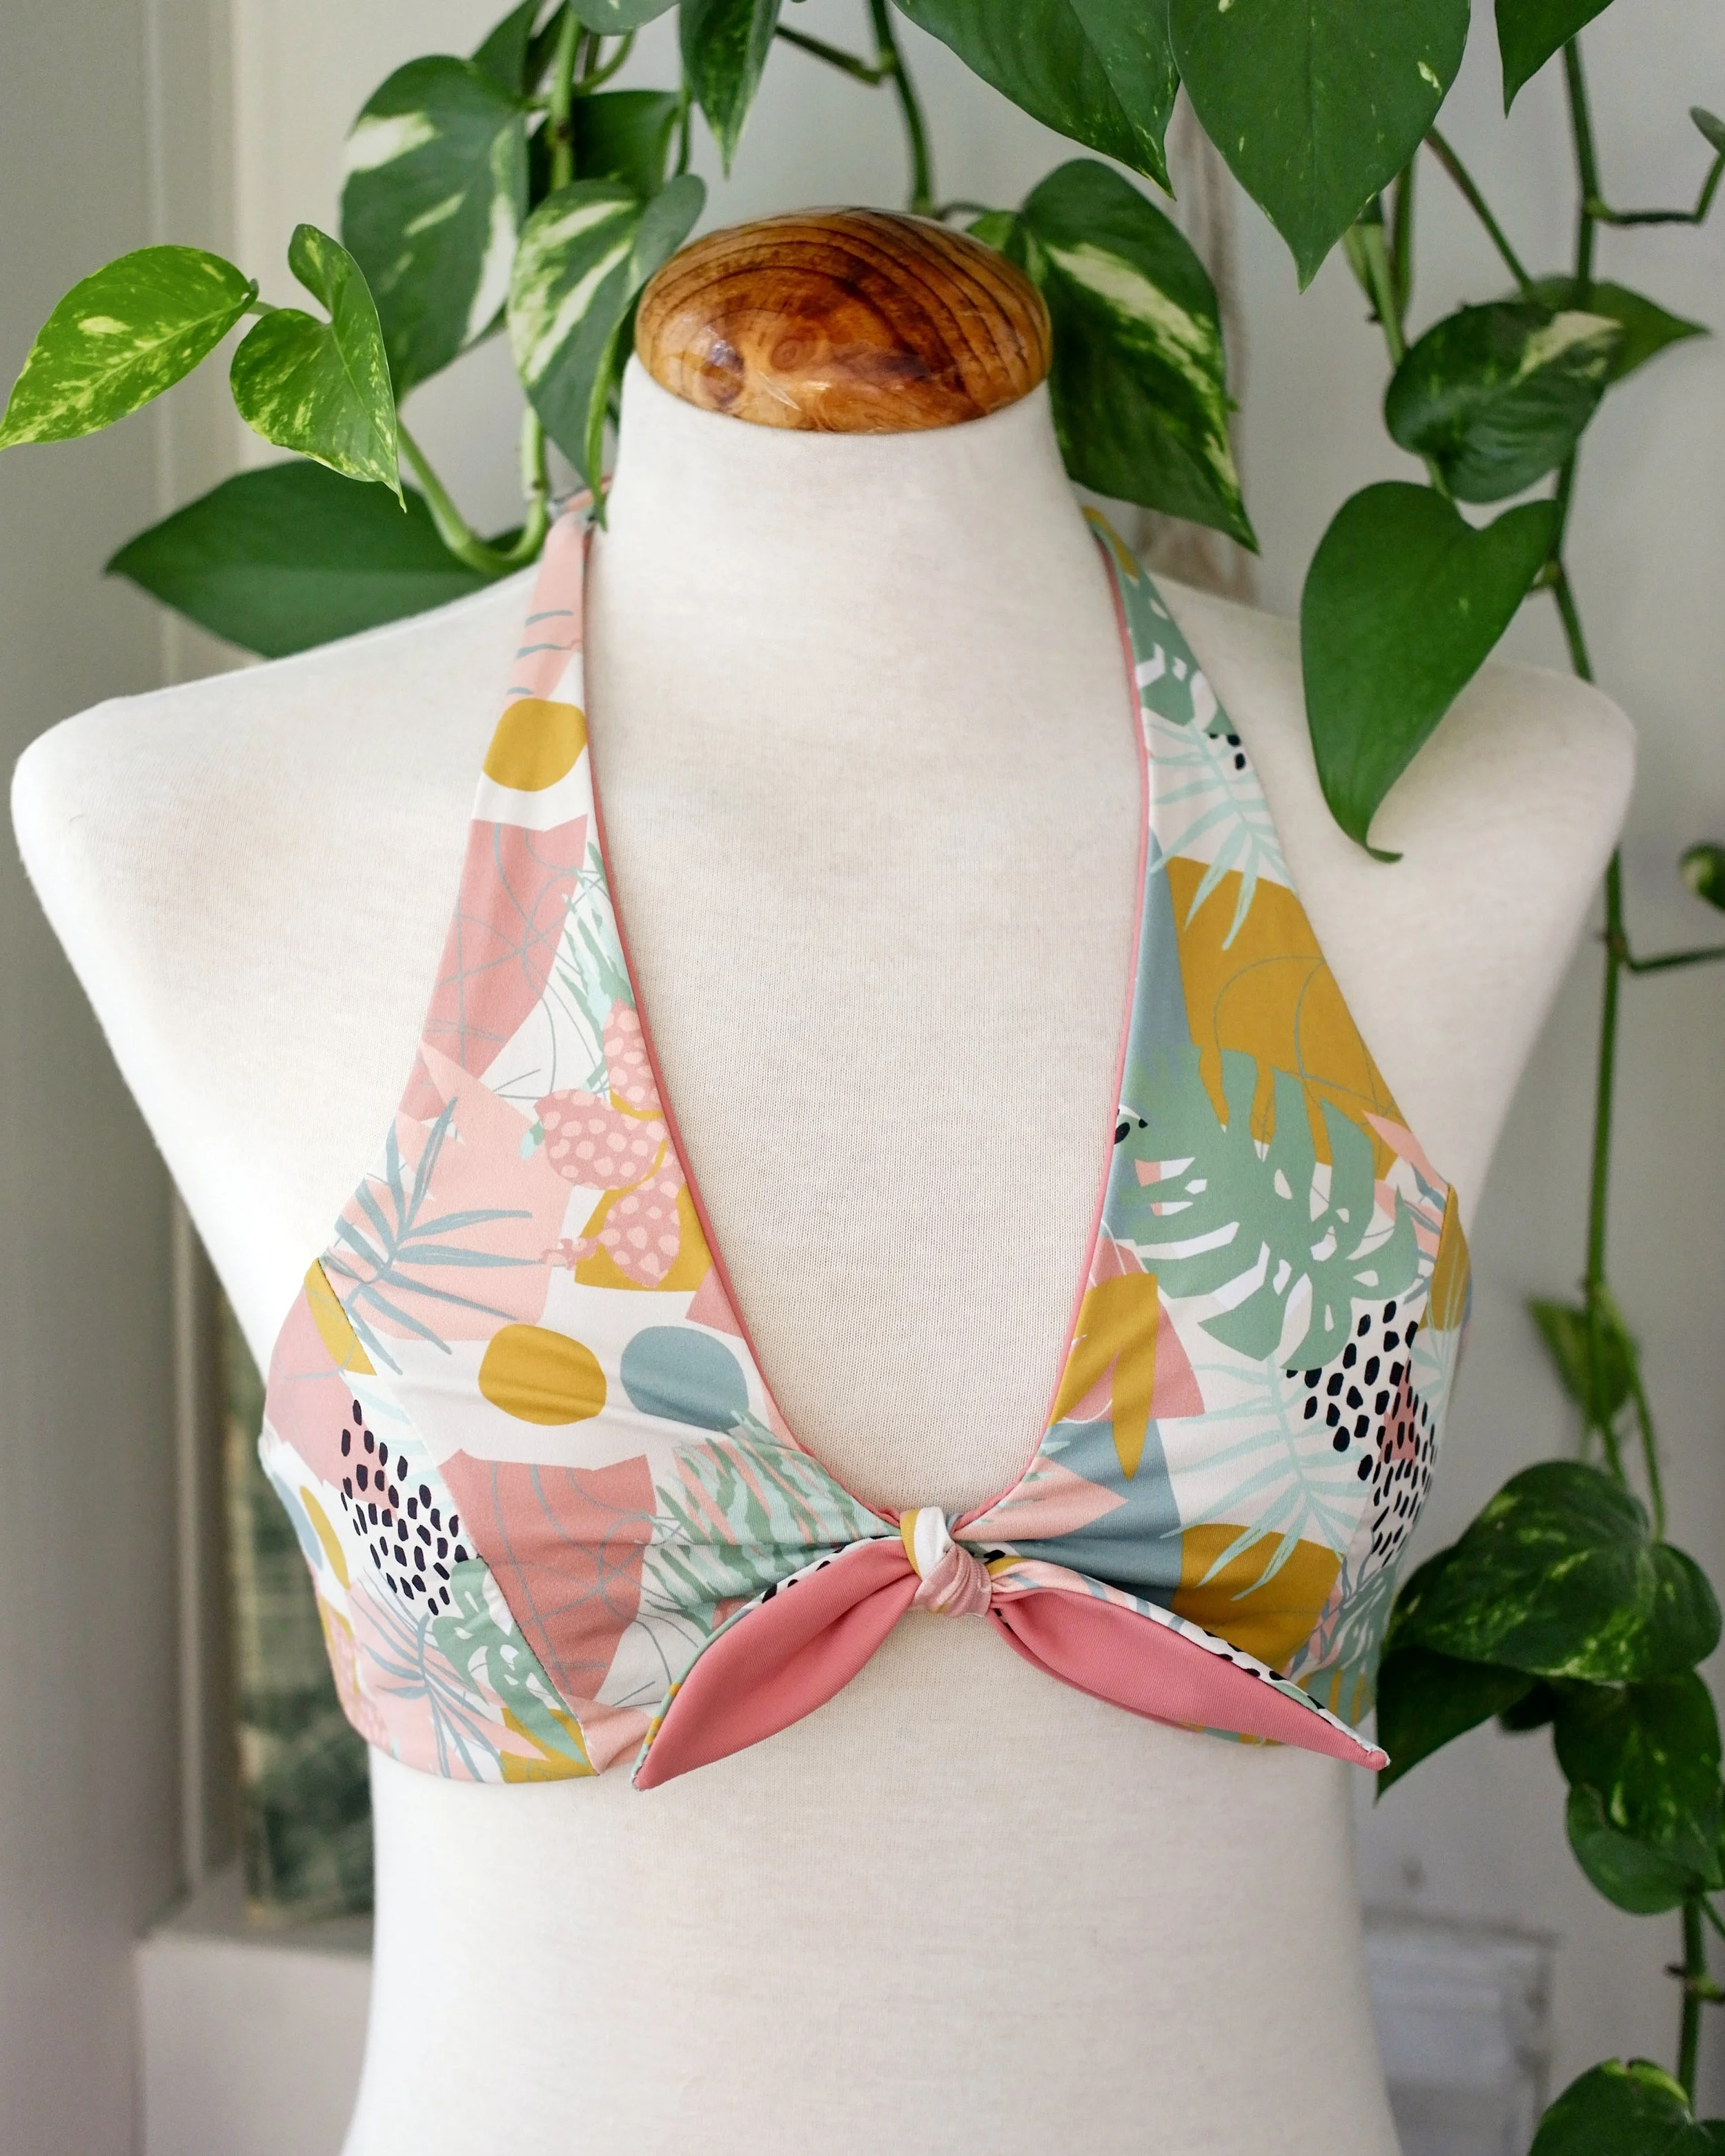
Ok, so let’s dive into the topic. First, I’m giving you some of my general thoughts about it, and after that you can follow the specific steps to sew your own. The biggest difference with the regular bikini sewing method (I’m just going to call it that here so it’s easier to distinguish between the two) is the elastic insertion.
With the regular method, we treat the swim fabric and lining as one and fold the elastic inward in a way that there’s a visible line of zigzag stitching on the outside, and the elastic is tucked under a fold of swim fabric on top of the lining. For reversible swimwear, you’d work with two layers of swimwear fabric separately, and the elastic is sewn in between those layers. There’s no visible zigzag stitching on either side of the two swim fabrics, and the elastic sits in between the two layers.
Visually, this means that the reversible version has a "cleaner" look with no visible zigzag. The counterpart is that, as the two layers are even on the edges, there’s almost always a peek of the opposite-side fabric seen on the other side (so you should take this into consideration and pick your fabrics accordingly). With the regular method, the swim fabric is folded under neatly, so no lining is seen on the other side.
Vale, pues vamos con este tema. Primero, te voy a contar algunas cosas sobre esta técnica y después podrás seguir los pasos concretos para coser el bikini. La mayor diferencia con el método habitual de coser bikinis (lo voy a llamar así aquí para que sea más fácil distinguir entre ambos) es la forma de coser el elástico.
Con el método habitual, tratamos la tela del bañador y el forro como una sola capa y doblamos el margen de costura junto al elástico hacia dentro. De esta manera queda una línea visible de zigzag en el exterior, y el elástico queda metido bajo el margen de costura de lycra que recubre el forro. En el caso de los bañadores reversibles, se trabaja con dos capas de tela de lycra por separado, y el elástico se cose entre ambas capas. No hay zigzag visible en ninguno de los lados de las dos lycras, y el elástico queda entre las dos capas.
Visualmente, esto significa que la versión reversible tiene un aspecto “más limpio”, sin el zigzag visible. La contrapartida es que, como las dos capas están alineadas en los bordes, casi siempre se ve un poco de la tela del lado opuesto en el otro lado (por lo que debes tener esto en cuenta y elegir las telas sabiendo eso). Con el método habitual, la lycra se dobla hacia dentro, por lo que no se ve el forro en el exterior.
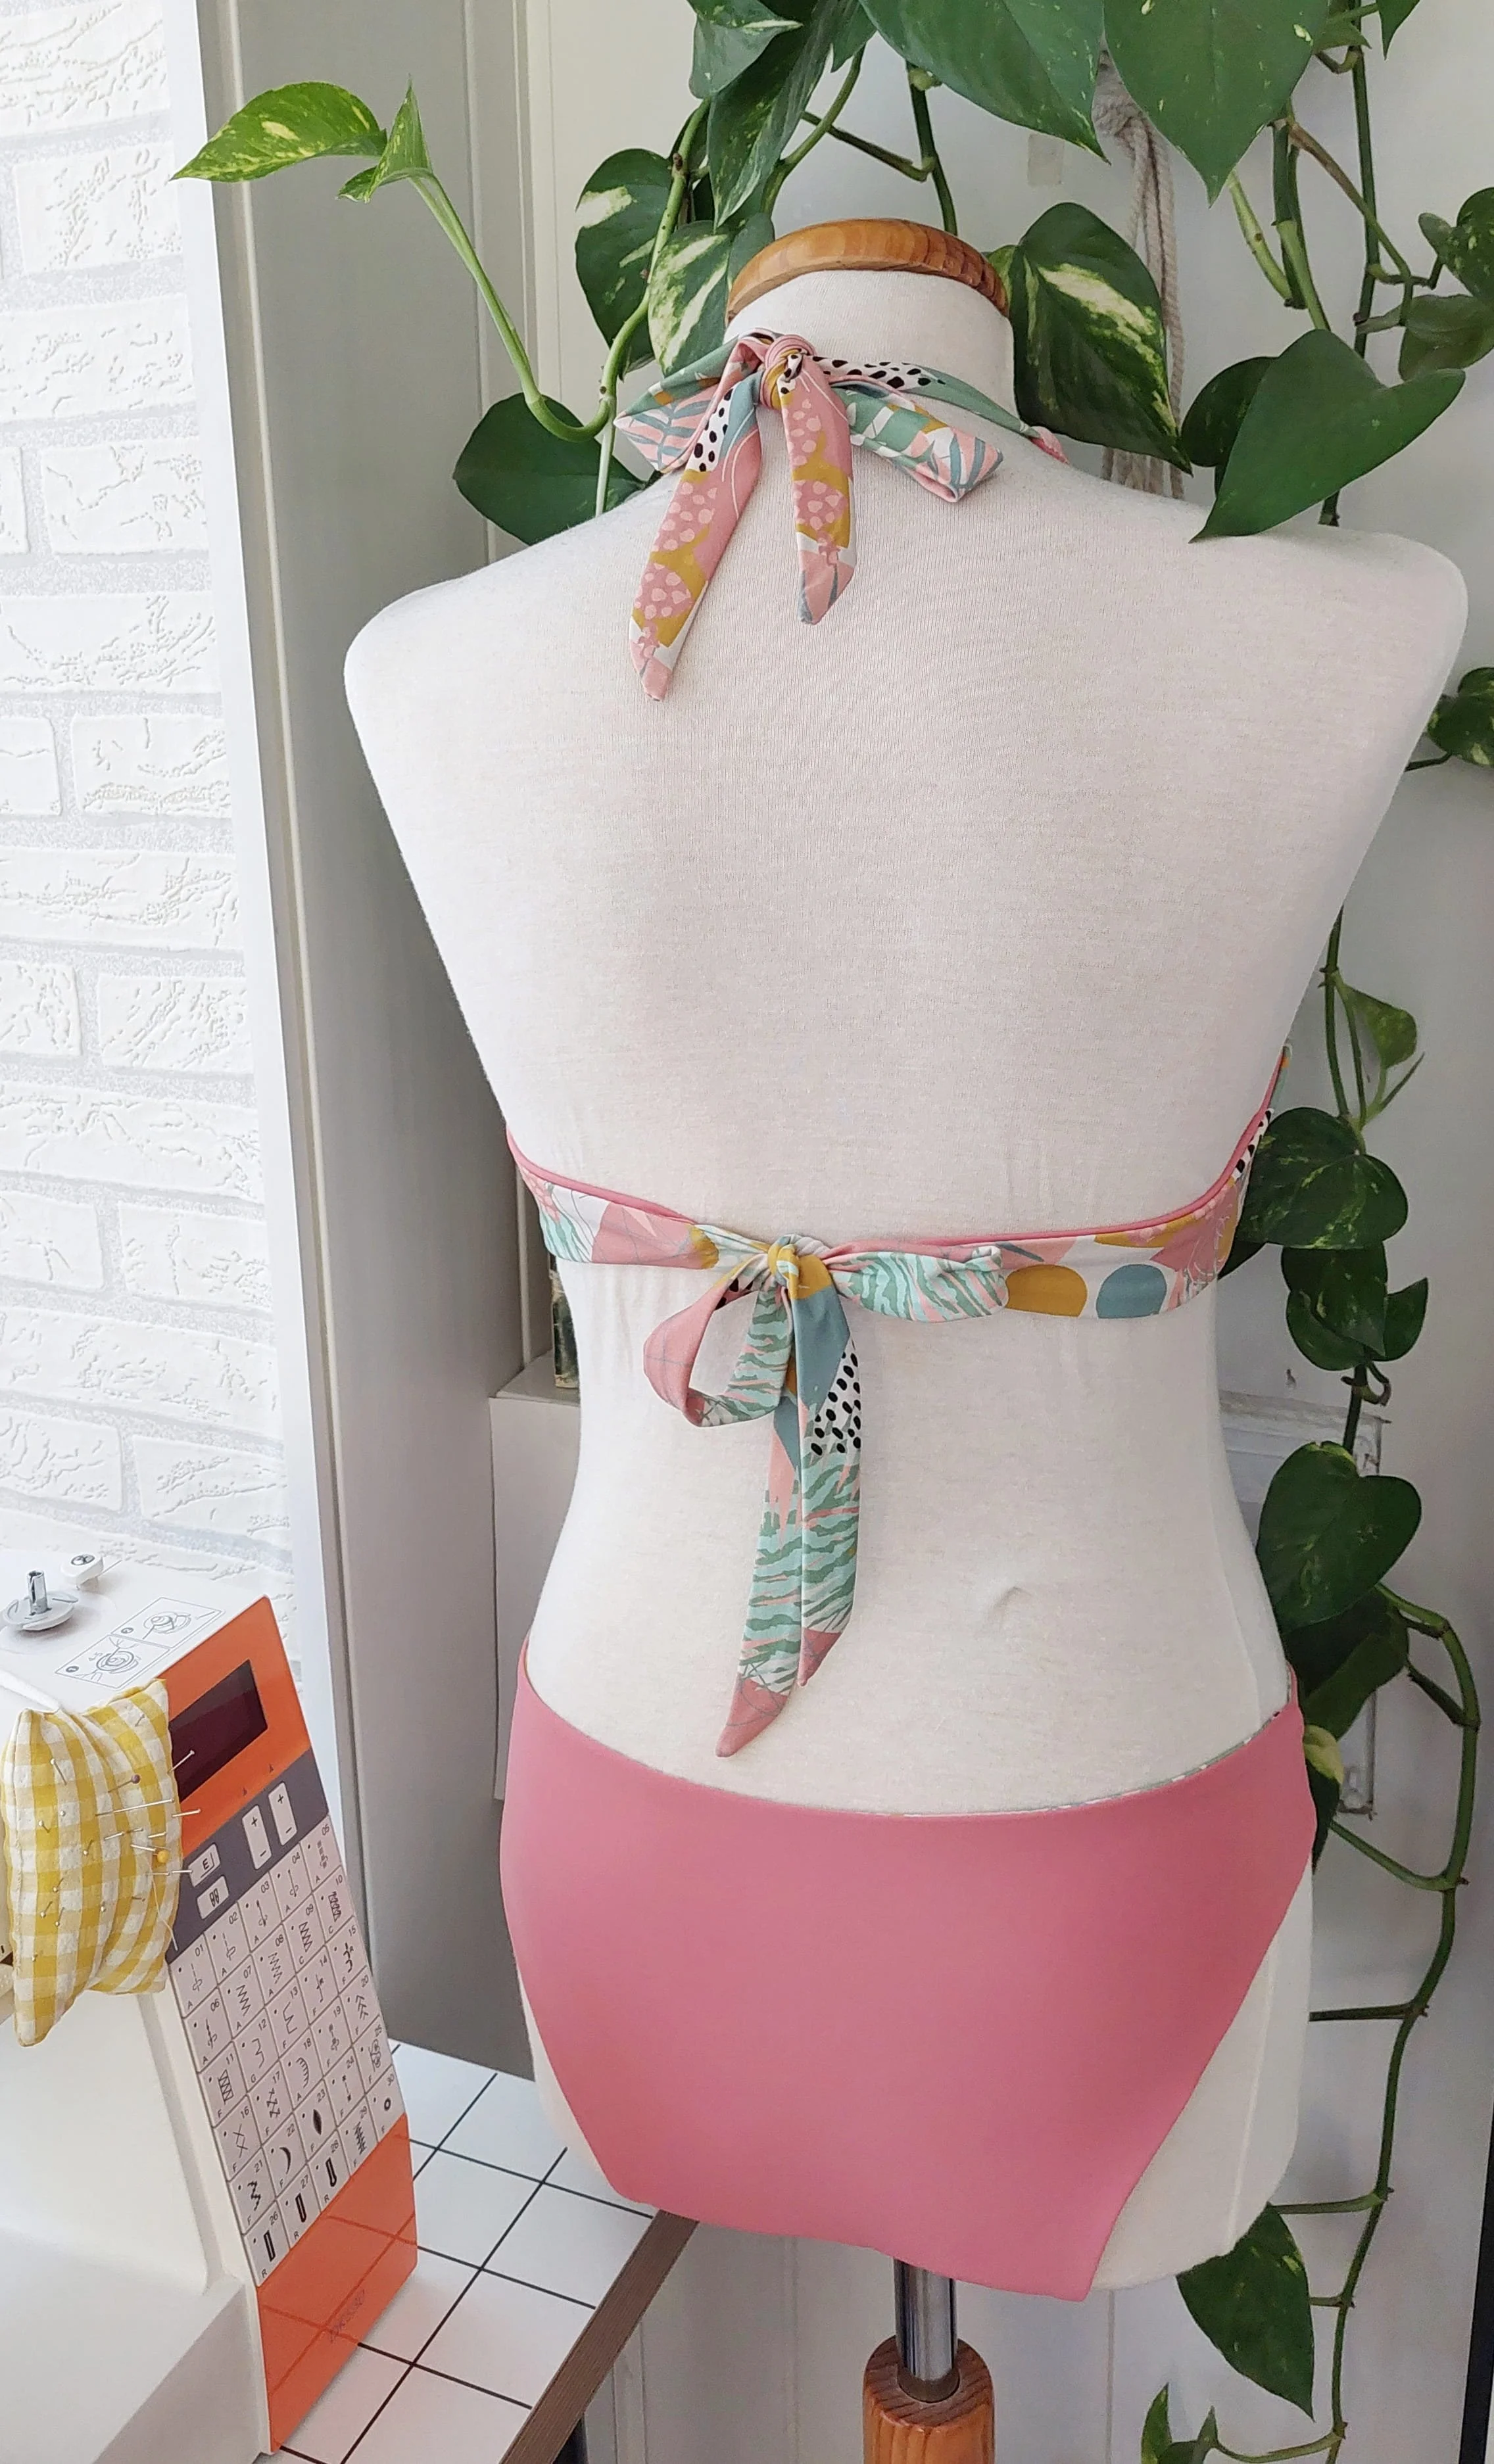
Another factor is fit. Using the regular method, you stretch the swim elastic slightly to get a nice, even tension. This will make your swimsuit hug the body and also make it "contain the volume" better. Especially with underbust elastic insertion, this is where a nice, wide elastic gives better support for bigger cup sizes. That tension is calculated into the pattern dimensions, so the sizing takes that snug fit into account.
With reversible swimwear, you don’t pull the elastic, as this is the trick to keeping everything nice and flat. The garment itself will mold around your body as one whole thing. The fabrics and the elastic stretch at the same time. This would initially mean that you’d need to size down, as you’re using the same pieces, but when you don’t pull the elastic, they will not have the same size as when you do (the reduction is around 5–10% when you pull the elastic).
The thing is that you do use two layers of swim fabric, which means that, at least in theory, the whole garment should have less stretch. Two layers of swim fabric stretch less than one layer of swim fabric plus one layer of lining fabric (obviously there are different weights and stretch factors for different swim fabrics, but I’d say that the geenral idea is this). Therefore, even if you don't stretch the elastic when making the reversible bikini, it probably won't be too big on you, because the double layer of fabric already makes it fit more snugly.
I’d test out this difference by checking how much stretch there is when holding together the two fabrics you’re planning to use for your swimsuit.
As a general rule, the regular method adds an elastic that will keep things "in place" more, and the reversible technique gives a more "seamless" finish. There is also a third option (well, probably there are more, but you get the point): using swim fabric and lining, but sewing the elastic between the layers and topstitching it down on the lining side. This way you won’t have the visible zigzag, but you can use a lining instead of another swim fabric. I’d suggest you inspect your RTW swimwear and see which finishings they have to decide which one works best for you. It’s also very interesting to do that at the stores; you can really see tons of different techniques.
As one last point, the side seams do generate more bulk when sewing with the reversible technique, but I guess it’s the price to pay for the rest of the look, hehe.
Otro factor es el ajuste. Con el método habitual, se estira ligeramente el elástico para conseguir una ligera tensión uniforme. Esto hace que el bikini/bañador se adapte al cuerpo y que “contenga el volumen” mejor. Especialmente con la inserción de elástico bajo el pecho, es aquí donde un elástico ancho y de buena calidad ofrece una mejor sujeción para las copas más grandes. Esa tensión se tiene en cuenta a la hora de patronar, por lo que las tallas se ajustan teniendo en cuenta ese ajuste ceñido.
En el caso de los bañadores reversibles, no se estira el elástico, ya que ese es el truco para que todo quede bonito y liso. La prenda en sí se amoldará a tu cuerpo como una sola pieza. Los tejidos y el elástico se estiran al mismo tiempo. En principio, esto significaría que tendrías que elegir una talla menos, ya que se utilizan las mismas piezas, pero al no estirar el elástico, no tendrán la misma talla que cuando sí lo haces (la reducción es de alrededor del 5-10% al estirar el elástico).
La cuestión es que sí utilizas dos capas de lycra para hacer la pieza reversible, al menos en teoría, la prenda en su conjunto debería tener menos elasticidad. Dos capas de lycra se estiran menos que una capa de lycra más una capa de forro (obviamente hay variedades en grosor y elasticidad de lycra, pero como norma general diría que es así). Por lo tanto, es probable que aunque no estires del elástico al hacer el bikini reversible, aún así no te quedará grande, porque el doble tela ya de por sí lo hace más ajustado. Yo comprobaría esta diferencia probando cuánta elasticidad hay al unir las dos telas que tienes pensado utilizar para tu bañador.
Como regla general, el método habitual añade un elástico que mantiene las piezas “en su sitio” con mayor firmeza, mientras que la técnica reversible ofrece un acabado más tipo “sin costuras”. También existe una tercera opción (bueno, probablemente haya más, pero ya entiendes la idea): utilizar lycra y forro, pero coser el elástico entre las dos capas y hacer una costura de carga por el lado en el forro. De esta forma no tendrás el zigzag visible, pero podrás usar un forro en lugar de otra tela de baño. Te recomiendo que mires tus bikinis y bañadores comprados y veas qué acabados tienen para decidir cuál te conviene más. También es muy interesante hacerlo en las tiendas, allí puedes ver un montón de técnicas diferentes.
Como último apunte, las costuras laterales sí que tienen más volumen al coser con la técnica reversible, pero supongo que es el precio que hay que pagar por el resto del acabado, jeje.
Sewing the top / Coser el top
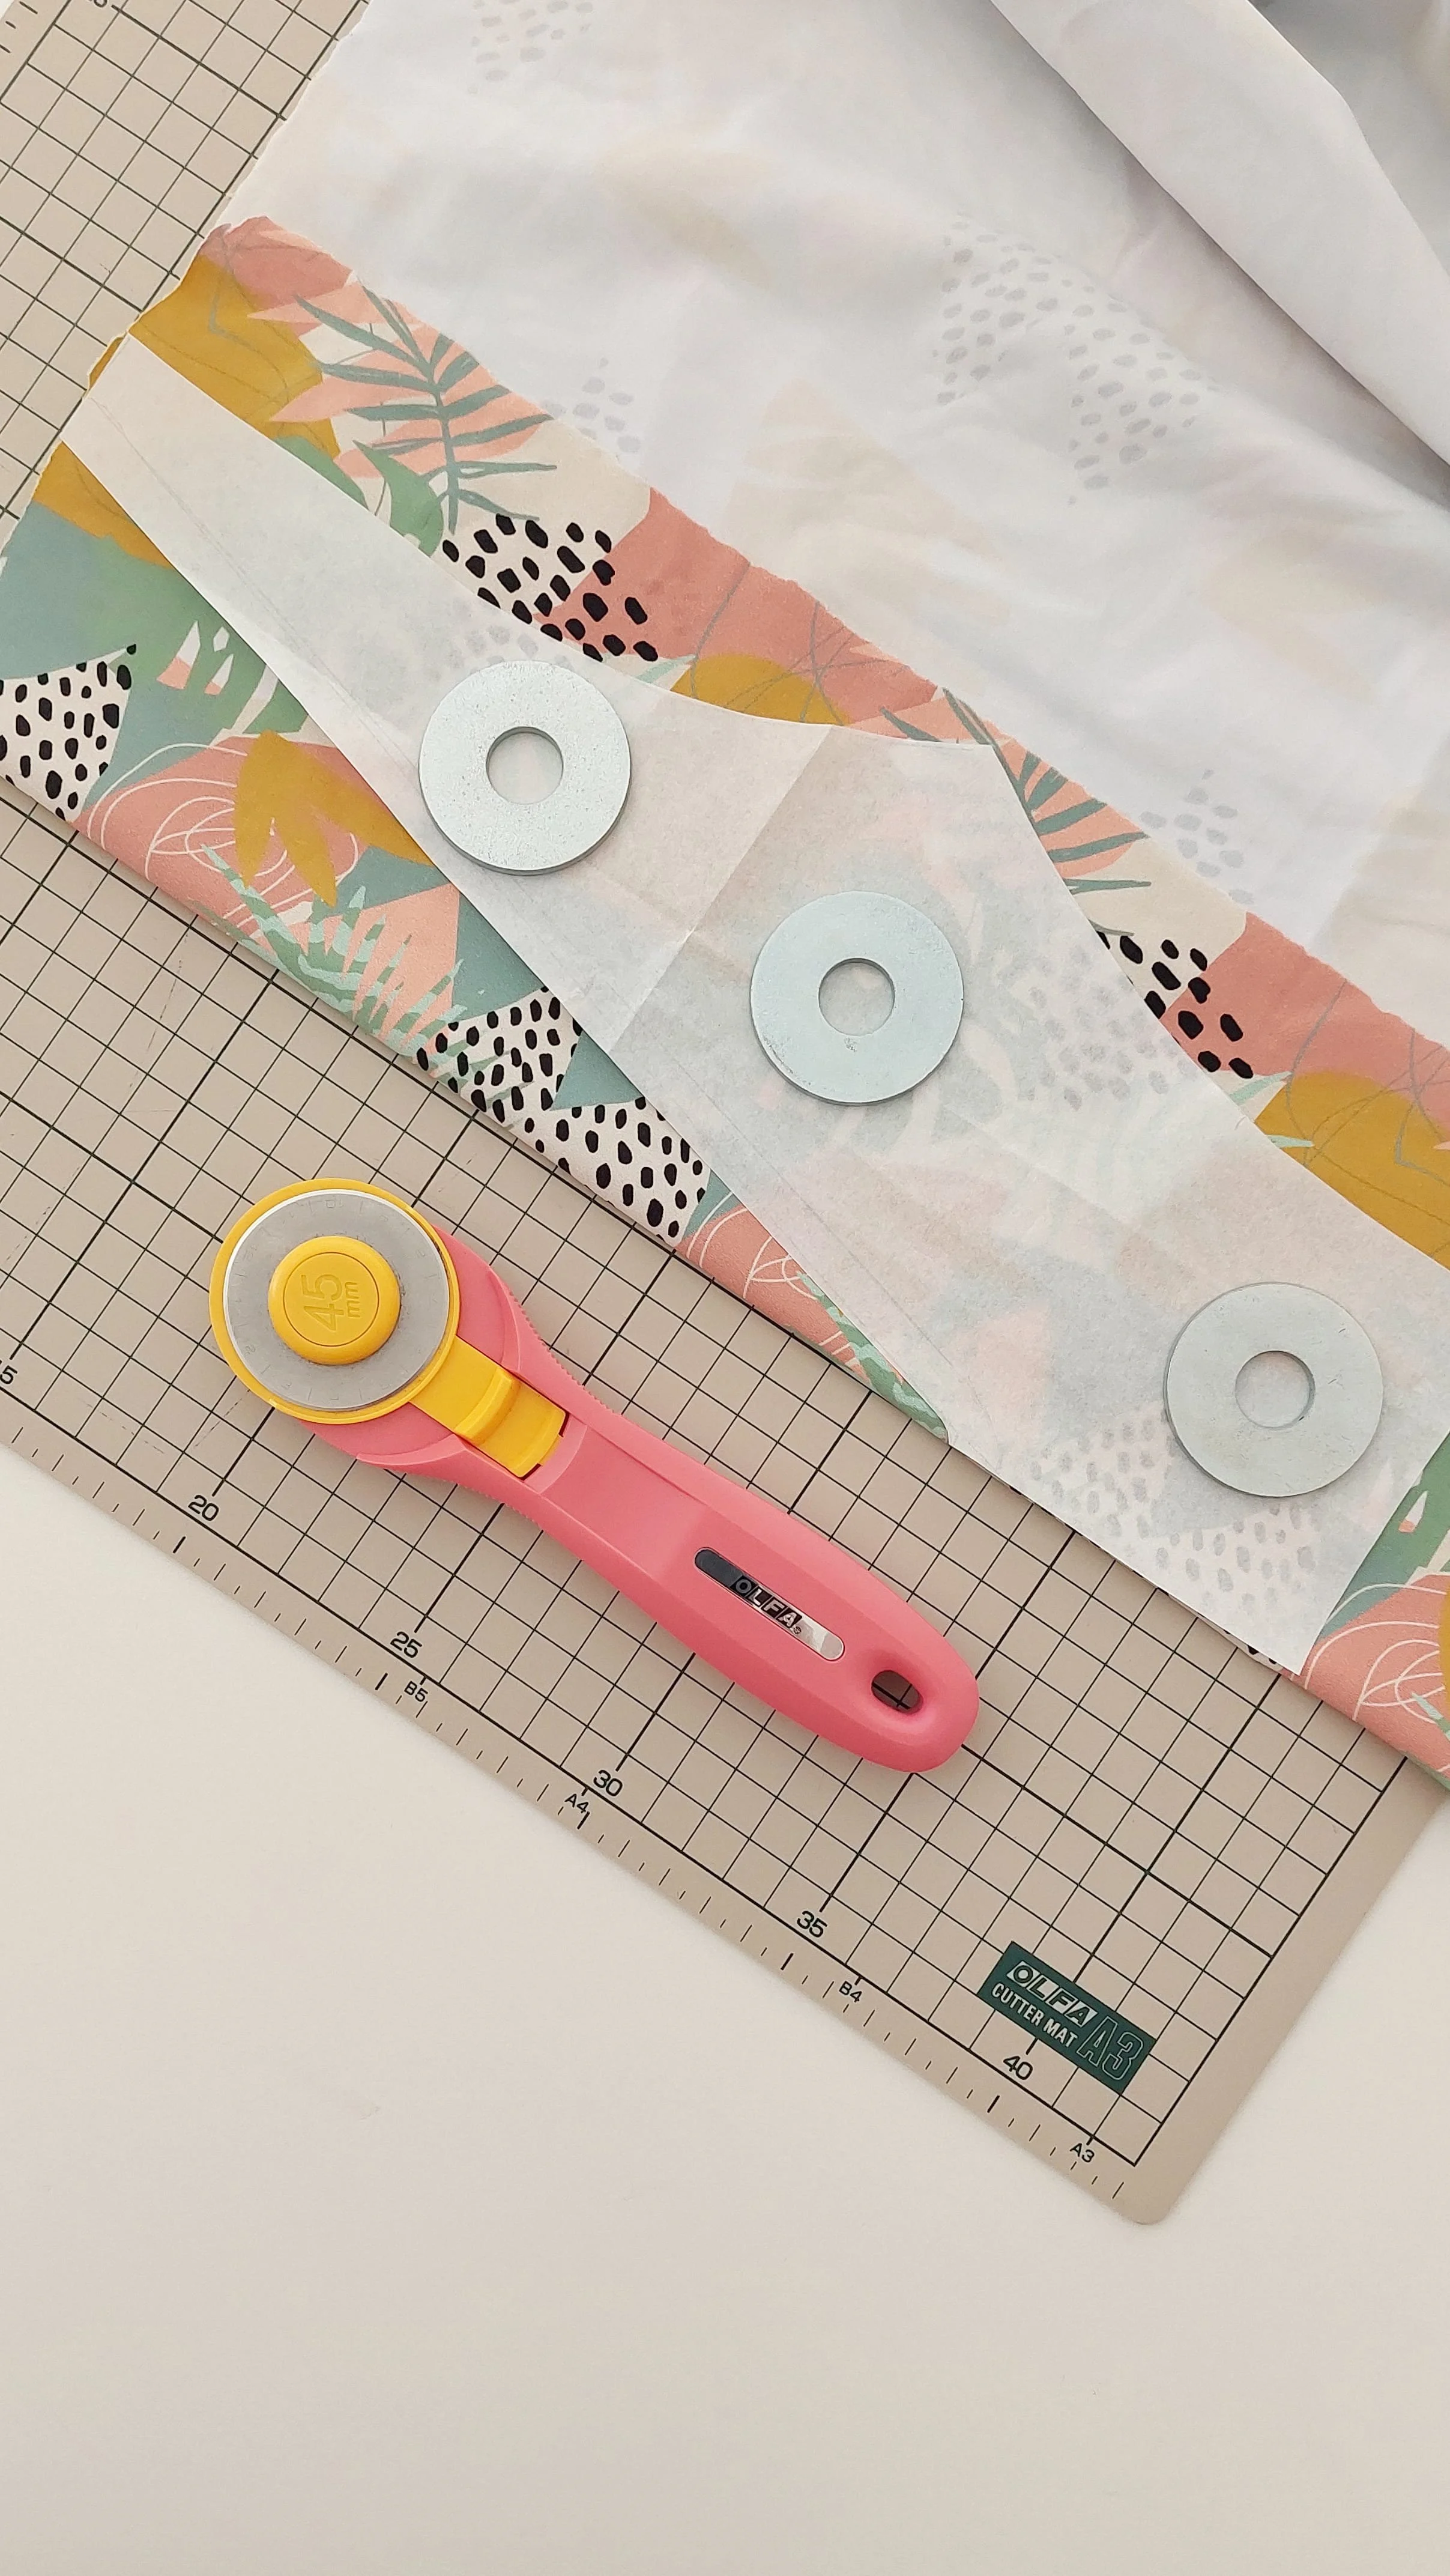
Now let’s move on to the tutorial. I’m using the Hanna bikini sewing pattern with the tie options for this one. You could also use straps, and the technique would be very similar, but you’d need to know the exact lenght for the straps first.
When I was thinking about writing this tutorial, I was going to cut the inner cup pieces (A) as usual, but then I figured I could also cut the piece on the fold and see how it works out. In general, I avoid deep curves like the one on the neckline when I need to fold under an elastic (that’s why the V-neck is formed by two separate pieces to create the angle), but as this style has the bow that covers that area, I figured that even if it doesn’t lie 100% flat, it would make sewing easier.
Ahora vamos con el tutorial. Para este proyecto estoy utilizando el patrón de bikini Hanna con los cierres de lazos. También puedes utilizar tirantes, y la técnica sería muy similar, pero primero tendrías que saber la longitud exacta de los tirantes.
Cuando estaba pensando en escribir este tutorial, iba a cortar las piezas de la copa interior (A) como de costumbre, pero luego se me ocurrió que también podía cortar la pieza en el doblez y ver cómo quedaba. En general, evito las curvas pronunciadas como la del escote si tengo que doblar un elástico (por eso el escote en V está formado por dos piezas separadas para crear el ángulo), pero como este modelo tiene el lazo que cubre esa zona luego, pensé que aunque no quedara 100% plano, facilitaría la costura bastante.
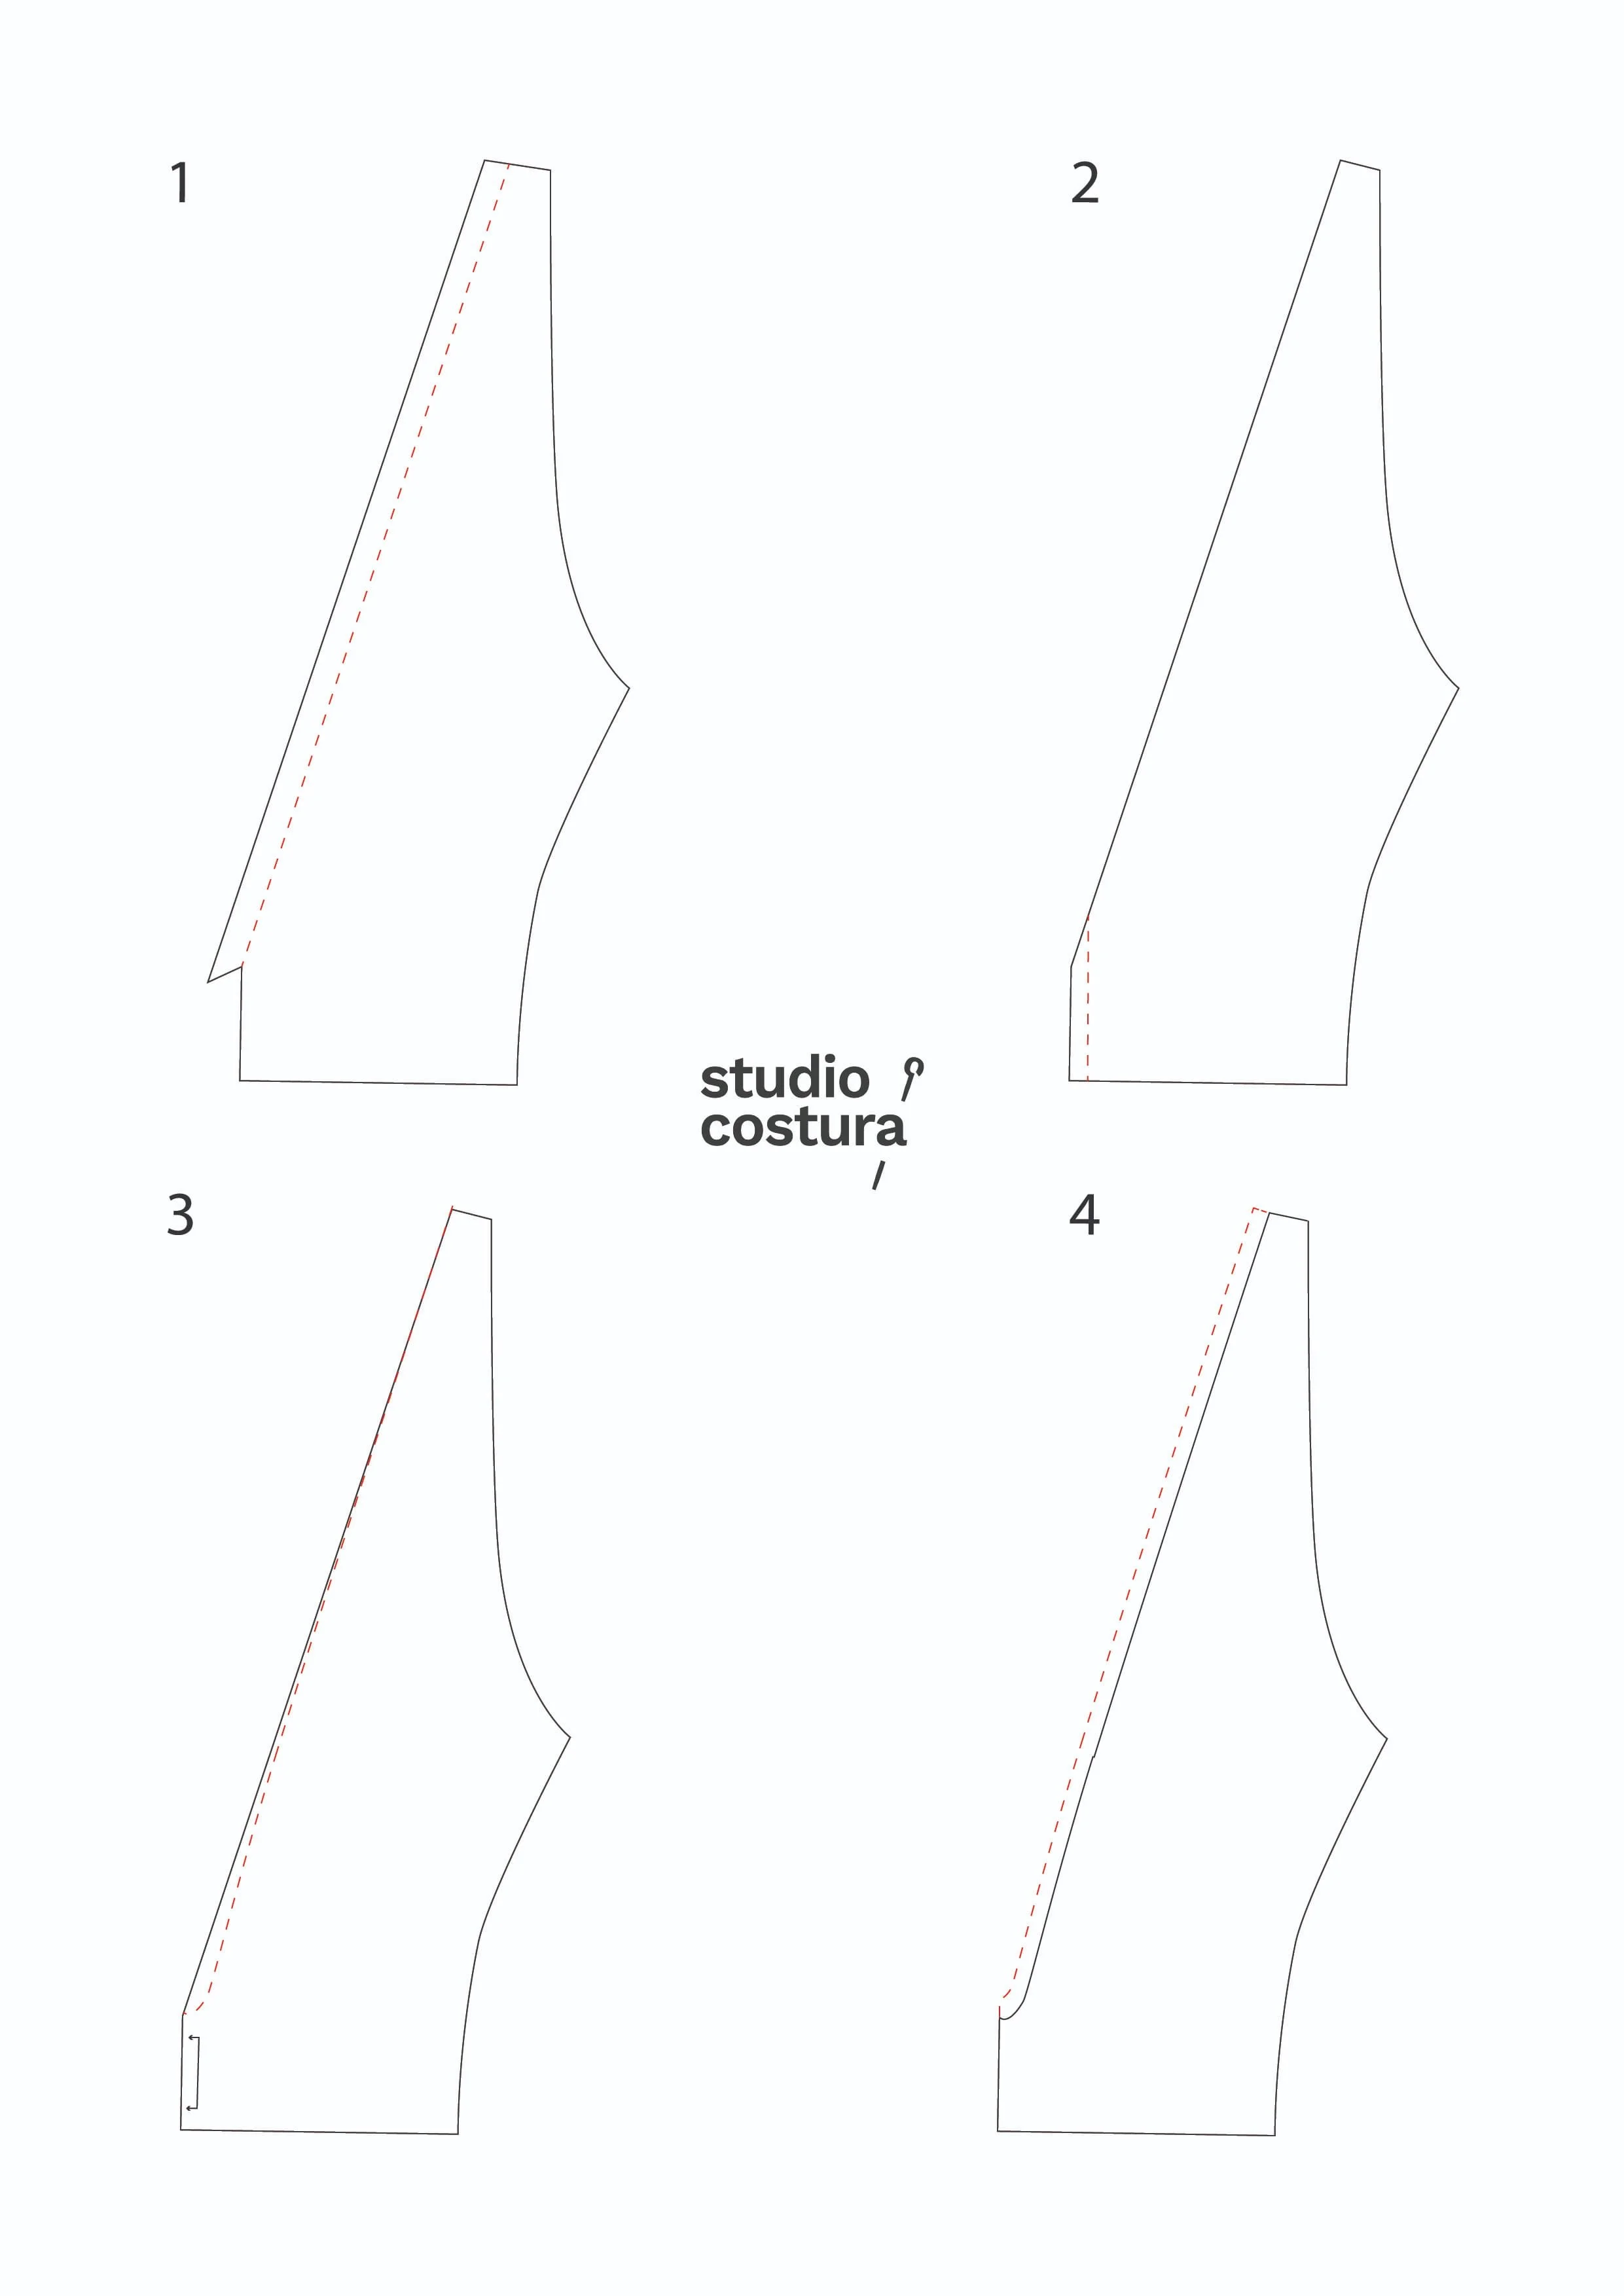
The steps to alter the inner cup piece (A) in order to be able to cut it on the fold and avoid the center seam are:
Remove the neckline 1 cm elastic seam allowance so it’s easier to alter the pattern.
Remove the center front 6 mm seam allowance, as this piece is cut on the fold now.
Draw a small curve starting from the lowest part of the neckline (I did go a bit on the inside of the pattern for a smoother transition).
Draw the 1 cm elastic seam allowance on the neckline again.
Los pasos para modificar la pieza de la copa interior (A) para poder cortarla en doblez y evitar la costura central son los siguientes:
Elimina el margen de costura de 1 cm del elástico del escote, para que sea más fácil modificar el patrón.
Elimina el margen de costura de 6 mm del centro delantero, ya que ahora esta pieza se corta en doblez.
Dibuja una pequeña curva empezando de la parte más baja del escote (yo la hice un poco hacia el interior del patrón para conseguir una transición más suave).
Vuelve a dibujar el margen de costura de 1 cm para el elástico en el escote.
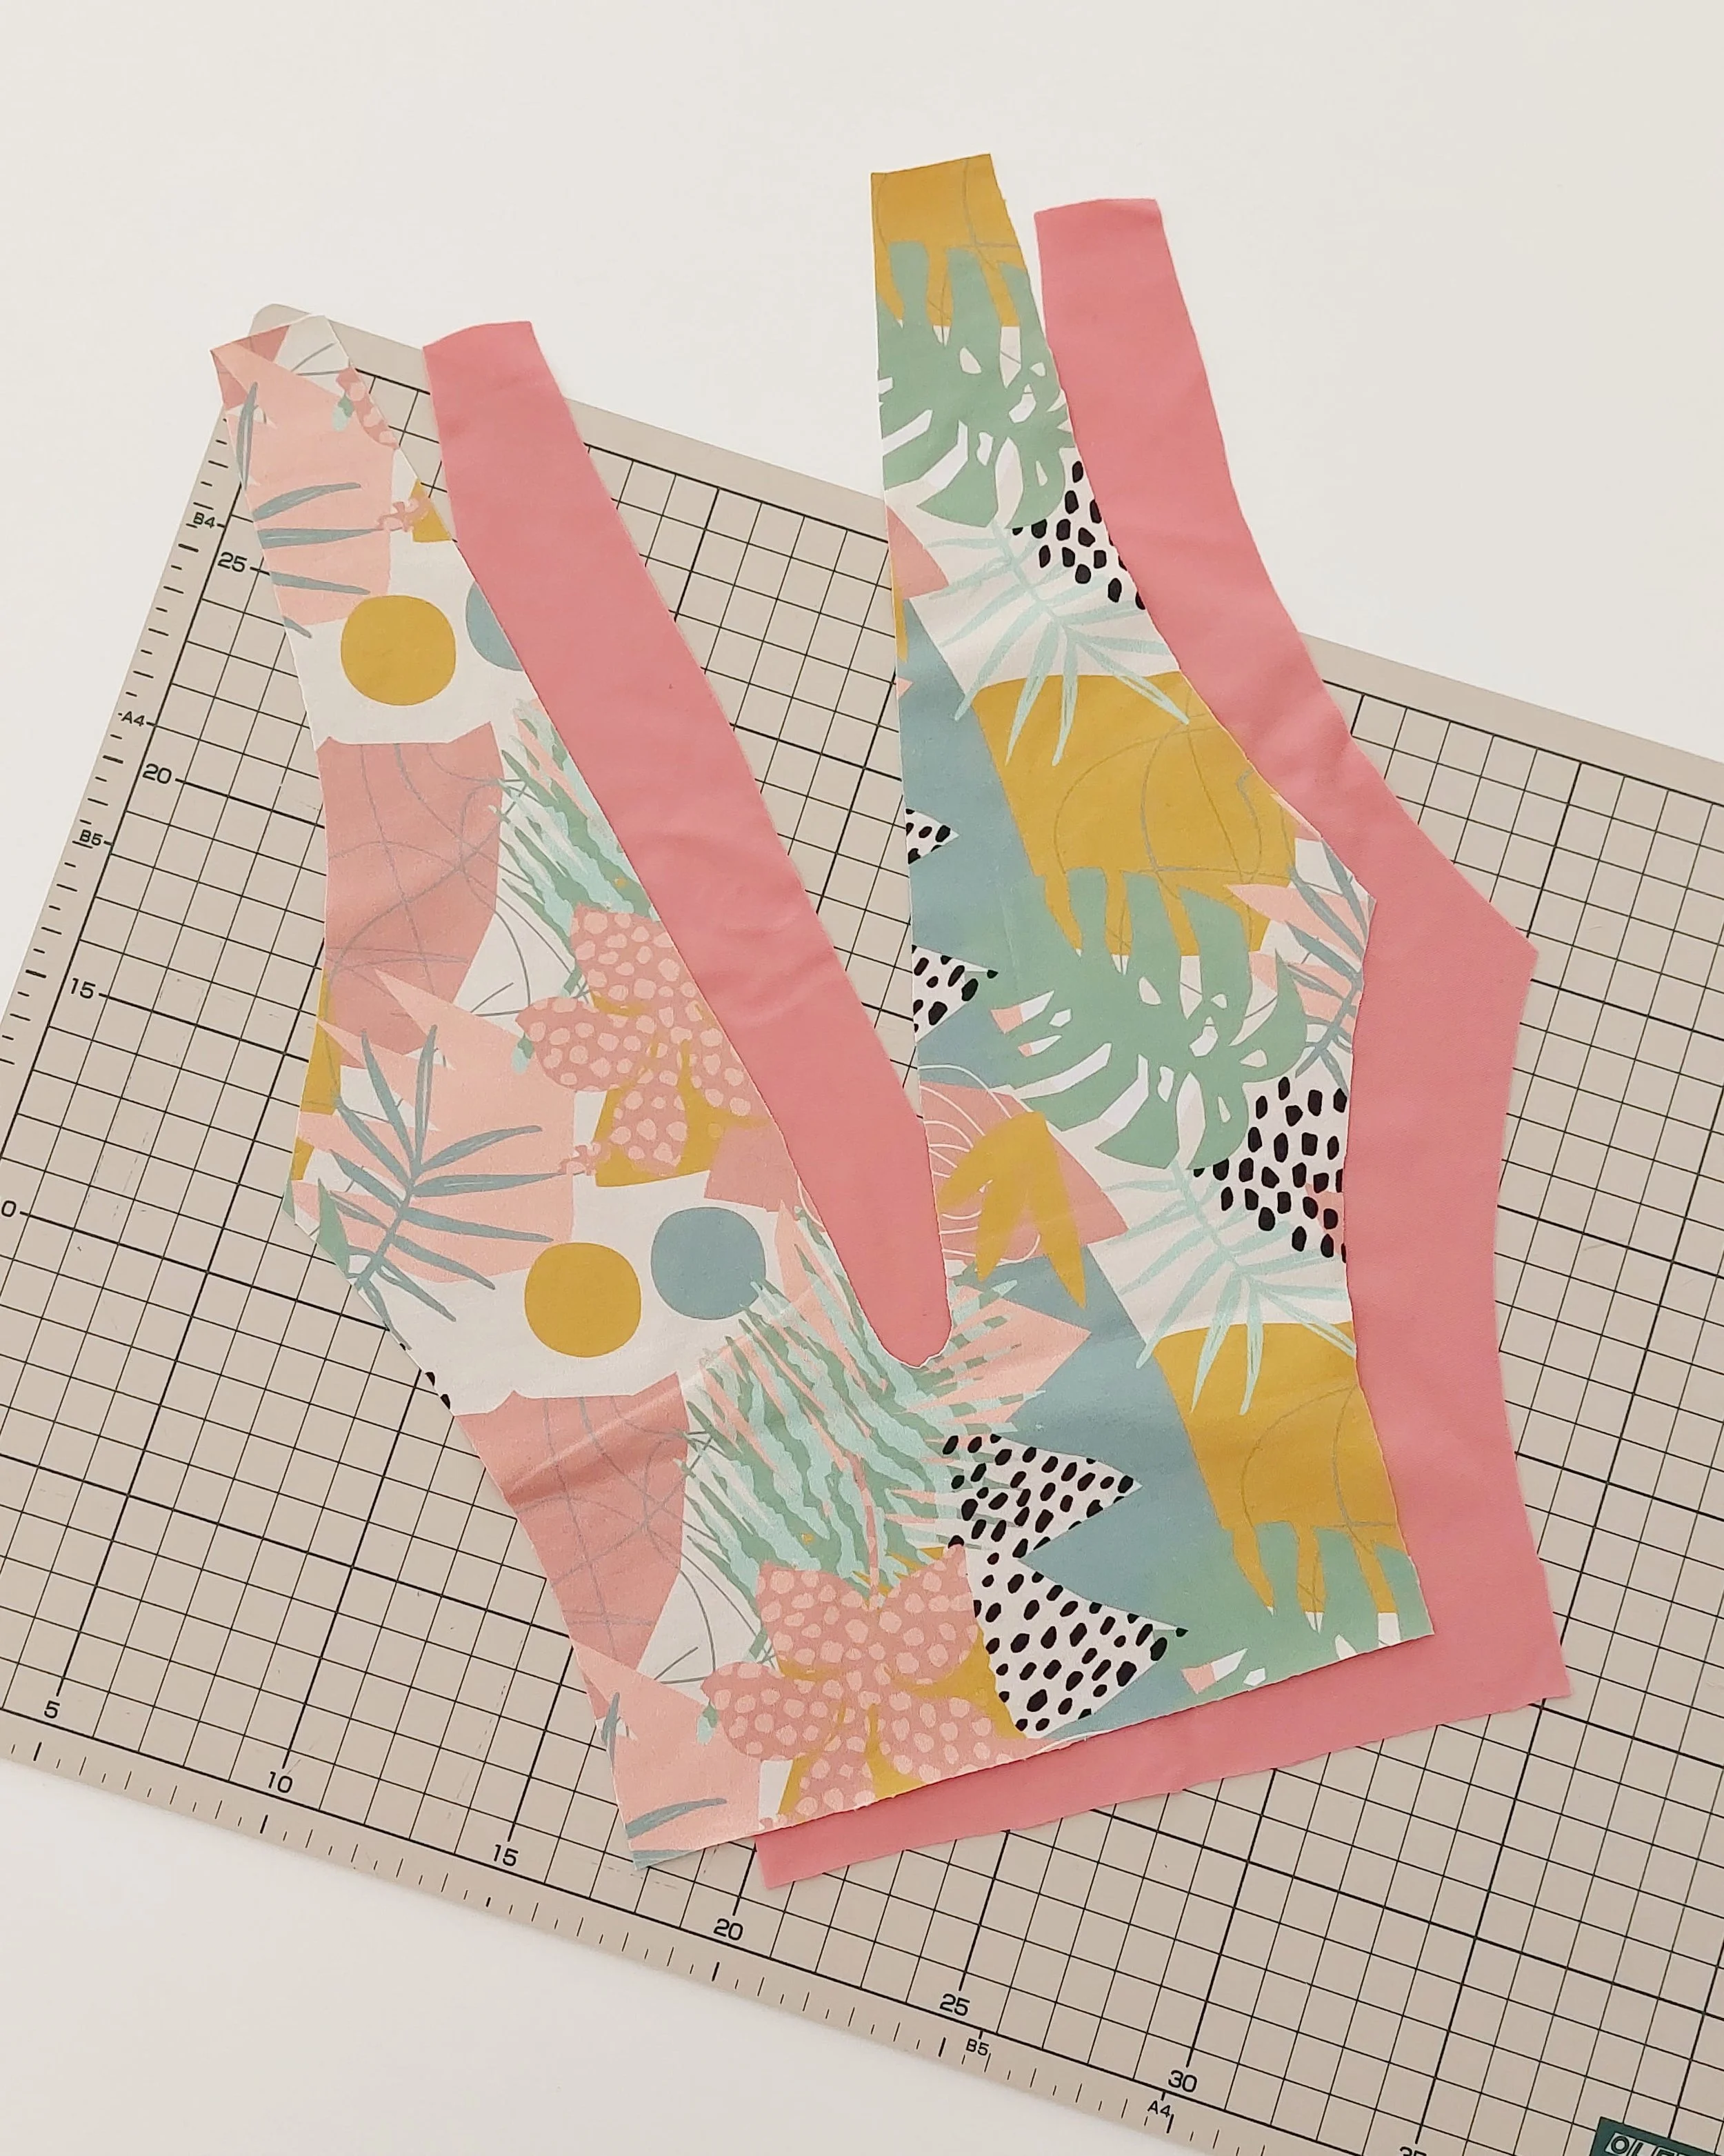
Now you can cut this piece on the fold.
Ahora puedes cortar esa pieza en doblez.
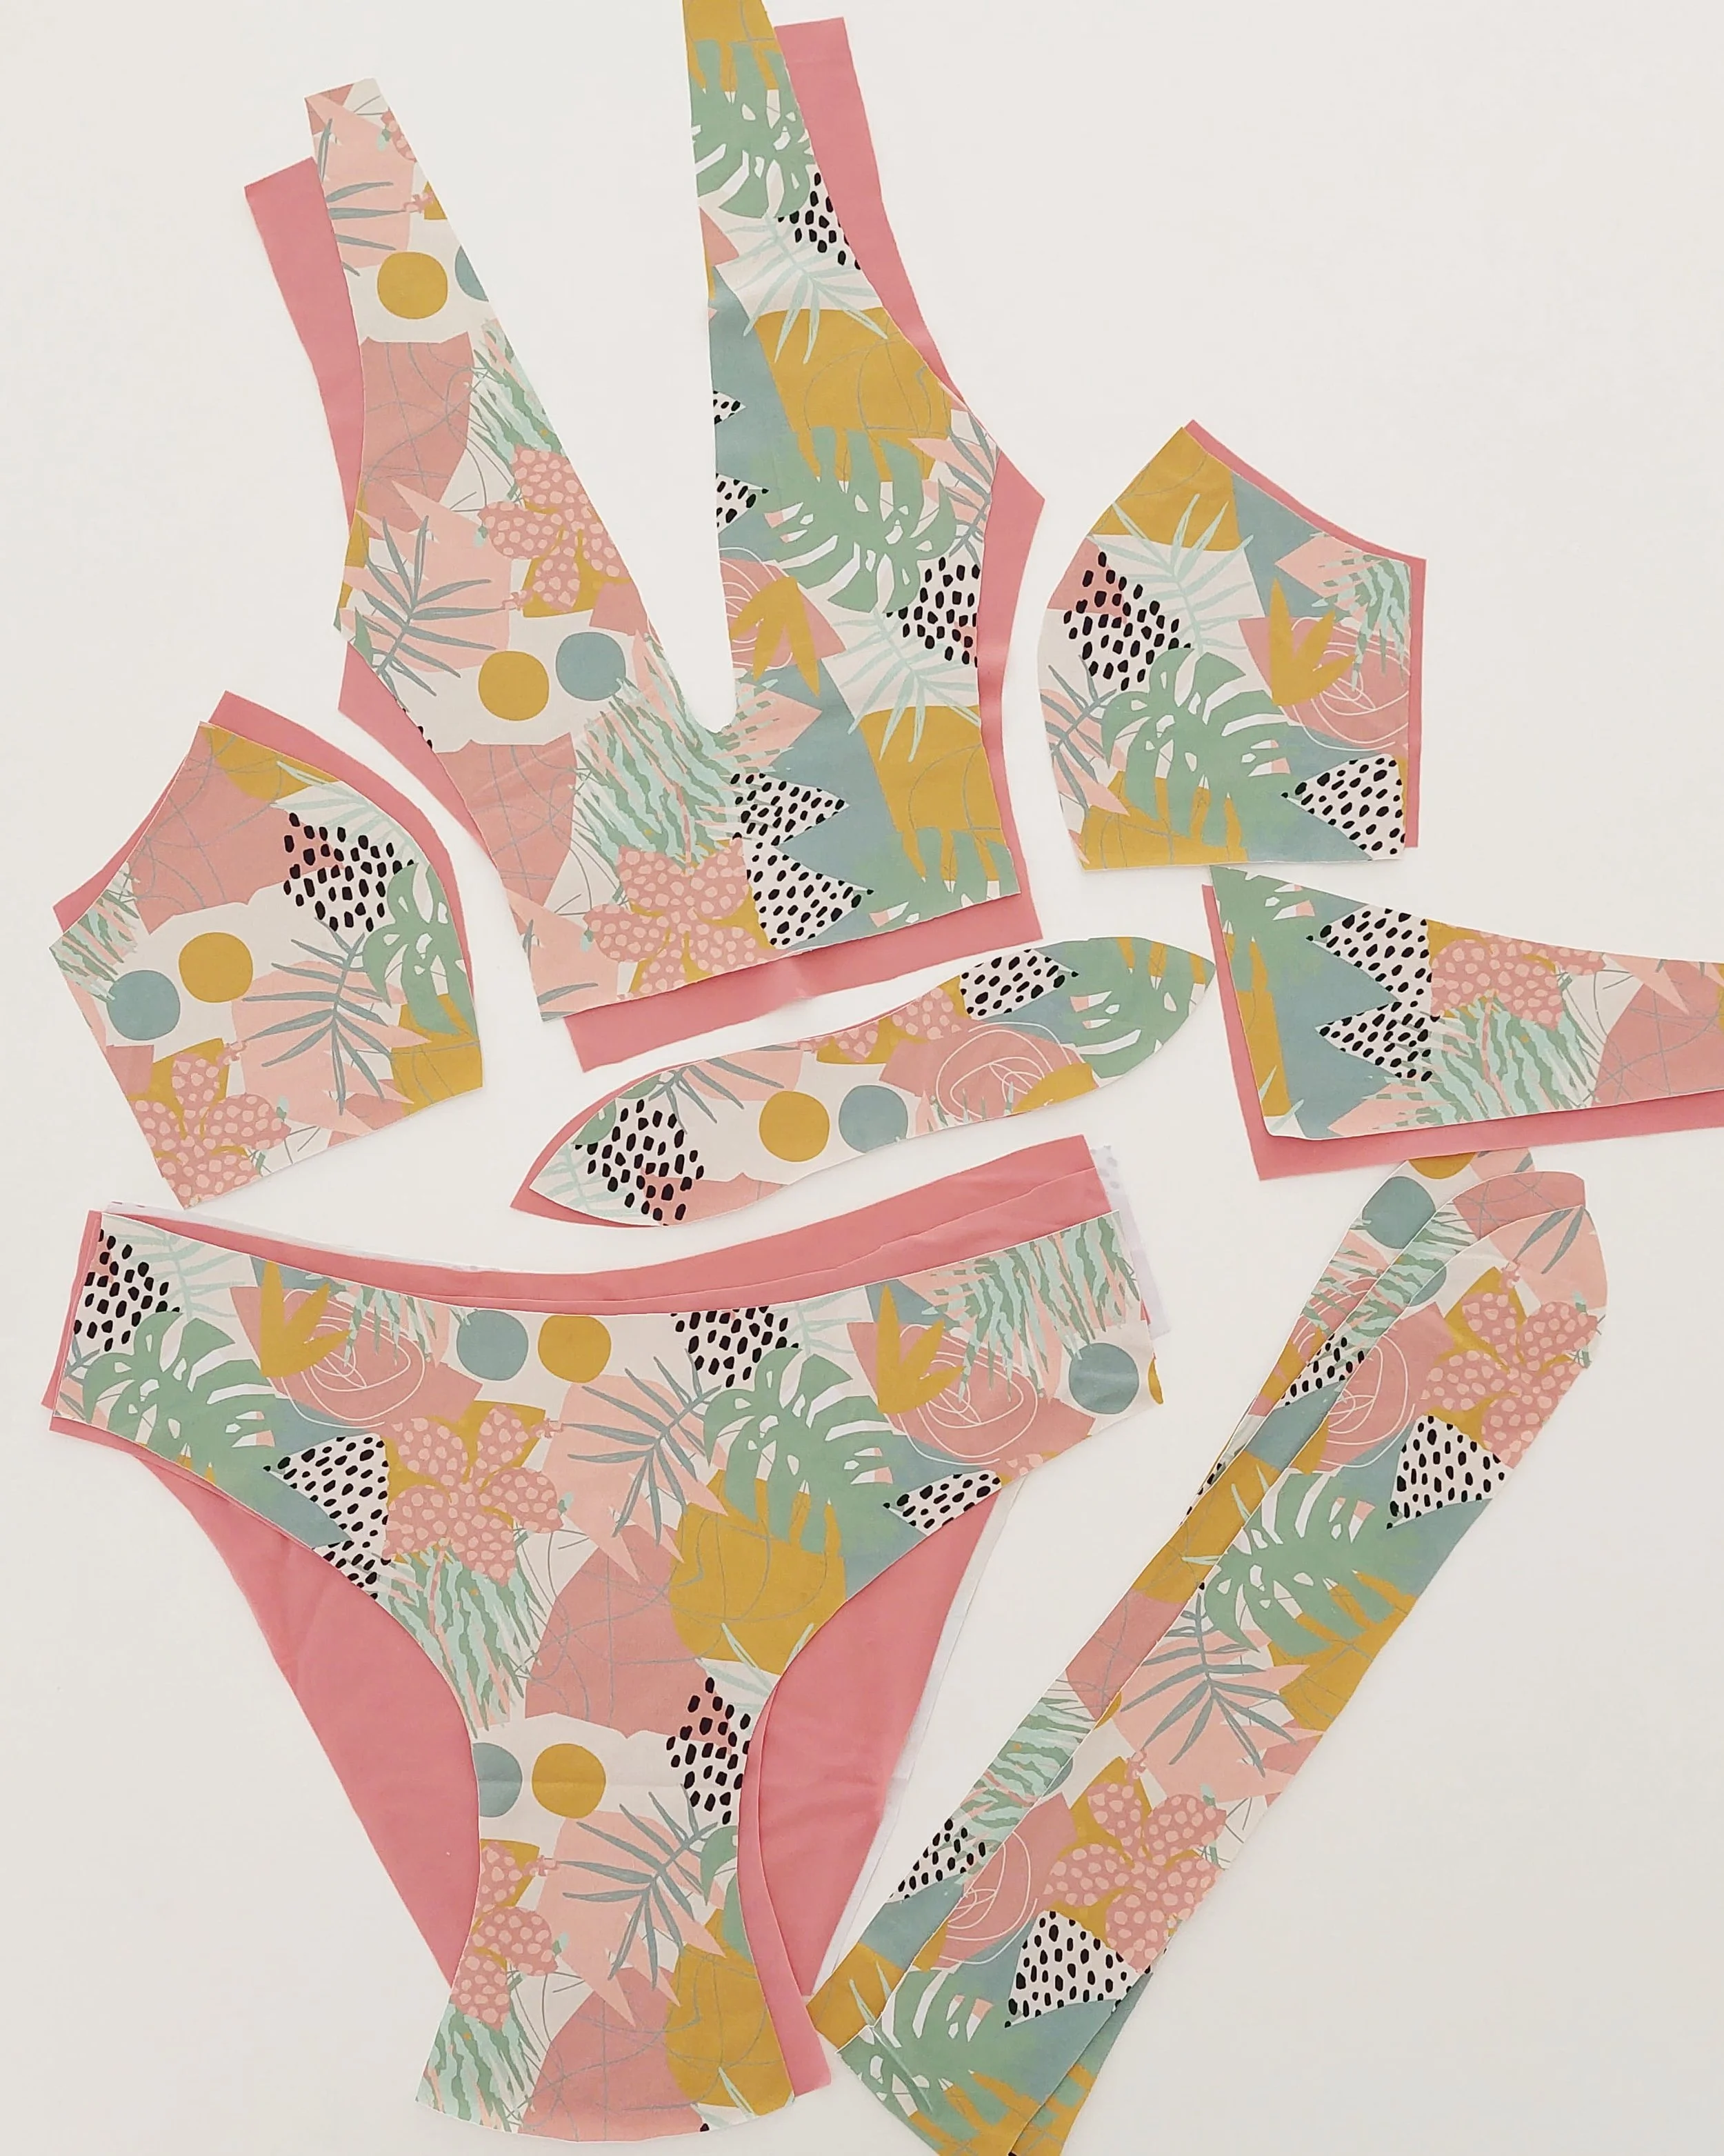
I cut pieces A (the new modified piece), B, and C from both fabrics (in my case, one is a solid color and the other is a print). I then cut two pairs of ties (D) for the neck and the back closures from the print fabric, and for the tie (E) I used one layer of solid color and one layer of print.
Corté las piezas A (la nueva pieza modificada), B y C de ambas telas (en mi caso, una es de color liso y la otra estampada). Después, corté dos pares de tiras para atar en el cuello y en la espalda (D) de la tela estampada y, para el lazo (E), usé una capa de tela lisa y otra de tela estampada.
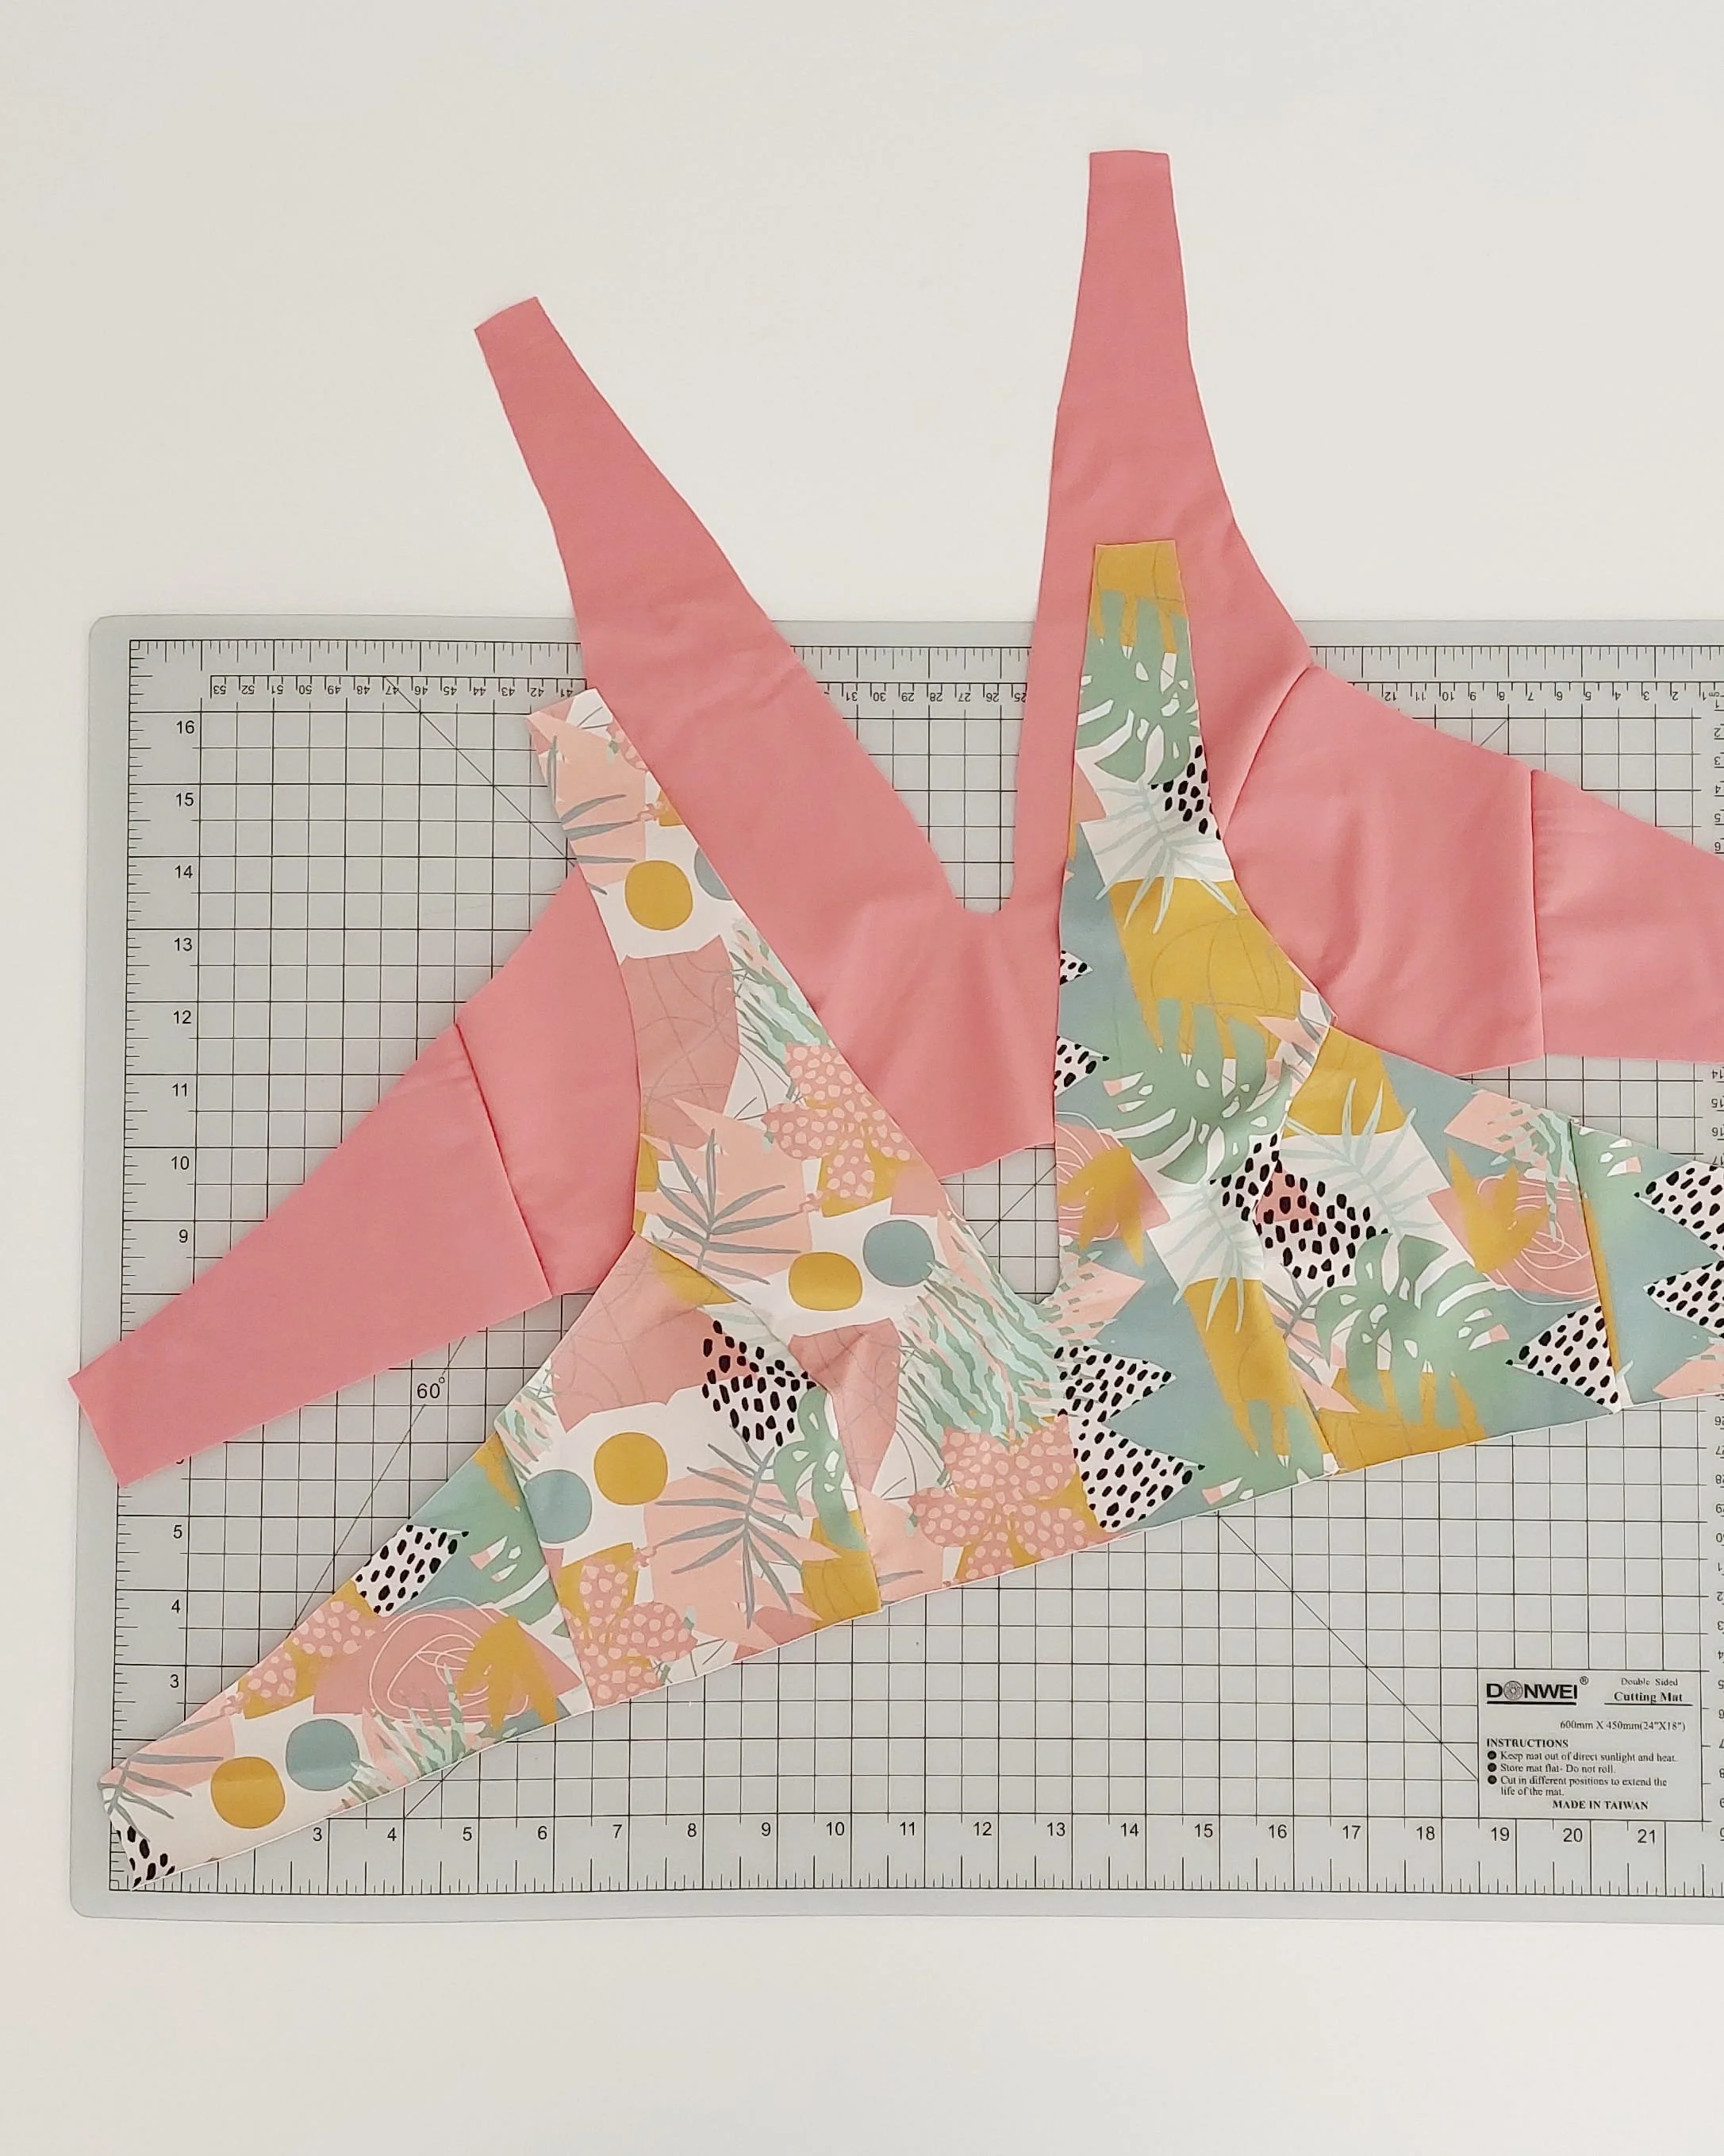
First, join A, B, and C together separately for the print and the solid layer, using either a small zigzag or a serger (I used a serger for this project). Put both layers with right sides together.
Primero une las piezas A, B y C por separado para la capa estampada y la capa lisa, con un zigzag pequeño o con la remalladora (yo usé la remalladora para este proyecto). Coloca ambas capas derecho con derecho.
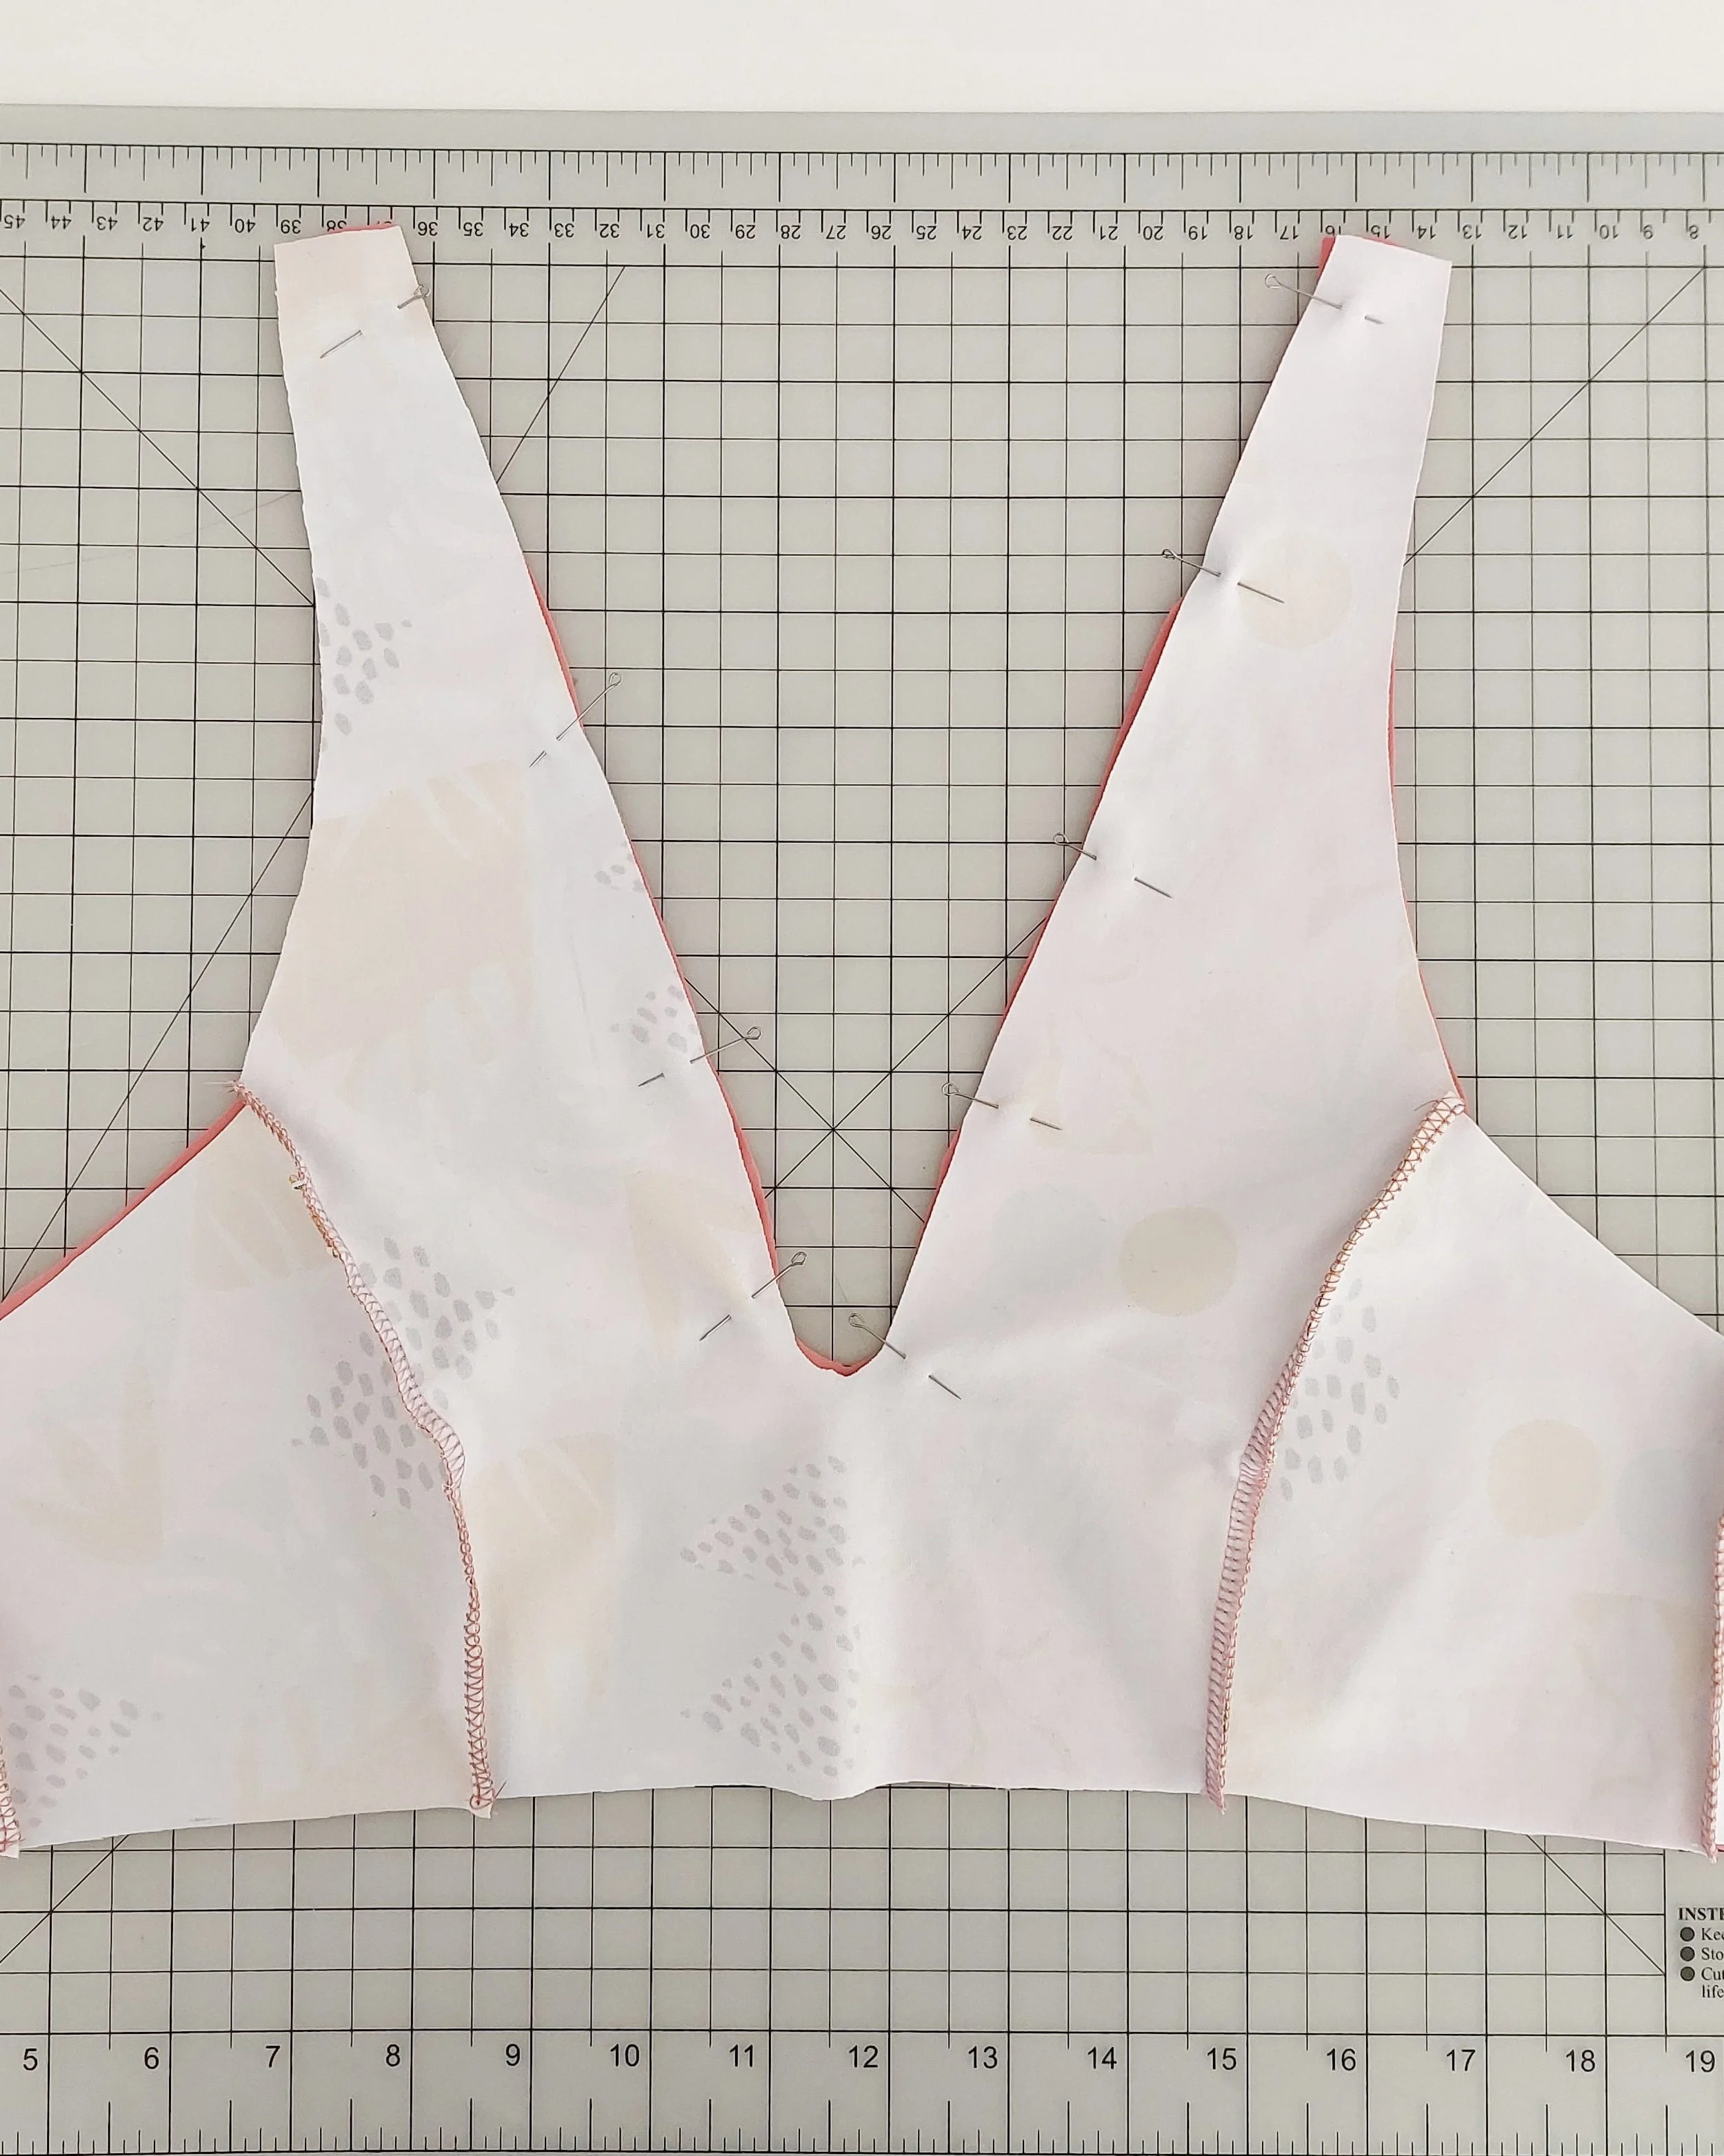
The elastic has to be inserted on the neckline, the armholes, and the lower part of the band. There are various options here.
What I did for this part of the tutorial: I pinned the edges together and sewed the elastic on with a zigzag.
Hay que colocar el elástico en el escote, las sisas y la parte inferior de la banda. Hay varias opciones.
Lo que hice en esta parte del tutorial: sujeté los bordes con alfileres y cosí el elástico con el zigzag.
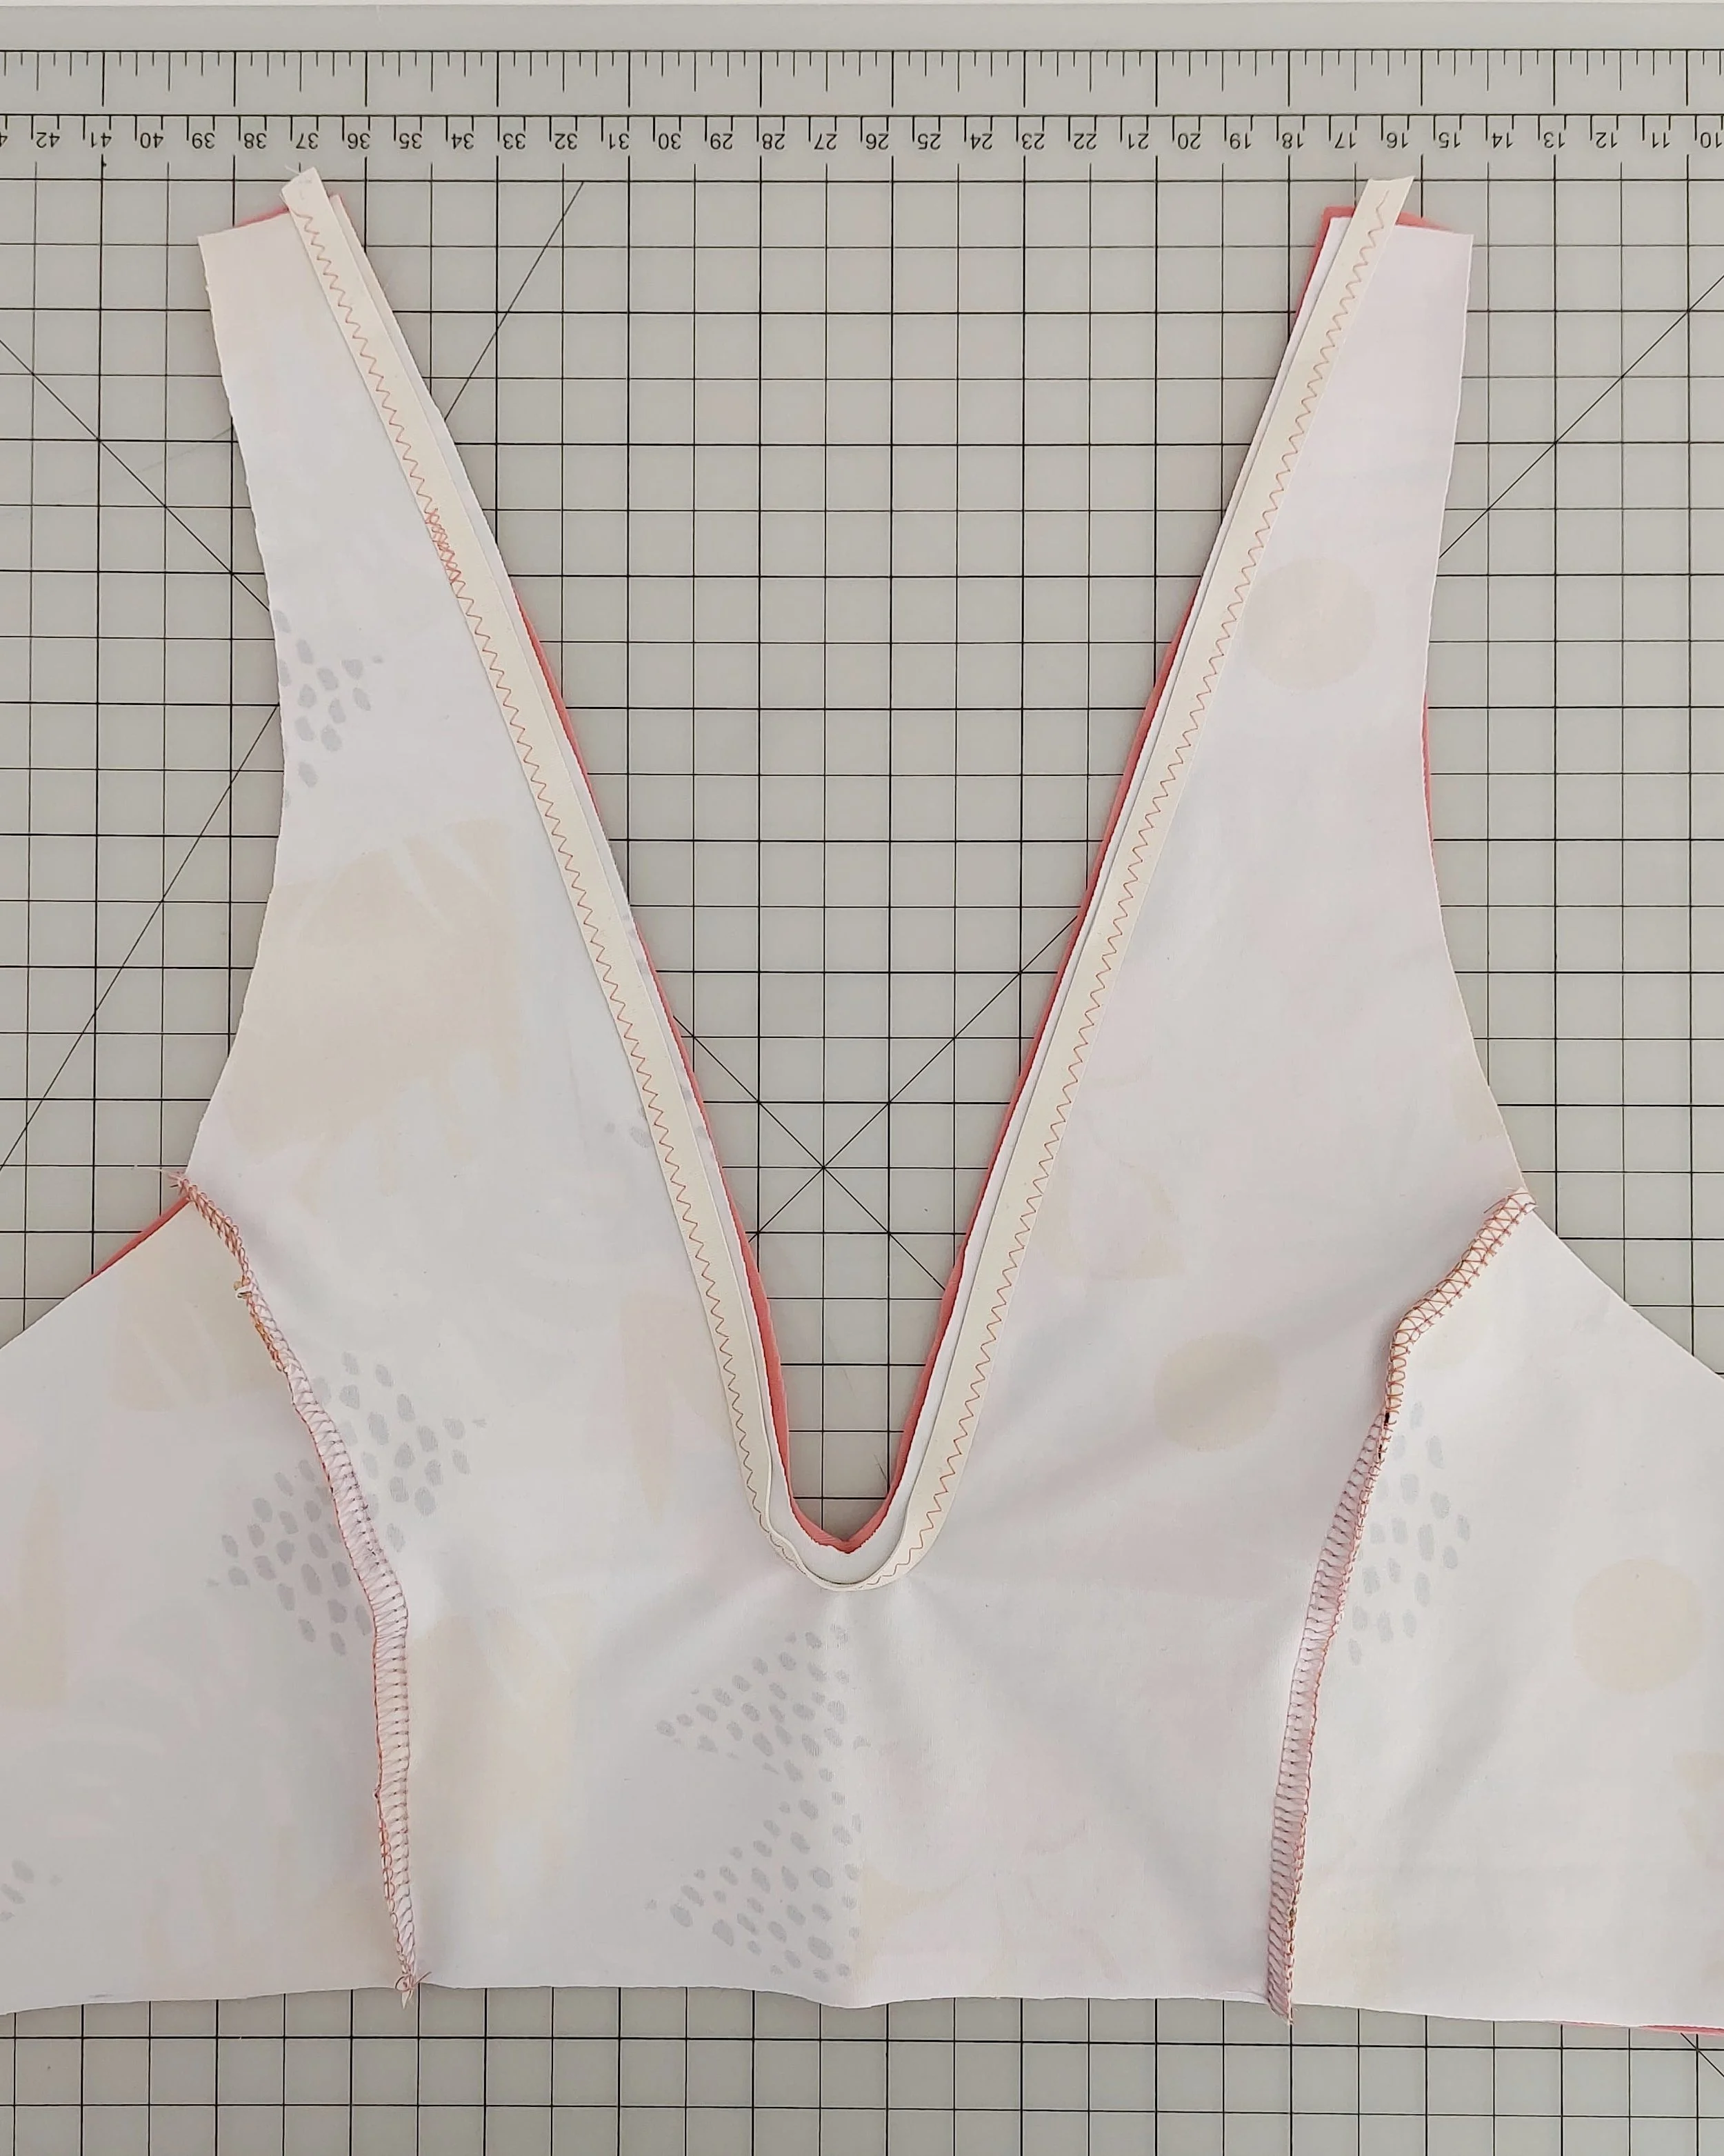
To follow the seam allowance included in this pattern (1 cm), I sewed my elastic (which is 8 mm wide) on, leaving a 2 mm edge (as explained in the pattern instructions for the regular elastic application method). I sewed on the left side of the elastic, so the zigzag is on the inner edge of it. I did not pull the elastic; I just kept it taut so it wouldn’t be loose either (otherwise you end up with wavy seams). When sewing the deep curve on the neckline, I held the fabric as straight as possible, and it wasn’t very complicated thanks to the stretchy nature of swim fabric.
For the bikini top, I sewed the elastic all the way to the end of every seam. For the bottoms that I sewed afterwards, I left the 6 mm seam allowance free on all ends so it would be less bulky once the pieces were sewn together (see the images of this below). However, I did not notice a very big difference, so you can go with either option.
If I wanted to apply this elastic with a serger, which is something you can do, you would need to use a narrower swim elastic (6 mm) and cut down the seam allowance to 6 mm beforehand too. Otherwise, you’d be sewing only on one part of the elastic and making the whole garment 2 mm bigger on every side where the elastic is sewn on. I’d highly recommend joining the pieces first with a basting stitch (a long straight stitch on your sewing machine) if you’re going to serge the elastic on. This way, you avoid dealing with pins and elastic at the same time.
Optionally, you can sew a smaller zigzag, like the one we usually use to sew pieces together, or serge these edges together before sewing on any elastic. On the bikini top, I did not do it, and on the bikini bottoms, I did do it. For the sake of the experiment, I tried both. I didn’t notice too much difference, but if you’re concerned that the zigzag you sew when attaching the elastic is not enough on its own, you can do that previous step too.
Para respetar el margen de costura incluido en este patrón (1 cm), cosí el elástico (que mide 8 mm de ancho) dejando un borde de 2 mm (tal y como se explica en las instrucciones del patrón para el método habitual de aplicación del elástico). Cosí por el lado izquierdo del elástico, de modo que el zigzag quedara en el borde interior del elástico. No estiré el elástico, solo mantenía una tensión uniforme para que tampoco quedara suelto (sino se forman costuras onduladas). Al coser la curva pronunciada del escote, mantuve la tela lo más recta posible, y no resultó muy complicado gracias a la elasticidad de la lycra.
Para el top del bikini, cosí el elástico hasta el final de cada costura. Para la braga, que cosí después, dejé libre el margen de costura de 6 mm en todos los extremos para que quedara menos voluminoso una vez unidas las piezas (verás las fotos más abajo). Sin embargo, no noté una gran diferencia, así que puedes optar por cualquiera de las dos opciones.
Si quieres coser este elástico con la remalladora (algo que se puede hacer), tendrías que utilizar un elástico más estrecho (6 mm) y reducir también el margen de costura a 6 mm. Sino, estarías cosiendo solo en una parte del elástico y haciendo que toda la prenda quedara 2 mm más ancha por cada lado donde se cose el elástico. Te recomiendo que unas primero las piezas con una puntada larga a máquina de coser si vas a coser el elástico con la remalladora. De esta forma, evitas tener que manejar alfileres y elástico al mismo tiempo.
Opcionalmente, puedes coser un zigzag más pequeño, como el que solemos usar para unir piezas, o remallar estos bordes antes de coser cualquier elástico. En la parte de arriba del bikini no lo hice, y en la parte de braga sí. A modo de experimento, yo probé ambas opciones. No noté demasiada diferencia, pero si te preocupa que el zigzag que coses al colocar el elástico no sea suficiente por sí solo, también puedes seguir ese paso previo.
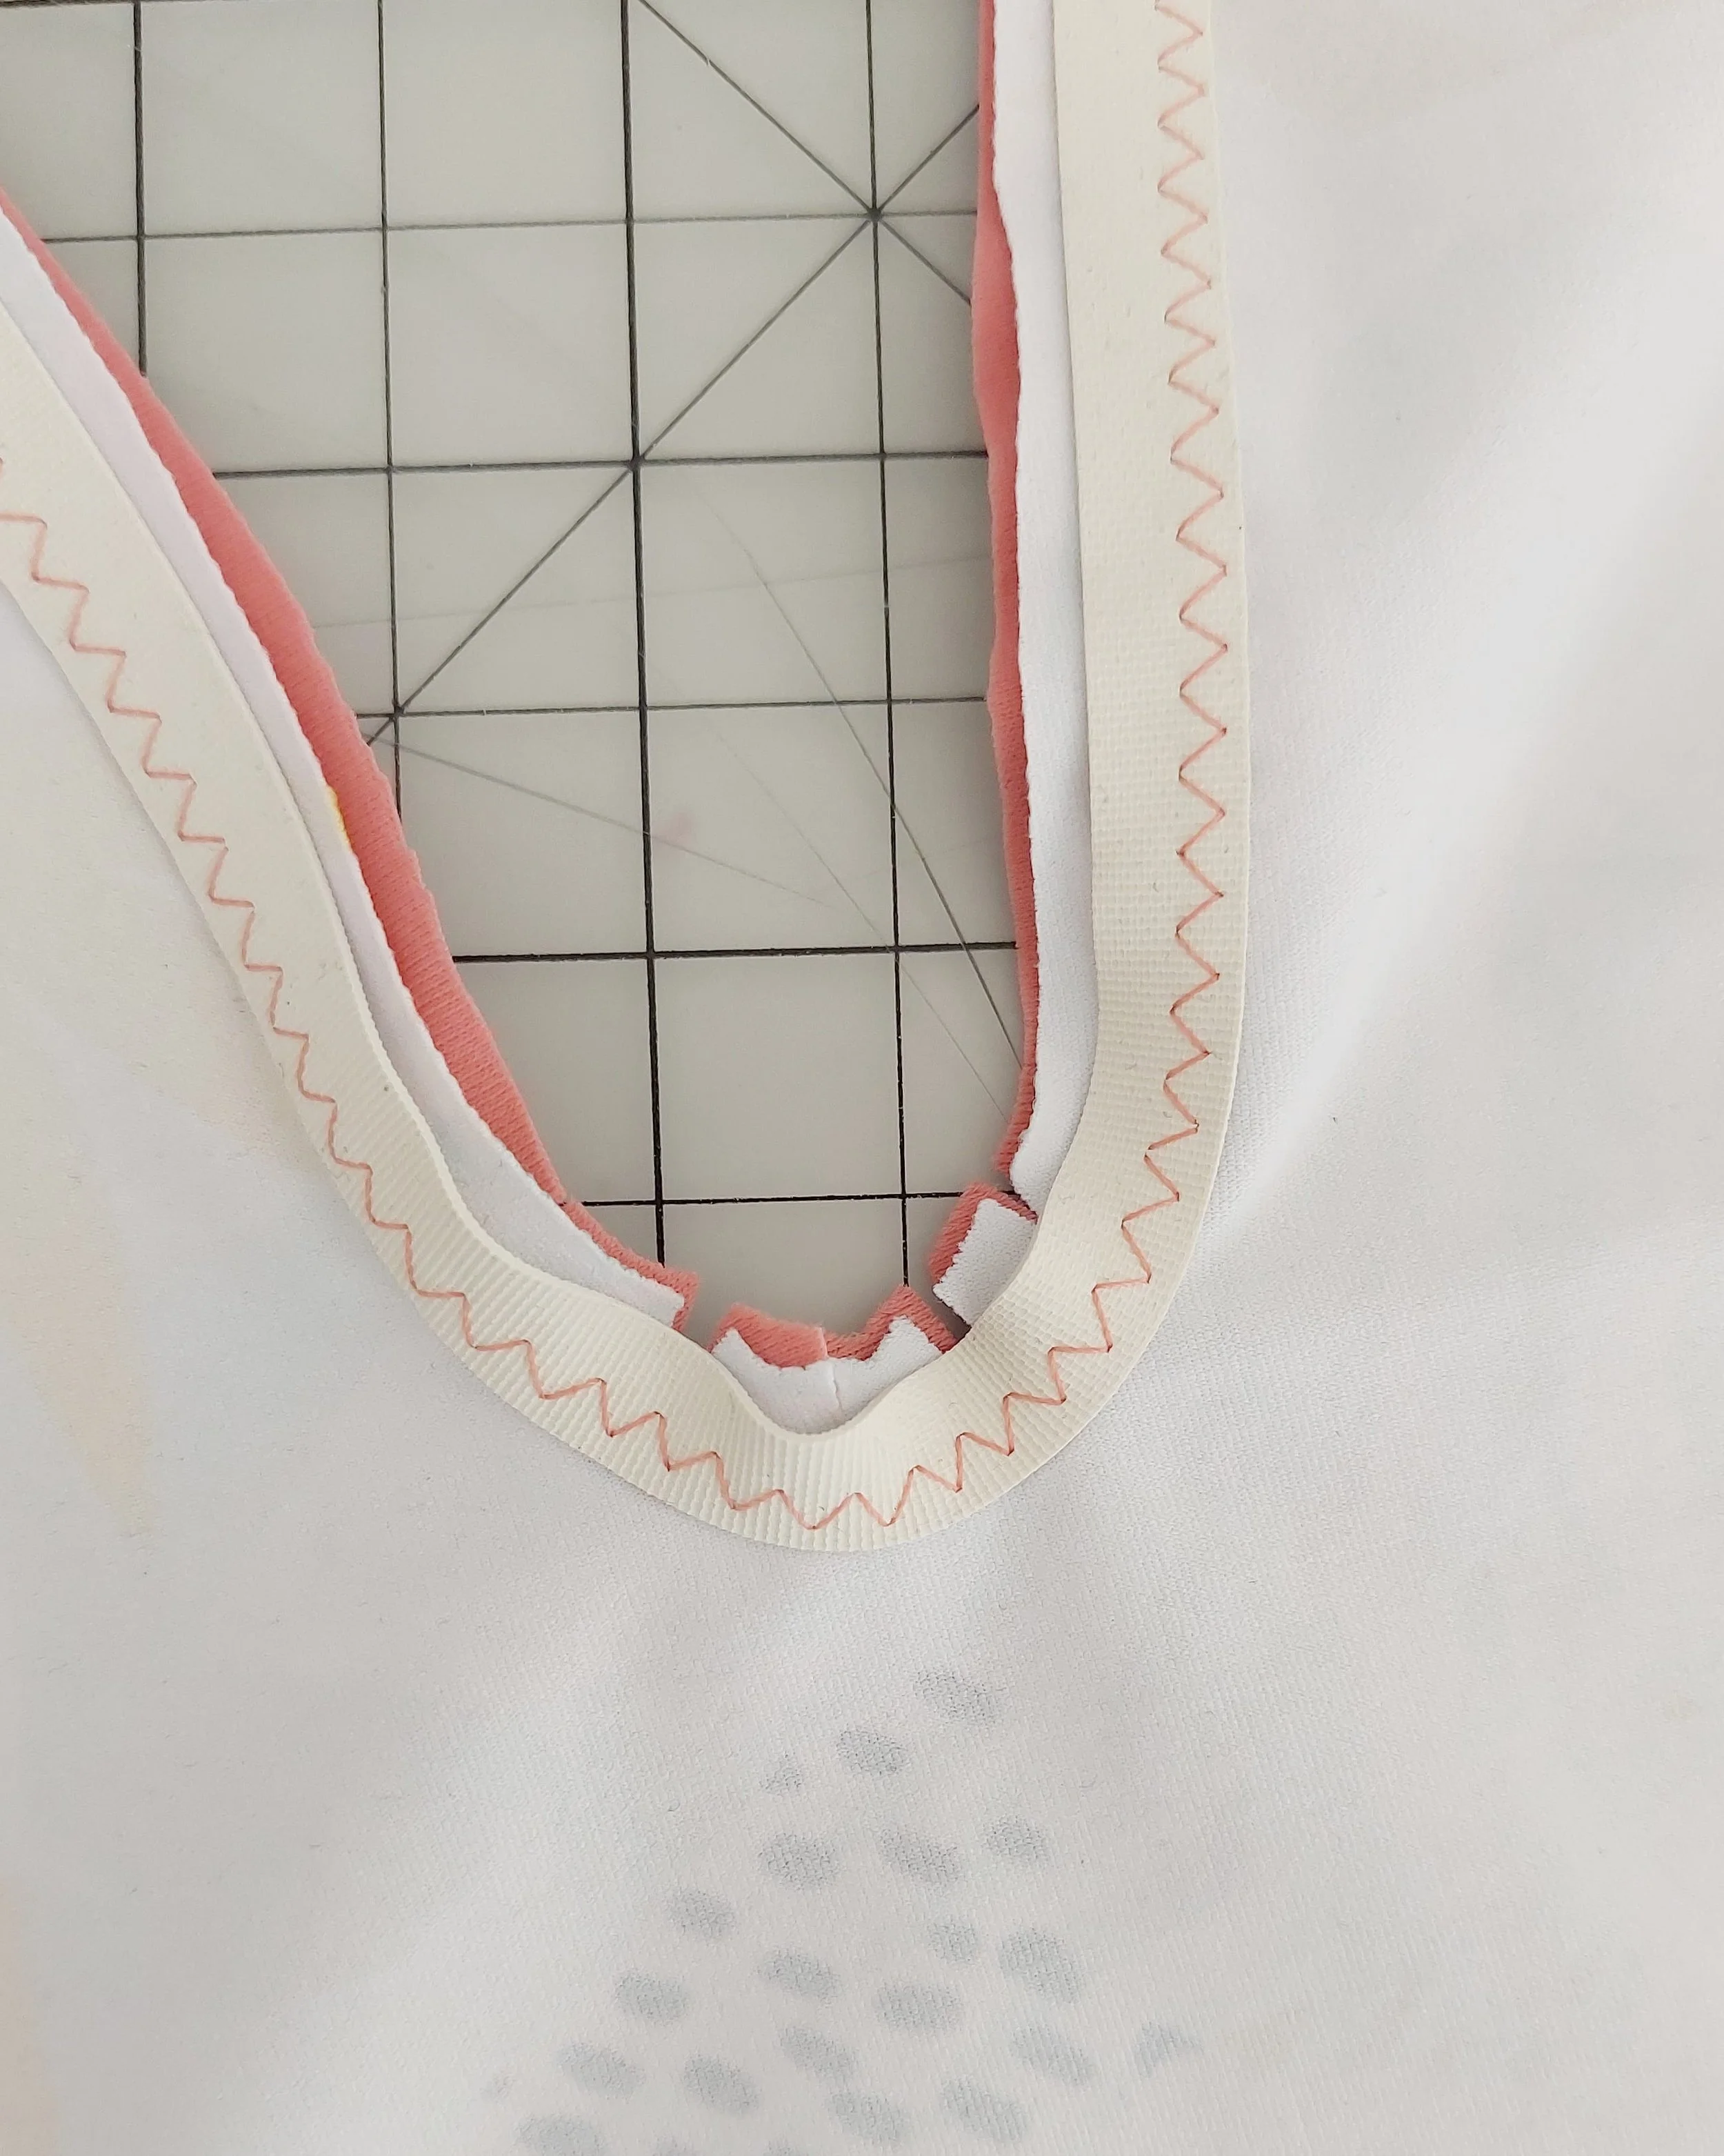
As the curve is deep on the lower part of the neckline and the seam allowance will pull once turned over, I did make some cuts there to get a better result.
Como la curva es pronunciada en la parte inferior del escote y el margen de costura tirará una vez dado la vuelta, hice algunos cortes en esa zona para conseguir que se quede un poco mejor luego.
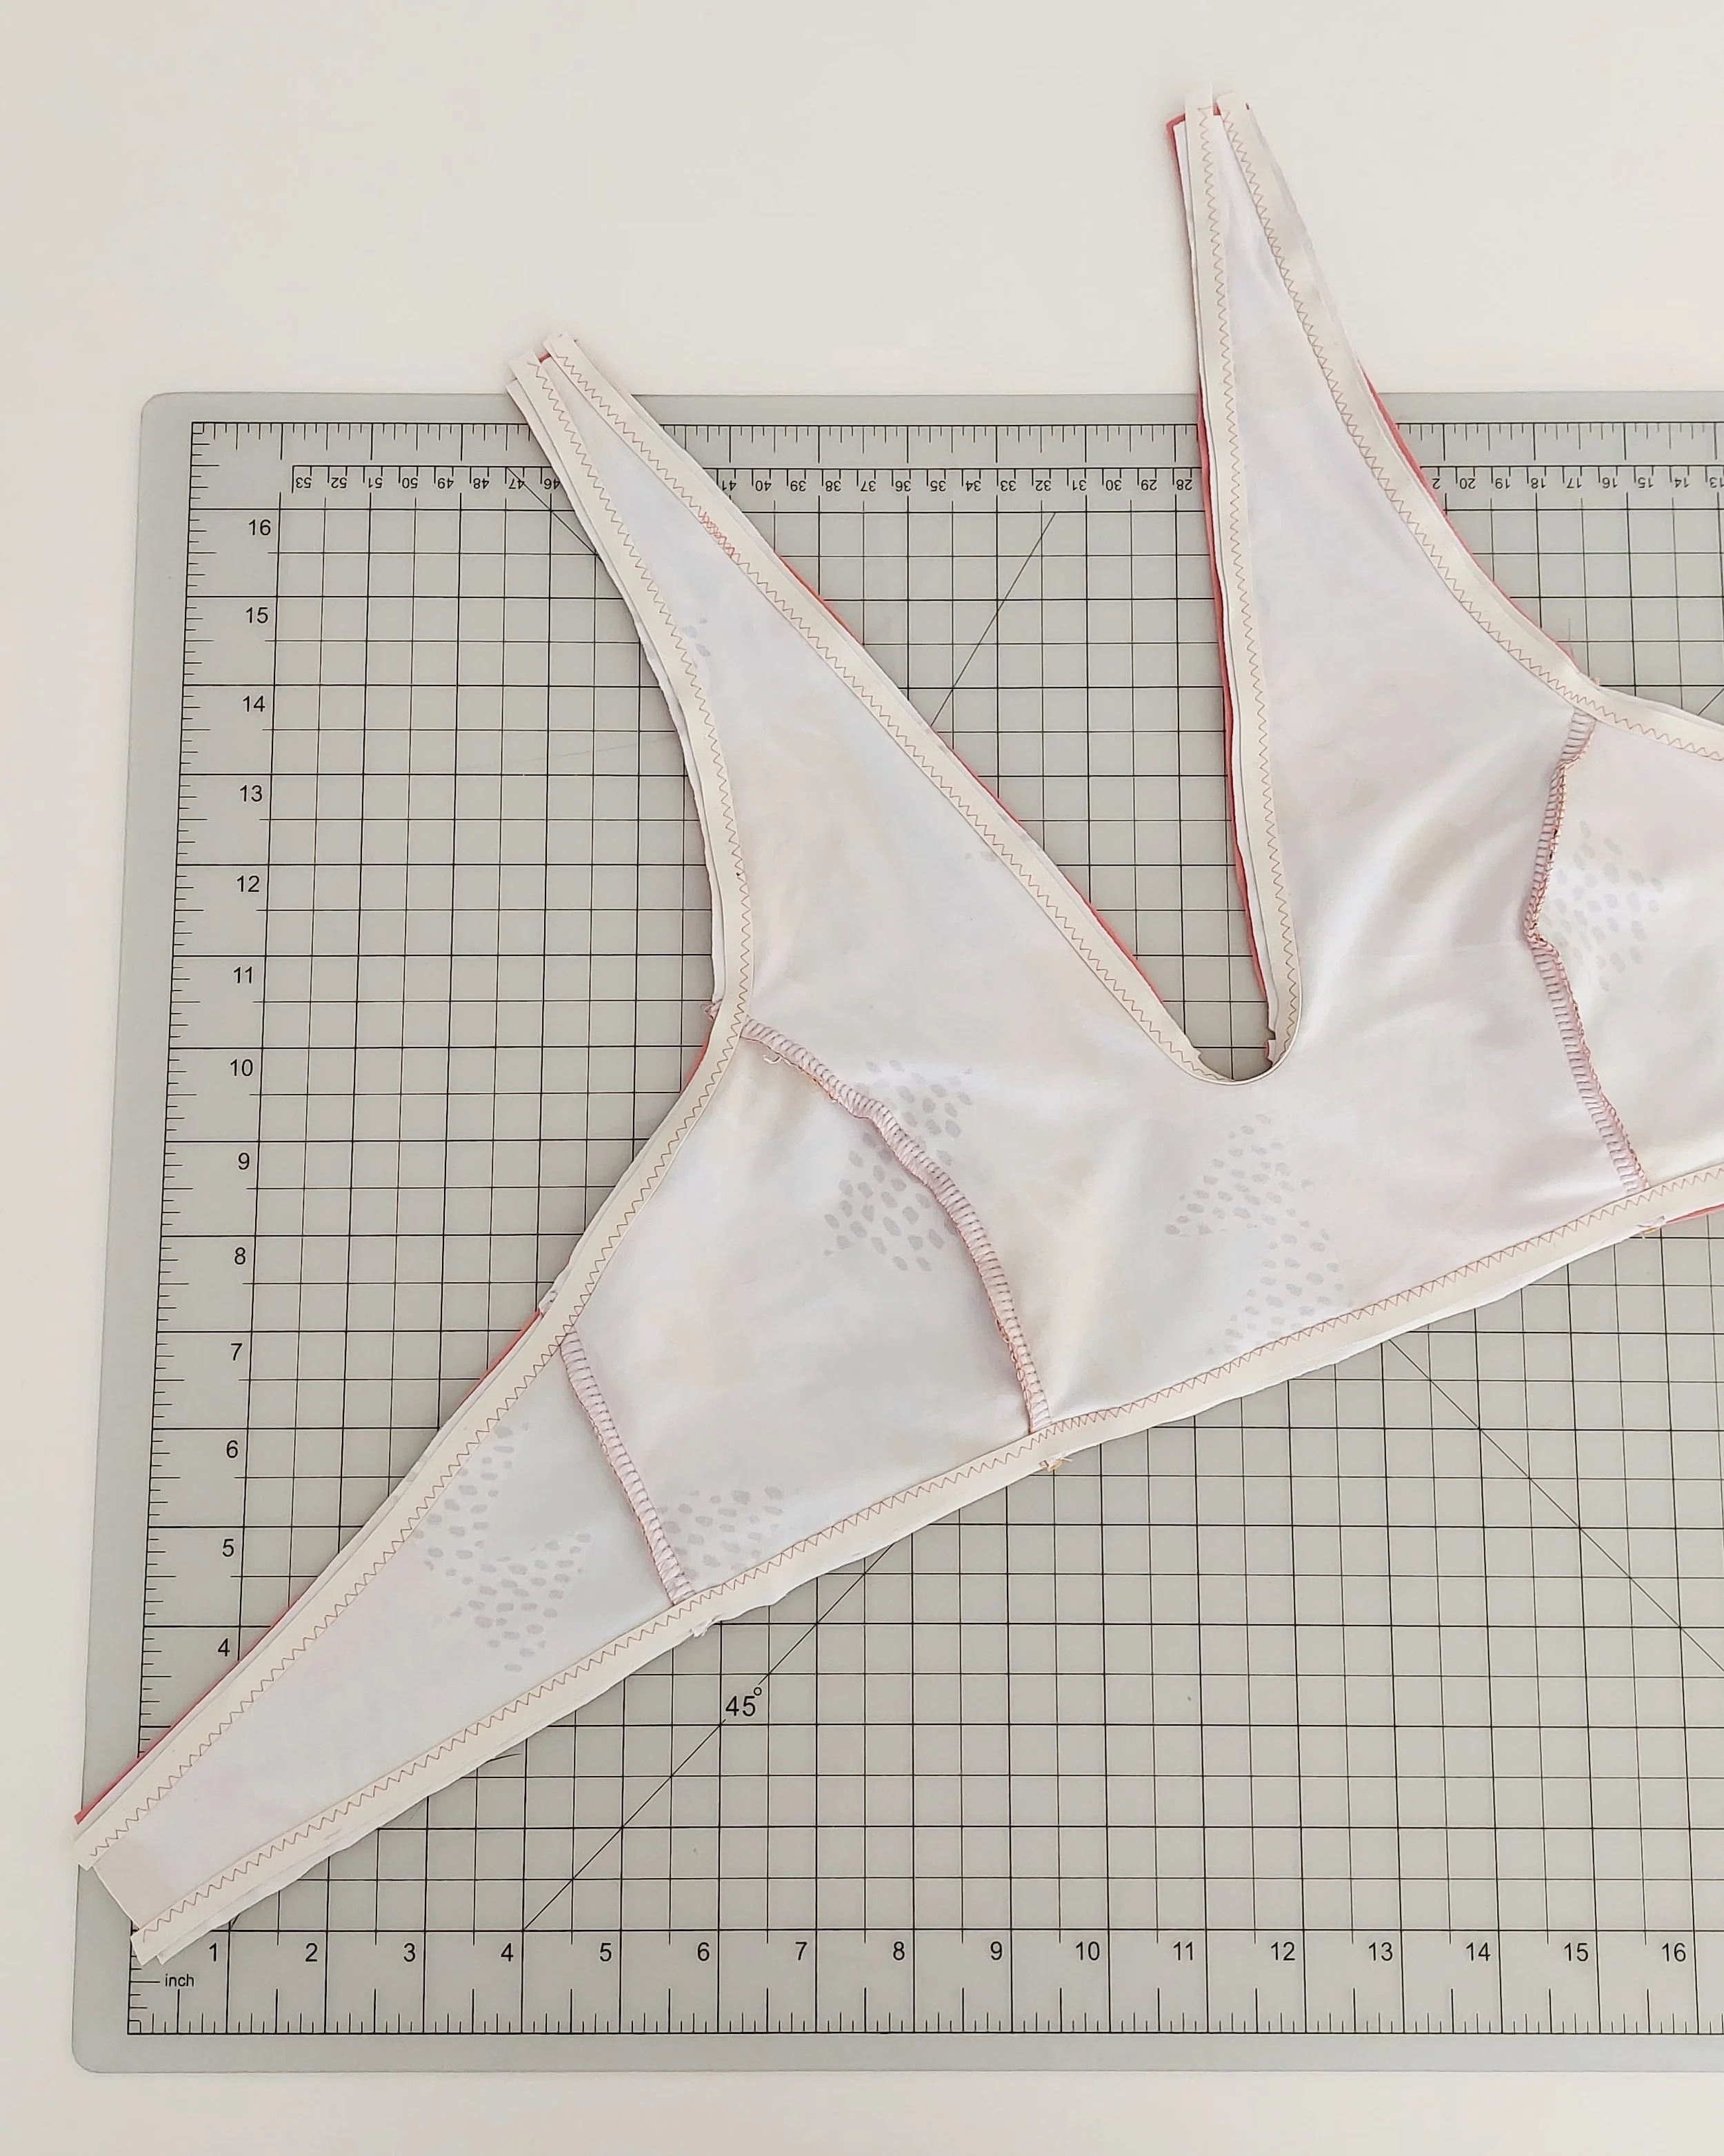
After that, you can sew the elastic in the same way for the armholes and the lower part of the band.
Después puedes coser el elástico de la misma forma en las sisas y en la parte inferior de la banda.
Attaching the ties /añadir los lazos
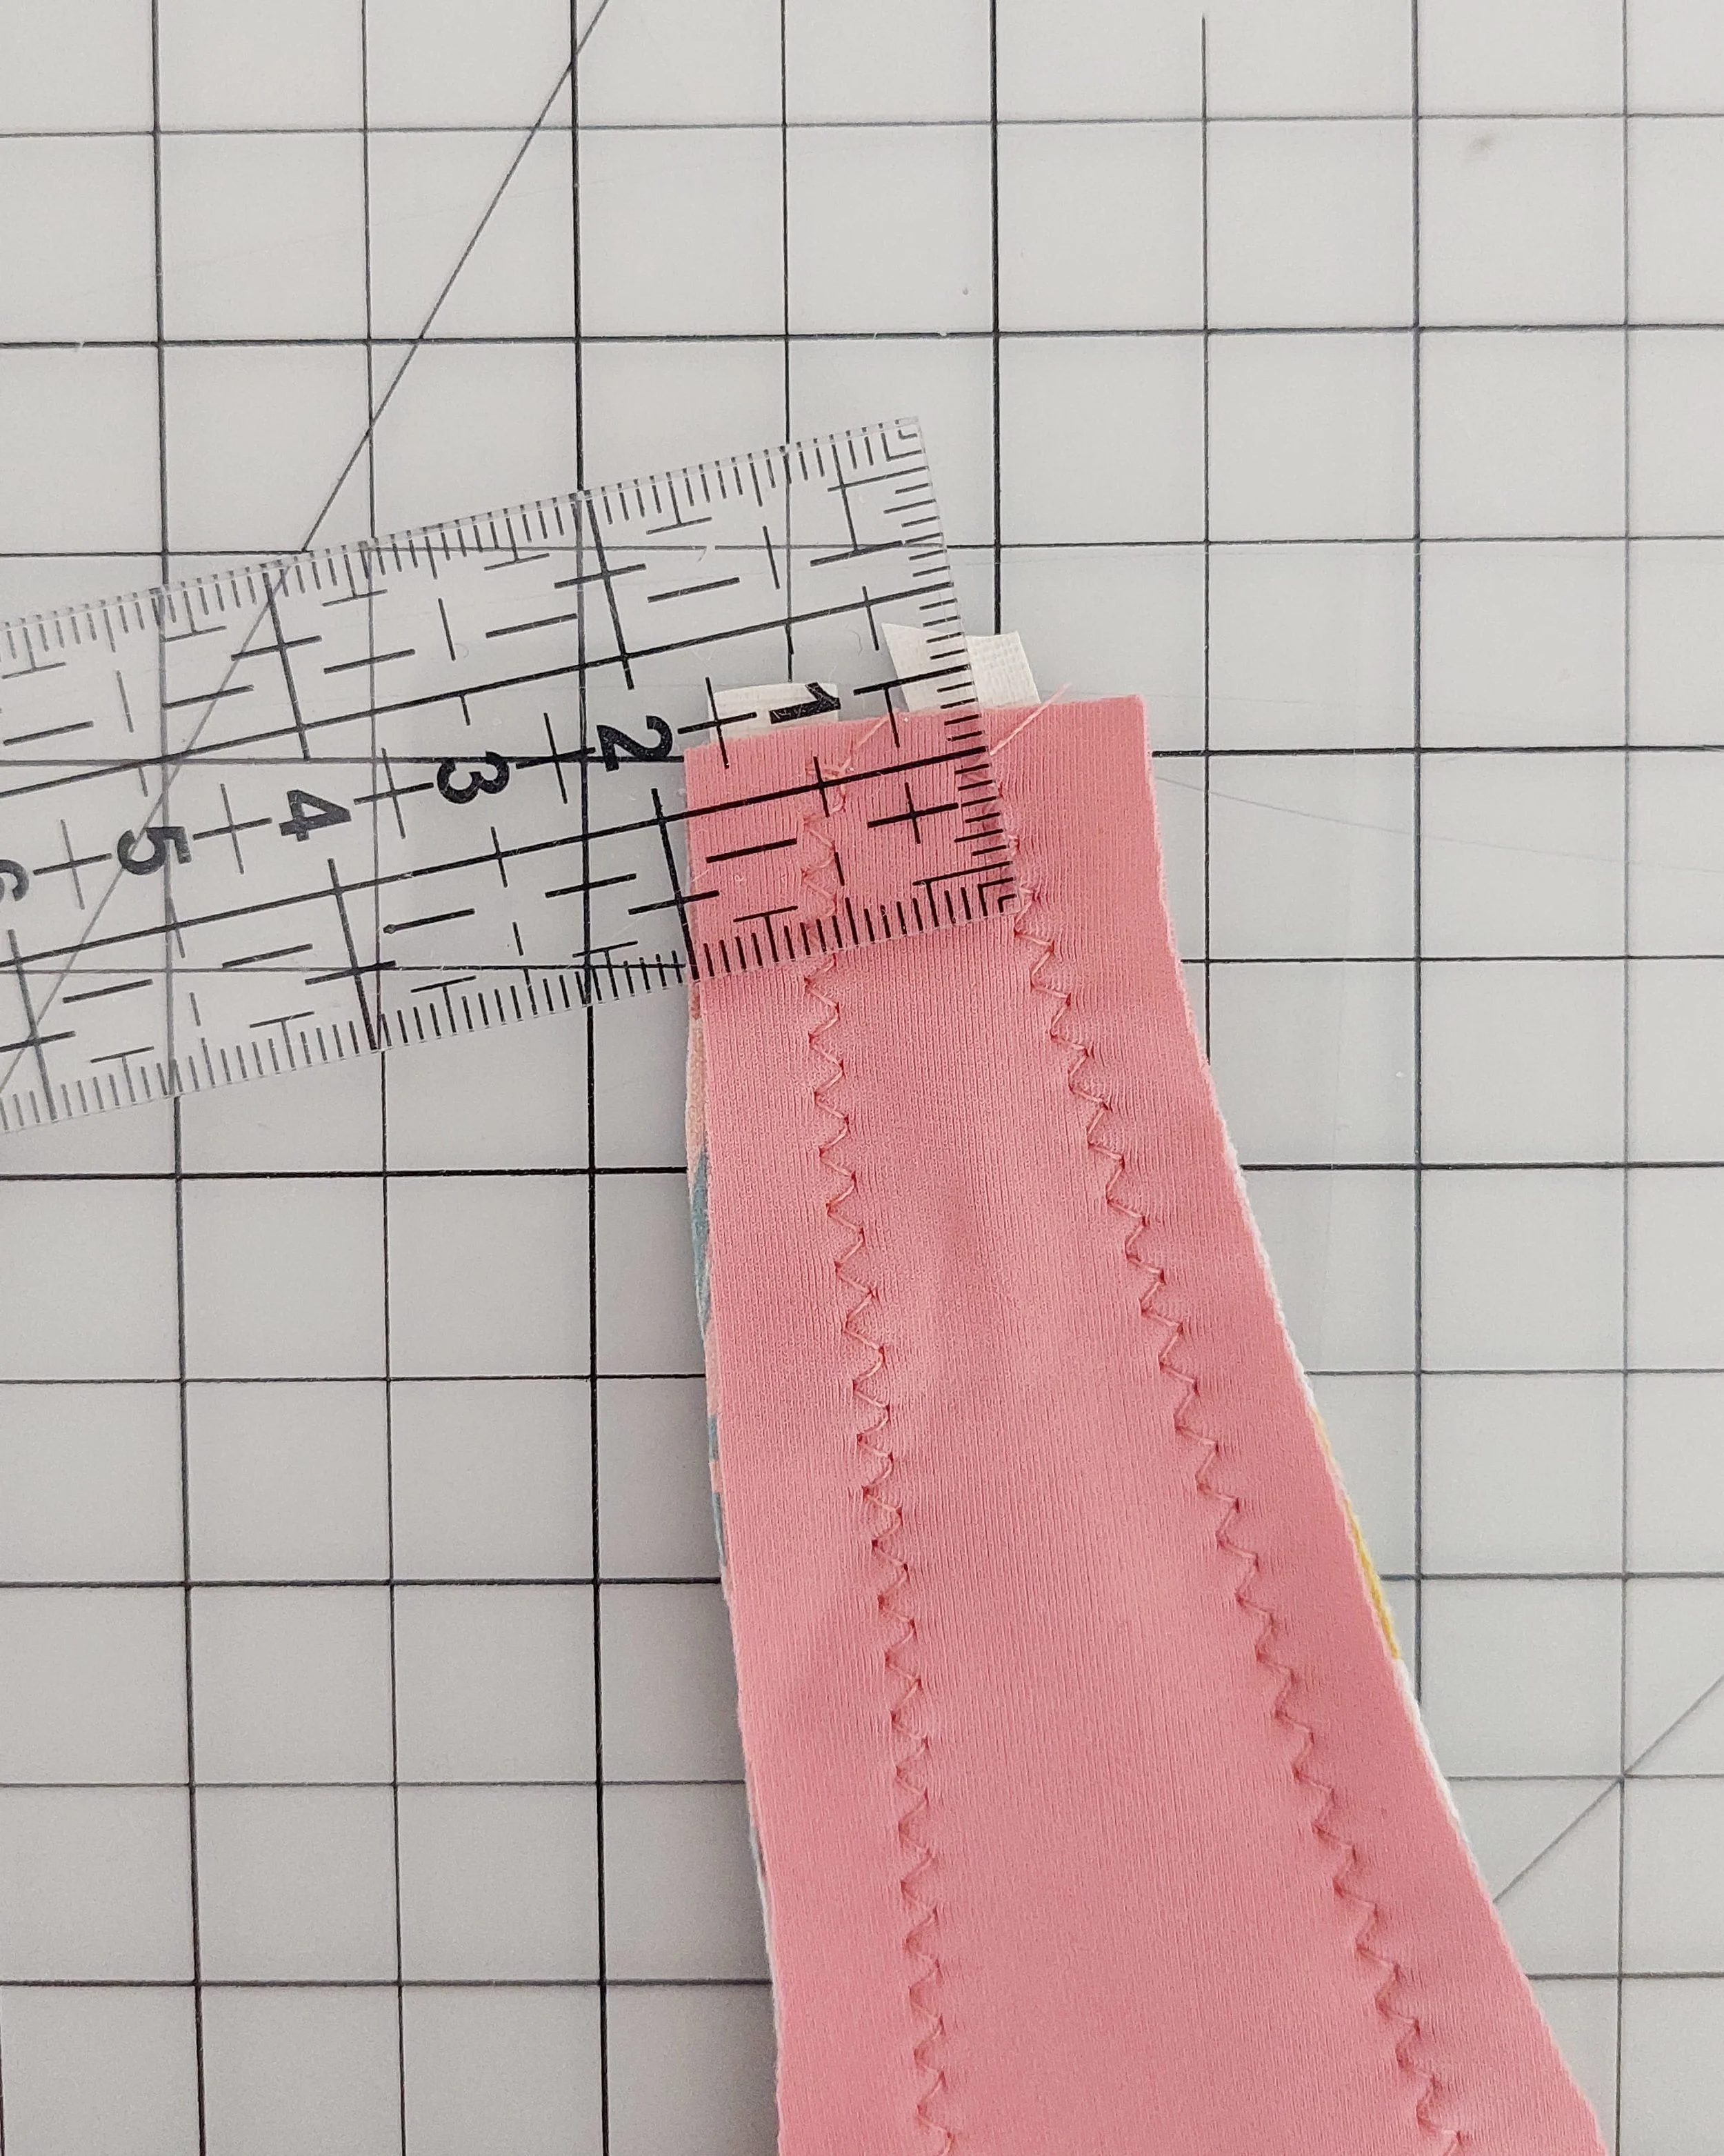
To make the ties for the neck, you need to adjust the end of the tie to match the width of the end of the inner cup piece. You should have a 1 cm wide opening there, but measure it to make sure how wide it is.
Para coser las tiras del lazo del cuello, tienes que ajustar el final de la tira (D) para que coincida con el ancho del final de la copa interior (A). Deberías tener allí una abertura de 1 cm de ancho, pero mídela para asegurarte de su ancho exacto.
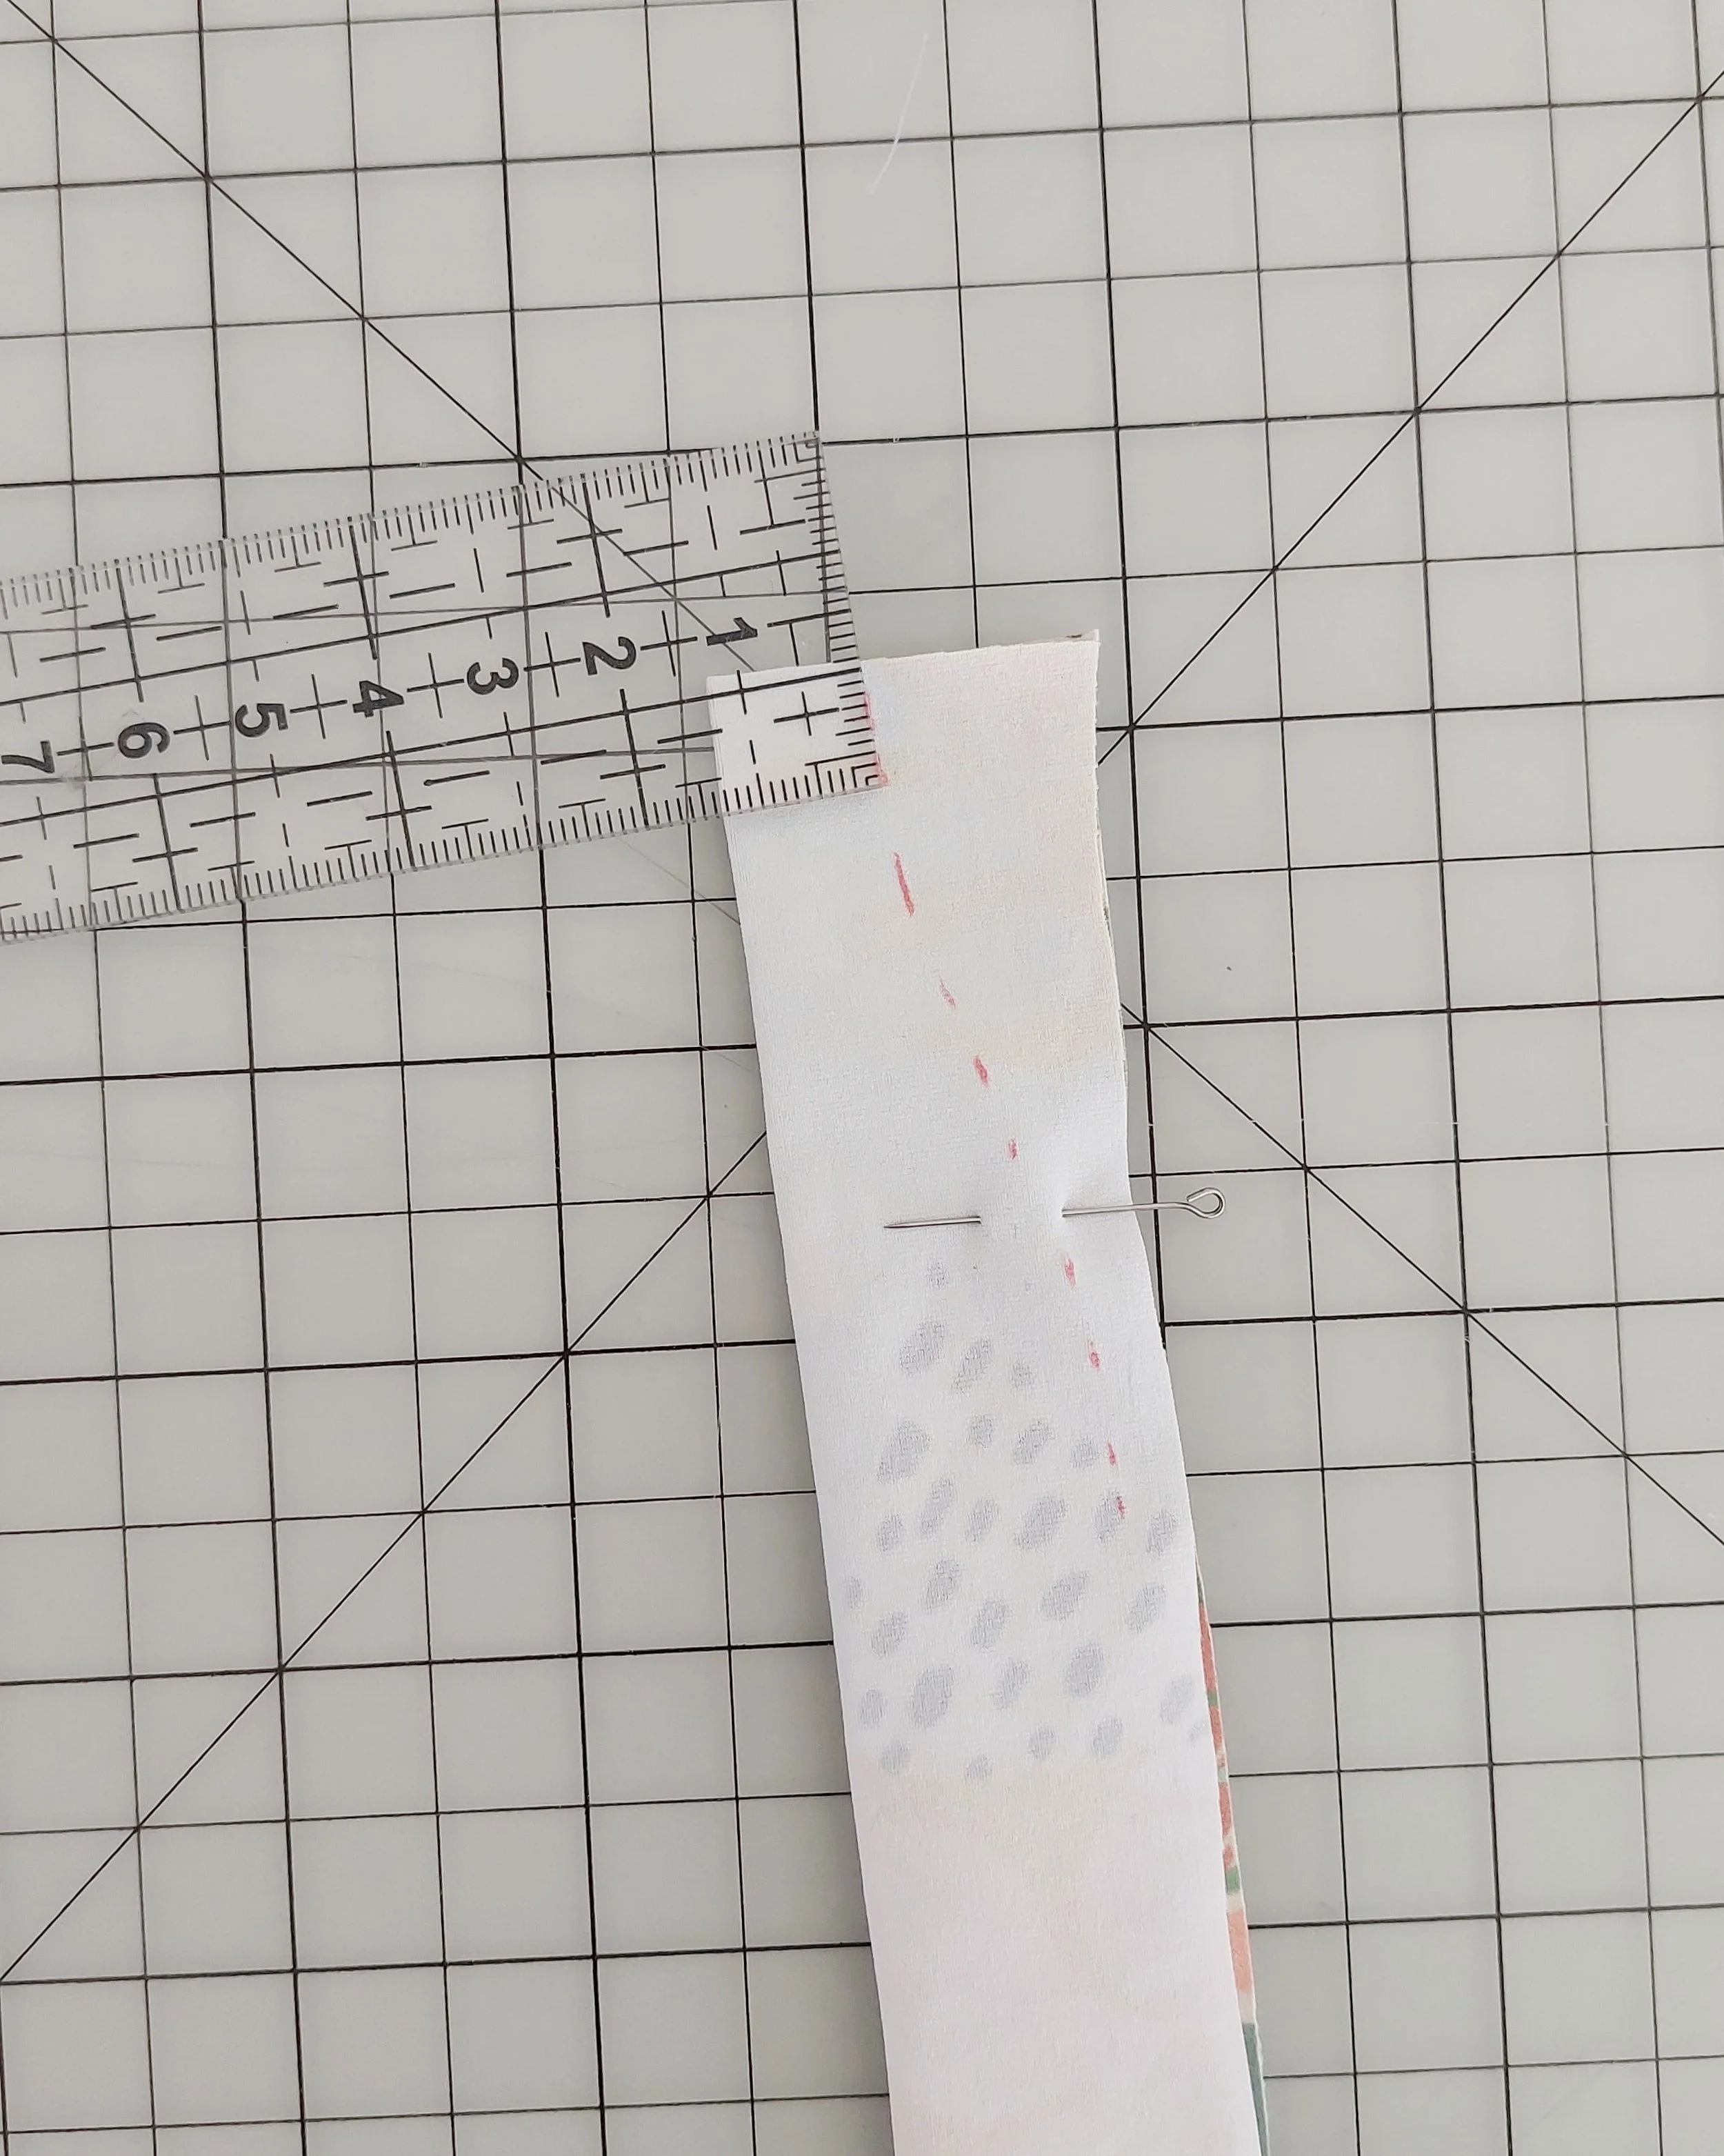
Fold the tie piece in half with right sides together, mark the 1 cm measurement, and gradually blend it into the rest of the piece.
Dobla la pieza de la tira por la mitad, derecho con derecho, y marca la medida de 1 cm. Haz una línea suavizada para unir esa medida con el resto de la pieza.
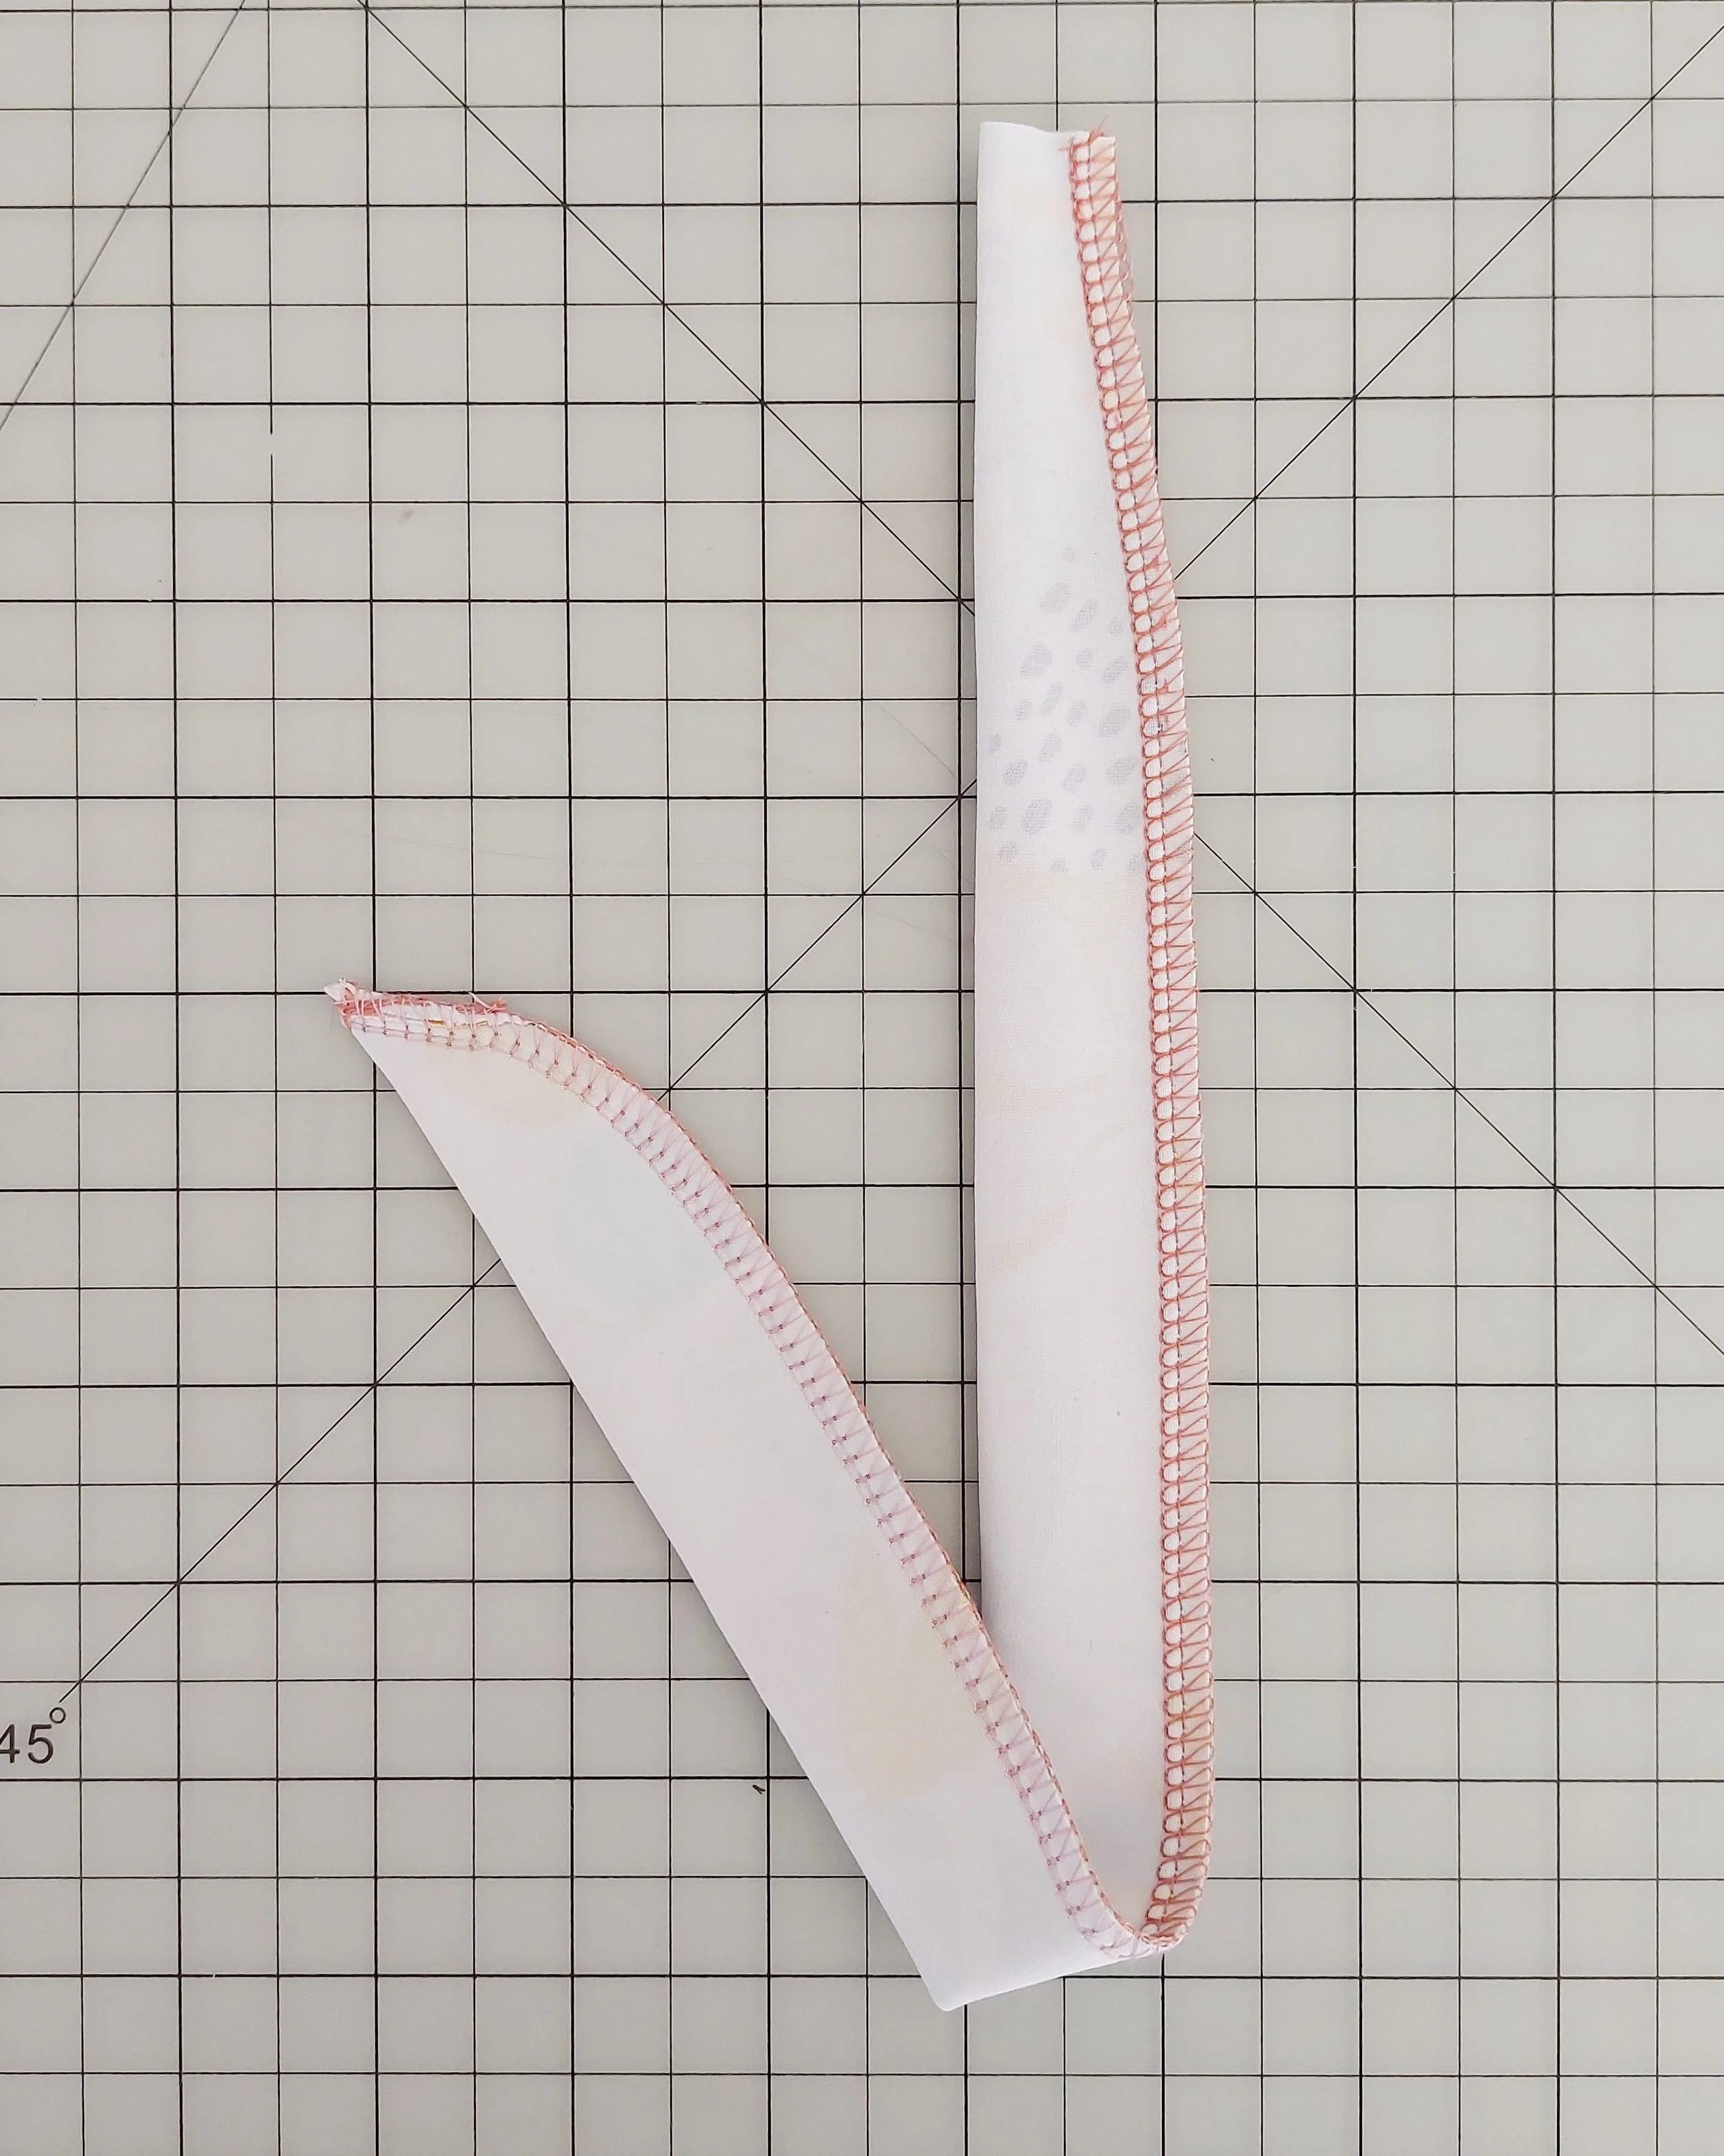
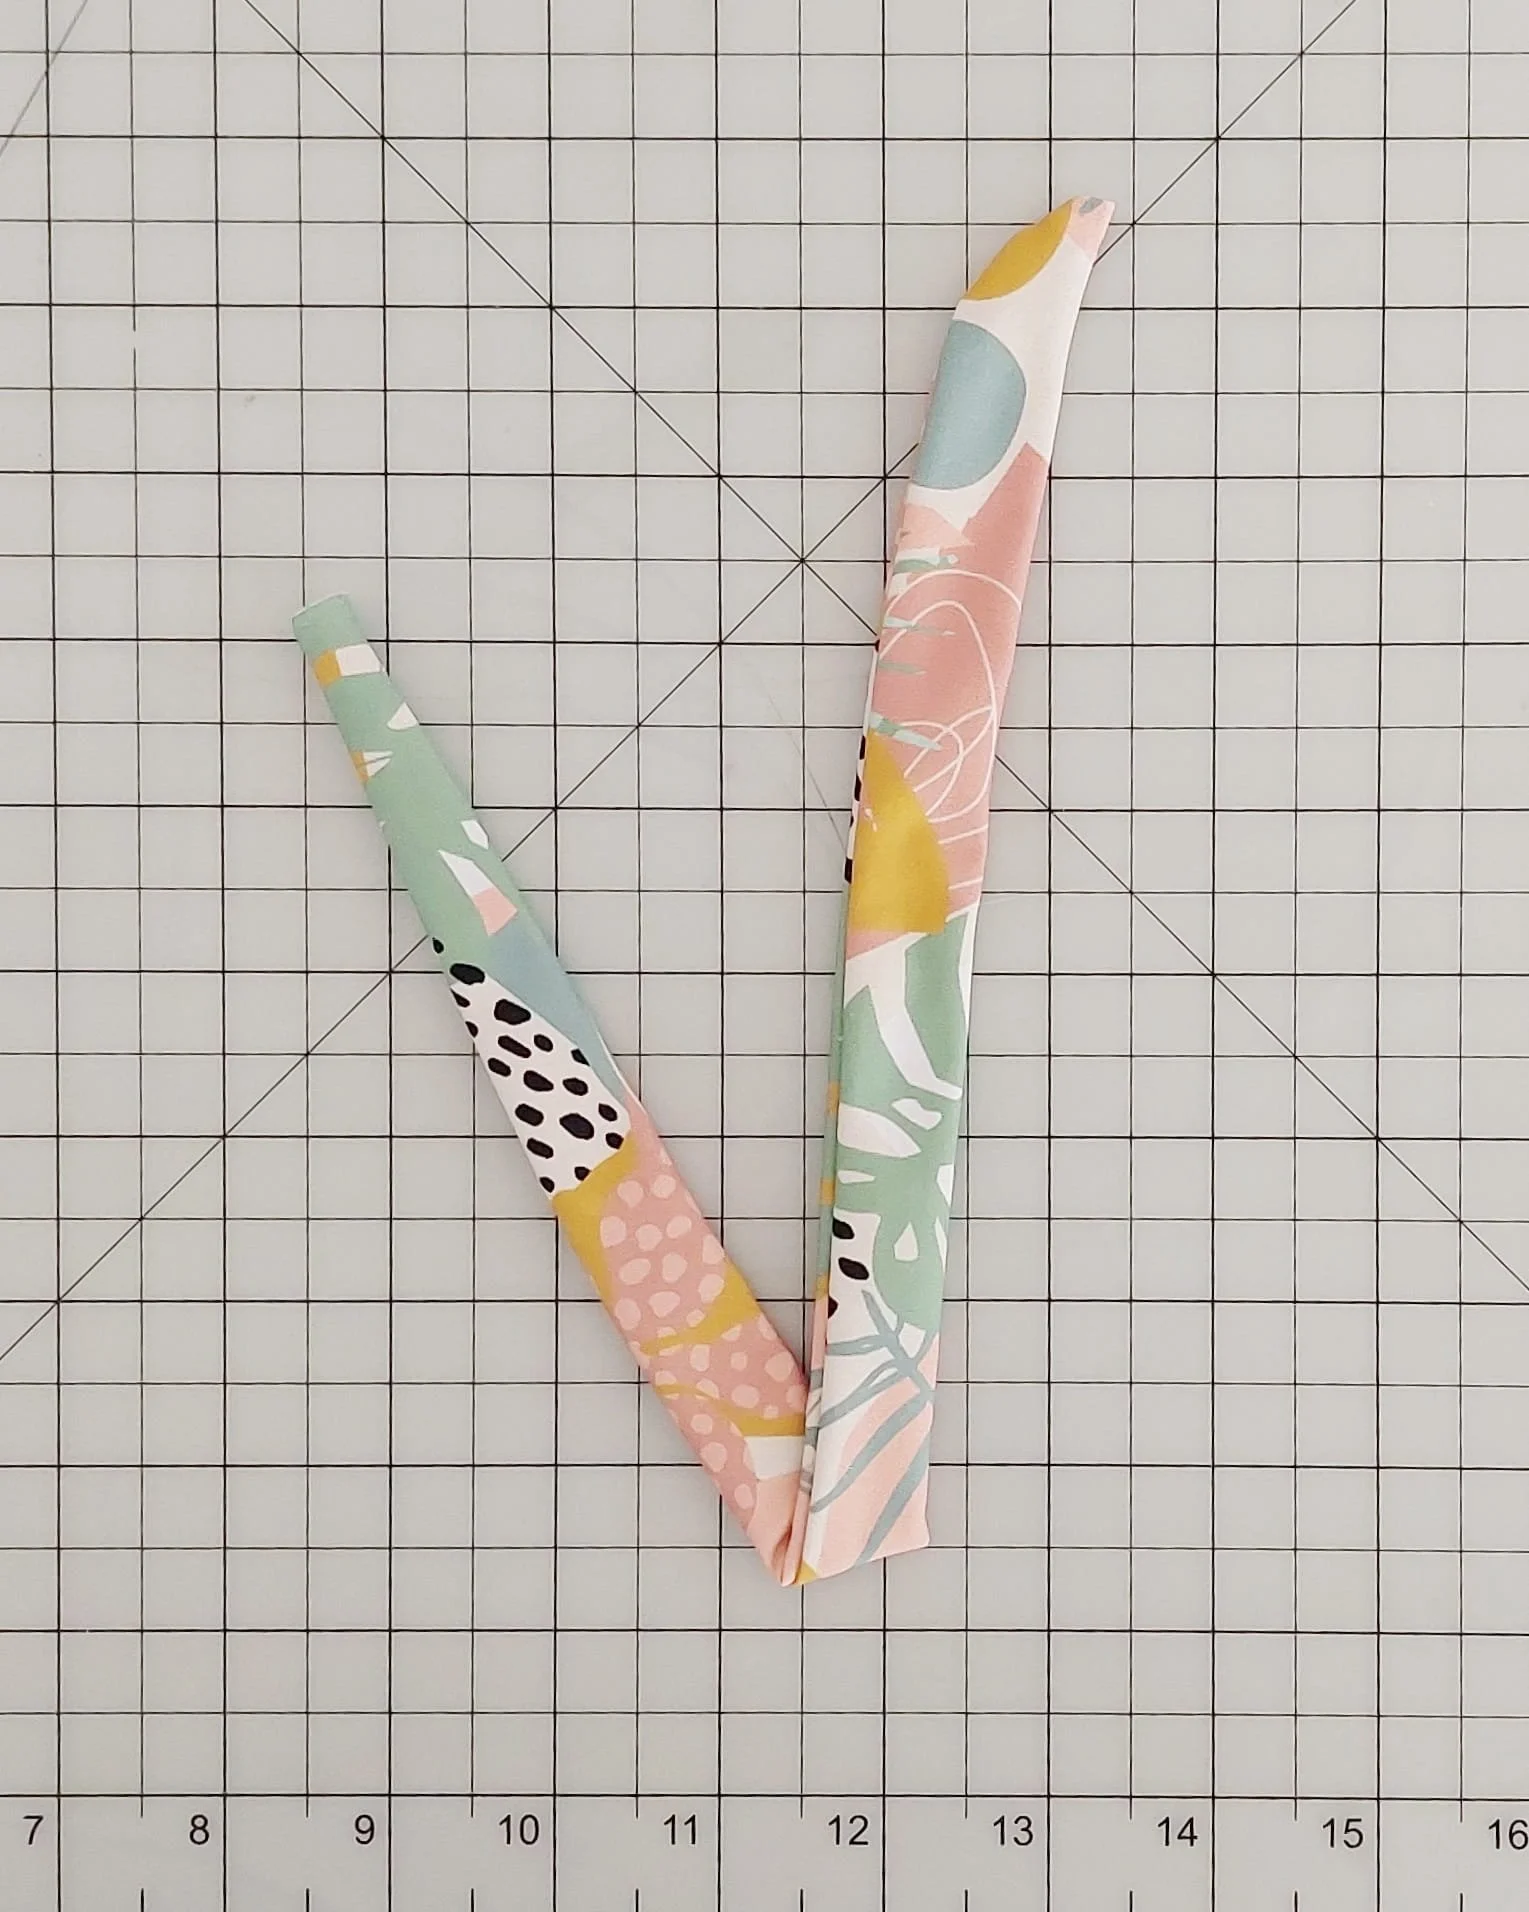
Sew with a small zigzag or serge, and turn the piece right side out.
Cose con un zigzag pequeño o con remalladora y dale la vuelta a la pieza para que quede del derecho.
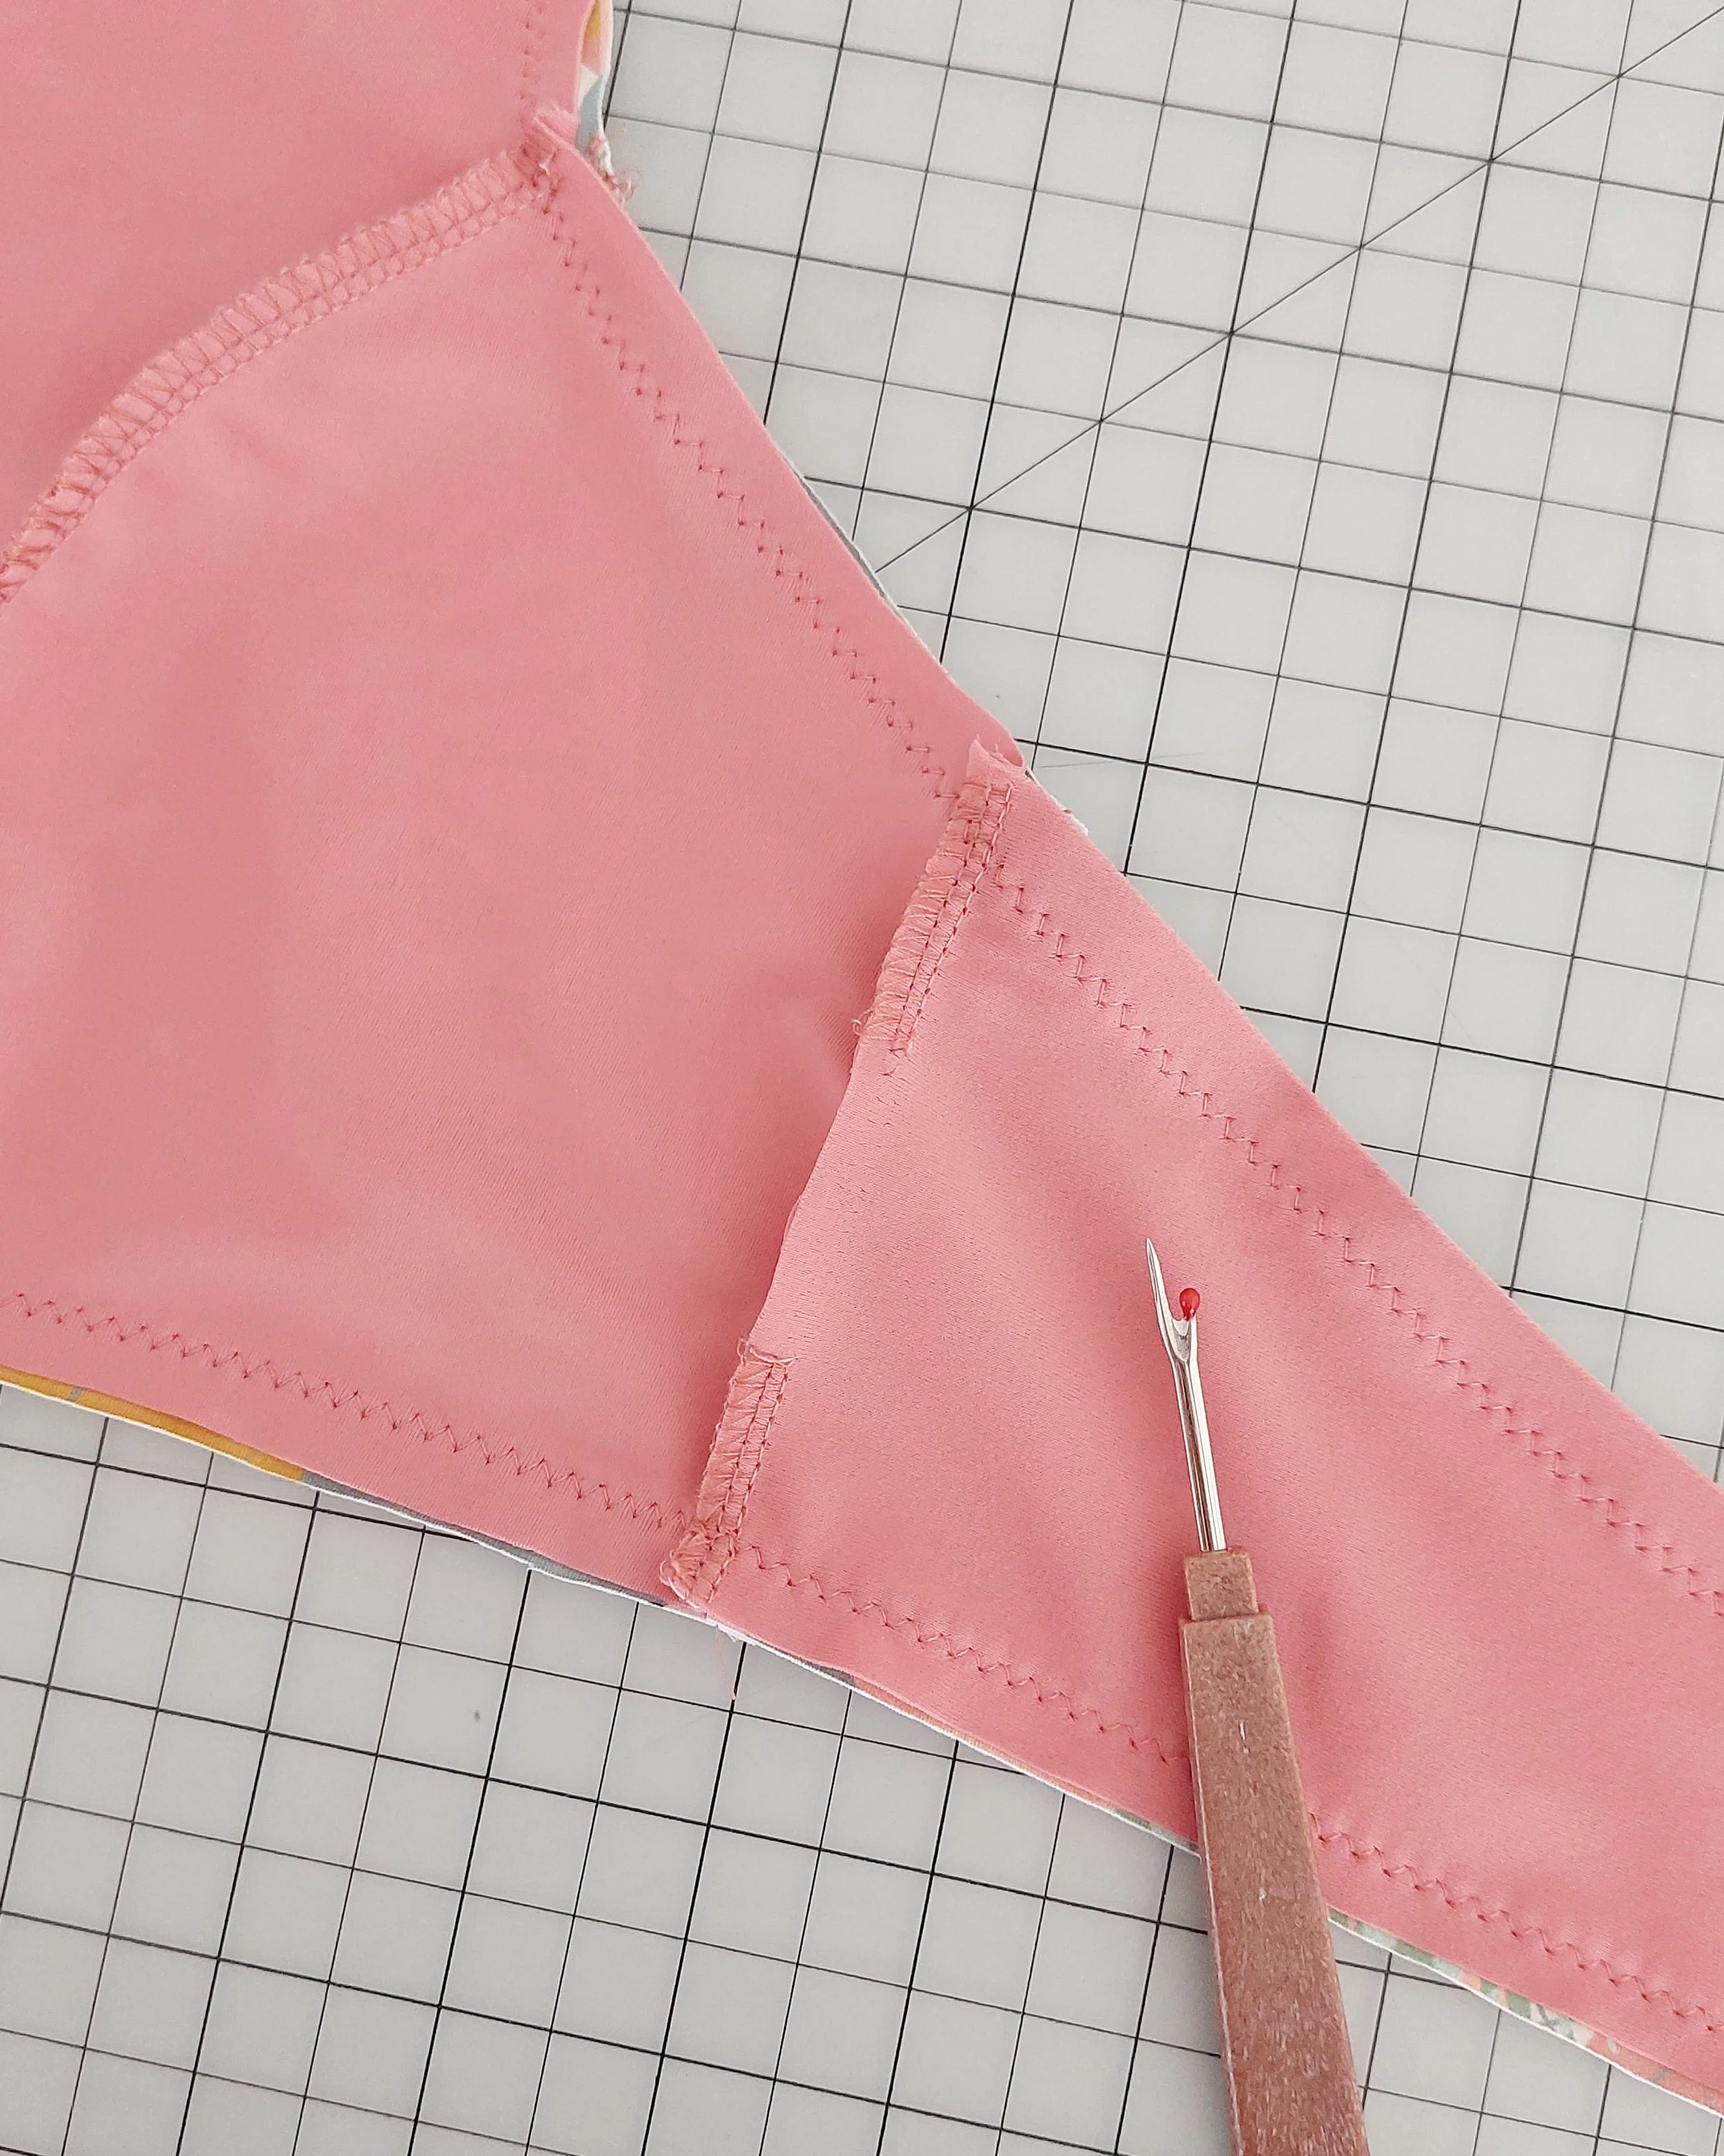
To insert the ties inside the bikini top, we actually need an opening that will also let us turn the whole project right side out once it’s done. I opened a couple of centimeters of the side seam on my solid-color layer.
Para poder enganchar los tirantes por dentro de la parte superior del bikini, necesitamos una abertura que también nos deja dar la vuelta a todo el top una vez terminado. He abierto un par de centímetros de la costura lateral de mi capa lisa.
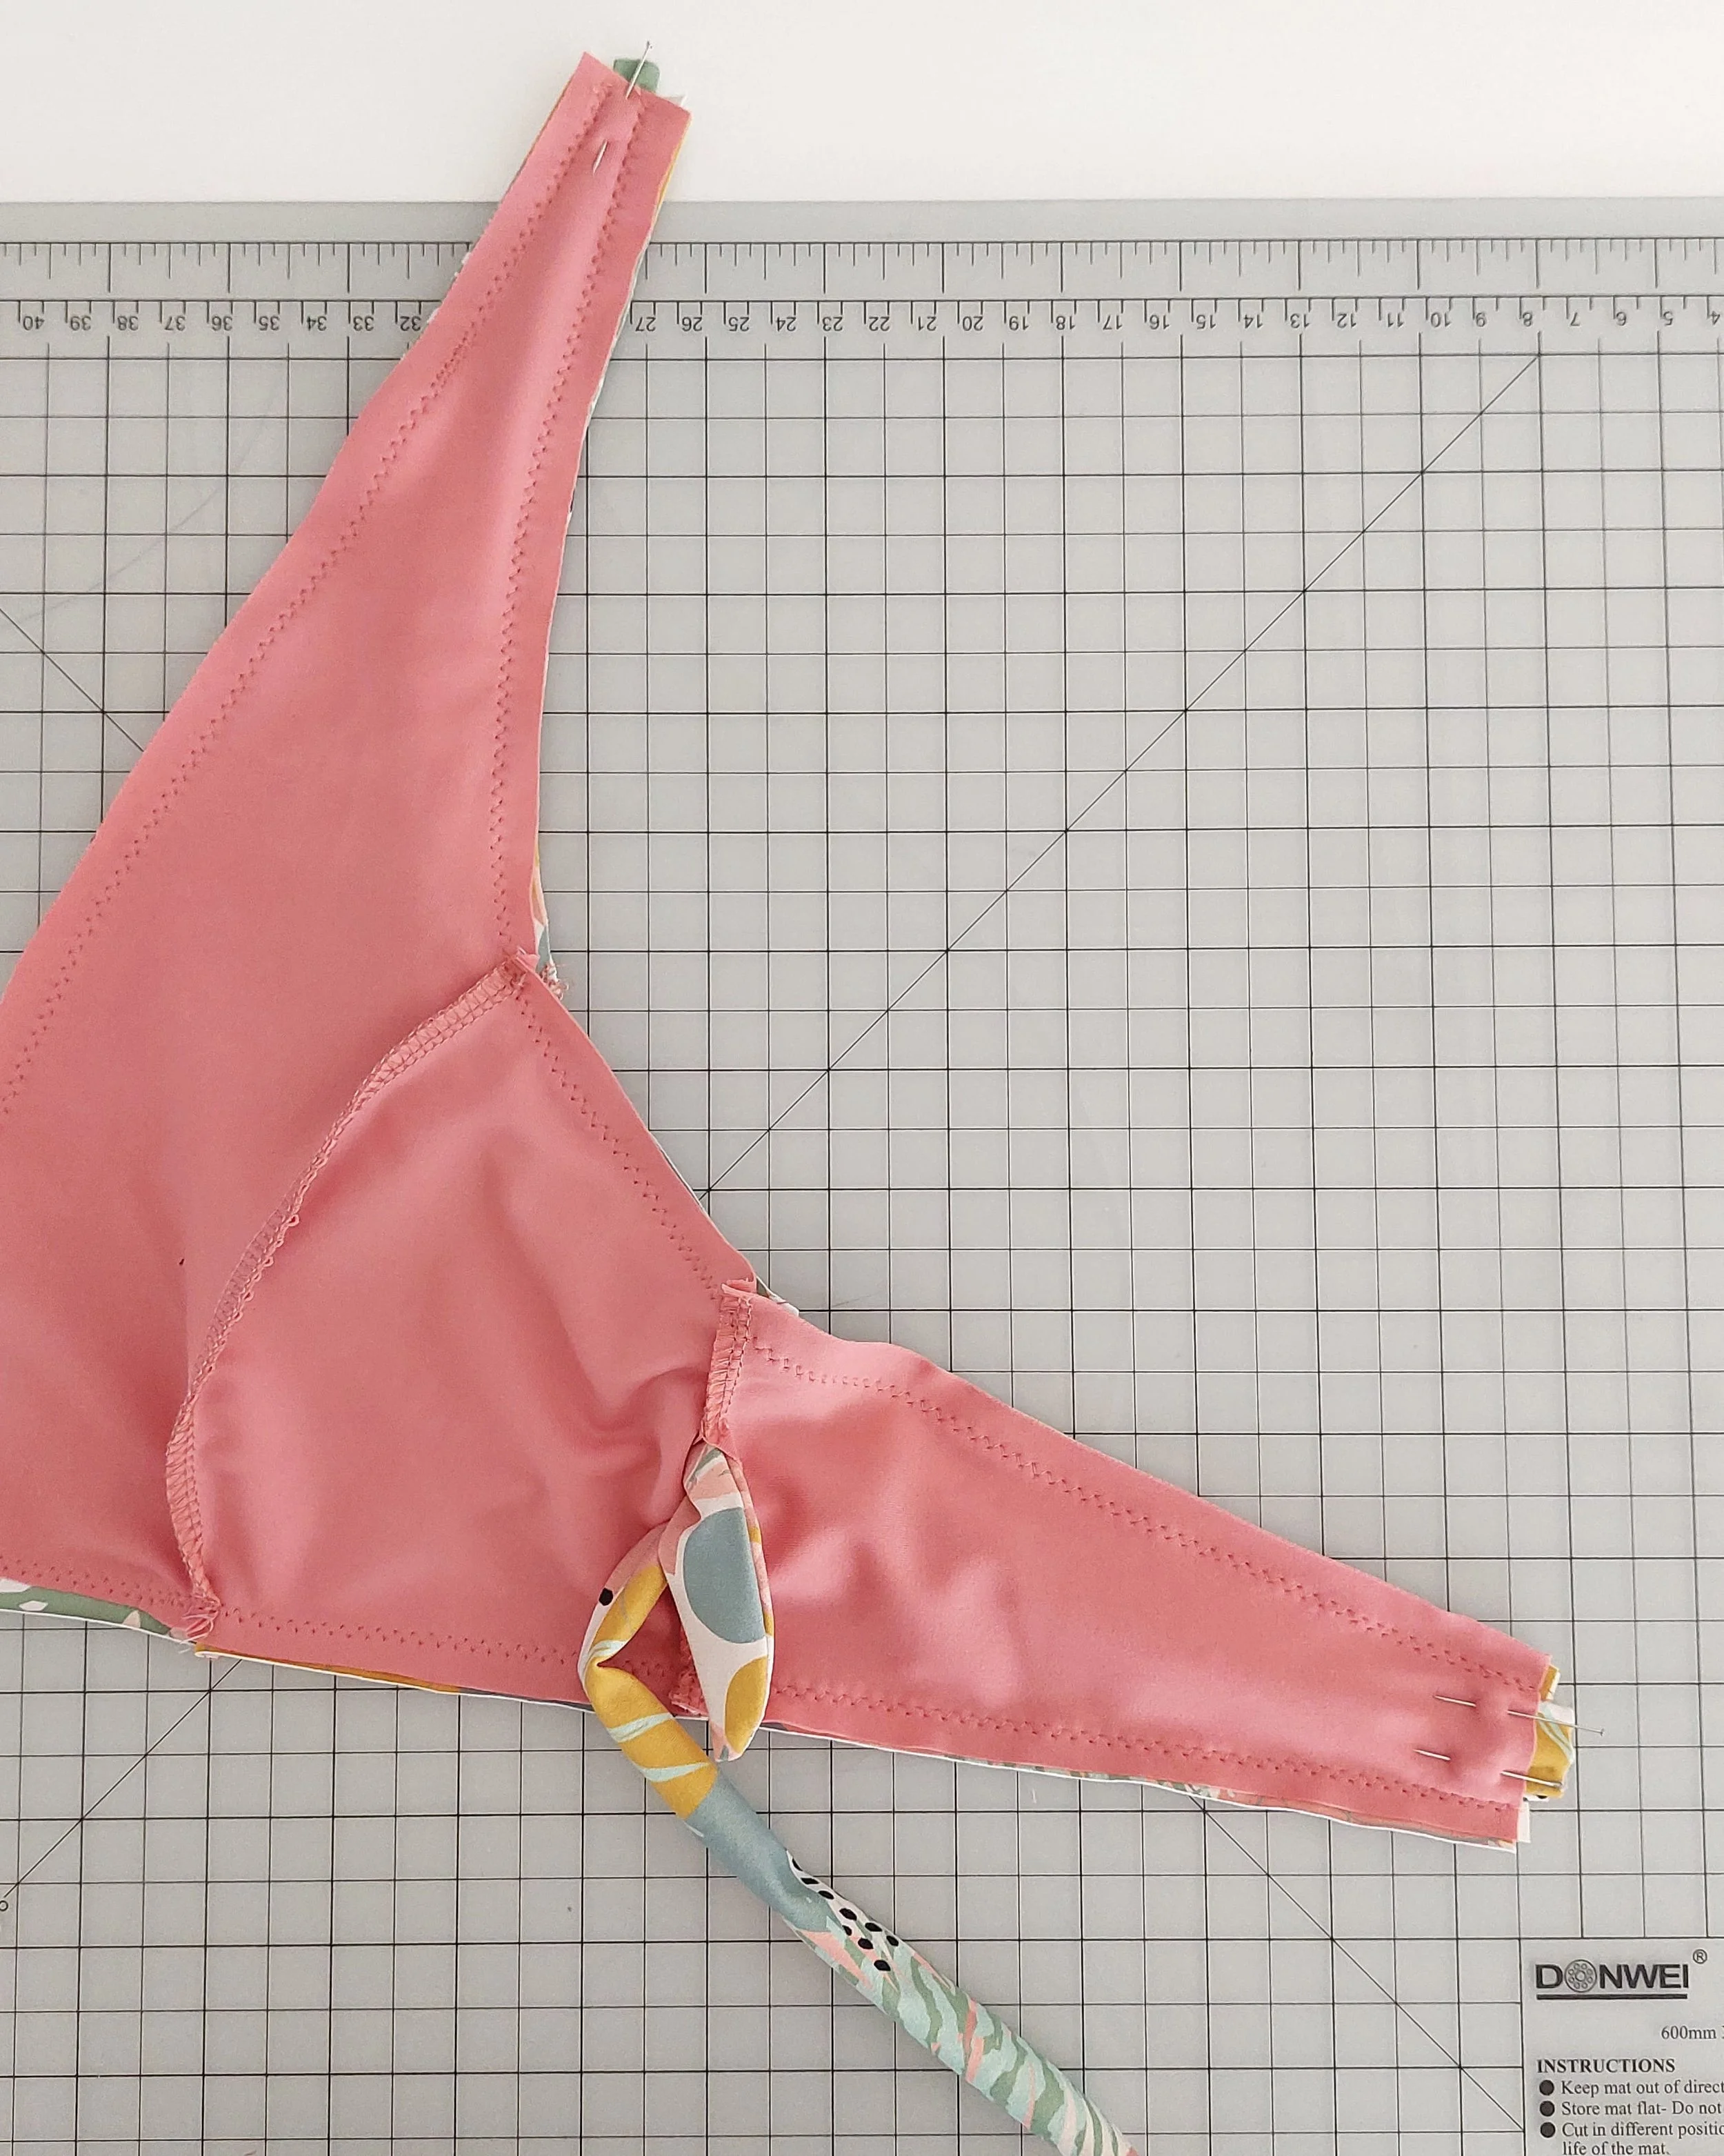
Using a safety pin, insert the strap through the hole and guide it to the end point of the inner cup piece, then pin it in place.
Do the same procedure with the back ties. These are wider as they adapt to the band piece, which has a wider opening (but measure before as always, in case you need to adjust any of the measurements).
Con un imperdible, pasa la cinta por la abertura y guíala hasta el extremo de de la copa, sujeta con alfiler en sitio.
Repite el mismo proceso con las piezas de los lazos de la espalda. Estos son más anchos, ya que se adaptan a la pieza de la banda que tiene una abertura más amplia (pero, como siempre, mide antes por si tienes que modificar algo).
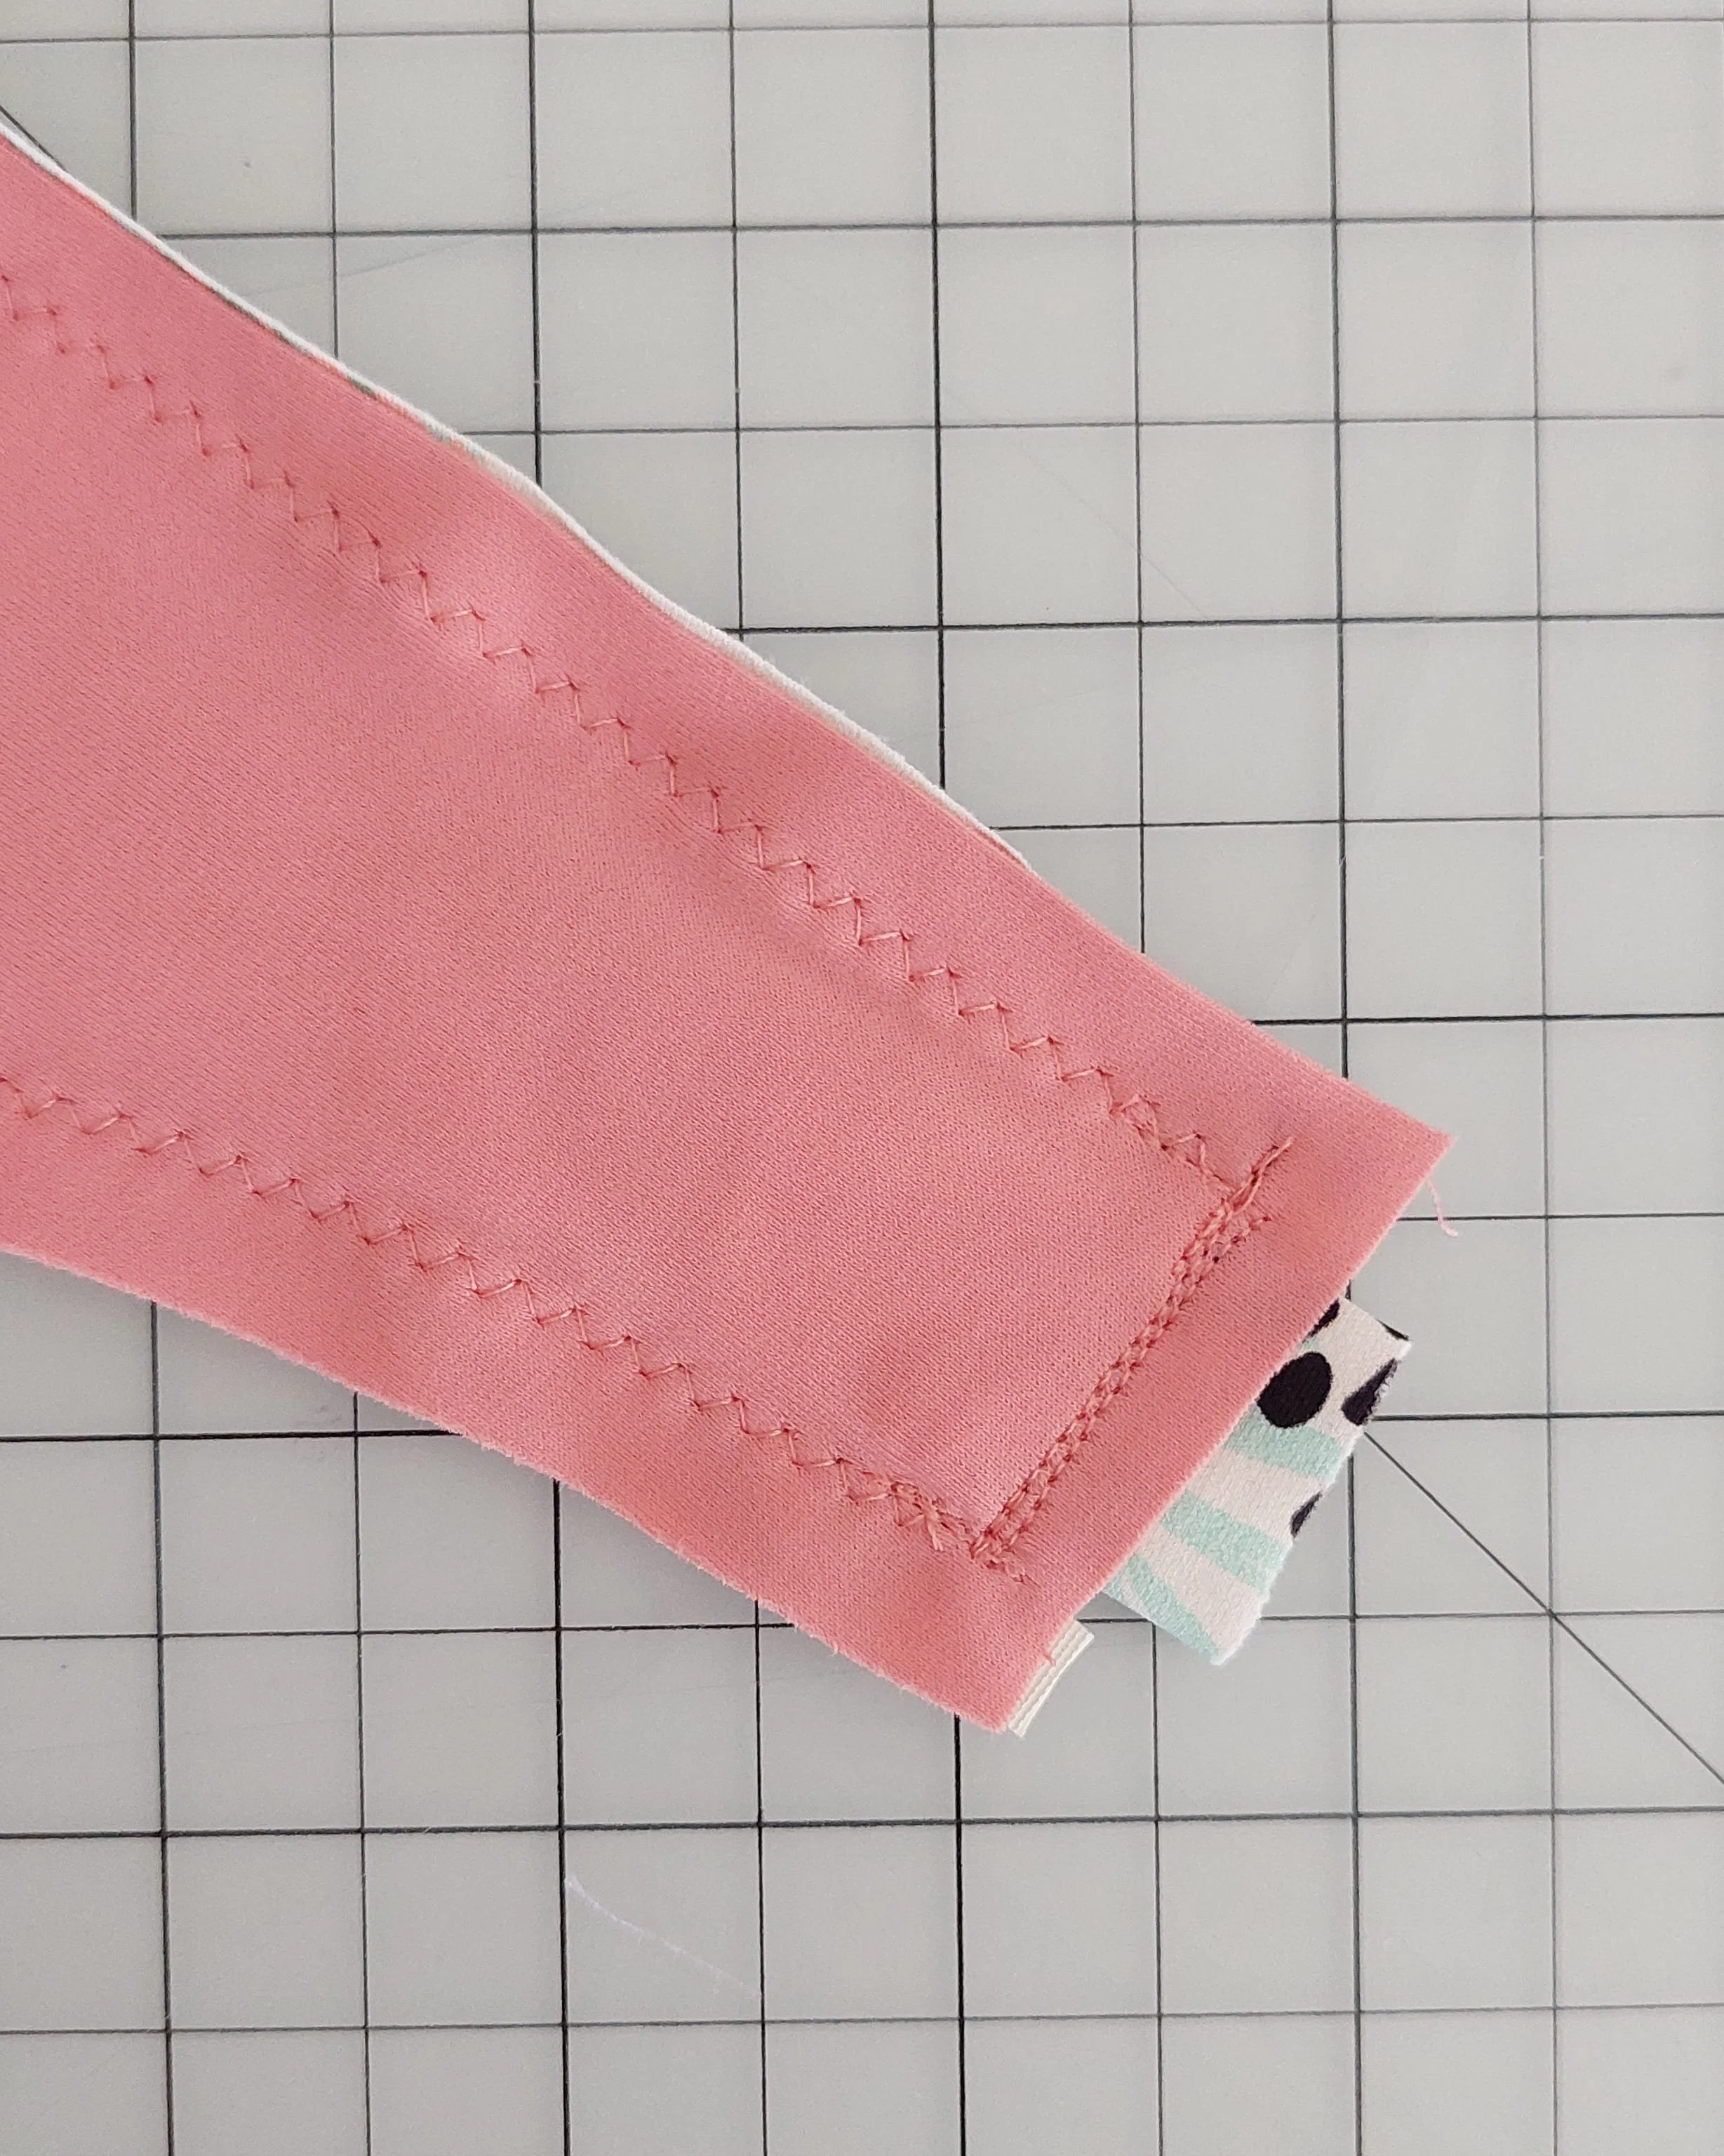
Using various rows of straight stitching, secure all four ties in place. Cut away any excess seam allowance.
Fija las cuatro tiras con varias pasadas de puntada recta. Reduce cualquier margen de costura que sobre.
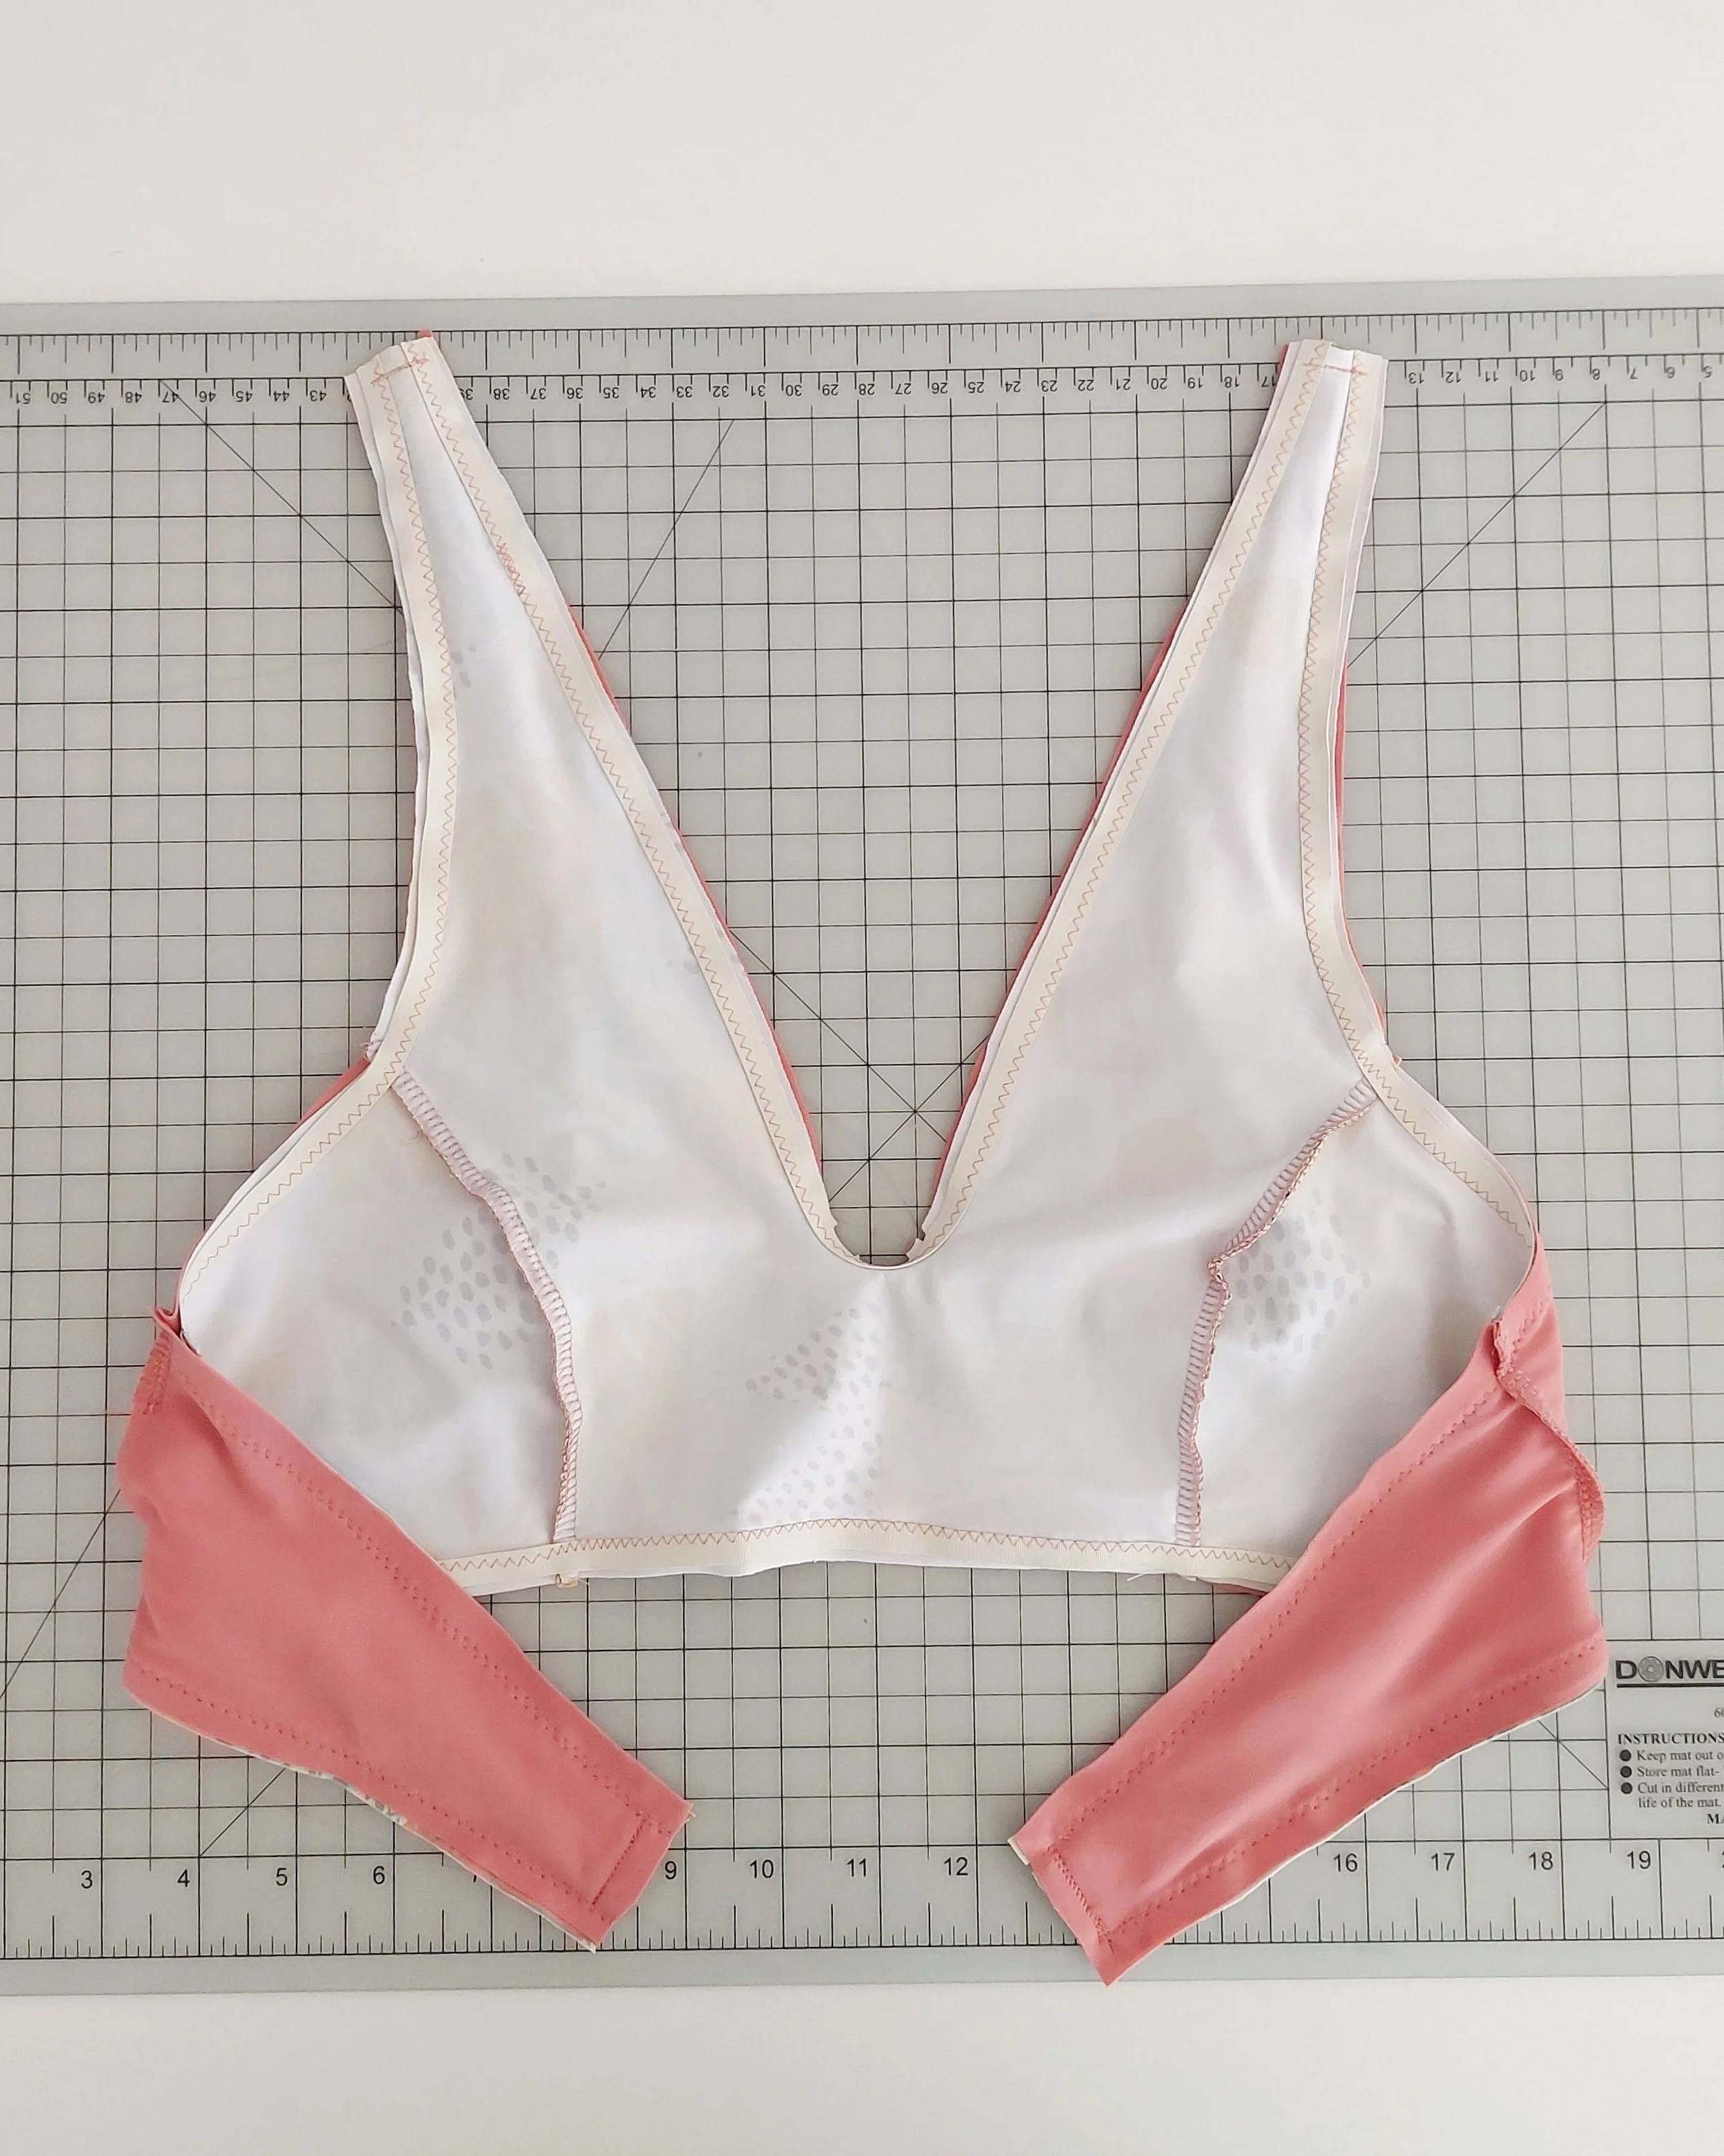
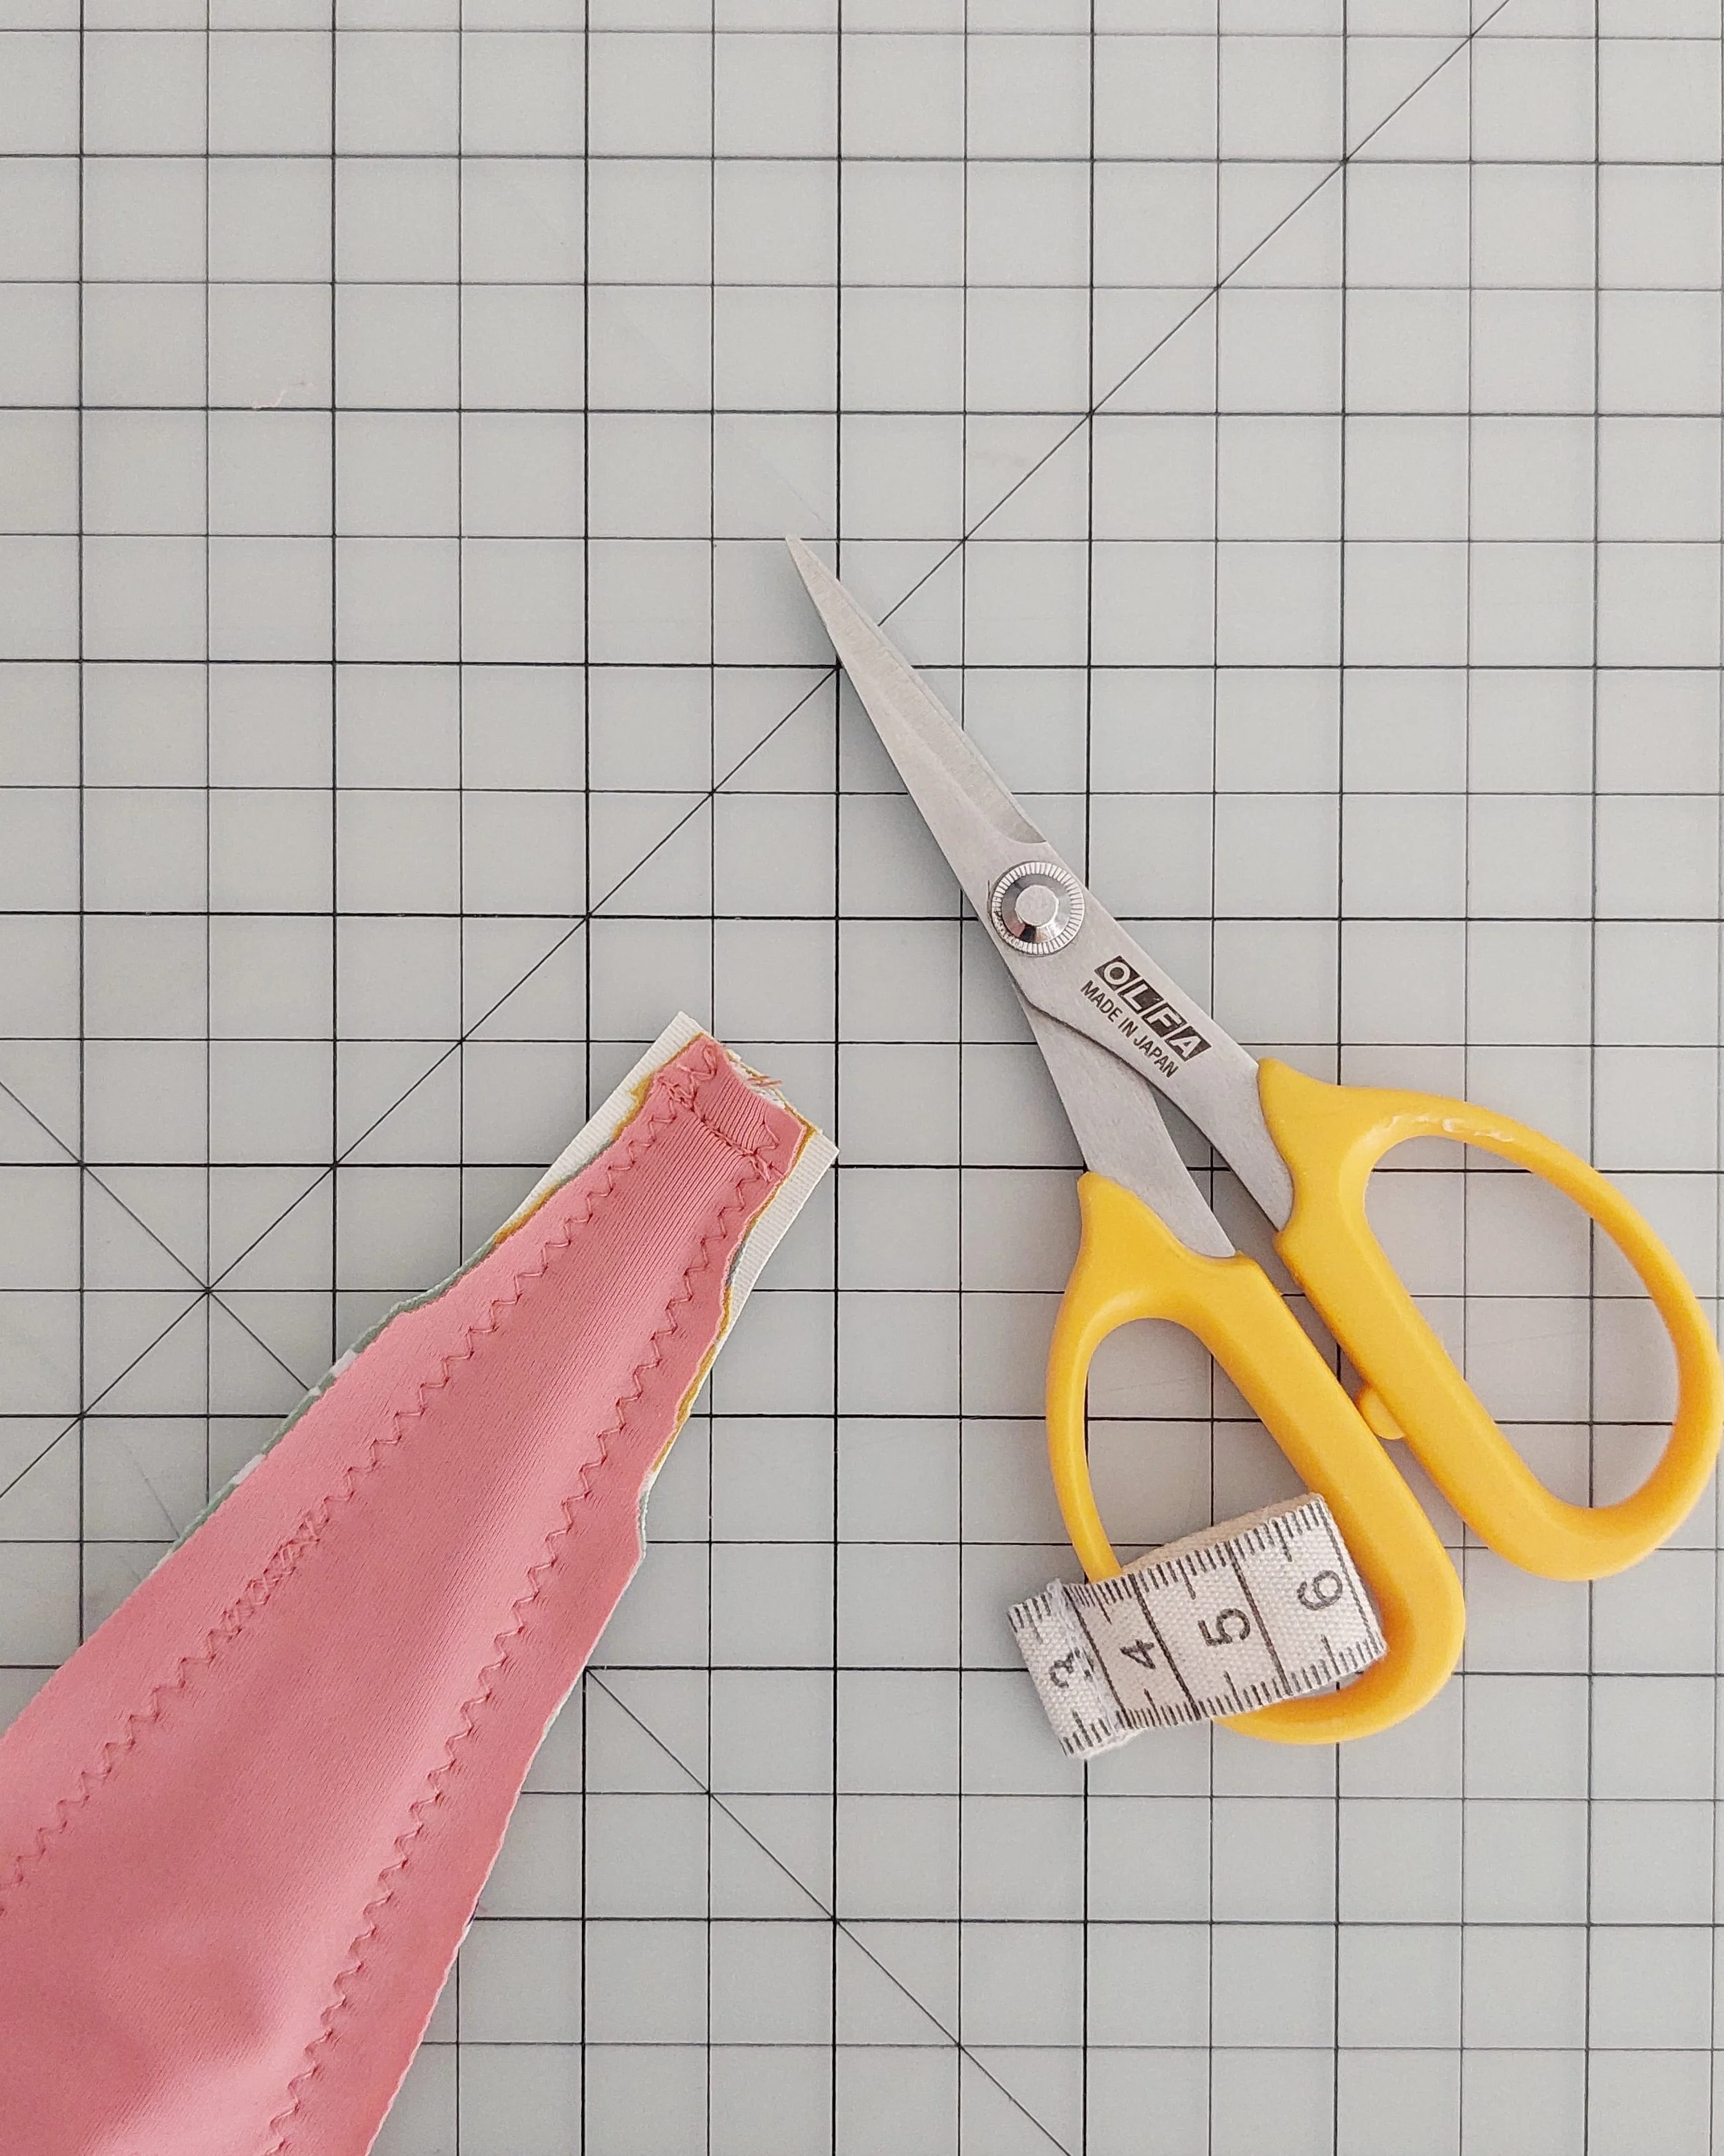
You can reduce some of the fabric under the elastic at the end points to create less bulk.
Puedes recortar un poco de tela por debajo del elástico en los extremos para que quede menos abultado.
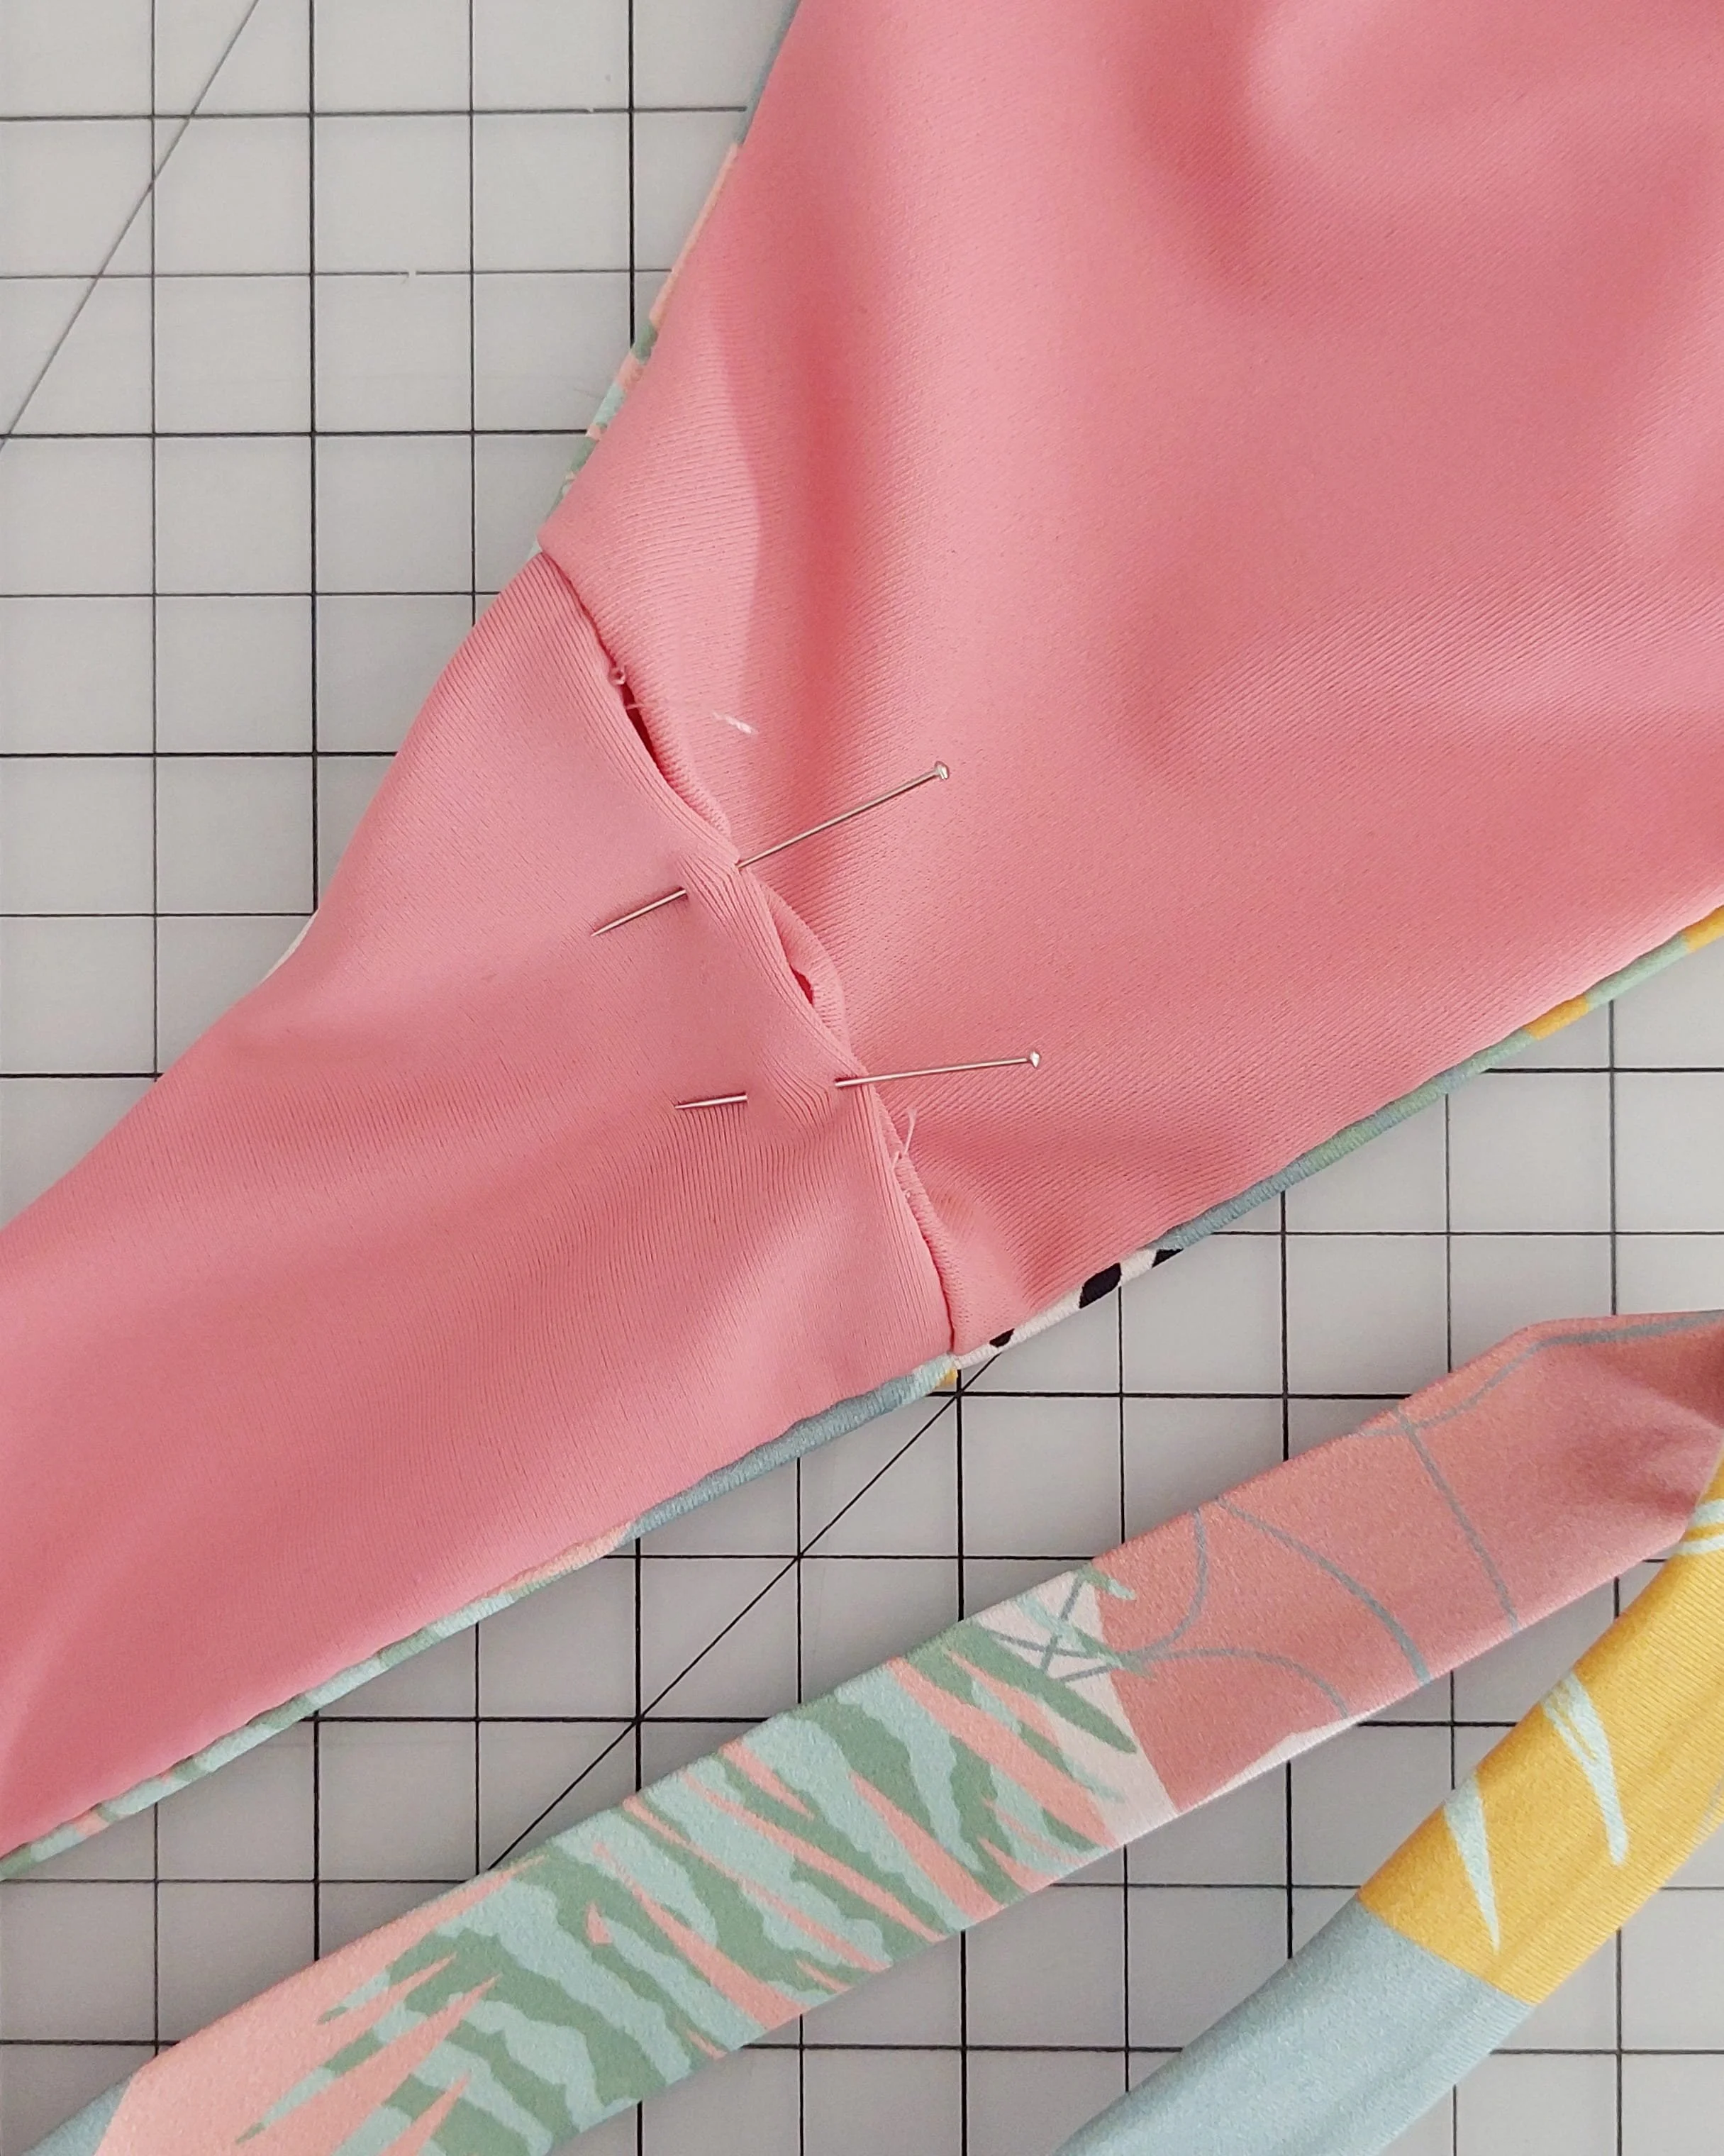
Turn the project right side out through the opening and close that part by hand or with a machine creating a tiny seam. Sew the bow and attach it to the middle, and there you have your reversible bikini top!
Da la vuelta al proyecto por la abertura y cierra esa parte a mano o a máquina, haciendo una costura muy fina. Cose el lazo y átalo en el centro. Ya tienes tu top de bikini reversible!
Sewing the reversible bottoms / Coser la braga de bikini reversible
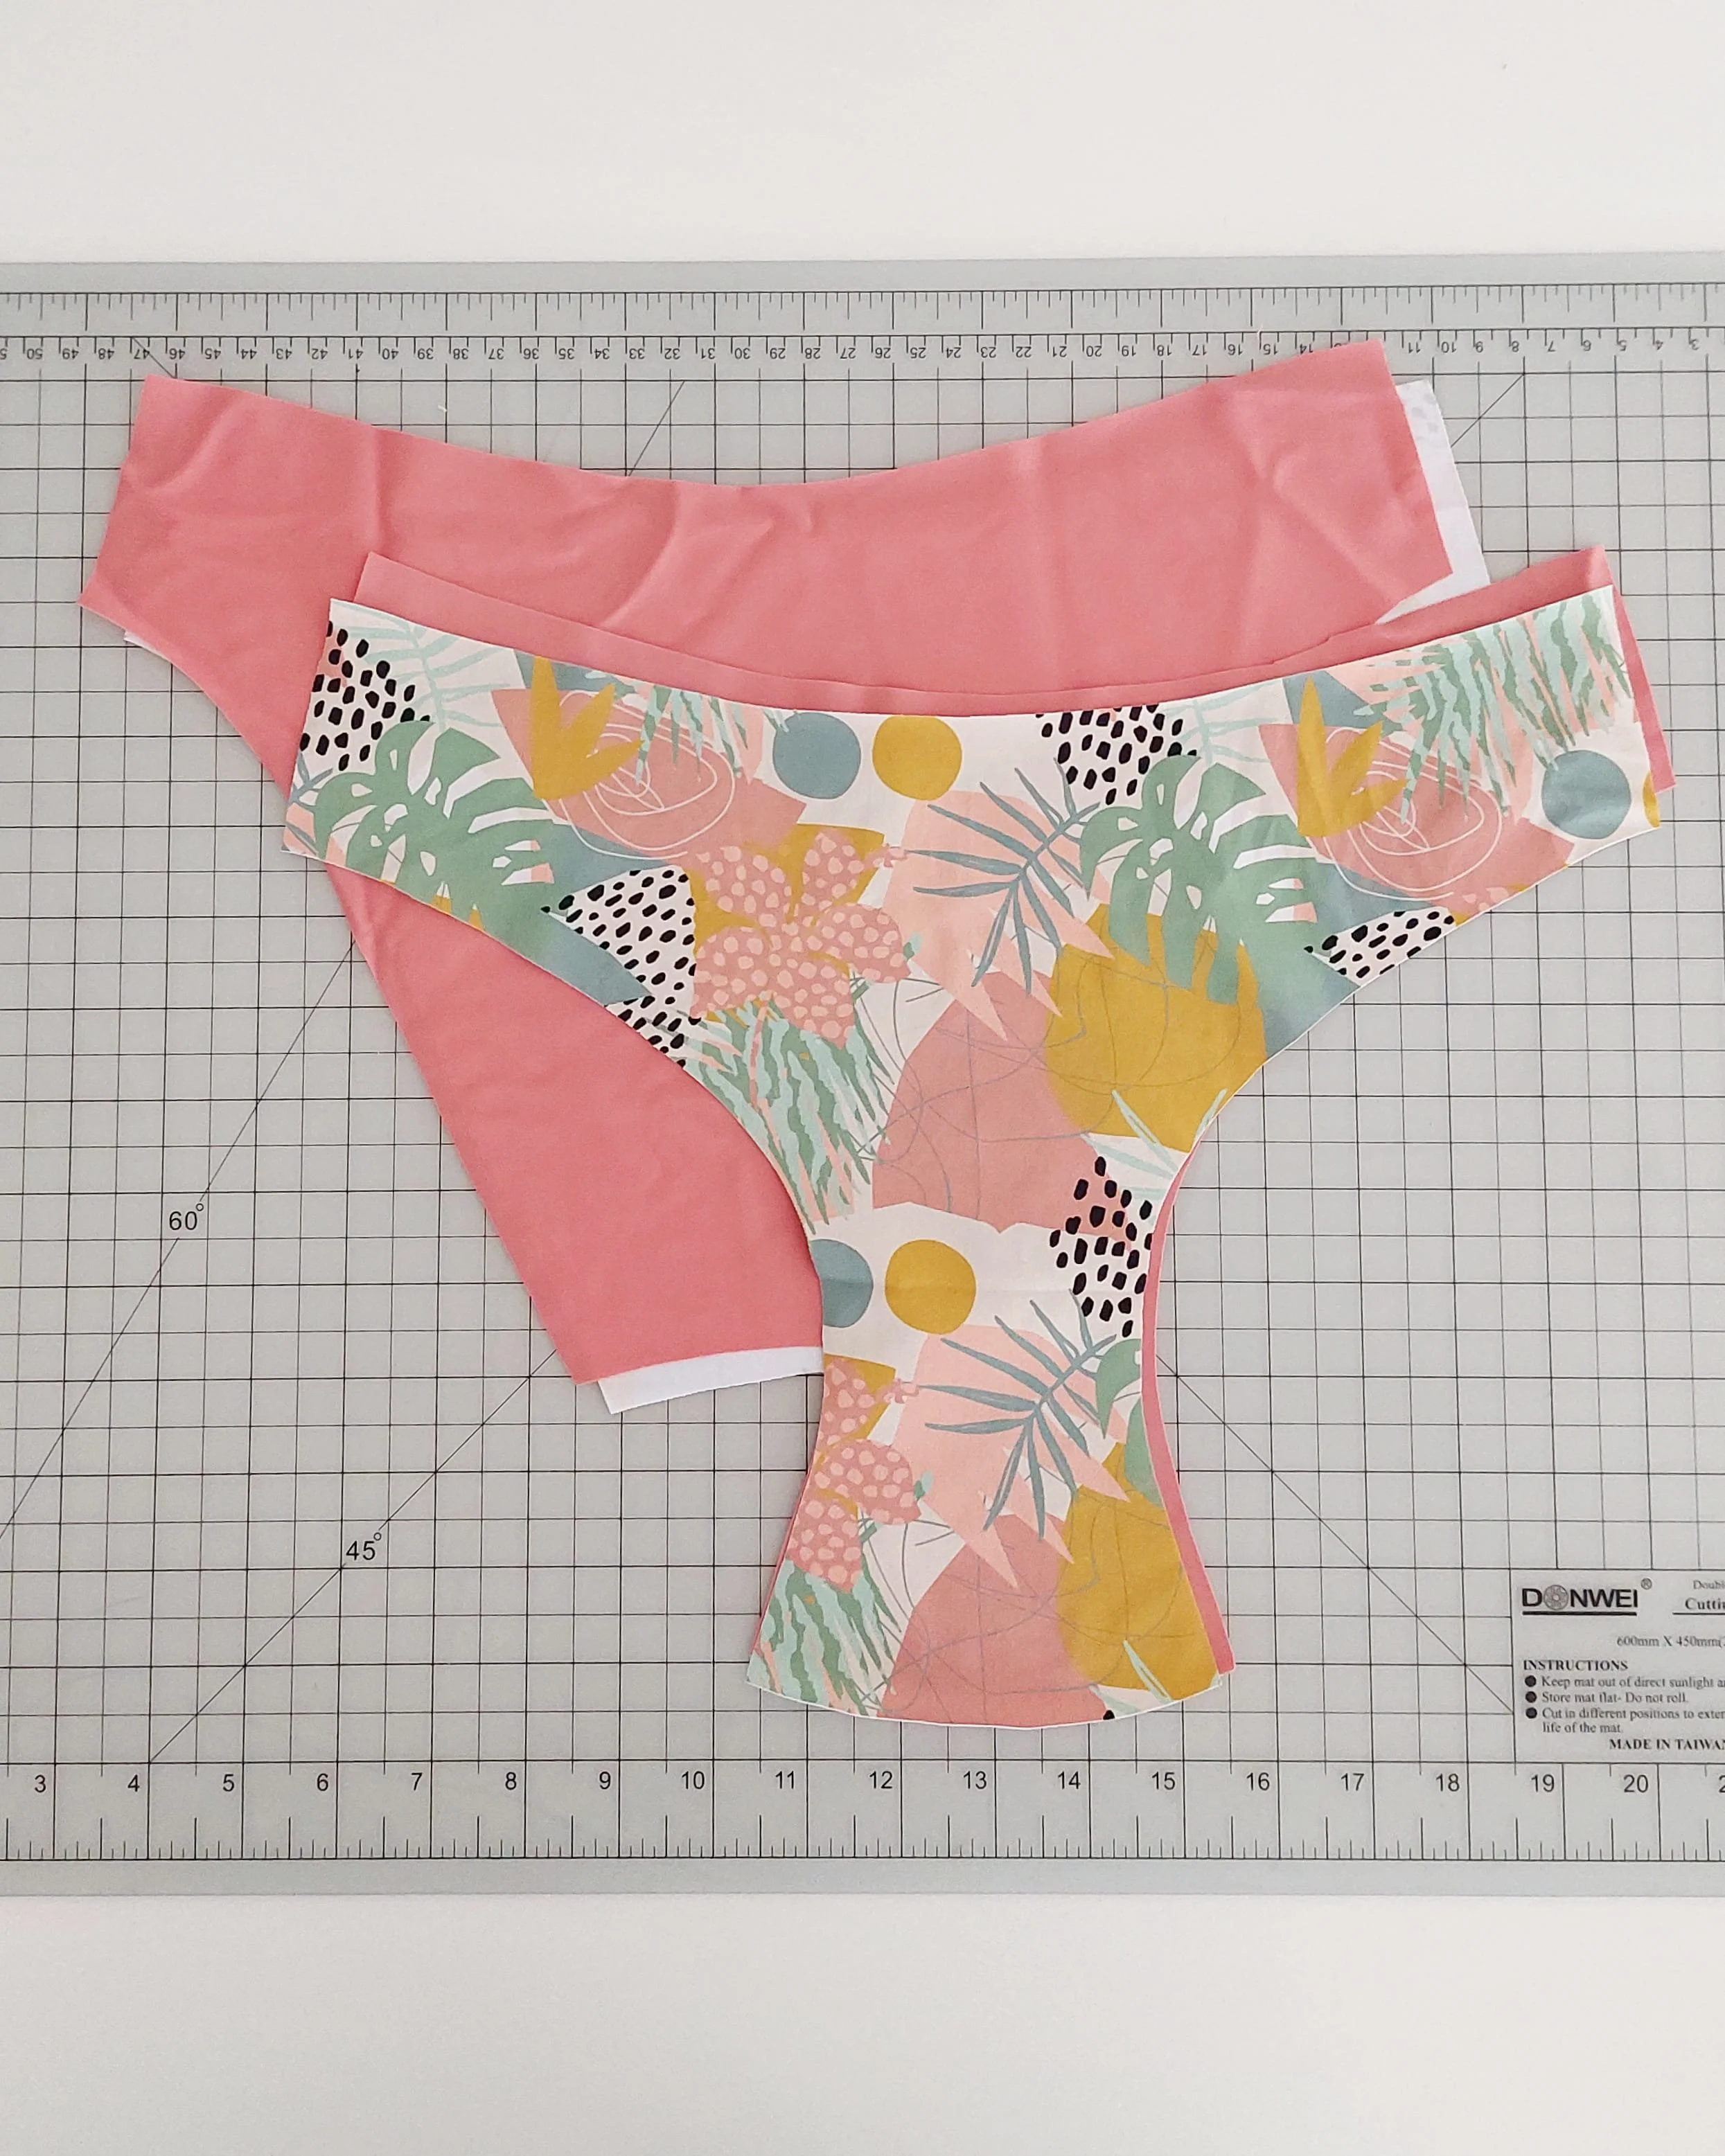
For the bottoms, the system is pretty much the same, but instead of attaching ties, we’re attaching both front and back pieces together using the same method.
En cuanto a la braga, el sistema es prácticamente el mismo, pero en vez de colocar los lazos, unimos las piezas delantera y trasera utilizando el mismo método.
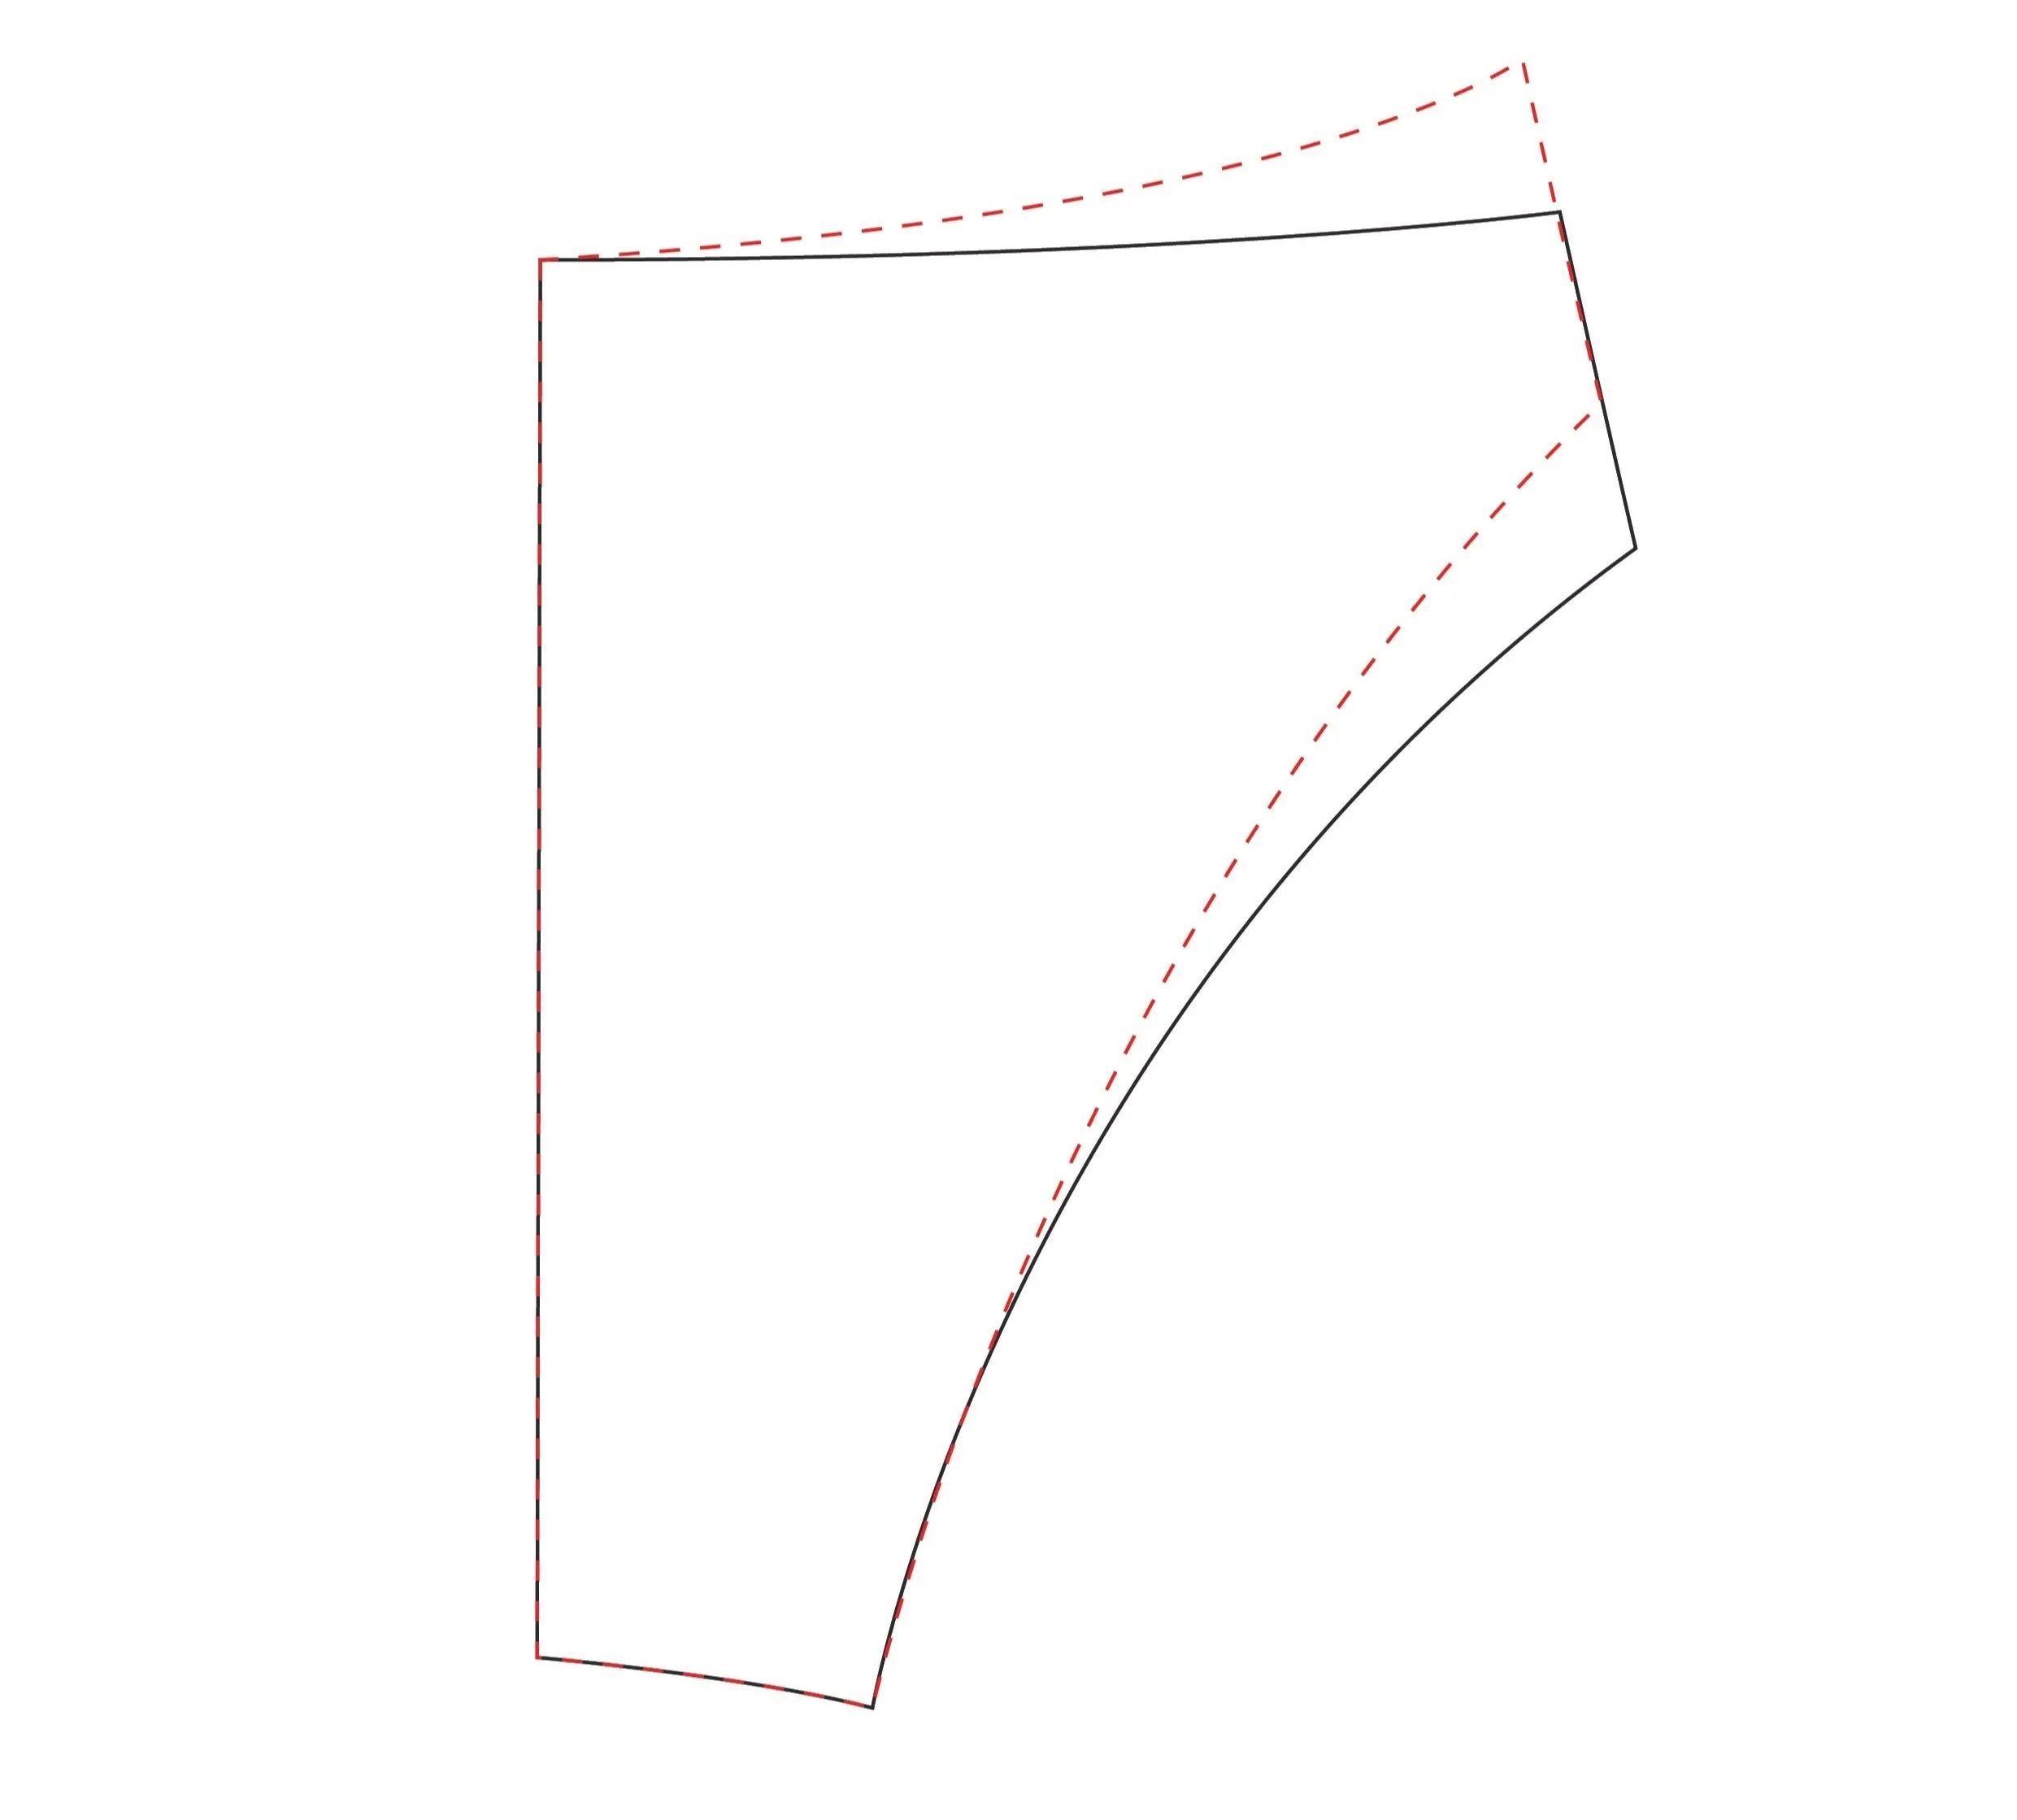
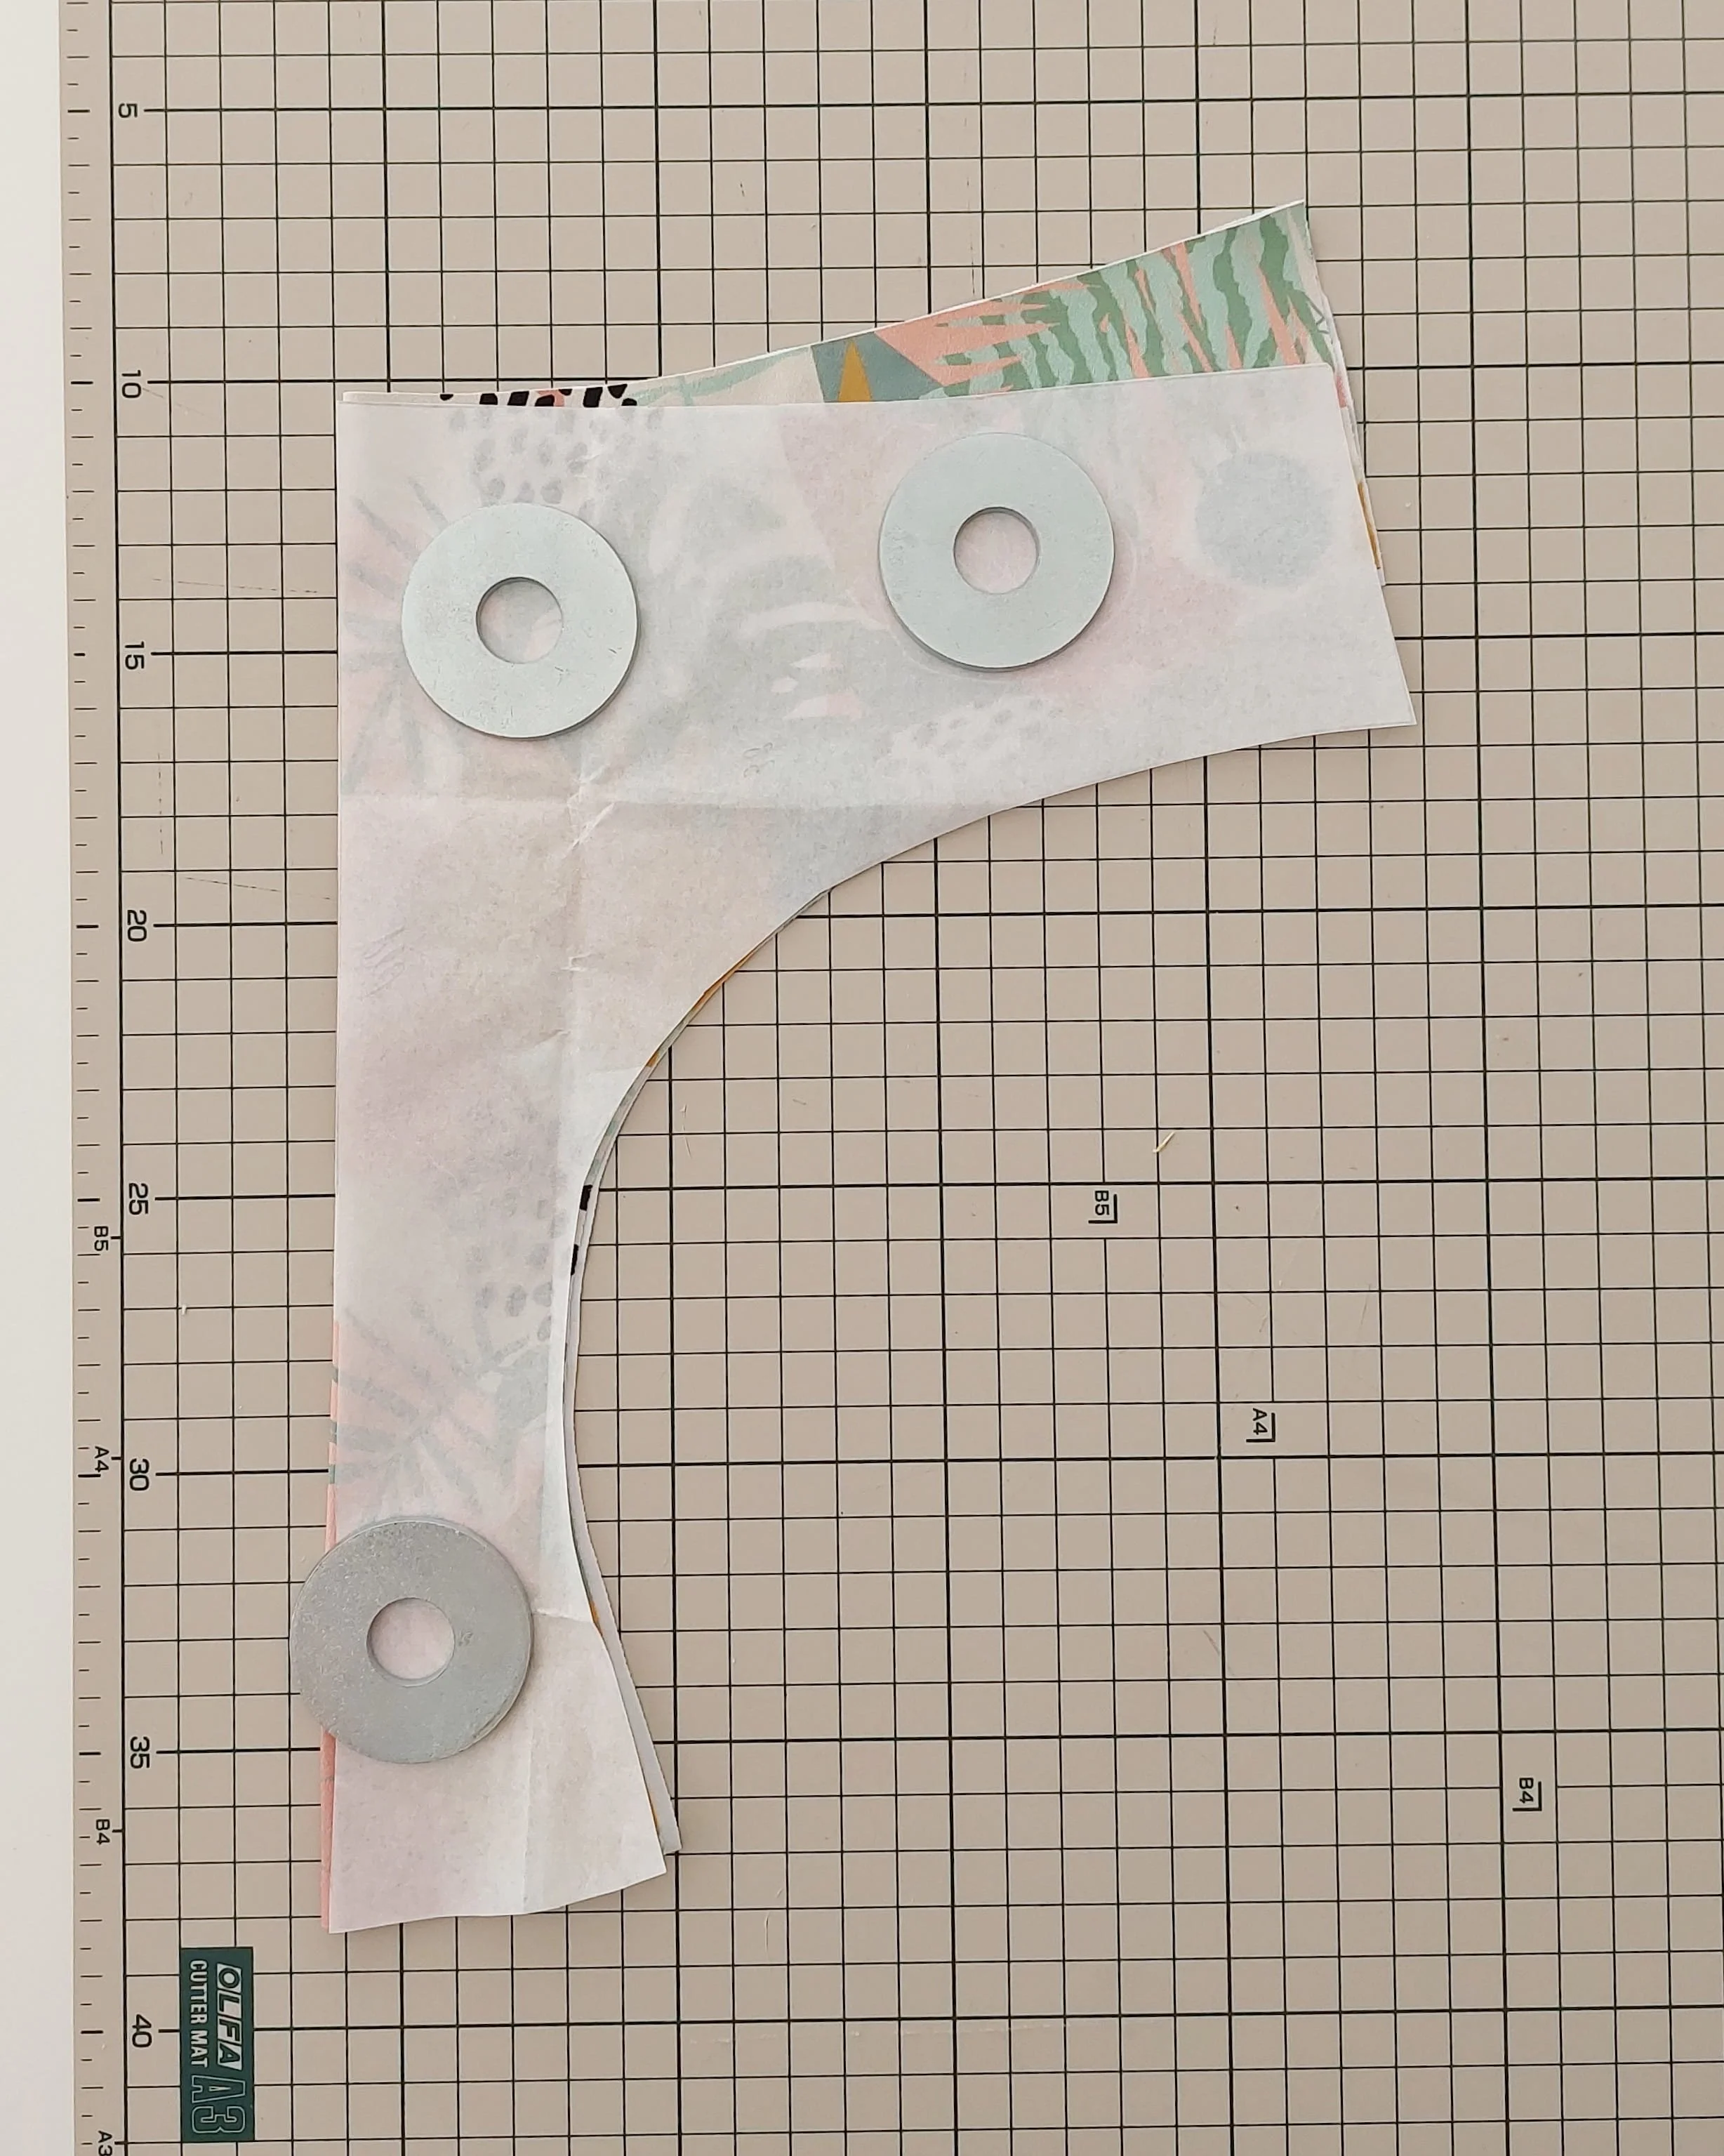
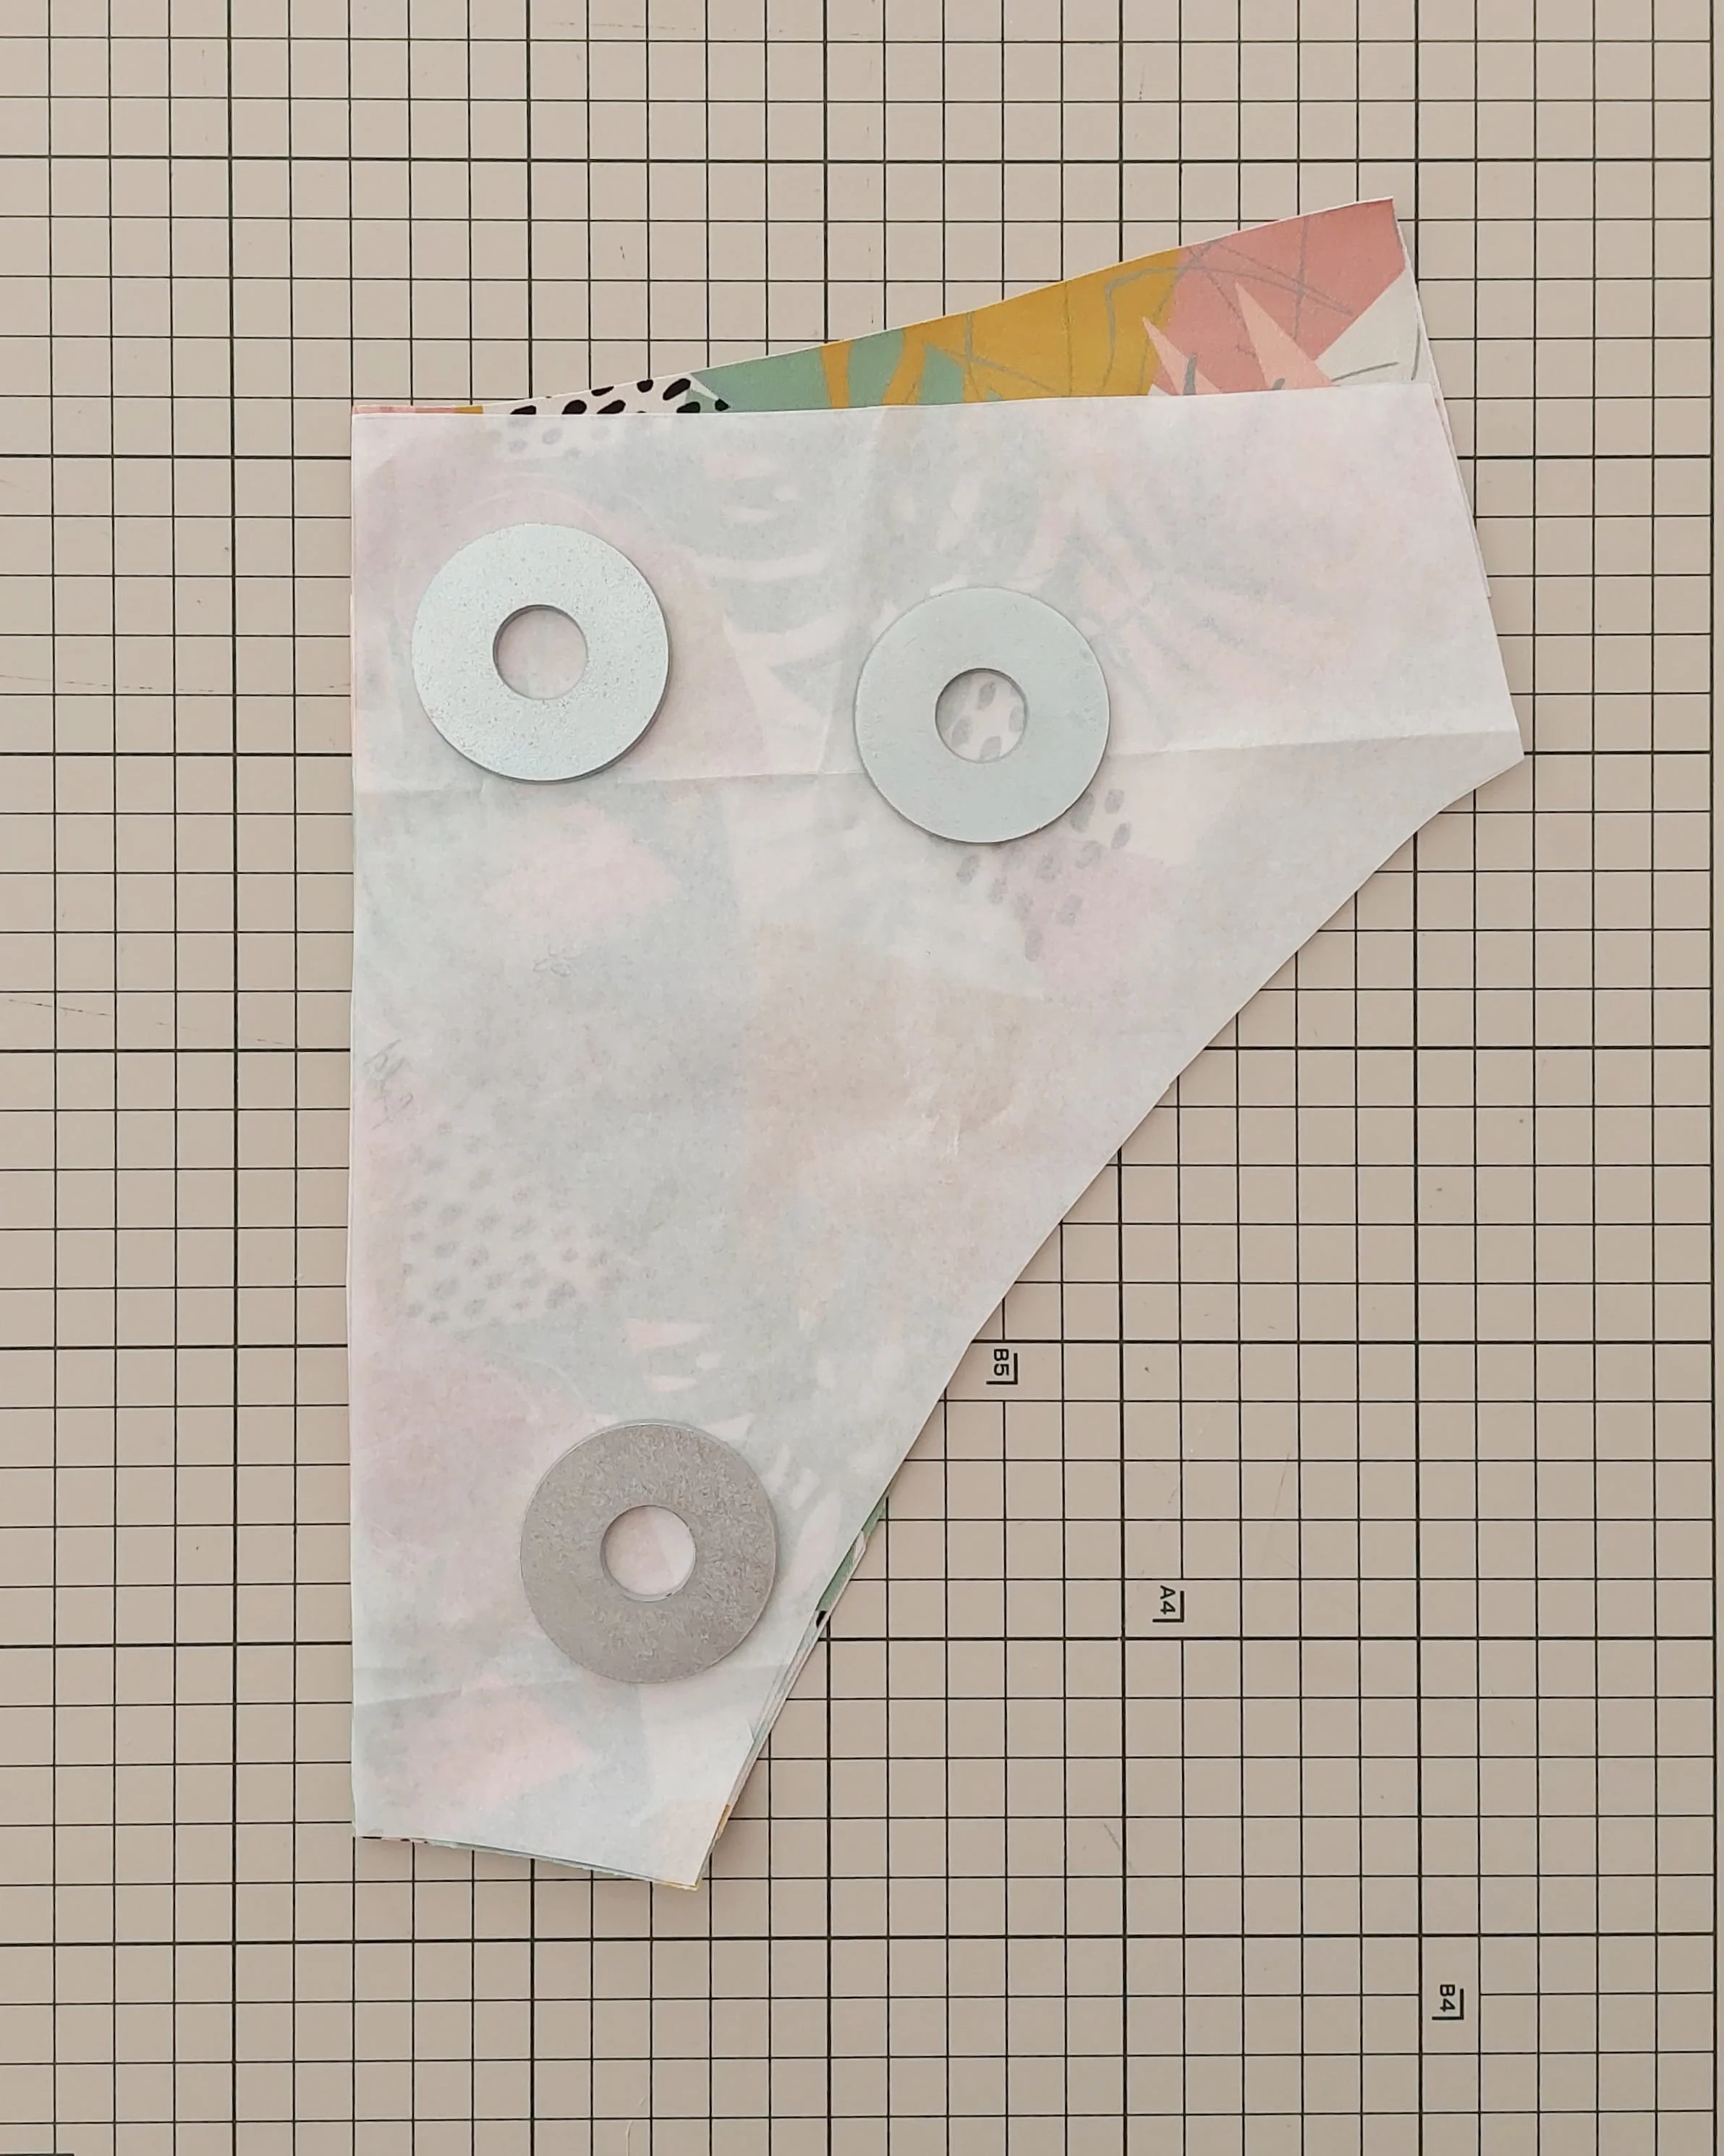
As I knew it would be a short tutorial (note the irony here, haha), I also wanted to show you how you can alter the shape of the bottoms to create a more upward curve on the waistline and the leg openings.
I used the low-waist bikini-cut version for these, and I altered the pieces so the side seams tilt 3 cm up. It’s pretty simple: just raise the waistline side seam point 3 cm and do the same with the leg opening, then blend both lines into the existing pattern piece (keeping the center on 90 degrees). The amount you raise depends on you, and I’d highly suggest observing the RTW bottoms you already own to compare them and make any changes. The base pattern is totally adaptable, so don’t be afraid to play around with it.
Como sabía que iba a ser un tutorial corto (notese la ironía, jeje), también quería enseñarte cómo puedes modificar la forma de la braga para crear una cintura más curvada para arriba y subir más las aberturas de las piernas.
Para esta versión, usé la opción de corte bikini de cintura baja y modifiqué las piezas para que las costuras laterales se inclinaran 3 cm hacia arriba. Es bastante sencillo: solo hay que subir 3 cm el punto de la costura lateral de la cintura y hacer lo mismo con la abertura de la pierna, y luego fusionar ambas líneas con la pieza del patrón normal (manteniendo el centro a 90 grados). La cantidad que subas depende de ti, yo te recomiendo que mires las bragas de bikini que ya tienes para compararlas y hacer los cambios que consideres. El patrón base es totalmente adaptable, así que no tengas miedo de experimentar con él.
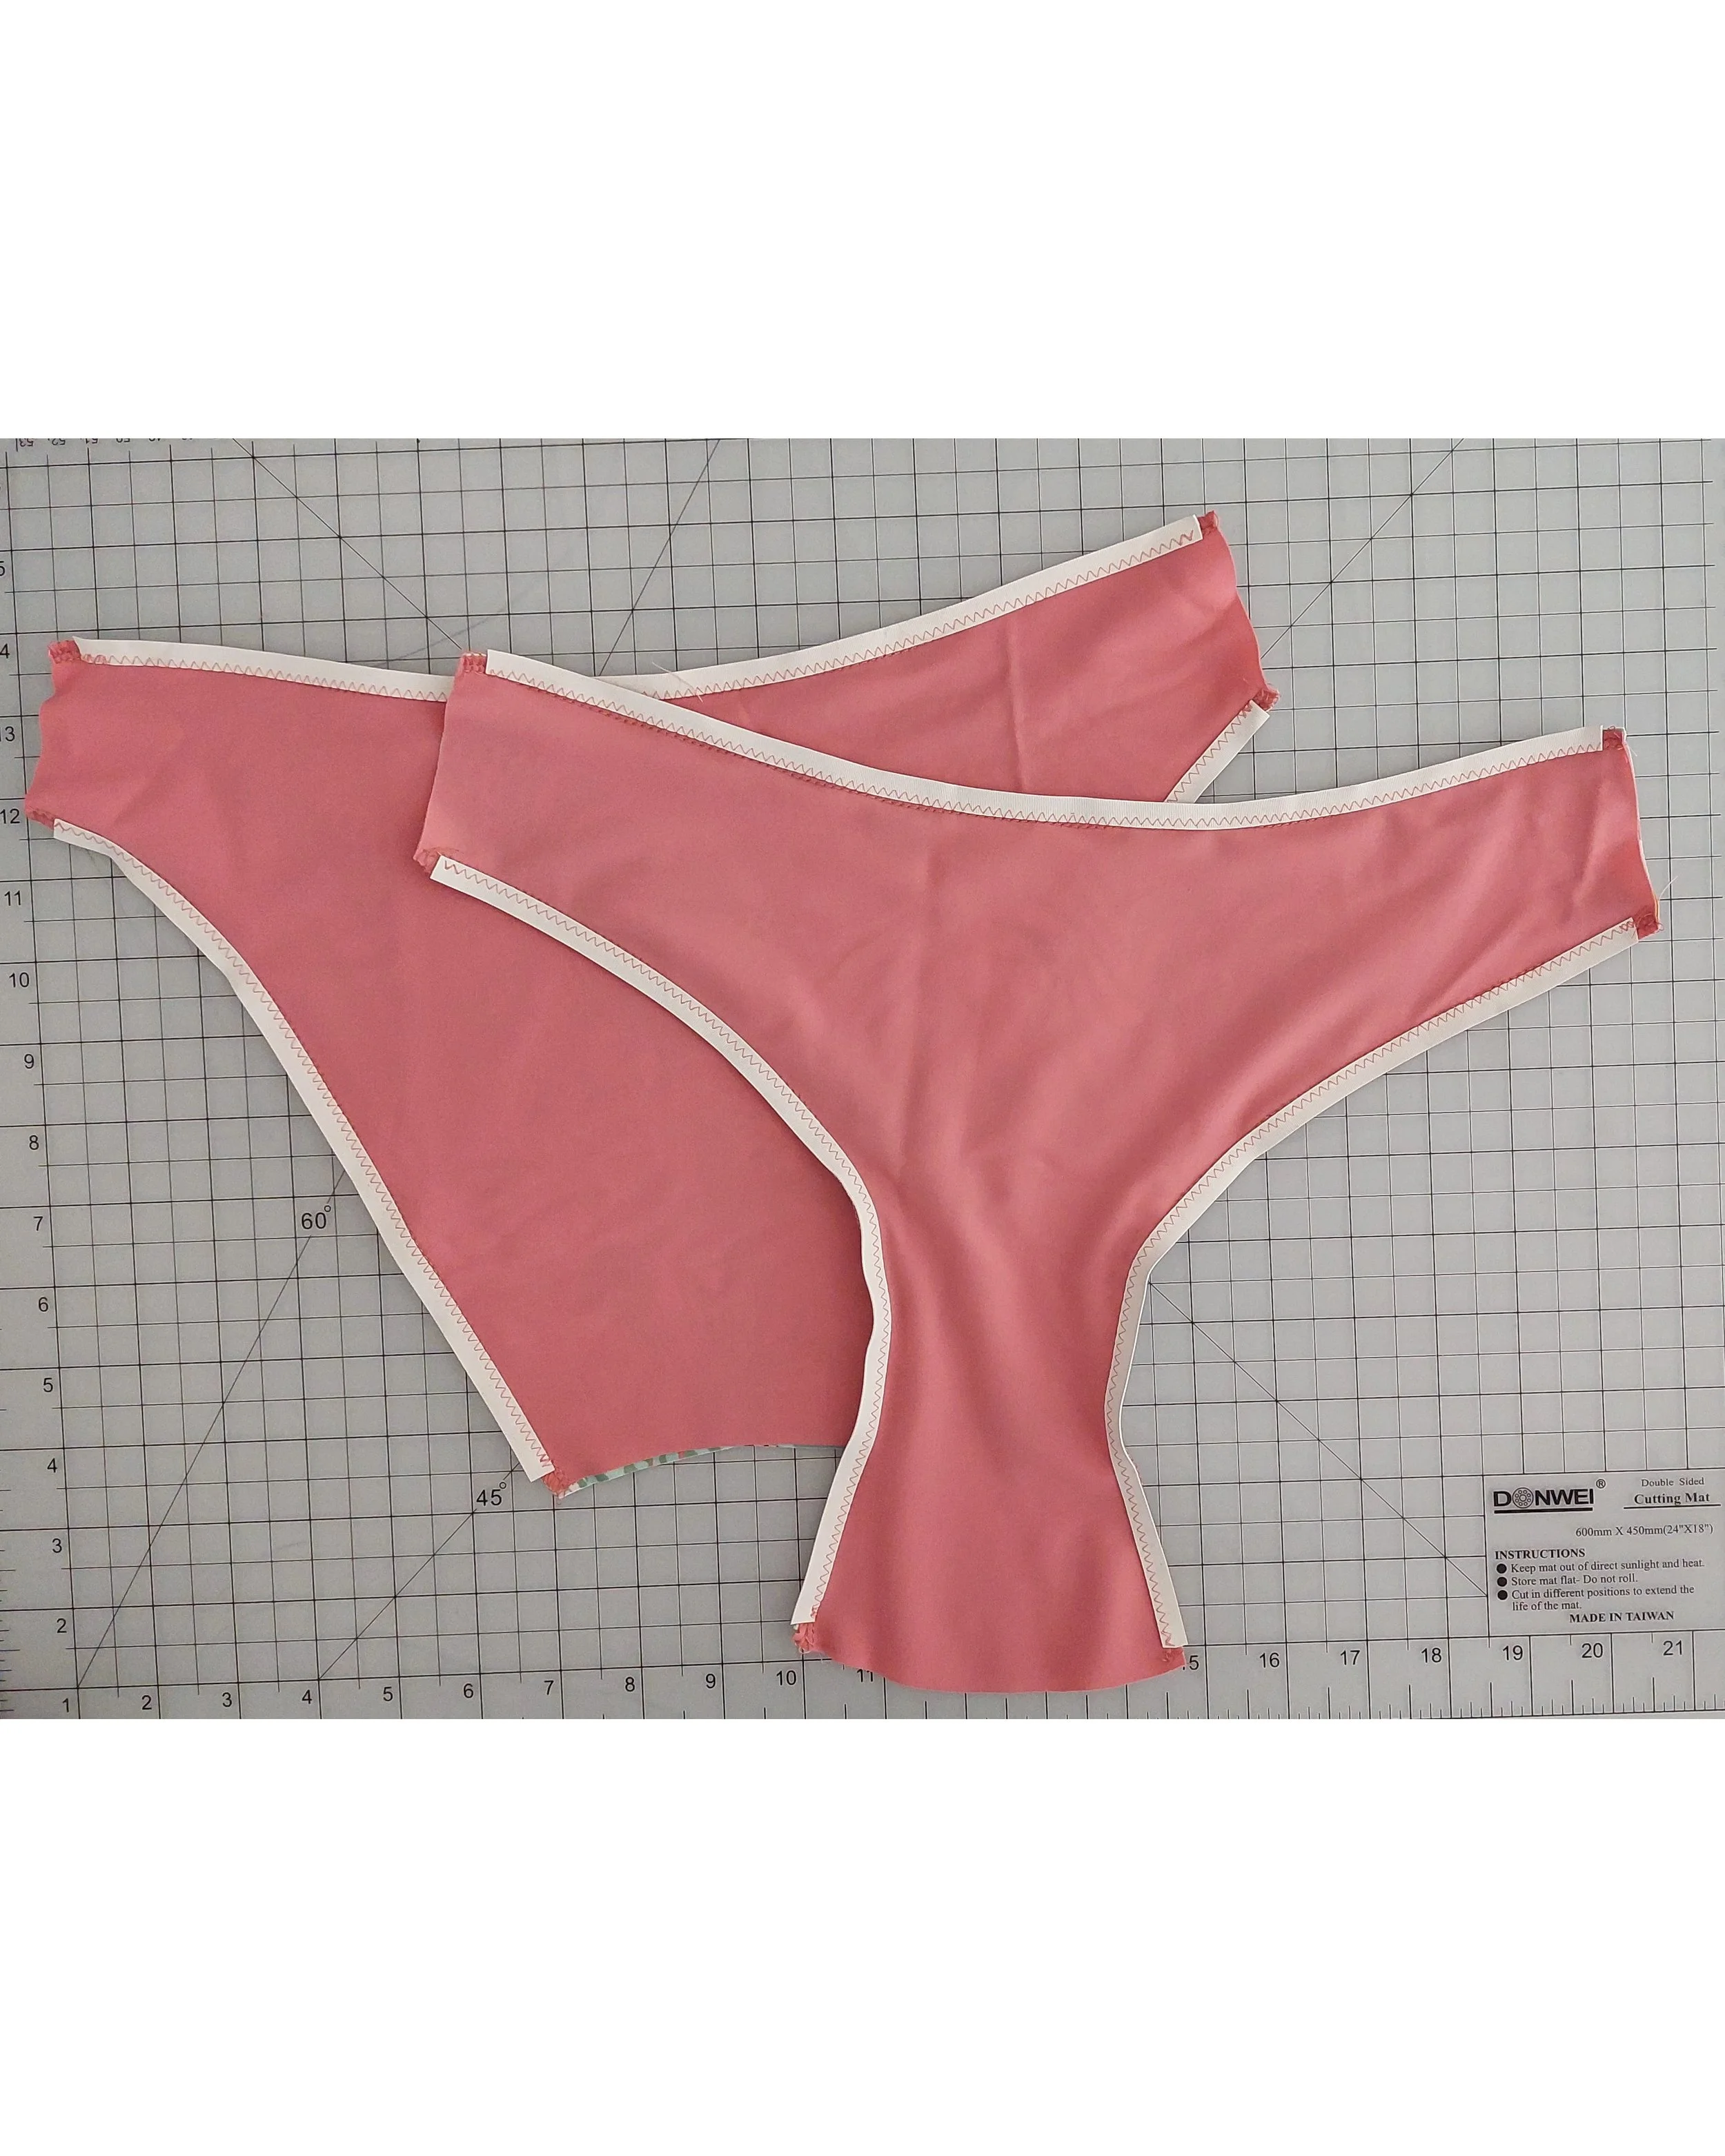
First, put your front pieces right sides together and your back pieces right sides together.
As I mentioned before, I did join the pieces with a serger for the bottoms, but I did not see much difference compared to the other method (I did not join the pieces prior to sewing the elastics for the top). You do you. I did chop off the extra seam allowance here (I’m using 6 mm with a serger, so I cut off 4 mm first) to keep the original size of the pattern.
Sew the elastic on the waistline and the leg openings without pulling it. As I mentioned before, I left 6 mm on all edges without elastic, but I didn’t notice too much of a difference compared to the way I sewed the elastic on the top.
Primero une las piezas delanteras derecho con derecho y las piezas traseras derecho con derecho.
Como ya he mencionado, yo uní las piezas de braga previamente con la remalladora, pero no noté mucha diferencia con respecto al otro método (en el top no cosí previamente las piezas, las uní directamente con el elástico). Hazlo como prefieras. En este caso, recorté el margen de costura sobrante (utilizo 6 mm con la remalladora, así que primero recorté 4 mm) para mantener el tamaño original del patrón.
Cose el elástico en la cintura y en las aberturas de las piernas sin estirarlo como antes. Como ya he mencionado, dejé 6 mm en todos los bordes sin elástico, pero no noté demasiada diferencia con respecto a cómo cosí el elástico en la parte superior.
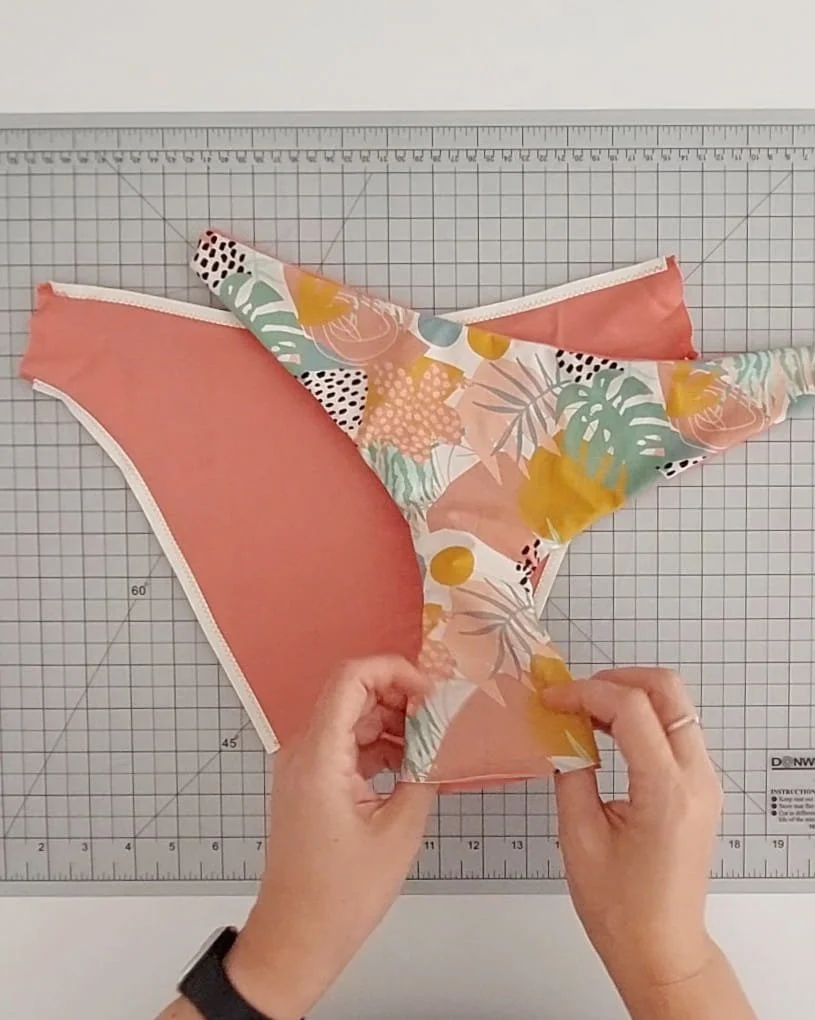
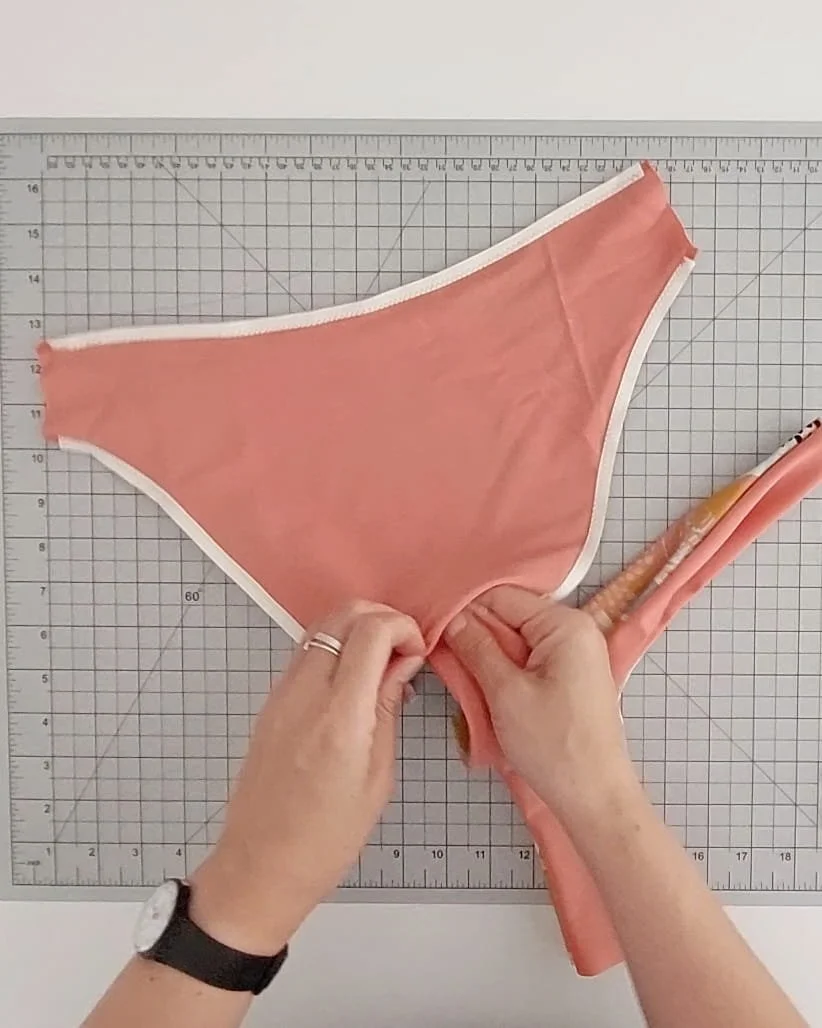
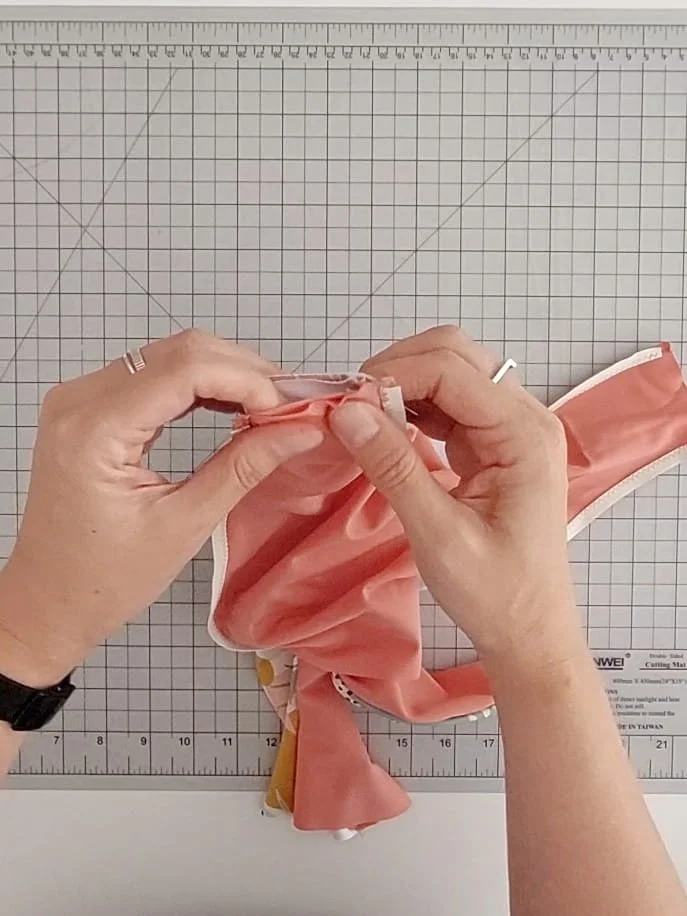
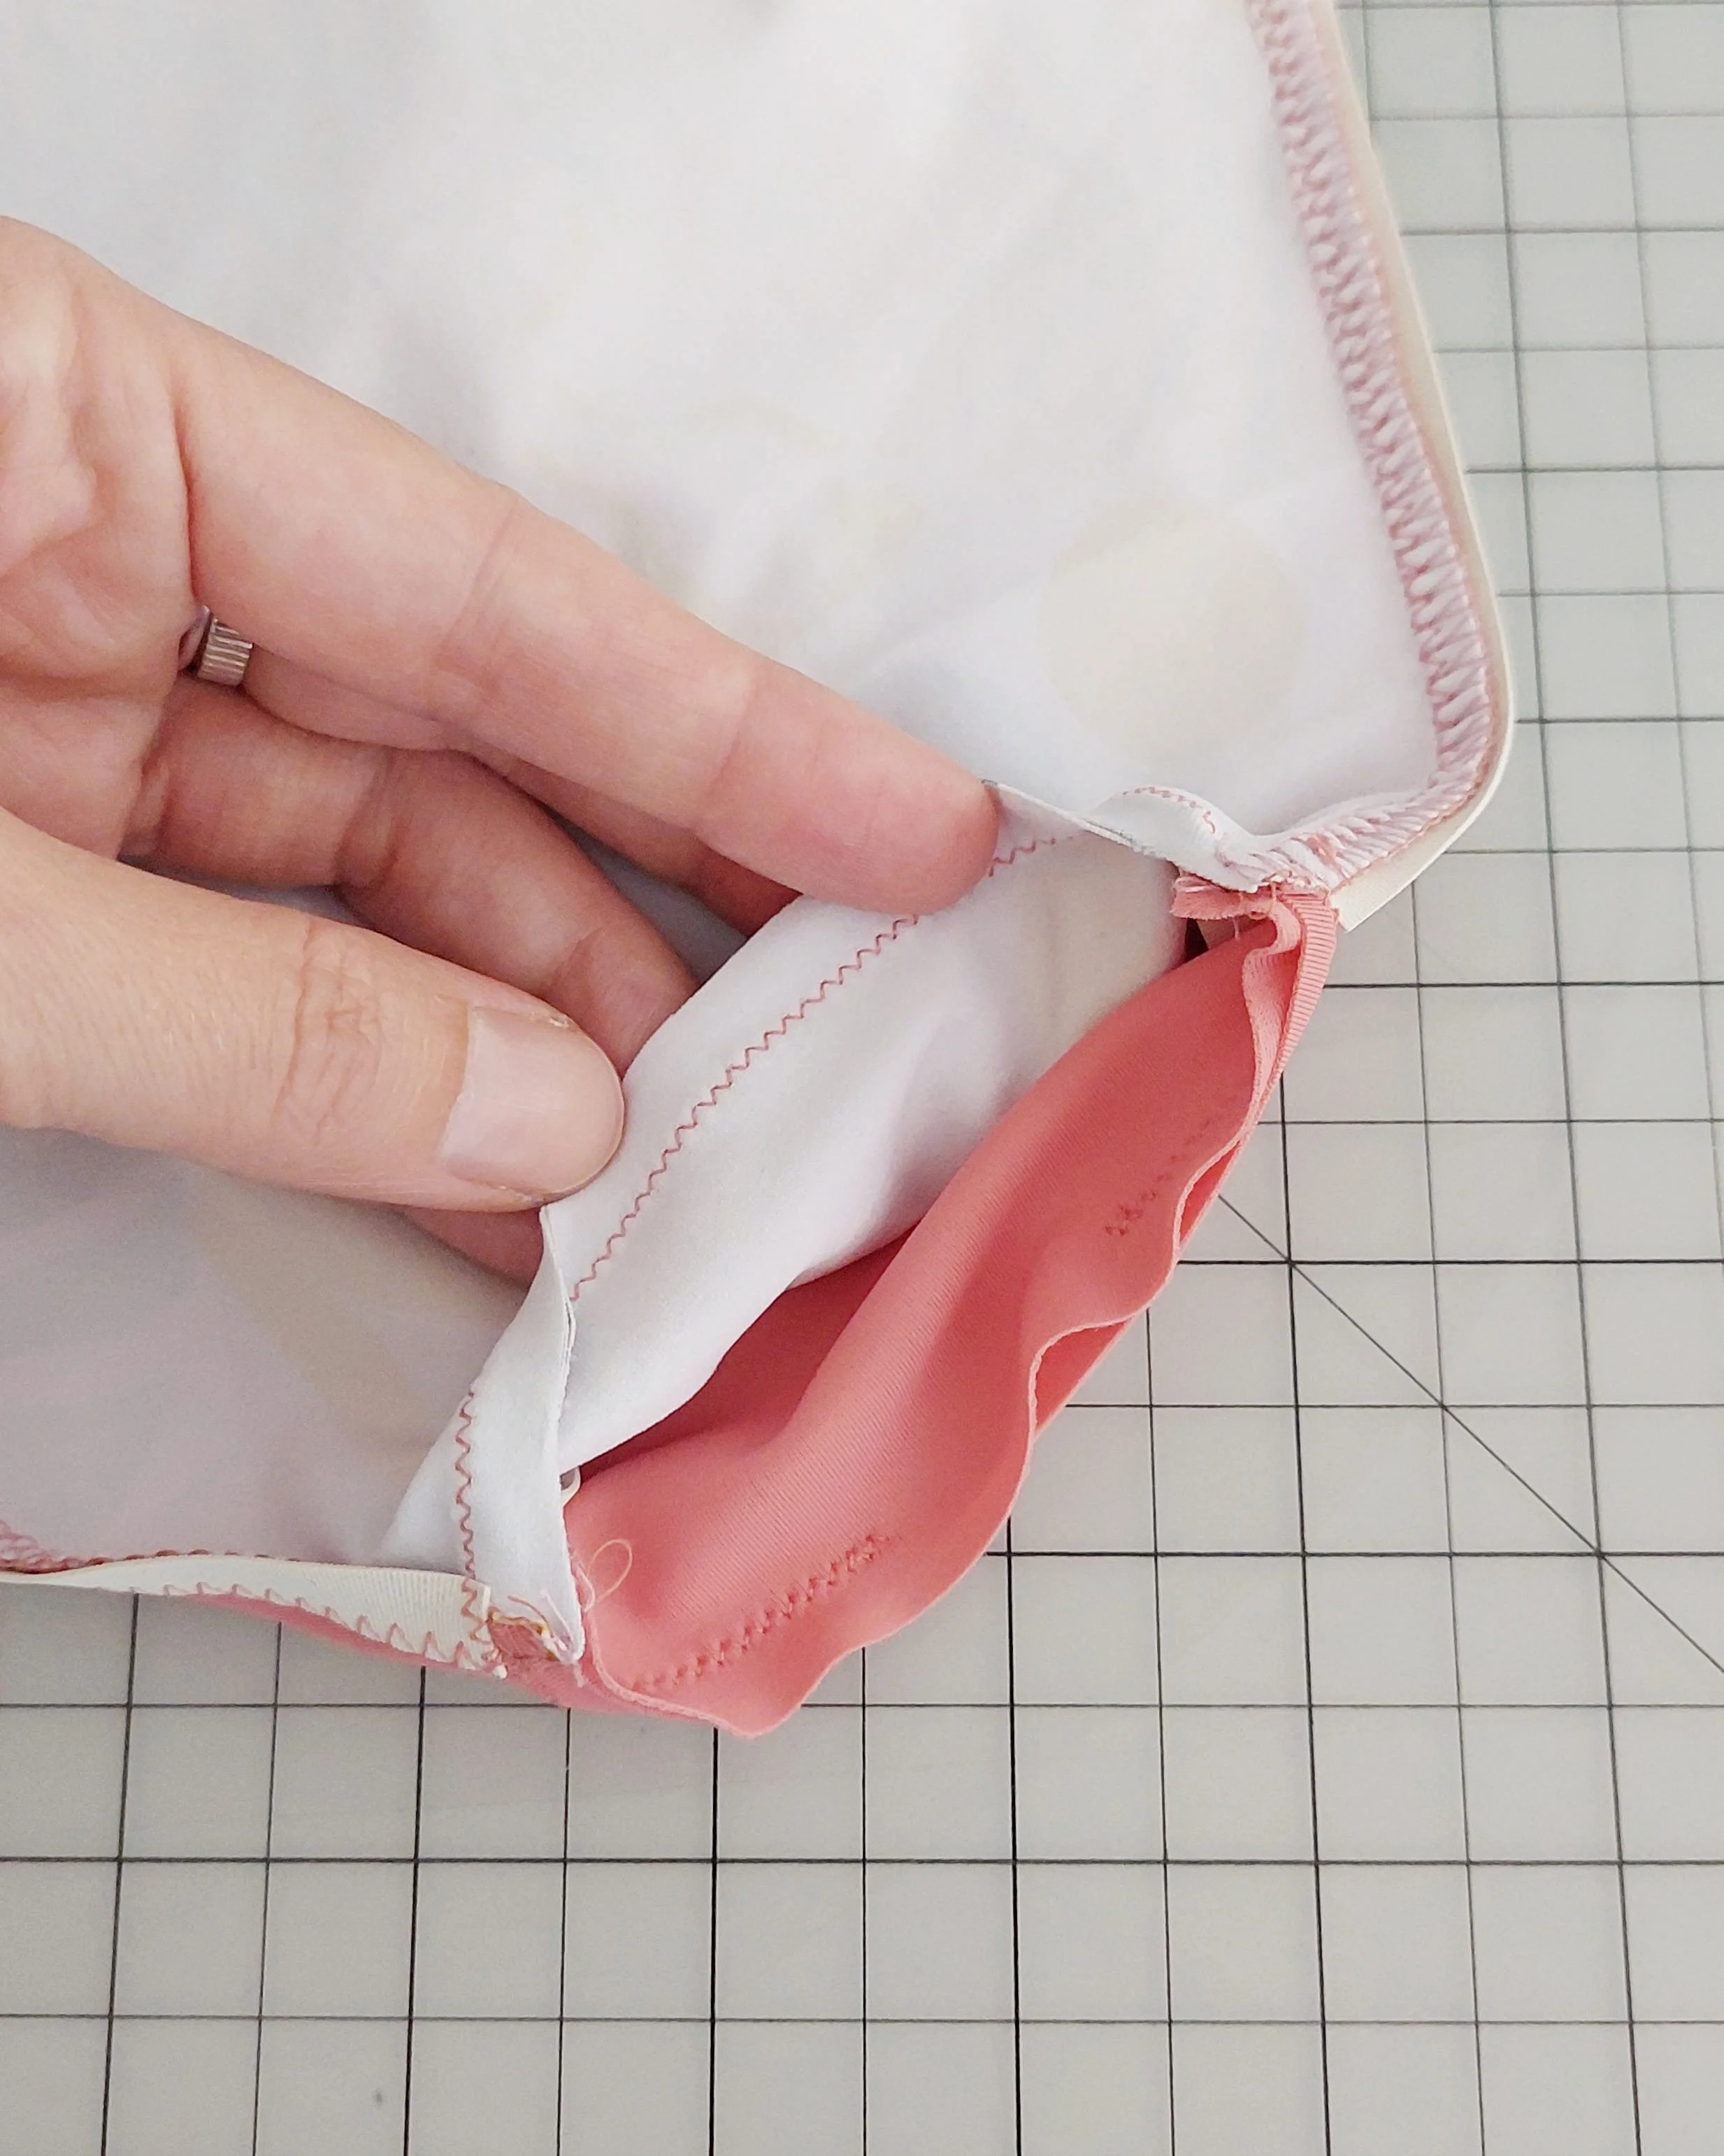
Turn one of the pieces right side out and slide it inside the other one using the crotch opening of the bottoms (I’m sorry, but these three photos have bad quality as I forgot to take pictures of that part, and I had to capture the steps from a video afterwards!).
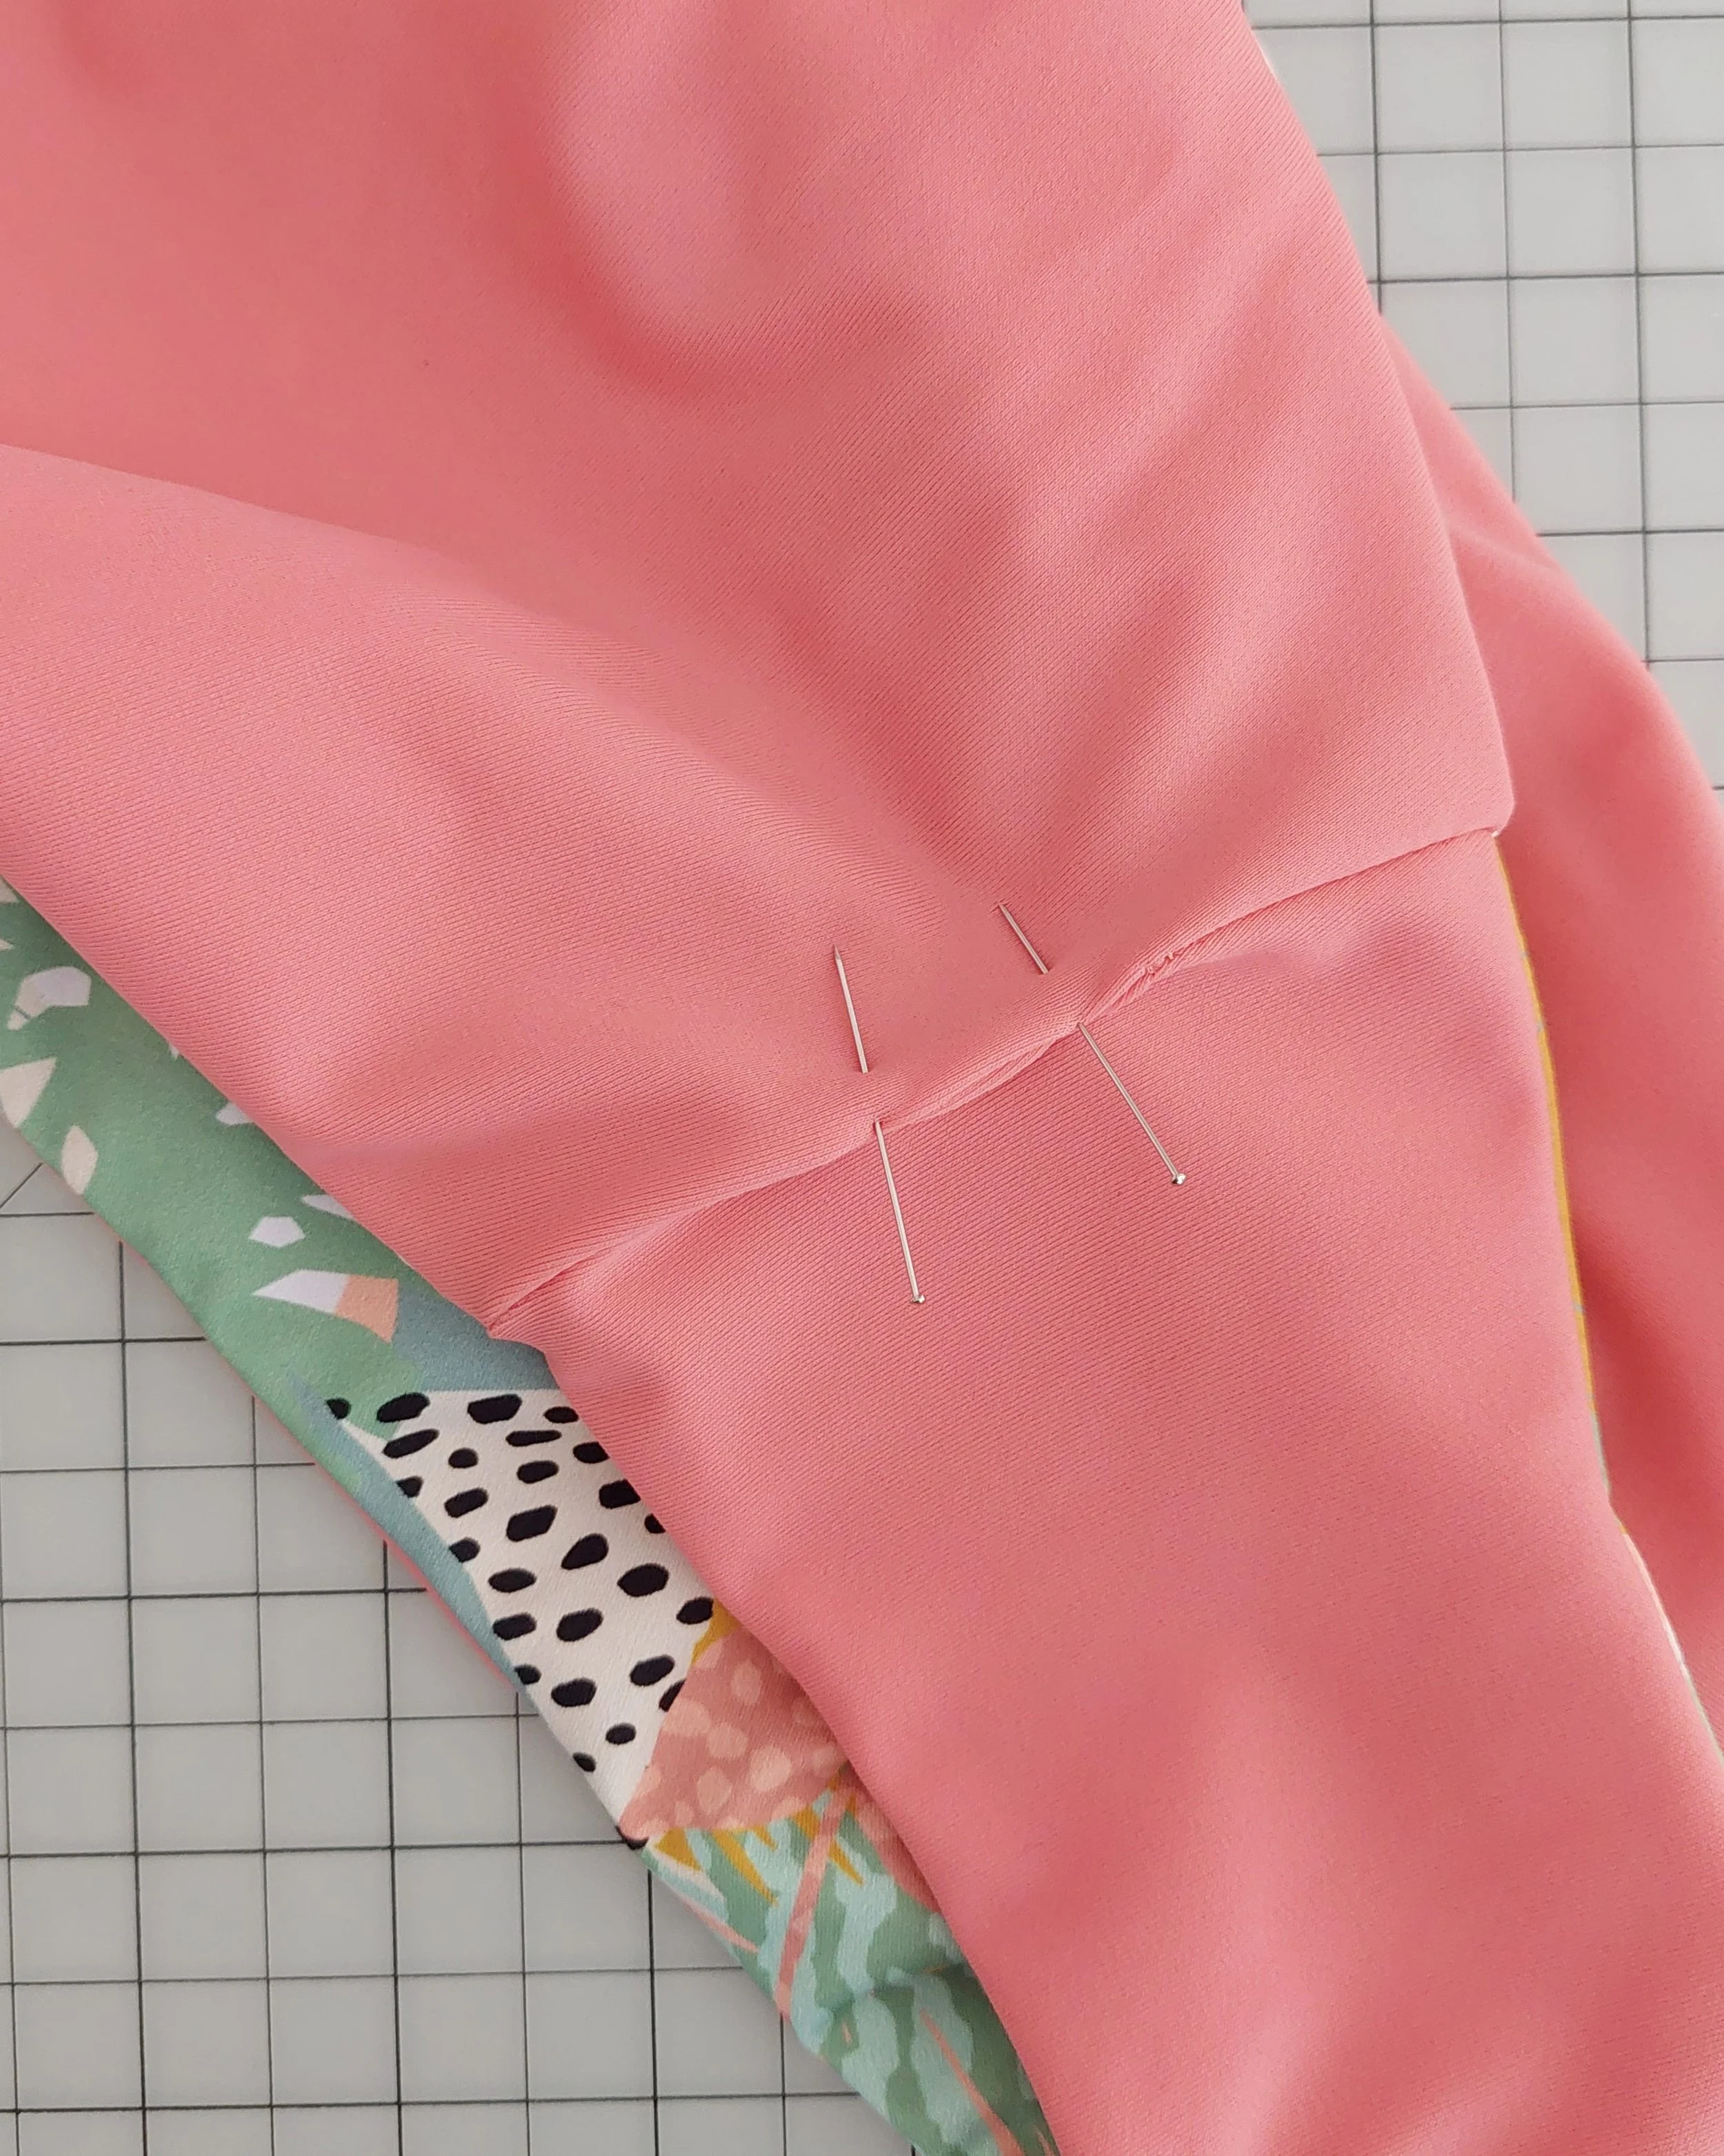
The print fabric has to match the print fabric, and the solid fabric has to match the solid fabric when the pieces are inside. You’re matching the side seam to the side seam there. I first pinned both side seams in place with one pin so they don’t twist and then added more pins so they were nice and even.
Da la vuelta a una de las piezas y deslízala dentro de la otra por la abertura de la entrepierna (lo siento, pero estas tres fotos son de mala calidad, ya que se me olvidó hacer fotos de esa parte y tuve que capturarlas a partir del vídeo después).
La tela estampada tiene que coincidir con la tela estampada, y la tela lisa con la tela lisa cuando las piezas estén una dentro de la otra. Lo que hay que hacer es hacer coincidir la costura lateral con la costura lateral. Primero sujeté ambas costuras laterales con un alfiler para que no se retorcieran y luego añadí más alfileres para que quedaran bien alineadas.
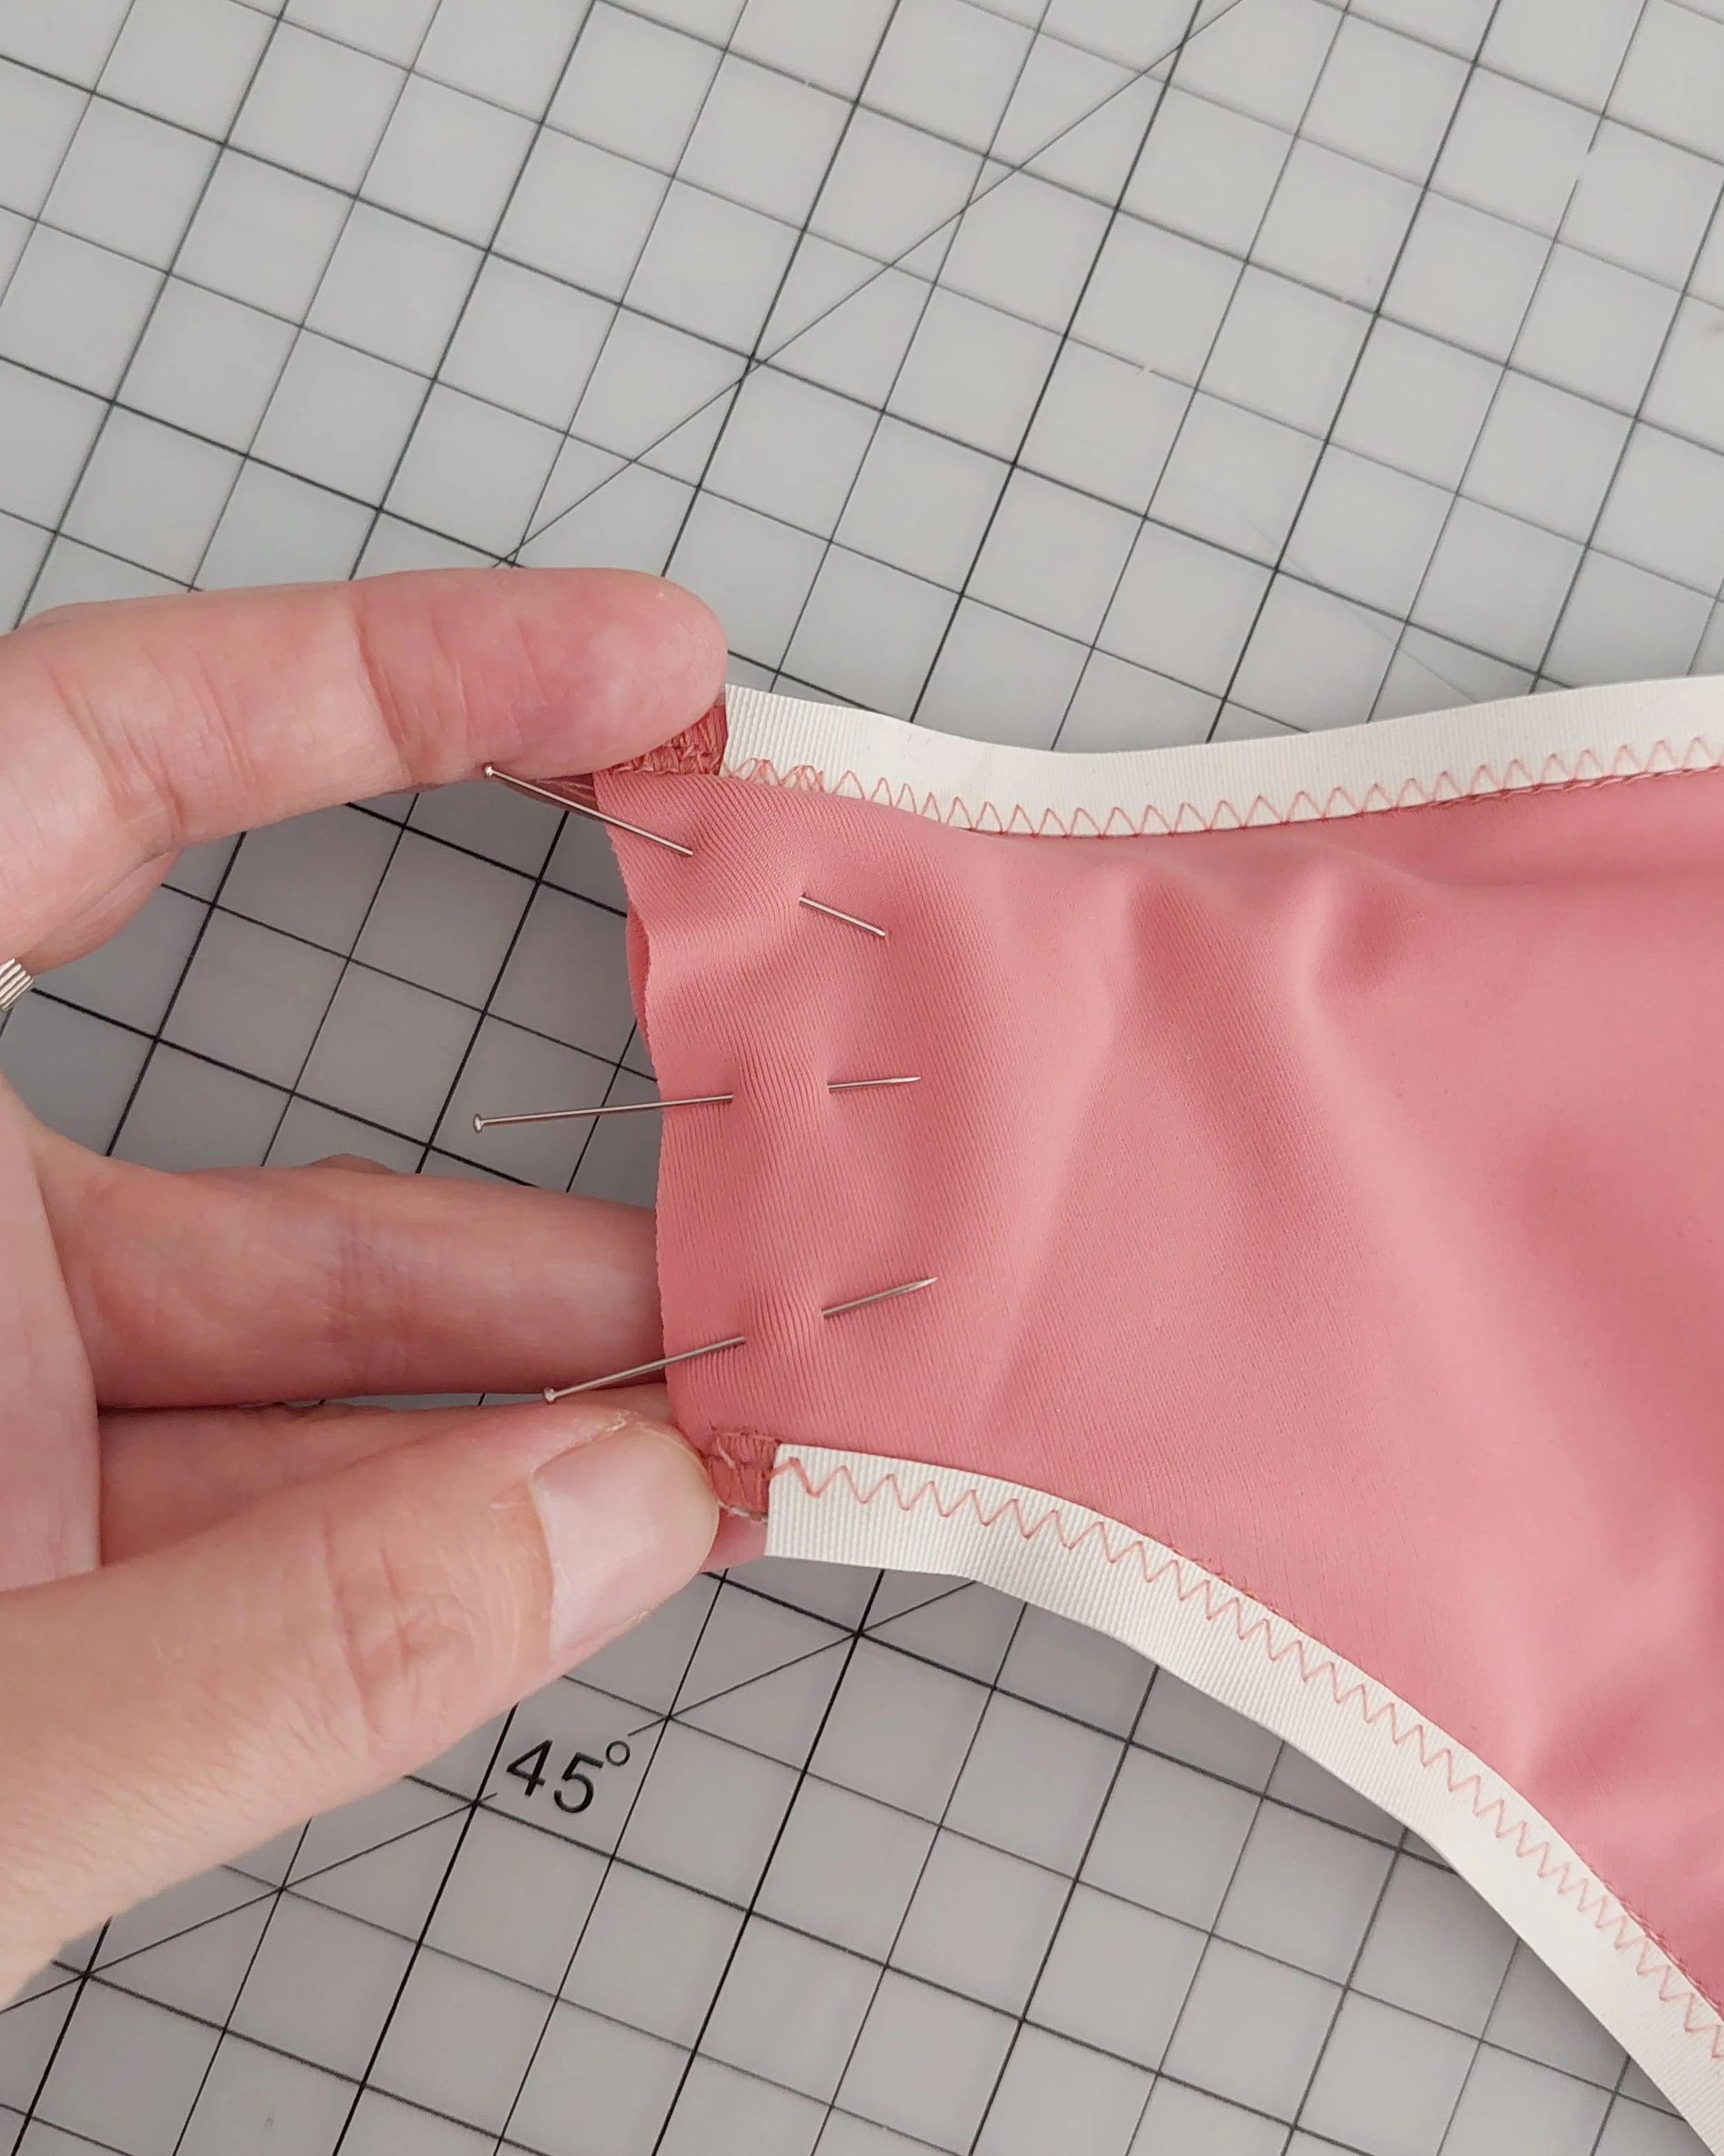
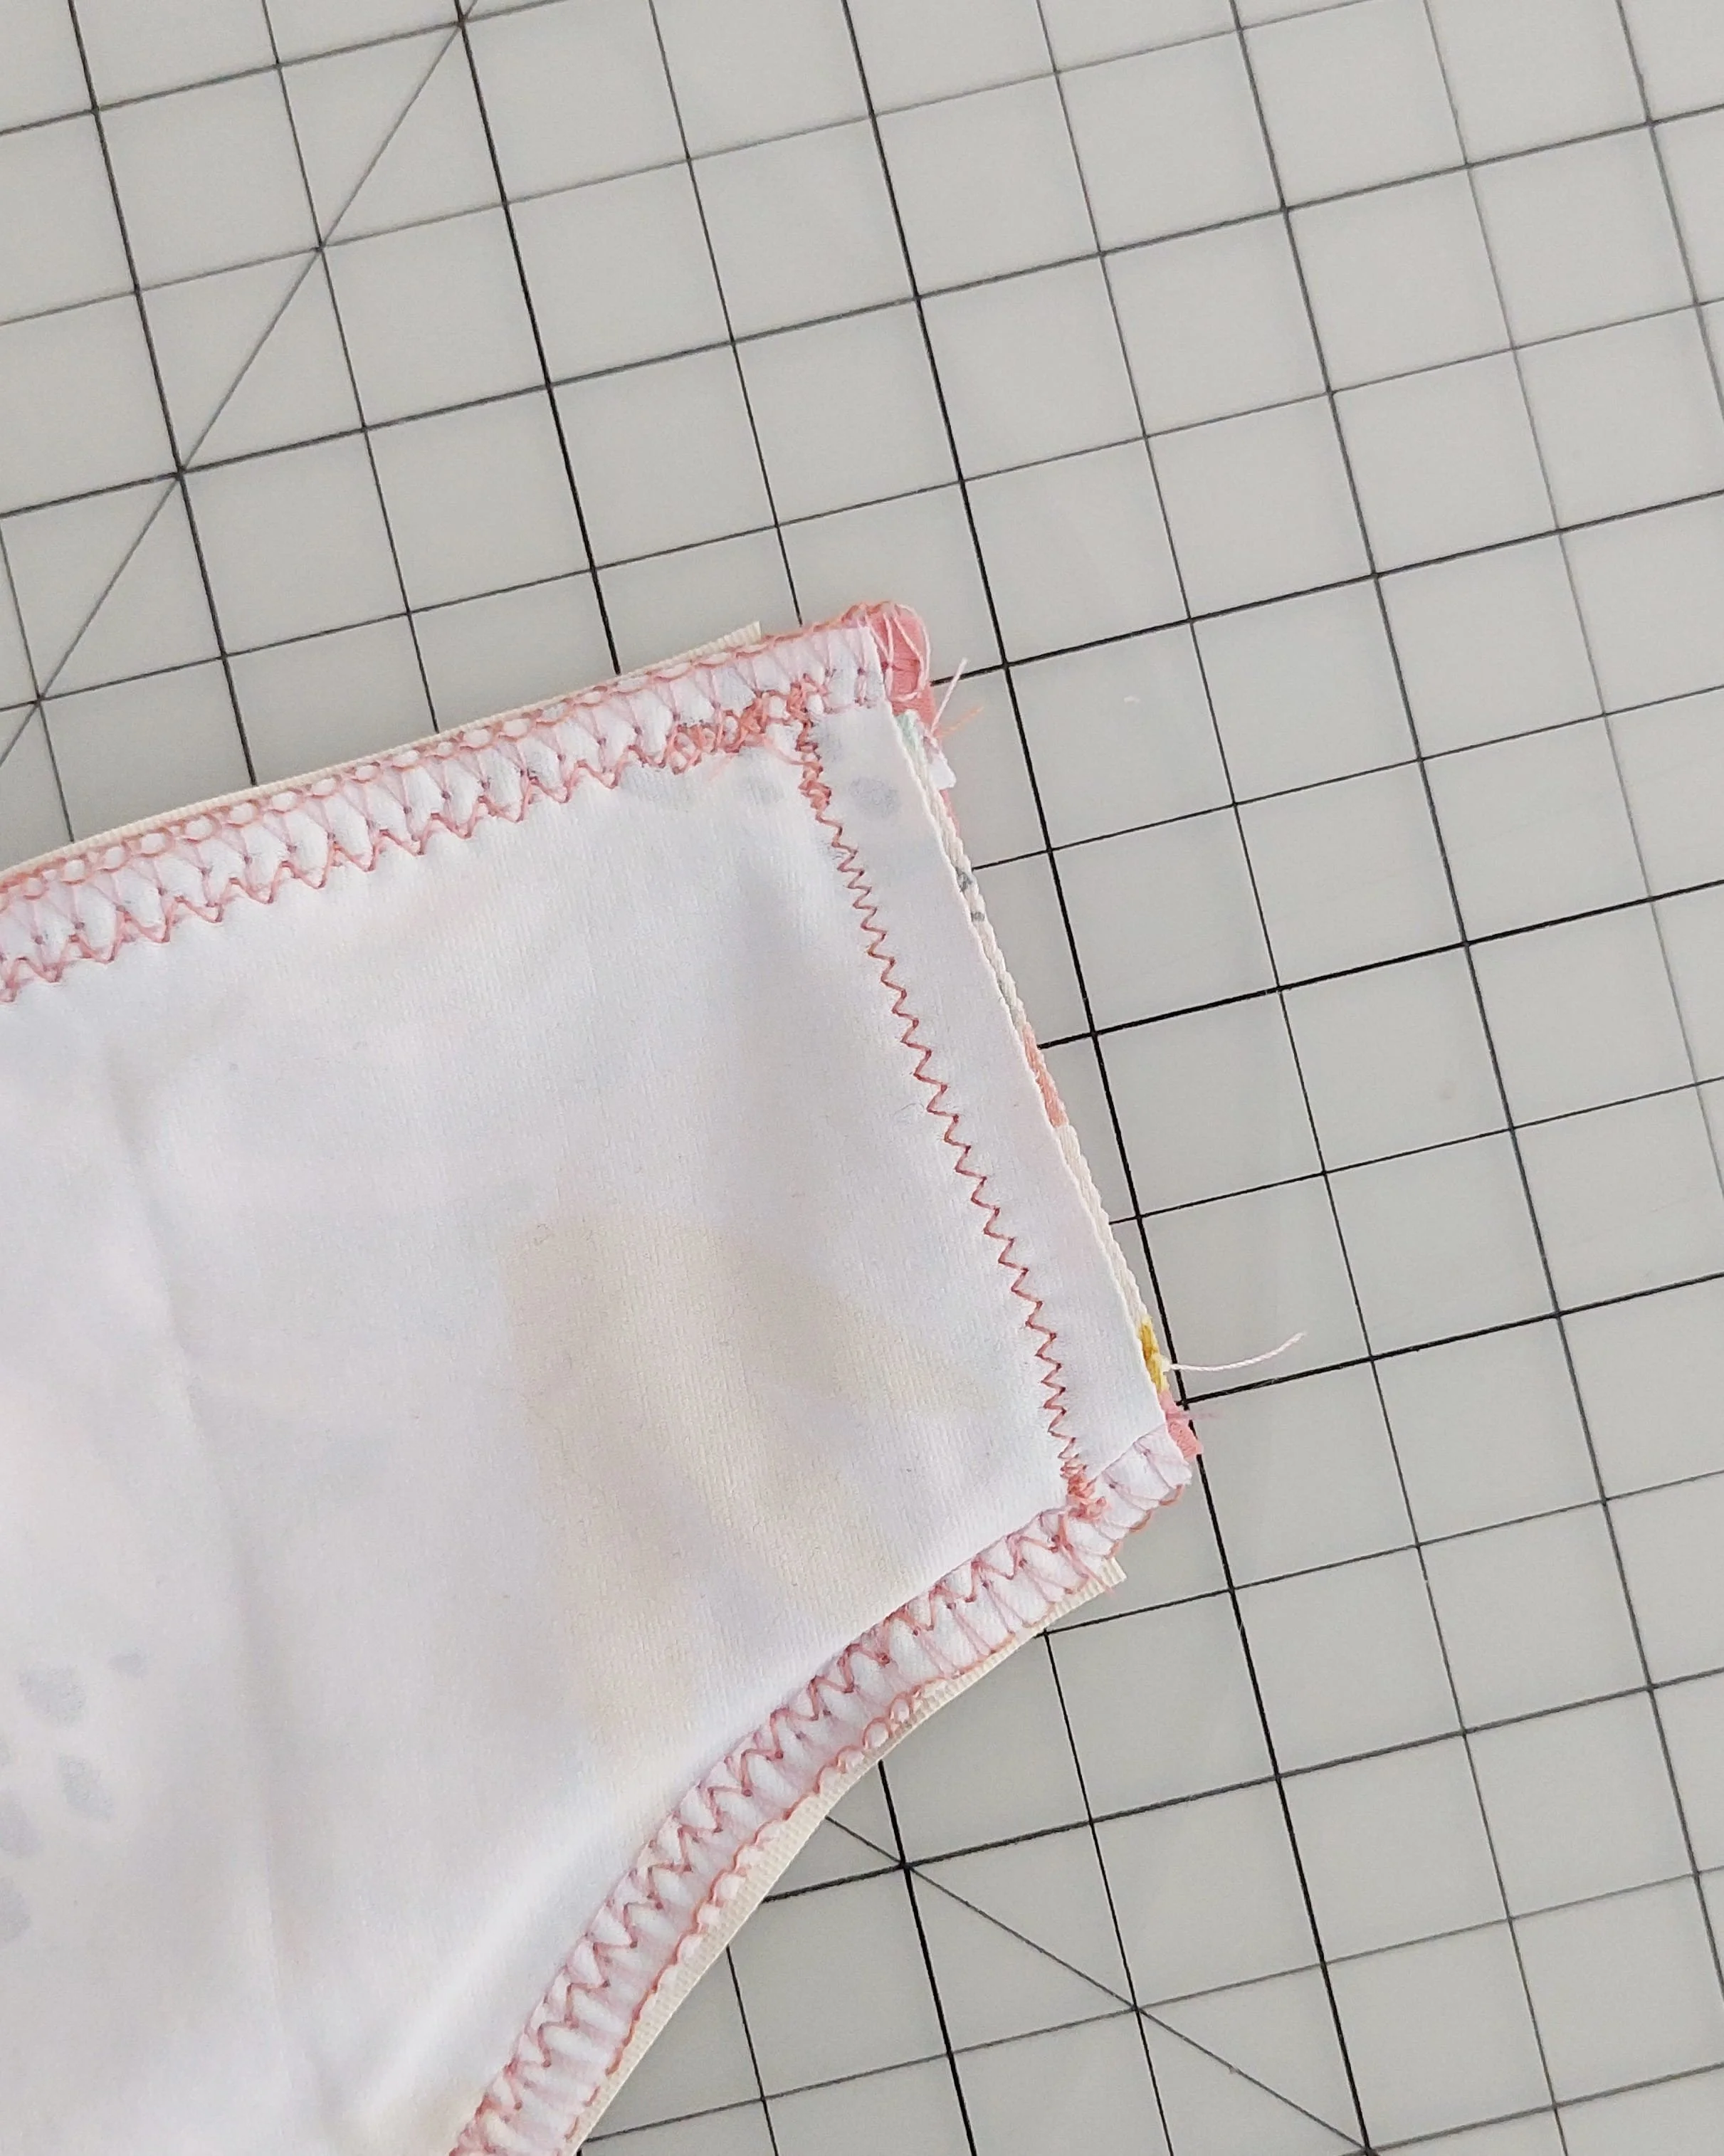
Sew the side seams through all layers using a small zigzag to prevent the stitches from popping when the garment is stretched.
Cose las costuras laterales a través de todas las capas con un zigzag pequeño para evitar que las puntadas se rompan cuando se estire la prenda.
We’ll need to turn the bottoms right side out through the crotch opening, so you need to sew this part like a circle, leaving an opening in the middle of one of the layers (in my case, I left it on the solid layer like I did for the bikini top).
Now you can turn the bottoms right side out and close the seam either by hand or by machine. And this is it, your set is done!
Hay que dar la vuelta a la braga por la abertura de la entrepierna, así que tienes que coser esta parte como si fuera un círculo, dejando una abertura en el centro de una de las capas (en mi caso, la dejé en la capa lisa, igual que hice con la parte de arriba del bikini).
Ahora ya puedes dar la vuelta a la braga y cerrar la costura, ya sea a mano o a máquina. Ya está, tu conjunto está listo!
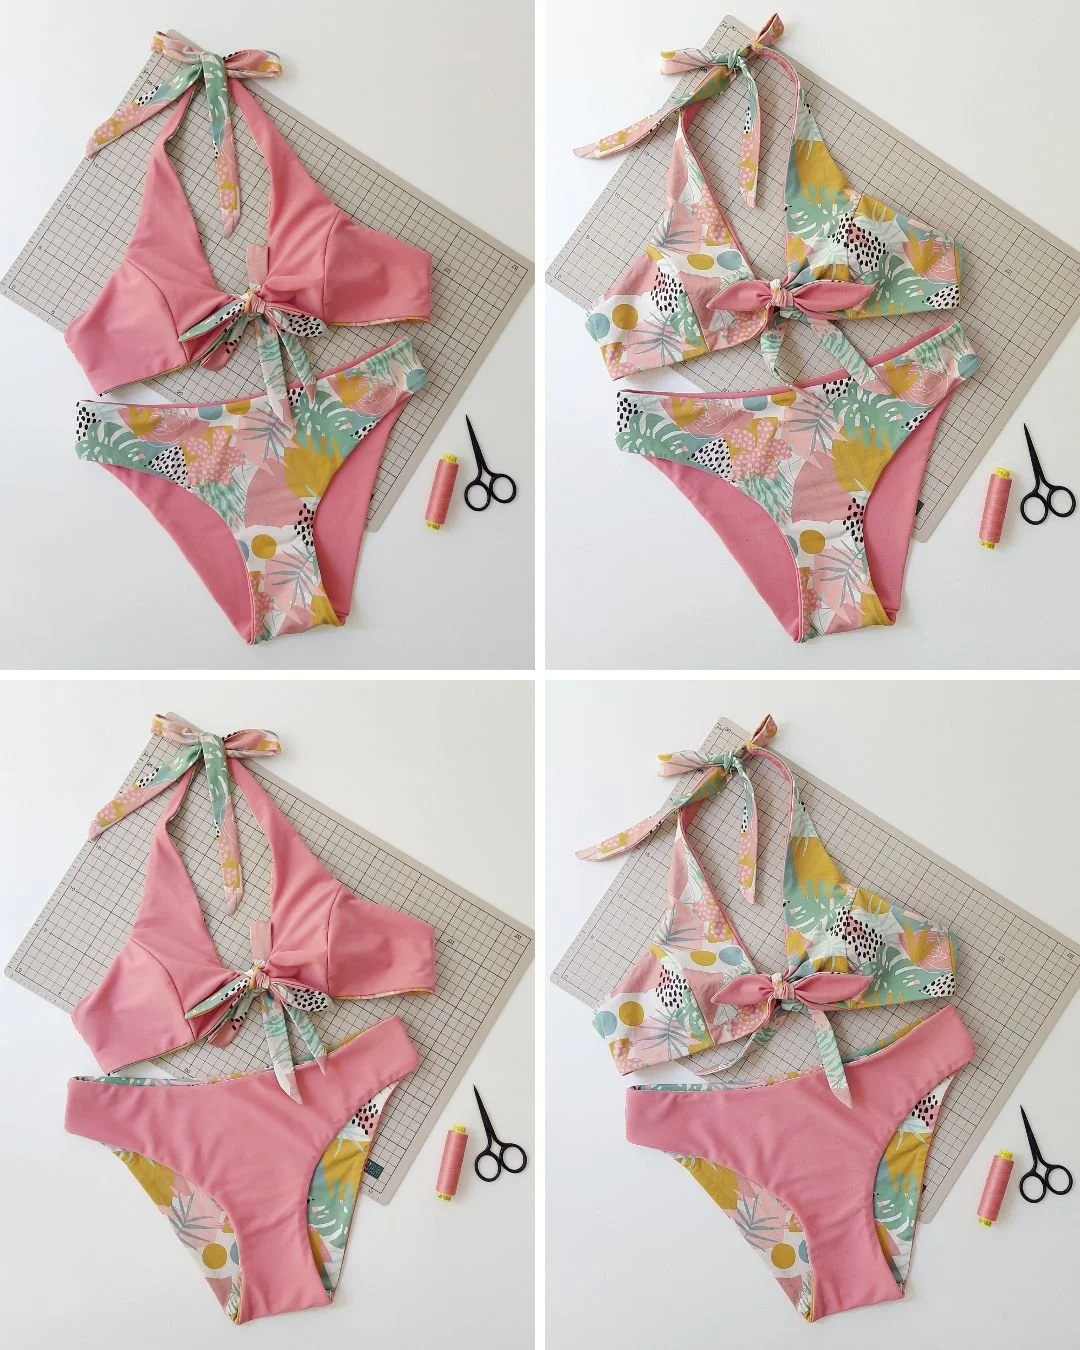
The cool thing about reversible swimsuits is that you can mix and match and create four different combinations with these two pieces. I hope you liked this tutorial and that you learned something useful for your own swimwear makes. Share your makes with me if you use this technique!
Lo mejor de los bikinis reversibles es que puedes mezclar y combinar las dos piezas para crear cuatro combinaciones diferentes. Espero que te haya gustado este tutorial y que hayas aprendido algo útil para tus propios proyectos de prendas de baño. Comparte tus proyectos conmigo si usas esta técnica!
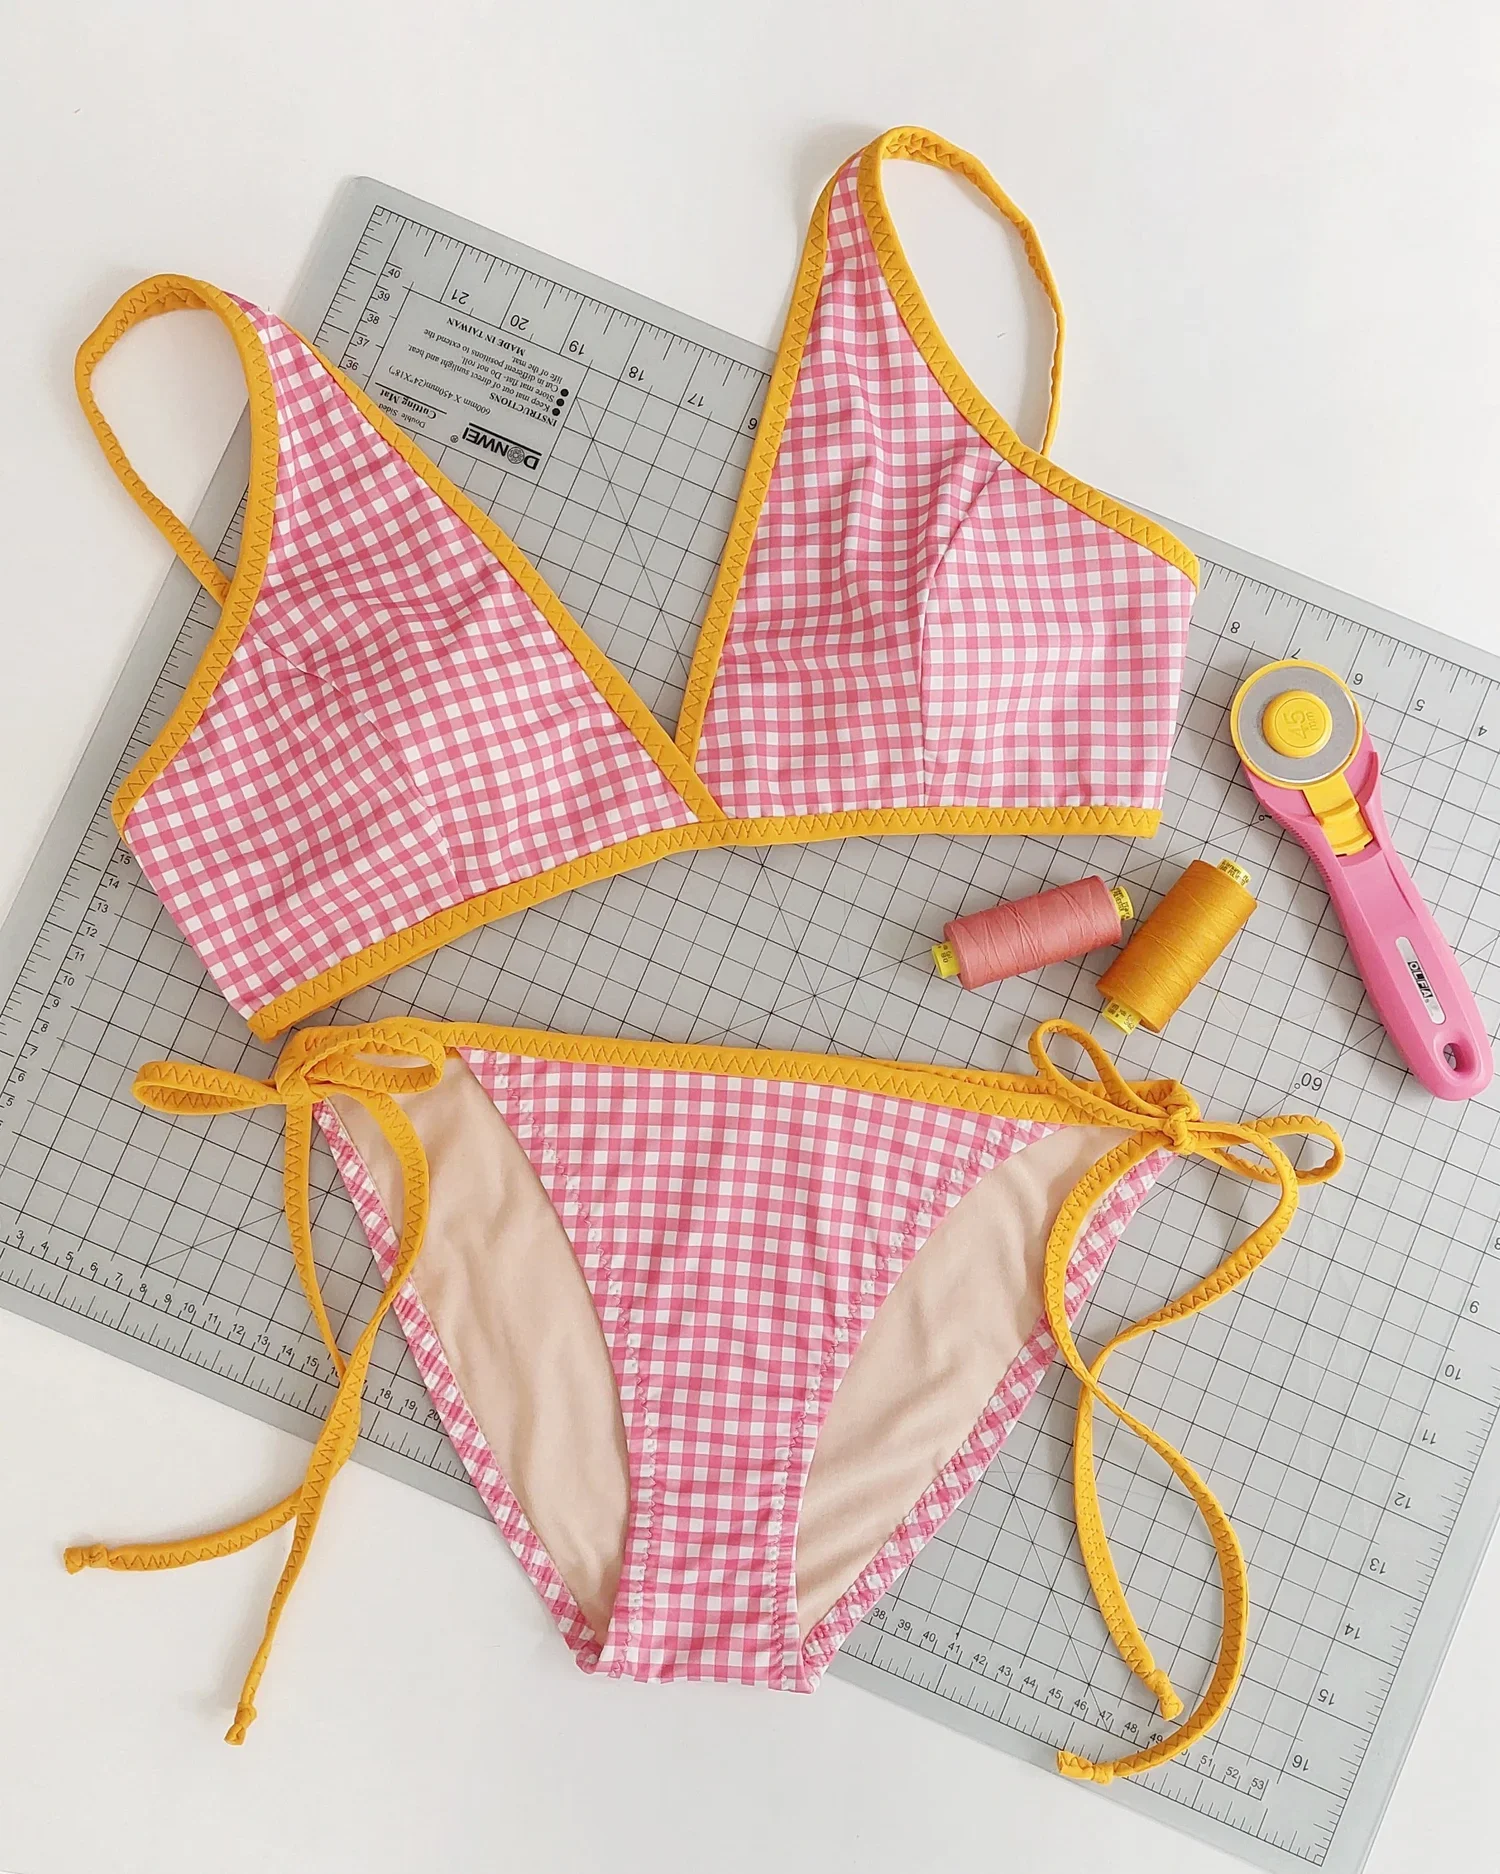
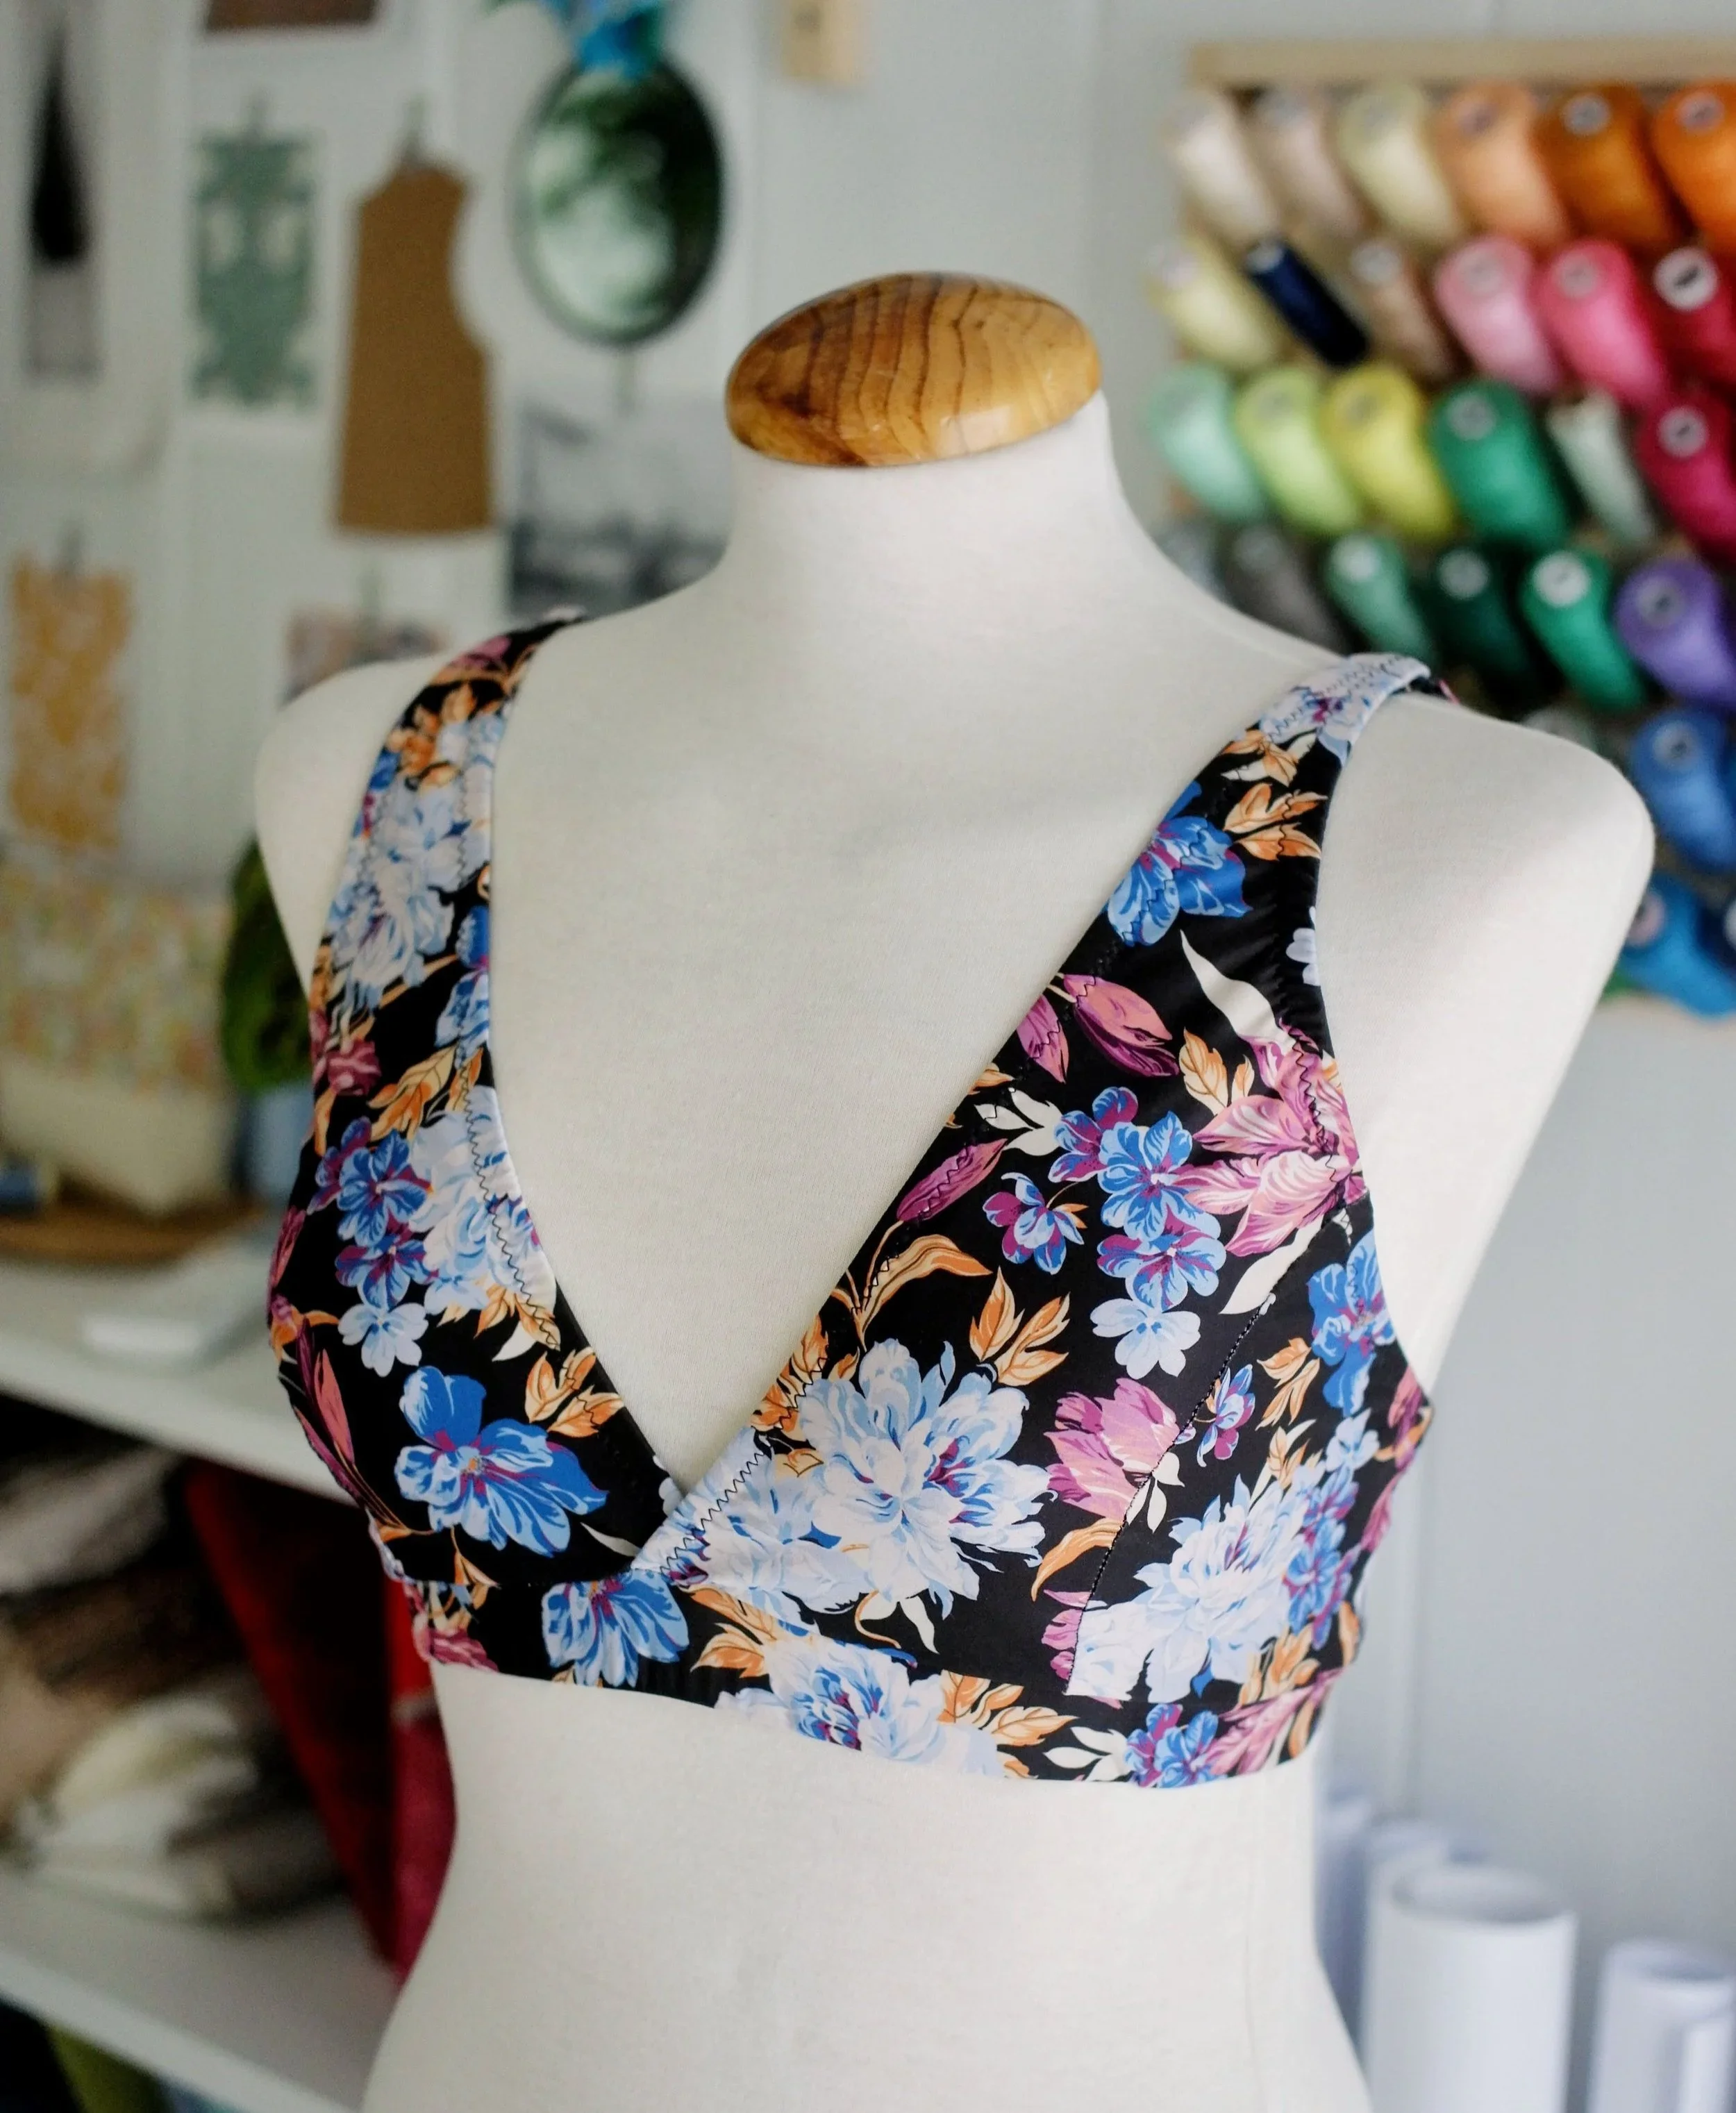
You can also check out other interesting tutorials you can use to sew up a Hanna bikini, like this extra band hack and this binding tutorial. And you can find the full archive of lingerie and swimwear posts here.
If you like my work, sign up for my newsletter to get all the new blog posts sent directly to your inbox. Thanks for reading!
También puedes echar un vistazo a otros tutoriales interesantes que te pueden servir para coser otras versiones del bikini Hanna, como este truco para añadir una banda extra y este tutorial sobre usar ribetes de contraste. Y aquí puedes encontrar el archivo completo de entradas sobre lencería y prendas de baño.
Si te gusta mi trabajo, suscríbete a mi newsletter para recibir las nuevas entradas del blog directamente en tu bandeja de entrada. Gracias por leer!